- Edit photos and videos in Windows 10
- Edit a photo
- Get creative with your photos and videos
- Share your creations
- How to crop, resize and enhance a photo in Windows 10
- Comments (34)
- Crop Images with Photos in Windows 10
- About Sergey Tkachenko
- How to Easily Resize and Crop a Single Image in Windows
- Fotophire Editing Toolkit
- Cut & Crop Photos
- 1. How to Crop Photos
- 2. Photo Croppers
- 3. Resize Images
- 4. Image Resizers
- How To Crop Photos on Windows with Windows Photo Editors
- How to crop a photo on Windows with Paint
- Crop a Photo As a Rectangle on Your PC
- Crop a Photo As a Free Form Selection on Your PC
- How to crop a photo on Windows with Photo Gallery
- How to crop a photo on Windows with Photo Manager
- A better way to crop photos on Windows
- How To Crop Photos Using Wondershare Fotophire
- Step 1: Install and Launch Wondershare Fotophire
- Step 2: Import Photo
- Step 3: Crop Photo
- Final Thoughts
Edit photos and videos in Windows 10
Whether you’re the hands-on type or like improvements that work automagically, the Photos app in Windows 10 gives you all kinds of options for getting your photos and videos looking their best.
Edit a photo
With the Photos app, you can easily crop, rotate, add a filter, and automatically enhance your photos.
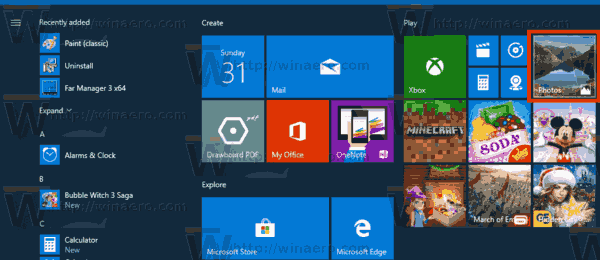
In the search box on the taskbar, enter photos. From the list, select Photos. Then select the photo you’d like to change.
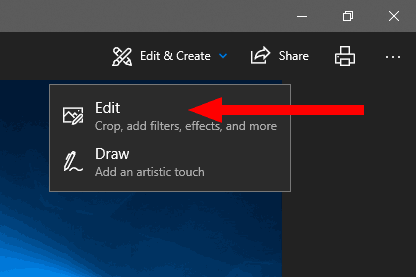
Begin by selecting Edit & Create at the top of your screen.
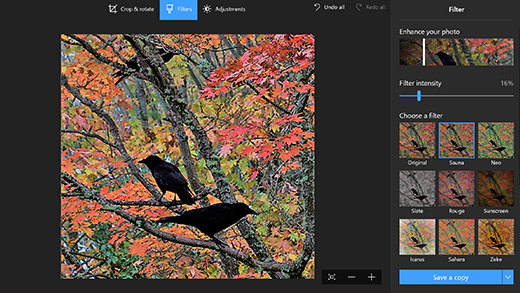
Select Edit, and then select either Crop & rotate, Filters, or Adjustments.
Use these features to tweak light, color, clarity, and remove red eyes.
Tip: To make minor changes or touch up blemishes, select Edit & Create > Edit > Adjustments. Then choose Red eye or Spot fix.
For more creative options, select Edit & Create, and then select Add 3D effects or Edit with Paint 3D .
Get creative with your photos and videos
Sometimes, there’s more to the story than what pictures and videos can convey on their own. Add a personal touch to your favorite moments by drawing on your photos and videos.
To get started, open the photo or video you’d like to enhance.
Select Edit & Create from the top of your screen.
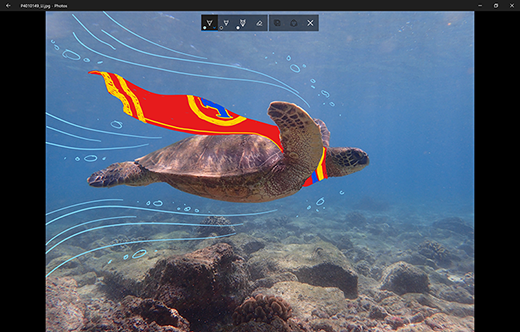
Select Draw and then, from the toolbar, select one of three drawing tools.
Select your chosen tool a second time to see options for color and size.
Go ahead and draw right on your image, and no worries if you mess up—you can always erase markings you don’t like with the Eraser tool. Or, clear your whole drawing by selecting Eraser at the top of the photo, then Erase all ink.

For more creative options, select Edit & Create, and then select Add 3D effects or Edit with Paint 3D .
Share your creations
Once you’re happy with your drawing, share it! To share a still of your new image or an animated playback of your drawing, with your creation open, select Share .
For more info on videos, see Create videos.
How to crop, resize and enhance a photo in Windows 10
Technical Level : Basic
Summary
If you want to make quick edits to your photos, Windows 10 has all you need in built in. Microsoft Paint and Photos provide powerful editing tools you can use to crop, cut, resize and touch photos. There is no need to download a third party editor for common tasks. Here is a quick look at using both
Details
The following looks at using Photos or Microsoft Paint to crop a photos.
You can use Microsoft Paint or Photos app to do that and its in Windows 10.
Click the Edit button (pencil icon) or press Ctrl + E
Resize the anchors to your desire then click the Check Mark
In Microsoft Paint, use the Crop Selection button, then select the area of the photo you want to Crop, then click Crop.
If you want to resize, under the same Home tab, click Resize, then enter dimensions:
Was this article helpful?
Sorry this didn’t help.
Great! Thanks for your feedback.
How satisfied are you with this article?
Thanks for your feedback, it helps us improve the site.
How satisfied are you with this article?
Thanks for your feedback.
Comments (34)
* Please try a lower page number.
* Please enter only numbers.
* Please try a lower page number.
* Please enter only numbers.
87 people found this comment helpful
Was this comment helpful?
Sorry this didn’t help.
Great! Thanks for your feedback.
How satisfied are you with this comment?
Thanks for your feedback, it helps us improve the site.
How satisfied are you with this comment?
Thanks for your feedback.
63 people found this comment helpful
Was this comment helpful?
Sorry this didn’t help.
Great! Thanks for your feedback.
How satisfied are you with this comment?
Thanks for your feedback, it helps us improve the site.
How satisfied are you with this comment?
Thanks for your feedback.
7 people found this comment helpful
Was this comment helpful?
Sorry this didn’t help.
Great! Thanks for your feedback.
How satisfied are you with this comment?
Thanks for your feedback, it helps us improve the site.
How satisfied are you with this comment?
Thanks for your feedback.
182 people found this comment helpful
Was this comment helpful?
Sorry this didn’t help.
Great! Thanks for your feedback.
How satisfied are you with this comment?
Thanks for your feedback, it helps us improve the site.
How satisfied are you with this comment?
Thanks for your feedback.
For a while now, I have been unable to crop photos like I used to 🙁
I used to be able to select the area I wanted to crop but now it only lets me crop from right to left and I am not able to select the area I want to crop. When it crops, I have to put my cursor into the middle of the photo to move the area cropped but it never gives a satisfactory crop.
Everything seemed fine until I got an update, I didn’t realise it had updated until I realised that things looked different :/
Can anyone please help me or recommend another good photo editor?
Thank you very much in advance 🙂
85 people found this comment helpful
Was this comment helpful?
Sorry this didn’t help.
Great! Thanks for your feedback.
How satisfied are you with this comment?
Thanks for your feedback, it helps us improve the site.
Crop Images with Photos in Windows 10
The Photos app is a Universal (Metro) app which comes pre-installed in Windows 10. It is a Store app which is intended to replace Windows Photo Viewer, since Microsoft wants to make the whole user environment look and work the same on Windows 10 Mobile and Windows 10 for PCs. While interested users can restore the classic desktop app, Windows Photo Viewer, those who prefer to use Photos might be interested in learning how to crop images with this new app.
The built-in Photos app allows viewing images and performing basic editing. Its tile is pinned to the Start menu. Also, the app is associated with most image file formats out of the box. Photos offers very basic functionality to view images from the user’s local drive or from the OneDrive cloud storage.
The Photos app comes with the Crop option, so you need no third-party image editors or even Microsoft Paint. Here is how to use this feature.
To resize images with Photos in Windows 10, do the following.
- Open Photos. Its tile is pinned to the Start menu by default.

- Open the image file you want to crop.
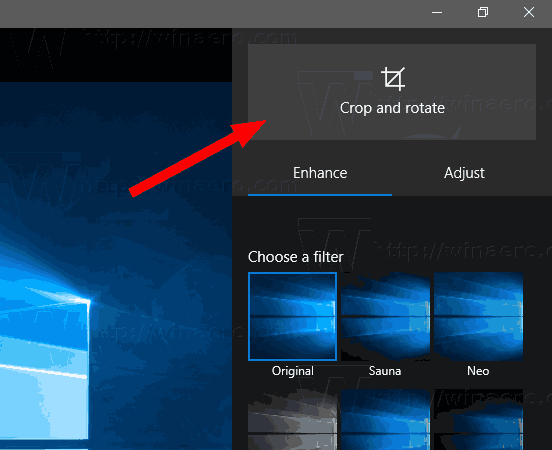
- Expand the item Edit & Create in the top toolbar area.
- Select the Edit command from the menu. Also, you can press Ctrl + E to go to Edit mode directly.
- A new flyout will open on the right. There, click on the Crop and rotate button.
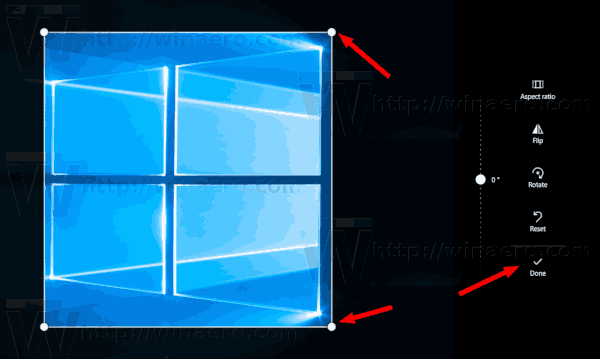
- Adjust the selection region using the large white dots.
- Now, click on the Done button on the right.
- Save the image.
- Now you can close the Photos app.
Winaero greatly relies on your support. You can help the site keep bringing you interesting and useful content and software by using these options:
Share this post
About Sergey Tkachenko
Sergey Tkachenko is a software developer from Russia who started Winaero back in 2011. On this blog, Sergey is writing about everything connected to Microsoft, Windows and popular software. Follow him on Telegram, Twitter, and YouTube.
How to Easily Resize and Crop a Single Image in Windows
 Note: For resizing and posting or e-mailing many images at once, see: How to Easily Resize Images in Windows
There is another little problem I see a lot: How does one resize and/or crop an image to a specific custom pixel size in order to post it online somewhere, or to send in an e-mail, or whatever?
Of course, most online services and social networking sites will automagically resize and compress your images for you, and the they often even let you crop the image right there on their site.
But, sometimes you need to create an image of a specific size, like when creating a Facebook-friendly image.
Fortunately, it turns out that there is a fairly easy and completely free way to do it without any extra software!
As the title implies, I’m assuming you’re using Windows. If you are, then you have Microsoft’s Paint program installed by default, and that’s all you really need. Nothing to download, nothing to install and configure…
So, let’s get started. First, you’ll want to open Explorer (aka My Computer , aka Computer ) and go find the image you want to resize. If the image you want to resize is on your desktop, you’re already there.
Next, right-click the image, and choose Edit in the popup menu.
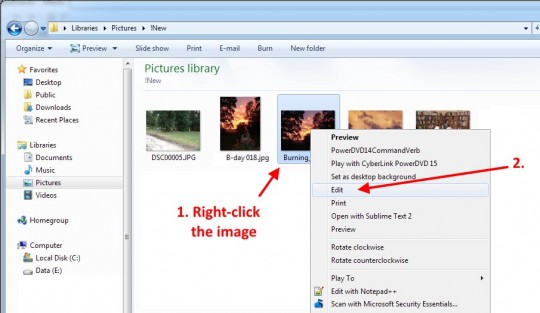
This will open the image in Paint. Next, click the Resize button:
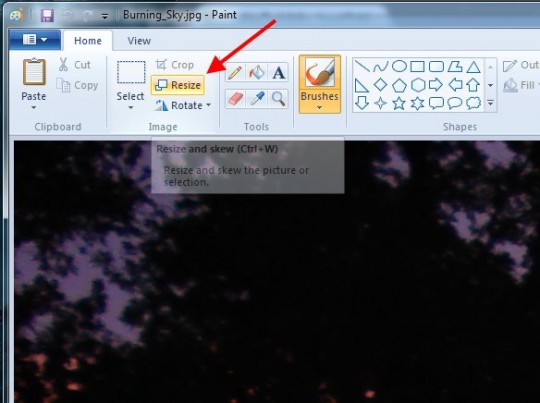
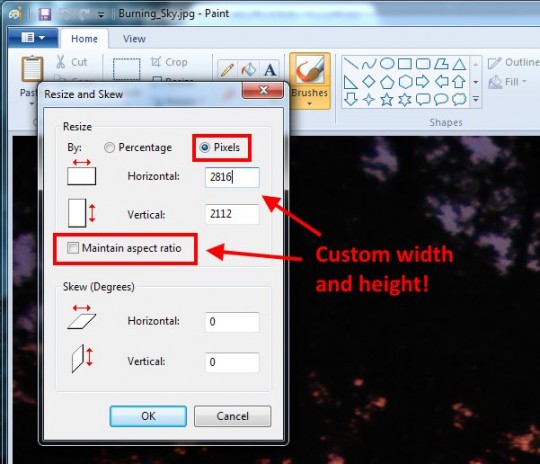
If you just want to resize the image, and you don’t care if it gets a bit stretched, then:
- Select Pixels
- UNcheck the Maintain aspect ratio checkbox
- Enter a width (Horizontal) and a height (Vertical) in pixels
- Click OK
If that looks okay, jump below to the Save As step.
If not, you’ll need to do a bit more work…
In the case where your image looks too stretched, you’ll need to resize and then crop the image. The easiest way to do this is to resize the image to the width you want, and then crop it to the height.
So, if your image is 2816 x 2112 pixels, and you want it to be 1200 x 630, you’d do this:
- Resize with Maintain aspect ratio to 1200 x . pixels
- Select 1200 x 630 pixels of the resulting image, and then Crop
Don’t worry, it’s easier than it sounds. Back in the Resize dialog box, you’ll do this:
- Check the Maintain aspect ratio checkbox
- Enter a width (Horizontal), and Paint will automatically calculate the height (Vertical) to prevent the image from becoming stretched
- Click OK
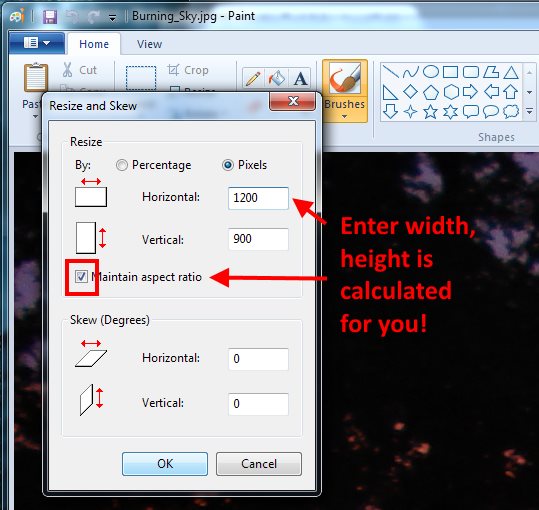
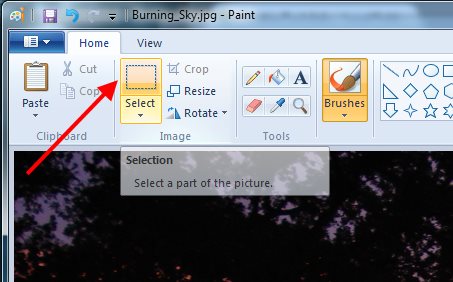
Right, so now your image is 1200 x 900 pixels. That’s close, but not quite 1200 x 630 like you want. So, next you’ll click the Select button:
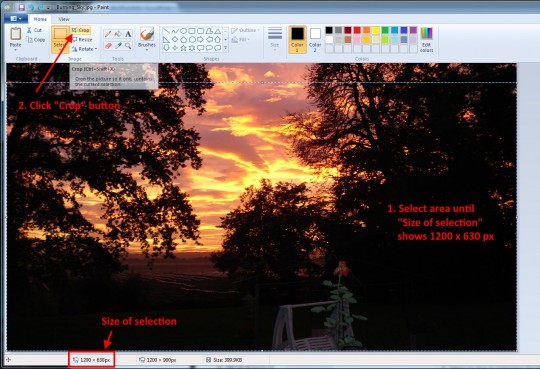
Now, you click and drag to draw a selection box on the image. Pay attention to the pixel size of the selection (lower-left corner of the Paint window). You’ll want to keep dragging until you hit exactly 1200 x 630px.
In the example below, I looked at the image and realized that I’d rather chop off the top of the image instead of the bottom. So, I started selecting at the bottom left, and dragged up to the top right until I hit 1200 x 630px. When done selecting, click the Crop button.
If you screw up the selection, just press the Esc key on your keyboard, and try again.
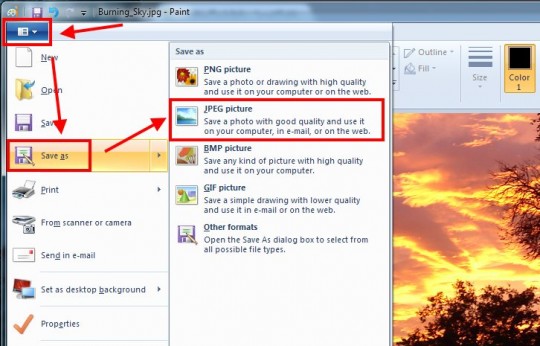
Now that your image is resized and cropped, you’ll want to Save As… in order to save a copy into a new file:
You’re done! Now you have a lovely, perfectly sized image to post on Facebook, or whatever…

Okay, so this wasn’t quite as a easy as you’d hoped… The cropping part can be a bit tedious. There are certainly other image processing software applications out there that make the task a bit easier. But, this method is free and built-in to Windows. After you’ve done it a few times, it becomes second nature.
If you just want to crop an image and you don’t care about specific dimensions in pixels, the Crop tool in Windows Photo Gallery is waaay easier to use. But, it doesn’t show you the size in pixels as you’re cropping, alas…
Fotophire Editing Toolkit
Cut & Crop Photos
1. How to Crop Photos
2. Photo Croppers
3. Resize Images
4. Image Resizers
How To Crop Photos on Windows with Windows Photo Editors
Everyone loves cool photos whether for personal use or for commercial use. Thankfully, these days there are lots of photo editors to that help polish up images the way we want them to be. Cropping is one way of spicing up those photos and it never seems to grow old. It is not only one of the simplest ways to resize images if you want to include them in documents, you can also crop to eliminate any distracting parts from photos. Now, how do you crop photos in your windows PC? Well, there are some marvelous third party apps that will do the job if you are photo savvy but wait, there are some free options as well! In fact, we are going to take you through how to crop photos on your windows using in built apps and one cool third party app. Let’s delve in now.
How to crop a photo on Windows with Paint
Using windows is one of the most popular and free ways of editing photos of windows. Well, it’s thanks to the fact that the Paint app is built into virtually all or rather, common windows versions-windows 7, 8 and 10. Moreover, the paint app is super easy to use and anyone-even the novice can edit an image with it. So, how do you crop your photos using paint?
The first thing you want to do is open your image with paint app. There are two ways do this, right click on the image and open with paint or launch paint then click on File>Open.
Now, there are two ways of cropping your photo. You can crop your photo into a rectangular format or you could go for free-form selection:
Crop a Photo As a Rectangle on Your PC
For the rectangular crop, click on Select and ensure the icon displayed is rectangular in shape-if not just toggle and select rectangular selection.
Then click on the image and drag your cursor to select the area you want to crop. You can always adjust the rectangular guidelines to cover the exact areas you want to be covered.
Once you are satisfied, simply click on the Crop button in the menu.
The last step is to save the new photo. Click on File>Save As to do this.
Crop a Photo As a Free Form Selection on Your PC
Cropping as a free-from selection on paint is more or less the same as cropping as a rectangle. The only difference is that you will click on the black arrow under Select and click on free-form selection
Then you can select the area you want to crop by dragging the mouse through the path. Once you are happy with your selection, click on Crop and save your file your desired location.
How to crop a photo on Windows with Photo Gallery
If you are running Windows vista, 7 or 8 then you can use Windows photo gallery to edit your photos. Follows these steps to crop your photos using the Photo Gallery app:
Step 1: Launch the Windows Photo Gallery App
First, launch the Photo Gallery app. Click on Start and search for photo gallery. From the list that appears, find Photo Gallery and click on it
Step 2: Find Your Photo
Once you have launched the app, you can look for the photo you want to edit and double click on it. This will take you to the editing mode.
Step 3: Crop Photo
In the tool bar find and click on the Crop icon and the crop grid will appear. Now you can simply resize the grid frame to cover the areas you want in the new photo. It’s that simple.
How to crop a photo on Windows with Photo Manager
The other free option for cropping photos in windows is to use Windows Photo Manager but this only comes with Microsoft office suite from 2003 to 2010. If you have it then here are the steps to crop your photo with the app:
Step 1: Open Your Photo With Windows Photo Manager
Simply right click on the photo you want to edit and open with the photo manager. If the app isn’t on your list, just click on Choose Default Program> Other Programs and select Photo Manager
Step 2: Crop Photo
After opening the photo on Windows Photo Manager, click on Edit Pictures
A toolbox will appear on the right where you will click on crop. Adjust the crop settings and the crop area to fit in with your preference, then click on OK and you are done!
A better way to crop photos on Windows
These free tools are great if you are handling small projects but if you are looking for a better way to crop and edit your photos then you will need to go for a third party app with the features you need.
One such tool is Fotophire, a photo editing app tailored for personal use and businesses. The beauty with this tool is that it has a variety of crop presets. The other amazing feature is that you also apply changes to several photos at once.
How To Crop Photos Using Wondershare Fotophire

Step 1: Install and Launch Wondershare Fotophire
Download Wondershare Fotophireand and install it on your windows PC. You can try the tool for a limited amount of time but you will only have access to limited features. After installing, launch the software and click on Photo Editor.
Step 2: Import Photo
Import the photo you want to edit by clicking on Open.
Step 3: Crop Photo
Now to crop your photo, click on the Crop Module and pick the proportion templates that suits you: crop with fixed ratio or custom ratio
Last but not least, save the image, print it or share it directly from the app.
Final Thoughts
Now that you know how to make good use of free windows apps to edit your photos, the ball is in your court now! Start playing around with the tools and if you want to go pro, then Wondershare Fotophire is one fantastic tool to jump into. Enjoy!!


