- Building Linux with Clang/LLVM
- About
- Clang
- Cross Compiling
- LLVM Utilities
- Omitting CROSS_COMPILE
- Supported Architectures
- Building the Linux Kernel — Cross-compiling for a BeagleBone Black
- Call: +44 (0)23 8098 8890 E-mail:
- What is Cross-compiling
- The Target platform — The BeagleBone Black
- The Host Platform
- Install the toolchain
- Cross-Compiling a kernel
- Deploying the kernel
- How ITDev Can Help
- Embedded Linux workshop
- Cross-compiling the Raspberry Pi OS Linux kernel on macOS
- Setting up a Debian VM
- Getting USB working
- Logging in and compiling the Linux kernel
- Mounting the Pi microSD or USB drive
- Installing modules and copying the built Kernel
- Unmounting the drive
- Conclusion
Building Linux with Clang/LLVM
This document covers how to build the Linux kernel with Clang and LLVM utilities.
About
The Linux kernel has always traditionally been compiled with GNU toolchains such as GCC and binutils. Ongoing work has allowed for Clang and LLVM utilities to be used as viable substitutes. Distributions such as Android, ChromeOS, and OpenMandriva use Clang built kernels. LLVM is a collection of toolchain components implemented in terms of C++ objects. Clang is a front-end to LLVM that supports C and the GNU C extensions required by the kernel, and is pronounced “klang,” not “see-lang.”
Clang
The compiler used can be swapped out via CC= command line argument to make . CC= should be set when selecting a config and during a build.
Cross Compiling
A single Clang compiler binary will typically contain all supported backends, which can help simplify cross compiling.
CROSS_COMPILE is not used to prefix the Clang compiler binary, instead CROSS_COMPILE is used to set a command line flag: —target=
LLVM Utilities
LLVM has substitutes for GNU binutils utilities. Kbuild supports LLVM=1 to enable them.
They can be enabled individually. The full list of the parameters:
The integrated assembler is enabled by default. You can pass LLVM_IAS=0 to disable it.
Omitting CROSS_COMPILE
As explained above, CROSS_COMPILE is used to set —target=
If CROSS_COMPILE is not specified, the —target=
That means if you use only LLVM tools, CROSS_COMPILE becomes unnecessary.
For example, to cross-compile the arm64 kernel:
If LLVM_IAS=0 is specified, CROSS_COMPILE is also used to derive —prefix=
to search for the GNU assembler and linker.
Supported Architectures
LLVM does not target all of the architectures that Linux supports and just because a target is supported in LLVM does not mean that the kernel will build or work without any issues. Below is a general summary of architectures that currently work with CC=clang or LLVM=1 . Level of support corresponds to “S” values in the MAINTAINERS files. If an architecture is not present, it either means that LLVM does not target it or there are known issues. Using the latest stable version of LLVM or even the development tree will generally yield the best results. An architecture’s defconfig is generally expected to work well, certain configurations may have problems that have not been uncovered yet. Bug reports are always welcome at the issue tracker below!
Источник
Building the Linux Kernel — Cross-compiling for a BeagleBone Black
Call: +44 (0)23 8098 8890
E-mail:
- Home
- Blog
- Building the Linux Kernel — Cross-compiling for a BeagleBone Black

Expanding on my previous blog post, which covered the basics of natively building a Linux kernel from scratch, we will now look at building a kernel for a different architecture. This is called cross-compiling.
What is Cross-compiling
Often, in the world of embedded computing, we need to compile a piece of software, whether that is a software application, some software libraries, or the operating system itself, non-natively. That is, build a piece of software on a machine dissimilar to the machine (architecture) it is destined to run on, hence the term cross-compiling. This is normally carried out for a number of reasons but perhaps the most important is the time required to compile the given piece of software locally; often embedded systems are limited in terms of processing power and available storage.
When cross-compiling there are some basic terms that we use to refer to the systems involved in the process. The two main elements are the target and the host. The target is the system that we wish to compile for. In this example we will compile a kernel for the BeagleBone Black system which is based on an ARM architecture. The host machine is the machine that we use to build the target software. This is where the toolchain will be installed. In this case, we are building on a 64-bit intel based architecture.
The process of cross-compiling the Linux kernel is much the same as compiling the kernel natively, except in this instance, we invoke the cross-compiler toolchain rather than the native toolchain.
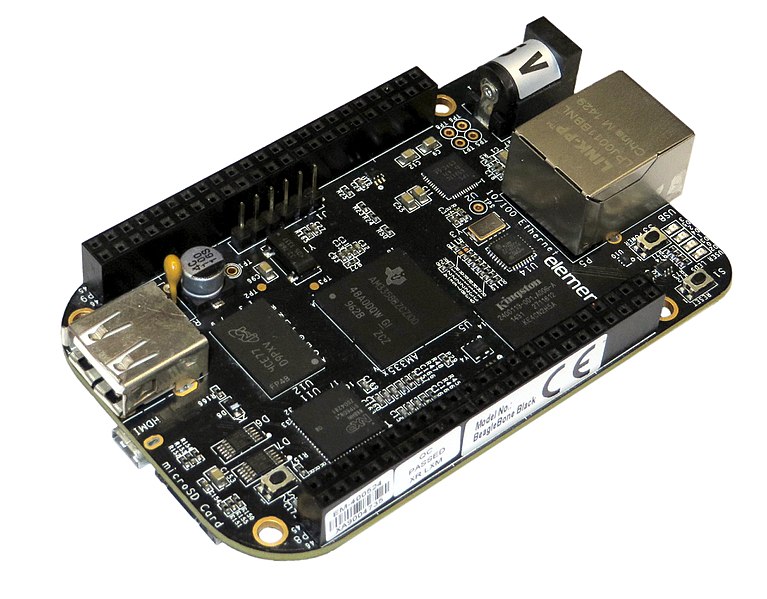
The Target platform — The BeagleBone Black
The BeagleBone Black is a low-cost ARM Cortex A8 processor-based single board computer produced by the BeagleBoard.org foundation. In recent years at ITDev, we have seen a number of new and existing projects using hardware that is very similar to the BeagleBone Black platform. This platform lends itself to use in these projects because not only is the hardware open-source but it is also very well supported by Linux and the open-source communities.
As such, I will use the BeagleBone Black platform to demonstrate how we can build a kernel for a different architecture. Using a host platform, we will build a new Linux kernel and then deploy this to an existing BeagleBone filesystem. With that in mind, a working BeagleBone Black will be required to test the final kernel build. That is, a BeagleBone Black running a recent Debian based image.
The Host Platform
The host platform chosen to cross-compile the BeagleBone kernel is the same build machine that we used for the previous blog article, Building the Linux Kernel — An Introduction, an Ubuntu based virtual machine. All of the commands presented here are entered via the command line. In this case, I simply used Ubuntu server, 18.04 LTS. However, one can equally use a desktop based release or even an entirely different distro. This being the case, be aware that whilst the theory remains the same, the commands to install the various tools presented here may differ.
Install the toolchain
Since we are using Ubuntu, we have access to the Ubuntu repositories and the wealth of software they provide. This greatly simplifies the installation of an ARM based toolchain which we install with the following single line:
The above command will search the Ubuntu repositories and install the tools presented below:
This ‘ arm-linux-gnueabi ‘ string in the tool name is the toolchain tuple — see Debian Tuples. In this case, the tuple simply implies that the tools will produce binaries for the 32-bit ARM platform, ‘ linux ‘ is the tool vendor and finally, the ‘ gnueabi ‘ implies that the tools are based on GNU glibc standard C library.
What is instantly noticeable from the above toolset is that the names are the same as the native tools prepended with this ‘ arm-linux-gnueabi- ‘ string. Cross-compiling using these tools is much the same as native compilation, except that the ‘arm-linux-gnueabi-‘ string is prepended. Although this is a simplified view, especially as some packages may require a number of additional libraries for either the host or the target platform, this is certainly true for a kernel.
Cross-Compiling a kernel
Our host should now be ready to cross-compile a kernel, all that is required is for us to do is download the kernel. There are a number of ways we can do this for the BeagleBone platform but here we will concentrate on the official kernel release which can be found on the BeagleBoard github repo and can be «checked out» using Git with the following command — note that this does take a good while:
Once complete change to the newly checked out directory. Note that this will have the same structure as the kernel downloaded in the previous blog article, Building the Linux Kernel — An Introduction . The only real difference is that this kernel should feature the latest configuration files and patches for the various BeagleBone Black platforms.
From here on in the process is much the same as that of the previous blog post. That is, we need to configure the kernel, then build it and finally deploy it. Let’s start with the configuration.
Since here we are only concerned with the process of cross compiling a kernel, we will simply rebuild the same kernel version that is currently present on the running BeagleBone. This will greatly simplify the deployment of the kernel whilst still allowing us to illustrate exactly what is required. We can find the kernel version running on the BeagleBone by running the following command on the BeagleBone terminal:
We can then ensure we are building a kernel against this version by checking out the correct kernel source version as follows — note that we should be able to check out the exact version we are running, unlike in the previous blog where we had to find a version that was close to the running kernel.
Previously, when building for a x86 architecture, we copied a kernel configuration file from the system’s boot partition and we could do the same with the BeagleBone platform. However, since we have cloned the official BeagleBoard source, we can call the default configuration straight from the sources. The following command initialises the kernel sources by copying the default BeagleBoard kernel configuration to the base directory of the kernel sources — and renames it ‘ .config ‘.
As discussed previously, we notify the kernel build script that we are cross-compiling by passing make the ‘ ARCH ‘ and ‘ CROSS_COMPILE ‘ flags. This tells the build system that it needs to prepend some of the commands with ‘ arm-linux-gnueabi- ‘ as discussed earlier.
If we need to fine-tune this configuration we can do so as we did in the previous kernel build using ‘ menuconfig ‘ i.e. we simply run:
Now the sources are configured, we should be able to build the kernel. As with the configuration command we also specify the ‘ ARCH ‘ and ‘ CROSS_COMPILE ‘ flags but this time we need to tell the build system the target kernel image type required — ‘ uImage ‘ along with specifying the address that the kernel should be located with the ‘ LOADADDR ‘ argument. We also specify that we want the device tree to be compiled too, as follows:
We have now built a kernel for the BeagleBoard platform and have shown that the build process is much the same as the x86 platform build except this time we added some additional arguments to the make commands. If we intend to make any changes to the kernel modules, we need to build these modules in much the same way as we did with the x86 kernel. We simply add the arguments to the ‘ make modules ‘ command as follows:
That is it — all that remains is to test this newly built kernel .
Deploying the kernel
There are more ways to deploy a kernel to an embedded system than there are ways to skin a cat, some of these require some additional setup, such as network booting, others require complicated configuration of bootloaders such as Grub or U-Boot. Many of these methods are too complicated to be featured in this post and could be a blog article in themselves. In this example, we are going to go for the simplest method possible, that is to drop the new kernel in-place, overwriting the existing kernel. Installing a kernel in this method is not for the faint-hearted since the slightest error could render the system useless. Hence, I recommend this is only carried out on BeagleBone that is running from an SD card — since this can easily be recovered if things go wrong.
The first thing we need to do is transfer this new kernel over to the BeagleBone, this can be carried out by either mounting the SD card on your build machine and directly copying it in place, in the ‘ /boot ‘ directory, or this can be copied over to a running BeagleBone using SCP, and then copied over to the correct place.
As mentioned previously, we are simply overwriting the existing kernel in this example. Here I have mounted the BeagleBone SD card under ‘ /mnt/rootfs ‘ on my build machine and then overwritten the existing kernel with the zImage file as follows:
Once the kernel image is installed, we now need to install the kernel modules. To do this we get the kernel build system to place these modules directly onto the SD card with the ‘ INSTALL_MOD_PATH ‘ variable on the make command. We also instruct the build system to strip any debug data to reduce the size of the modules directory with the ‘ INSTALL_MOD_STRIP ‘ variable:
Now re-boot the device and we should be able to boot into our new kernel. If it is not obvious, we can confirm this with the ‘ uname ‘ command as follows. Note that the build date should be the date we built the kernel:
We have now successfully built and deployed a kernel for the BeagleBone Black platform.
To find out about future blog posts related to Linux and embedded software, follow us on Linkedin, Twitter or Facebook, or sign up to our Embedded Linux Interest Group.
How ITDev Can Help
As a provider of software and electronics design services, we are often working with the Linux and Android operating systems. We have extensive experience in developing, modifying, building, debugging and bring up of these operating systems, be it for new developments or working with existing kernels to demonstrate new device technologies and features.
We offer advice and assistance to companies considering to use or already using Linux or Android on their embedded system. Initial discussions are always free of charge, so if you have any questions, or would like to find out more, email us.
Embedded Linux workshop
We are running a workshop focused on the challenges around embedded Linux later this year. If you are interested in attending this workshop, sign up to our Embedded Linux Interest Group to be kept informed.
Источник
Cross-compiling the Raspberry Pi OS Linux kernel on macOS
After doing a video testing different external GPUs on a Raspberry Pi last week, I realized two things:
- Compiling the Linux kernel on a Raspberry Pi is slow. It took 54 minutes, and I ended up doing it 7 times during the course of testing for that video.
- If you ever want to figure out a better way to do something, write a blog post or create a video showing the less optimal way of doing it.
To the second point, about every fifth comment was telling me to cross-compile Linux on a faster machine instead of doing it on the Pi itself. For example:

And on the Pi Forums, it seems like nobody worth their salt compiles the kernel on the Pi either, so I figured—since I’m probably going to have to do it again another thousand times in my life—I might as well put together a guide for how to do it on a Mac.
And my first attempt was to use Docker for Mac, but that attempt faltered once I realized there’s no way to mount a microSD card (‘device’) into Docker for Mac, unless you hack things through VirtualBox with Docker inside or use Docker Machine. And that’s a lotta layers of abstraction.
And my second attempt was to see if osxfuse could be made to help (I’ve used osxfuse to mount Raspberry Pi microSD cards before. ). That didn’t pan out, and I didn’t want to rely on something that used paid ext4 software that may or may not work with virtualization, so ultimately I went back to my old faithful, Vagrant + VirtualBox.
I wanted to compile the Raspberry Pi OS kernel with support for 9000 MTU on the built-in Gigabit network interface for some ethernet benchmarking I was doing (it only supports 1500 MTU out of the box, and the driver doesn’t allow changing MTU on the fly), and I had to put that kernel on four Pi 4 model Bs, so this was the perfect time to start cross-compiling on my fast Core i9 Mac.
Setting up a Debian VM
I wanted my cross-compile environment to be close to the Pi OS, and work with the Raspberry Pi Kernel Building directions out of the box, so I created a Vagrantfile that used the debian/buster64 base box.
See the entire Vagrantfile using the link in the previous paragraph, but one of the more important bits is the enabling of the XHCI USB 3.0 interface in the VM, so you can attach USB devices—and thus access and mount the fat32 and ext4 partitions on a microSD card directly within the VM:
I initially tried using the USB 2.0 EHCI option instead of USB 3.0 and xHCI, but when I did that, and tried attaching my card reader (detailed later in this post), I got the error message VERR_PDM_NO_USB_PORTS :
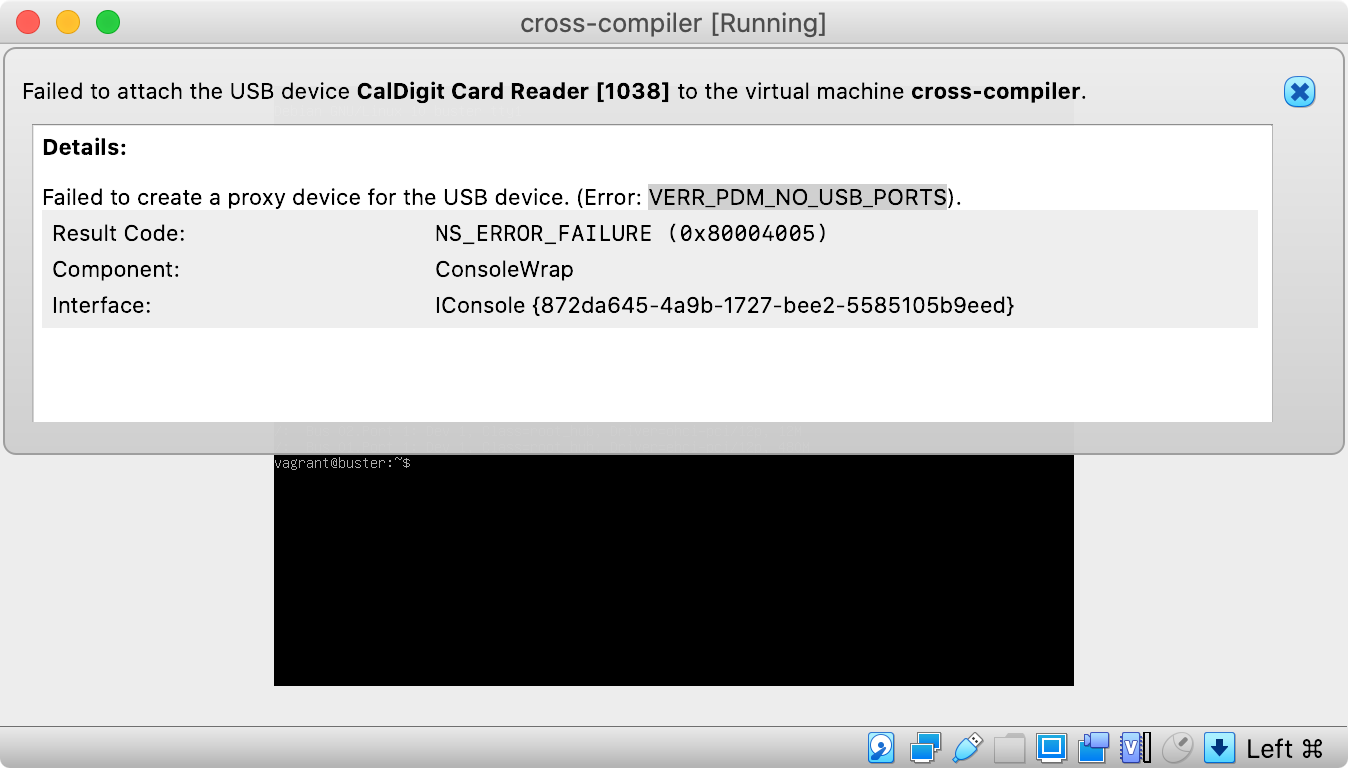
So if you get that error, try out the USB 3.0 XHCI option instead.
I also put in an inline shell provisioner in the Vagrantfile that installs all the build dependencies:
Again, check out the linked Vagrantfile in my GitHub repo to find the whole thing.
With that Vagrantfile, assuming you have Vagrant and VirtualBox installed on your computer, along with the VirtualBox Extension Pack (required for USB support), you can run vagrant up , and you’ll end up with a VM ready to cross-compile ARM Linux!
Getting USB working
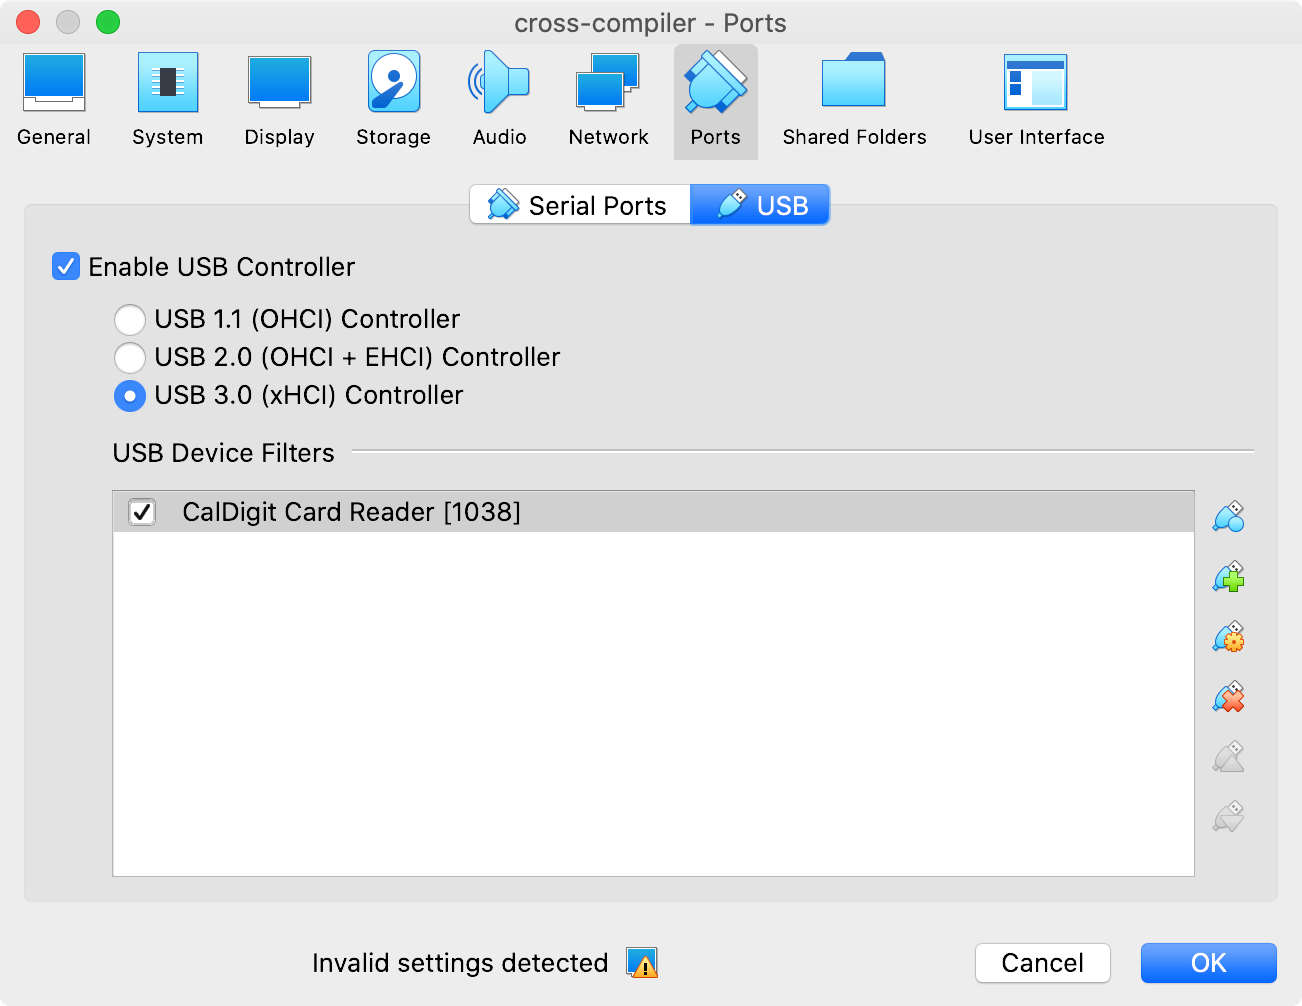
The next step for me was to get my external USB card reader (in my case, built into my CalDigit TS3 Plus ThunderBolt hub) attached to the VM so when I put in a microSD card, it would show up inside Debian.
To do this, I shut down the VM with vagrant halt , then I opened VirtualBox, went into the Settings for the new ‘cross-compile’ VM, then to ‘Ports’, then ‘USB’, then in the ‘USB Device Filters’ section, I added my ‘CalDigit Card Reader [1038]’.
You can specify USB device directly in the Vagrantfile (see the comments on this older blog post), but since I move my Mac between different locations, with different card readers, I didn’t want to hardcode anything in the Vagrantfile.
Now that the card reader is attached, I started up the VM again, with vagrant up .
Logging in and compiling the Linux kernel
For the rest of this blog post, I’m assuming you’ll be building Linux for the Raspberry Pi 4 (or Compute Module 4, or Pi 400), and for 64-bit ARM, not 32-bit. If you need to build for 32-bit, or for a different Pi model, please make sure you use the right environment variables and build args as outlined in the Kernel building cross-compiling documentation.
Log into the VM using vagrant ssh , then start the process of compiling Linux and copying everything to your microSD card or USB drive:
Clone the linux repo (or clone a fork or a different branch):
git clone —depth=1 https://github.com/raspberrypi/linux
Run the following commands to make the .config file:
(Optionally) Either edit the .config file by hand or use menuconfig:
Compile the Kernel:
make -j4 ARCH=arm64 CROSS_COMPILE=aarch64-linux-gnu- Image modules dtbs
For 32-bit Pi OS, use KERNEL=kernel7l , ARCH=arm , CROSS_COMPILE=arm-linux-gnueabihf- , and zImage instead of Image .
Mounting the Pi microSD or USB drive
Mount the FAT and ext4 partitions of the USB card to the system. First, insert your microSD card into the reader you attached to the VM earlier, then run the following commands:
Installing modules and copying the built Kernel
Install the kernel modules onto the drive:
For 32-bit Pi OS, use sudo env PATH=$PATH make ARCH=arm CROSS_COMPILE=arm-linux-gnueabihf- INSTALL_MOD_PATH=mnt/ext4 modules_install
Copy the kernel and DTBs onto the drive:
Unmounting the drive
Unmount the disk before you remove it from the card reader or unplug it.
Now you can pull the card out of the reader, or disconnect your USB drive, and put it in the Pi!
Conclusion
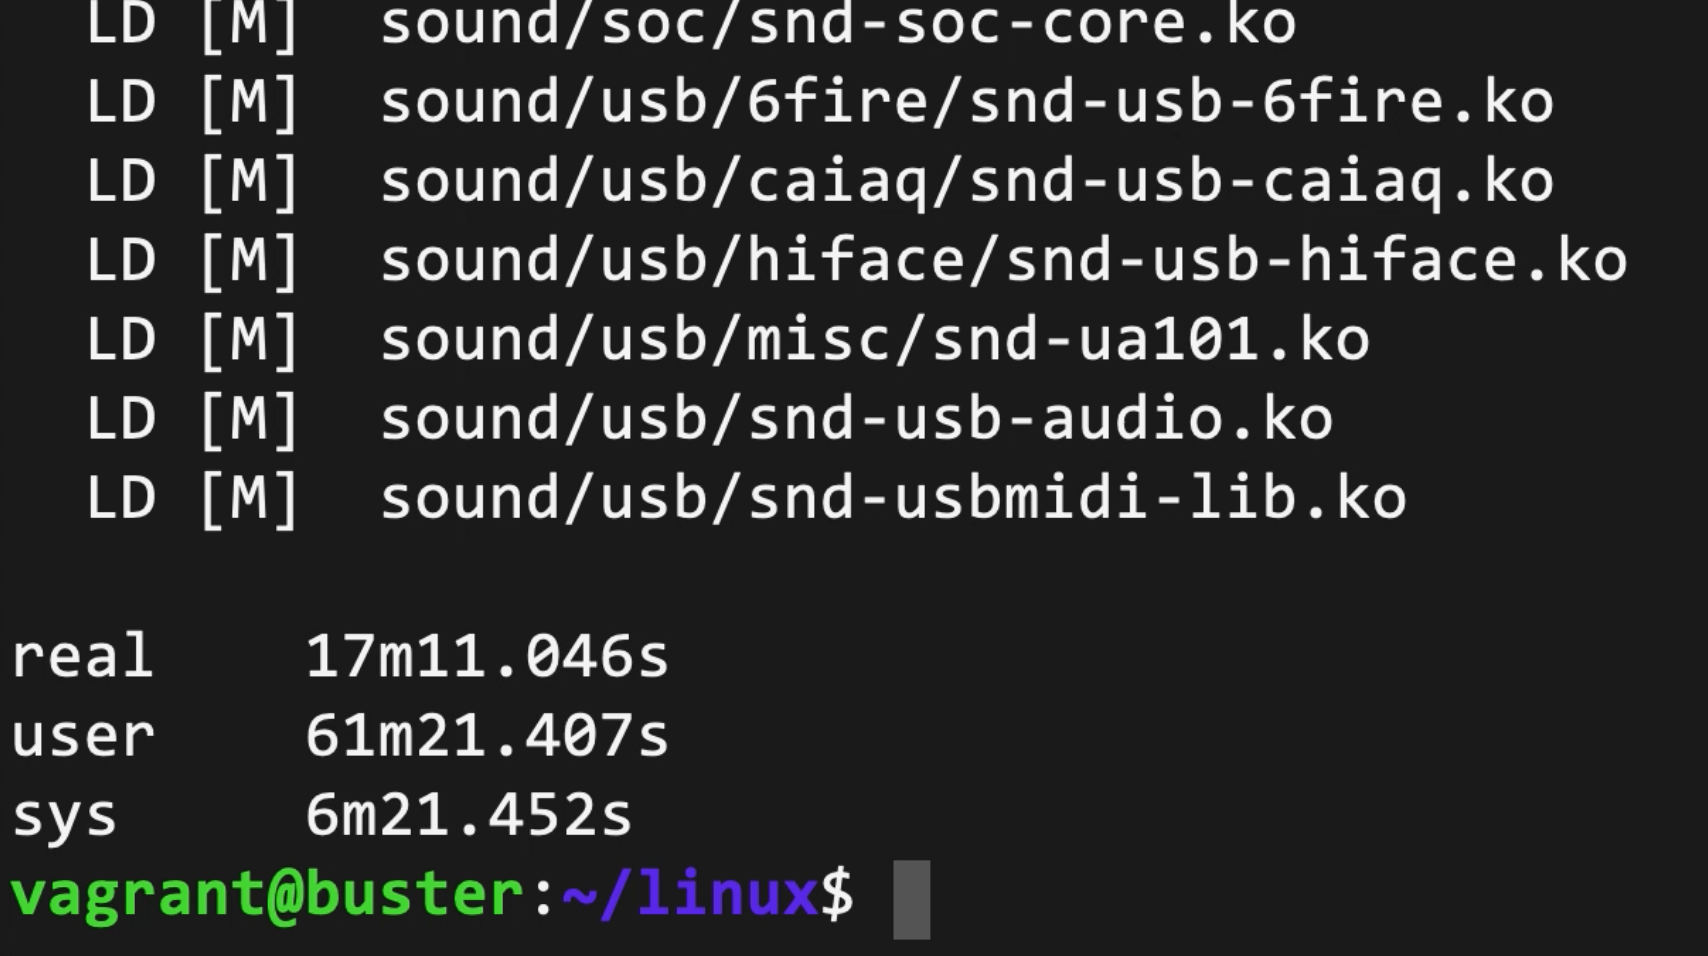
In total, compiling the kernel on my MacBook Pro only takes about 18-20 minutes (whereas it took over an hour on the Pi 4 model B). I can probably optimize the VM layout and CPU utilization better to bring that number down a bit more, and probably will at some point.
Since I’m making a lot of tweaks right now to multiple Pis at a time (and currently testing a new GPU, a 10 Gbps network adapter, and a 4x 1 Gbps network adapter on the Compute Module 4), this is a much more efficient way to build custom Pi kernels.
Please check out the Raspberry Pi PCI Express Card Database project for the latest configuration and documentation for everything mentioned in this blog post, in the cross-compile directory.
Источник


