- GPU in Windows Subsystem for Linux (WSL)
- Enable Developers
- Access Advanced AI
- Reduce Obstacles
- WHY USE NVIDIA GPUS ON WINDOWS for AI?
- Get Started Developing GPUs Quickly
- Simplifying Deep Learning
- Accelerate Analytics and Data Science
- CUDA Everywhere
- Cuda linux or windows
- 1. Introduction
- 2. Windows
- 2.1. Network Installer
- 2.2. Local Installer
- 3. Linux
- 3.1. Linux x86_64
- 3.1.1. Redhat / CentOS
- 3.1.1.1. RPM Installer
- 3.1.1.2. Runfile Installer
- 3.1.2. Fedora
- 3.1.2.1. RPM Installer
- 3.1.2.2. Runfile Installer
- 3.1.3. SUSE Linux Enterprise Server
- 3.1.3.1. RPM Installer
- 3.1.3.2. Runfile Installer
- 3.1.4. OpenSUSE
- 3.1.4.1. RPM Installer
- 3.1.4.2. Runfile Installer
- 3.1.5. WSL
- 3.1.6. Ubuntu
- 3.1.6.1. Debian Installer
- 3.1.6.2. Runfile Installer
- 3.1.7. Debian
- 3.1.7.1. Debian Installer
- 3.1.7.2. Runfile Installer
- 3.2. Linux POWER8
- 3.2.1. Ubuntu
- 3.2.1.1. Debian Installer
- 3.2.2. Redhat / CentOS
- 3.2.2.1. RPM Installer
- Notices
- Notice
- VESA DisplayPort
GPU in Windows Subsystem for Linux (WSL)
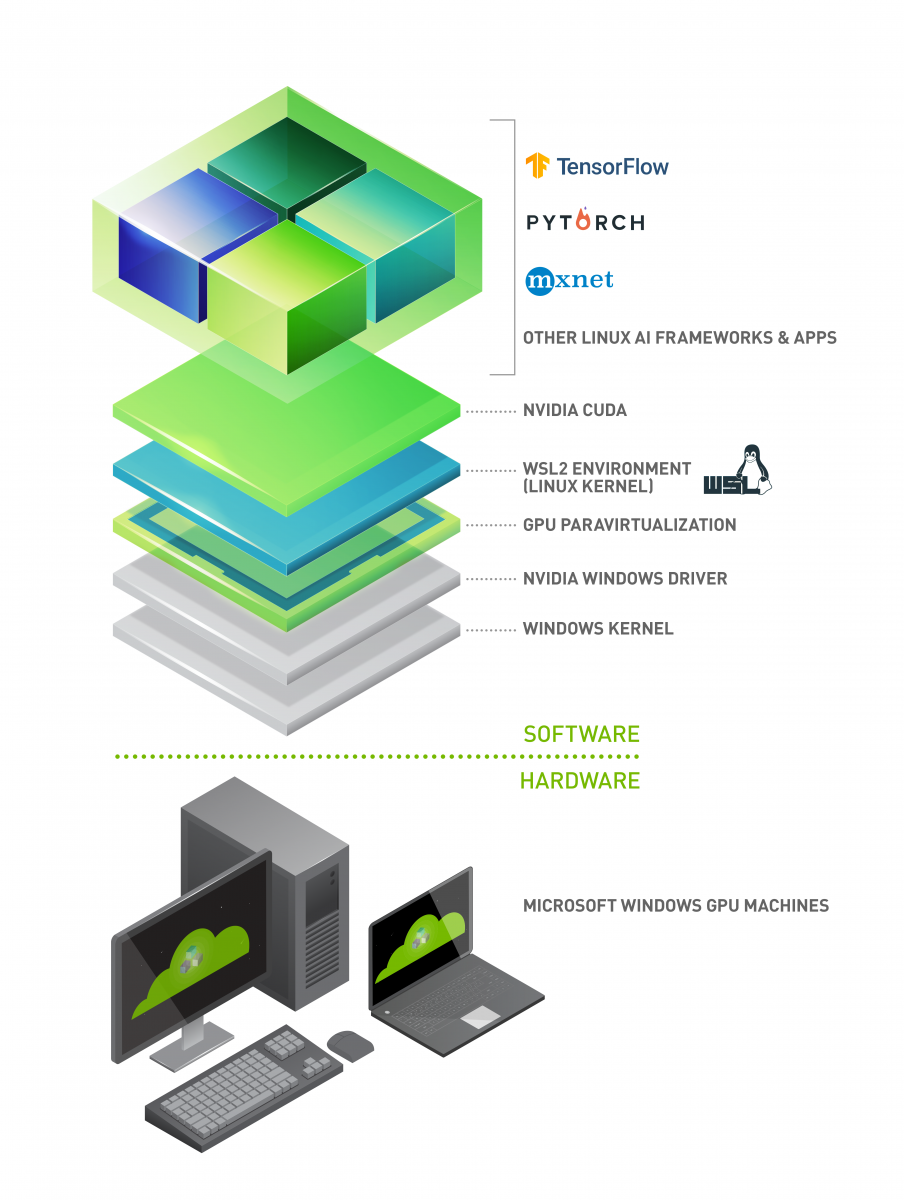
Microsoft Windows is a ubiquitous platform for enterprise, business, and personal computing systems. However, industry AI tools, models, frameworks, and libraries are predominantly available on Linux OS. Now all users of AI — whether they are experienced professionals, or students and beginners just getting started — can benefit from innovative GPU-accelerated infrastructure, software, and container support on Windows.
The NVIDIA CUDA on WSL Public Preview brings NVIDIA CUDA and advanced AI together with the ubiquitous Microsoft Windows platform to deliver advanced machine learning capabilities across numerous industry segments and application domains.
Interested parties will need to join the appropriate user programs, and will download specific components from both NVIDIA and Microsoft to set-up the complete WSL environment.
NVIDIA drivers for WSL with CUDA and DirectML support are available as preview for Microsoft Windows Insider Program members who have registered for the NVIDIA Developer Program.
Enable Developers
GPU support is the number one requested feature from worldwide WSL users — including data scientists, ML engineers, and even novice developers.
Access Advanced AI
The most advanced and innovative AI frameworks and libraries are already integrated with NVIDIA CUDA support, including industry leading frameworks like PyTorch and TensorFlow.
Reduce Obstacles
The overhead and duplication of investments in multiple OS compute platforms can be prohibitive — AI users, developers, and data scientists need quick access to run Linux software on their productive Windows platforms.
WHY USE NVIDIA GPUS ON WINDOWS for AI?
If you are a Microsoft Windows user who wants access to state of the art AI technology, NVIDIA enables GPU-accelerated AI development, running advanced Linux-based ML applications on Microsoft Windows by leveraging the WSL application layer.
GPUs have a robust history of accelerating AI applications for both training and inference. NVIDIA provides a wide variety of proven machine learning solutions, and are validated to work with numerous industry frameworks. We leverage our extensive AI experience and domain knowledge to deliver solutions that accelerate your learning, adoption, and results.
Join the NVIDIA Developer Program and come take advantage of our developer tools, training, platforms, and integrations.
Get Started Developing GPUs Quickly
The CUDA Toolkit provides everything developers need to get started building GPU accelerated applications — including compiler toolchains, Optimized libraries, and a suite of developer tools. Use CUDA within WSL and CUDA containers to get started quickly. Features and capabilities will be added to the Preview version of the CUDA Toolkit over the life of the preview program.
Simplifying Deep Learning
NVIDIA provides access to over a dozen deep learning frameworks and SDKs, including support for TensorFlow, PyTorch, MXNet, and more.
Additionally, you can even run pre-built framework containers with Docker and the NVIDIA Container Toolkit in WSL. Frameworks, pre-trained models and workflows are available from NGC.
Accelerate Analytics and Data Science
RAPIDS is an open source NVIDIA suite of software libraries to accelerate data science and analytics pipelines on GPUs.
Reduce training time and increase model accuracy by iterating faster with proven, pre-built libraries.
CUDA Everywhere
Numerous NVIDIA platforms in different form factors and at different price points exist for hosting your work environment, including GPU-enabled graphics cards, laptops, and more.
“The Microsoft — NVIDIA collaboration around WSL enables masses of expert and new users to learn, experiment with, and adopt premier GPU-accelerated AI platforms without leaving the familiarity of their everyday MS Windows environment.”
Kam VedBrat, Partner Group Program Manager for Windows AI Platform, Microsoft Corp.
Cuda linux or windows
Minimal first-steps instructions to get CUDA running on a standard system.
1. Introduction
This guide covers the basic instructions needed to install CUDA and verify that a CUDA application can run on each supported platform.
These instructions are intended to be used on a clean installation of a supported platform. For questions which are not answered in this document, please refer to the Windows Installation Guide and Linux Installation Guide.
The CUDA installation packages can be found on the CUDA Downloads Page.
2. Windows
When installing CUDA on Windows, you can choose between the Network Installer and the Local Installer. The Network Installer allows you to download only the files you need. The Local Installer is a stand-alone installer with a large initial download. For more details, refer to the Windows Installation Guide.
2.1. Network Installer
Perform the following steps to install CUDA and verify the installation.
- Launch the downloaded installer package.
- Read and accept the EULA.
- Select «next» to download and install all components.
- Once the download completes, the installation will begin automatically.
- Once the installation completes, click «next» to acknowledge the Nsight Visual Studio Edition installation summary.
- Click «close» to close the installer.
- Navigate to the CUDA Samples’ nbody directory.
- Open the nbody Visual Studio solution file for the version of Visual Studio you have installed.


2.2. Local Installer
Perform the following steps to install CUDA and verify the installation.
- Launch the downloaded installer package.
- Read and accept the EULA.
- Select «next» to install all components.
- Once the installation completes, click «next» to acknowledge the Nsight Visual Studio Edition installation summary.
- Click «close» to close the installer.
- Navigate to the CUDA Samples’ nbody directory.
- Open the nbody Visual Studio solution file for the version of Visual Studio you have installed.
3. Linux
CUDA on Linux can be installed using an RPM, Debian, or Runfile package, depending on the platform being installed on.
3.1. Linux x86_64
For development on the x86_64 architecture. In some cases, x86_64 systems may act as host platforms targeting other architectures. See the Linux Installation Guide for more details.
3.1.1. Redhat / CentOS
When installing CUDA on Redhat or CentOS, you can choose between the Runfile Installer and the RPM Installer. The Runfile Installer is only available as a Local Installer. The RPM Installer is available as both a Local Installer and a Network Installer. The Network Installer allows you to download only the files you need. The Local Installer is a stand-alone installer with a large initial download. In the case of the RPM installers, the instructions for the Local and Network variants are the same. For more details, refer to the Linux Installation Guide.
3.1.1.1. RPM Installer
Perform the following steps to install CUDA and verify the installation.
- Install EPEL to satisfy the DKMS dependency by following the instructions at EPEL’s website.
- Enable optional repos:
On RHEL 7 Linux only, execute the following steps to enable optional repositories.
- On x86_64 workstation:
- On POWER9 system:
- On x86_64 server:
3.1.1.2. Runfile Installer
Perform the following steps to install CUDA and verify the installation.
3.1.2. Fedora
When installing CUDA on Fedora, you can choose between the Runfile Installer and the RPM Installer. The Runfile Installer is only available as a Local Installer. The RPM Installer is available as both a Local Installer and a Network Installer. The Network Installer allows you to download only the files you need. The Local Installer is a stand-alone installer with a large initial download. In the case of the RPM installers, the instructions for the Local and Network variants are the same. For more details, refer to the Linux Installation Guide.
3.1.2.1. RPM Installer
Perform the following steps to install CUDA and verify the installation.
- Install the RPMFusion free repository to satisfy the Akmods dependency:
- Install the repository meta-data, clean the dnf cache, and install CUDA:
- Reboot the system to load the NVIDIA drivers.
- Set up the development environment by modifying the PATH and LD_LIBRARY_PATH variables:
- Install a writable copy of the samples then build and run the nbody sample:
3.1.2.2. Runfile Installer
Perform the following steps to install CUDA and verify the installation.
3.1.3. SUSE Linux Enterprise Server
When installing CUDA on SUSE Linux Enterprise Server, you can choose between the Runfile Installer and the RPM Installer. The Runfile Installer is only available as a Local Installer. The RPM Installer is available as both a Local Installer and a Network Installer. The Network Installer allows you to download only the files you need. The Local Installer is a stand-alone installer with a large initial download. In the case of the RPM installers, the instructions for the Local and Network variants are the same. For more details, refer to the Linux Installation Guide.
3.1.3.1. RPM Installer
Perform the following steps to install CUDA and verify the installation.
- Install the repository meta-data, refresh the Zypper cache, and install CUDA:
- Add the user to the video group:
- Reboot the system to load the NVIDIA drivers.
- Set up the development environment by modifying the PATH and LD_LIBRARY_PATH variables:
- Install a writable copy of the samples then build and run the vectorAdd sample:
3.1.3.2. Runfile Installer
Perform the following steps to install CUDA and verify the installation.
- Reboot into runlevel 3 by temporarily adding the number «3» and the word «nomodeset» to the end of the system’s kernel boot parameters.
- Run the installer silently to install with the default selections (implies acceptance of the EULA):
- Create an xorg.conf file to use the NVIDIA GPU for display:
- Reboot the system to load the graphical interface.
- Set up the development environment by modifying the PATH and LD_LIBRARY_PATH variables:
- Install a writable copy of the samples then build and run the vectorAdd sample:
3.1.4. OpenSUSE
When installing CUDA on OpenSUSE, you can choose between the Runfile Installer and the RPM Installer. The Runfile Installer is only available as a Local Installer. The RPM Installer is available as both a Local Installer and a Network Installer. The Network Installer allows you to download only the files you need. The Local Installer is a stand-alone installer with a large initial download. In the case of the RPM installers, the instructions for the Local and Network variants are the same. For more details, refer to the Linux Installation Guide.
3.1.4.1. RPM Installer
Perform the following steps to install CUDA and verify the installation.
- Install the repository meta-data, refresh the Zypper cache, and install CUDA:
- Add the user to the video group:
- Reboot the system to load the NVIDIA drivers.
- Set up the development environment by modifying the PATH and LD_LIBRARY_PATH variables:
- Install a writable copy of the samples then build and run the nbody sample:
3.1.4.2. Runfile Installer
Perform the following steps to install CUDA and verify the installation.
3.1.5. WSL
These instructions must be used if you are installing in a WSL environment. Do not use the Ubuntu instructions in this case.
- Install repository meta-data
When installing using the local repo:
When installing using the network repo:
Pin file to prioritize CUDA repository:
Update the Apt repository cache and install CUDA
3.1.6. Ubuntu
When installing CUDA on Ubuntu, you can choose between the Runfile Installer and the Debian Installer. The Runfile Installer is only available as a Local Installer. The Debian Installer is available as both a Local Installer and a Network Installer. The Network Installer allows you to download only the files you need. The Local Installer is a stand-alone installer with a large initial download. In the case of the Debian installers, the instructions for the Local and Network variants are the same. For more details, refer to the Linux Installation Guide.
3.1.6.1. Debian Installer
Perform the following steps to install CUDA and verify the installation.
- Install the repository meta-data, install GPG key, update the apt-get cache, and install CUDA:
- Reboot the system to load the NVIDIA drivers.
- Set up the development environment by modifying the PATH and LD_LIBRARY_PATH variables:
- Install a writable copy of the samples then build and run the nbody sample:
3.1.6.2. Runfile Installer
Perform the following steps to install CUDA and verify the installation.
3.1.7. Debian
When installing CUDA on Debian 10, you can choose between the Runfile Installer and the Debian Installer. The Runfile Installer is only available as a Local Installer. The Debian Installer is available as both a Local Installer and a Network Installer. The Network Installer allows you to download only the files you need. The Local Installer is a stand-alone installer with a large initial download. For more details, refer to the Linux Installation Guide.
3.1.7.1. Debian Installer
Perform the following steps to install CUDA and verify the installation.
- Install the repository meta-data, install GPG key, update the apt-get cache, and install CUDA:
- Reboot the system to load the NVIDIA drivers.
- Set up the development environment by modifying the PATH and LD_LIBRARY_PATH variables:
- Install a writable copy of the samples then build and run the nbody sample:
3.1.7.2. Runfile Installer
Perform the following steps to install CUDA and verify the installation.
3.2. Linux POWER8
For development on the POWER8 architecture.
3.2.1. Ubuntu
When installing CUDA on Ubuntu on POWER8, you must use the Debian Installer. The Debian Installer is available as both a Local Installer and a Network Installer. The Network Installer allows you to download only the files you need. The Local Installer is a stand-alone installer with a large initial download. The instructions for the Local and Network variants are the same. For more details, refer to the Linux Installation Guide.
3.2.1.1. Debian Installer
Perform the following steps to install CUDA and verify the installation.
- Install the repository meta-data, update the apt-get cache, and install CUDA:
- Reboot the system to load the NVIDIA drivers.
- Set up the development environment by modifying the PATH and LD_LIBRARY_PATH variables:
- Install a writable copy of the samples then build and run the vectorAdd sample:
3.2.2. Redhat / CentOS
When installing CUDA on Redhat on POWER8, you must use the RPM Installer. The RPM Installer is available as both a Local Installer and a Network Installer. The Network Installer allows you to download only the files you need. The Local Installer is a stand-alone installer with a large initial download. The instructions for the Local and Network variants are the same. For more details, refer to the Linux Installation Guide.
3.2.2.1. RPM Installer
Perform the following steps to install CUDA and verify the installation.
- Install EPEL to satisfy the DKMS dependency by following the instructions at EPEL’s website.
- Install the repository meta-data, clean the yum cache, and install CUDA:
- Reboot the system to load the NVIDIA drivers.
- Set up the development environment by modifying the PATH and LD_LIBRARY_PATH variables:
- Install a writable copy of the samples then build and run the vectorAdd sample:
Notices
Notice
This document is provided for information purposes only and shall not be regarded as a warranty of a certain functionality, condition, or quality of a product. NVIDIA Corporation (“NVIDIA”) makes no representations or warranties, expressed or implied, as to the accuracy or completeness of the information contained in this document and assumes no responsibility for any errors contained herein. NVIDIA shall have no liability for the consequences or use of such information or for any infringement of patents or other rights of third parties that may result from its use. This document is not a commitment to develop, release, or deliver any Material (defined below), code, or functionality.
NVIDIA reserves the right to make corrections, modifications, enhancements, improvements, and any other changes to this document, at any time without notice.
Customer should obtain the latest relevant information before placing orders and should verify that such information is current and complete.
NVIDIA products are sold subject to the NVIDIA standard terms and conditions of sale supplied at the time of order acknowledgement, unless otherwise agreed in an individual sales agreement signed by authorized representatives of NVIDIA and customer (“Terms of Sale”). NVIDIA hereby expressly objects to applying any customer general terms and conditions with regards to the purchase of the NVIDIA product referenced in this document. No contractual obligations are formed either directly or indirectly by this document.
NVIDIA products are not designed, authorized, or warranted to be suitable for use in medical, military, aircraft, space, or life support equipment, nor in applications where failure or malfunction of the NVIDIA product can reasonably be expected to result in personal injury, death, or property or environmental damage. NVIDIA accepts no liability for inclusion and/or use of NVIDIA products in such equipment or applications and therefore such inclusion and/or use is at customer’s own risk.
NVIDIA makes no representation or warranty that products based on this document will be suitable for any specified use. Testing of all parameters of each product is not necessarily performed by NVIDIA. It is customer’s sole responsibility to evaluate and determine the applicability of any information contained in this document, ensure the product is suitable and fit for the application planned by customer, and perform the necessary testing for the application in order to avoid a default of the application or the product. Weaknesses in customer’s product designs may affect the quality and reliability of the NVIDIA product and may result in additional or different conditions and/or requirements beyond those contained in this document. NVIDIA accepts no liability related to any default, damage, costs, or problem which may be based on or attributable to: (i) the use of the NVIDIA product in any manner that is contrary to this document or (ii) customer product designs.
No license, either expressed or implied, is granted under any NVIDIA patent right, copyright, or other NVIDIA intellectual property right under this document. Information published by NVIDIA regarding third-party products or services does not constitute a license from NVIDIA to use such products or services or a warranty or endorsement thereof. Use of such information may require a license from a third party under the patents or other intellectual property rights of the third party, or a license from NVIDIA under the patents or other intellectual property rights of NVIDIA.
Reproduction of information in this document is permissible only if approved in advance by NVIDIA in writing, reproduced without alteration and in full compliance with all applicable export laws and regulations, and accompanied by all associated conditions, limitations, and notices.
THIS DOCUMENT AND ALL NVIDIA DESIGN SPECIFICATIONS, REFERENCE BOARDS, FILES, DRAWINGS, DIAGNOSTICS, LISTS, AND OTHER DOCUMENTS (TOGETHER AND SEPARATELY, “MATERIALS”) ARE BEING PROVIDED “AS IS.” NVIDIA MAKES NO WARRANTIES, EXPRESSED, IMPLIED, STATUTORY, OR OTHERWISE WITH RESPECT TO THE MATERIALS, AND EXPRESSLY DISCLAIMS ALL IMPLIED WARRANTIES OF NONINFRINGEMENT, MERCHANTABILITY, AND FITNESS FOR A PARTICULAR PURPOSE. TO THE EXTENT NOT PROHIBITED BY LAW, IN NO EVENT WILL NVIDIA BE LIABLE FOR ANY DAMAGES, INCLUDING WITHOUT LIMITATION ANY DIRECT, INDIRECT, SPECIAL, INCIDENTAL, PUNITIVE, OR CONSEQUENTIAL DAMAGES, HOWEVER CAUSED AND REGARDLESS OF THE THEORY OF LIABILITY, ARISING OUT OF ANY USE OF THIS DOCUMENT, EVEN IF NVIDIA HAS BEEN ADVISED OF THE POSSIBILITY OF SUCH DAMAGES. Notwithstanding any damages that customer might incur for any reason whatsoever, NVIDIA’s aggregate and cumulative liability towards customer for the products described herein shall be limited in accordance with the Terms of Sale for the product.
VESA DisplayPort
DisplayPort and DisplayPort Compliance Logo, DisplayPort Compliance Logo for Dual-mode Sources, and DisplayPort Compliance Logo for Active Cables are trademarks owned by the Video Electronics Standards Association in the United States and other countries.


