- How I installed CUDA 10.0 for PyTorch in Linux Mint
- Installation & Verification in 10 minutes!
- Install nvidia-driver-410 from the graphics-drivers PPA
- Install CUDA 10.0 Using the Local.deb
- Analytics Vidhya
- Through my Memory Lane.
- Sunday, November 25, 2018
- Install CUDA 10 on Linux mint 19 or Ubuntu 18.04
- Through my Memory Lane.
- Tuesday, August 1, 2017
- Installing CUDA on Linux Mint and Hello CUDA Program
- How to Install CUDA Linux Mint 17 64-bit Easy Guide
- Linux Mint 17 CUDA Toolkit Installation Guide
- Cuda nvidia linux mint
- Latest commit
- Git stats
- Files
- README.md
How I installed CUDA 10.0 for PyTorch in Linux Mint
Installation & Verification in 10 minutes!

I know it is truly bothersome to install CUDA separately. It is really troublesome for a user who is not so familiar with Linux to set the path of CUDA.
Before proceeding, I suggest you back up your data because you never know when things go down south and may turn out different given the complex nature of the Linux graphics stack.
Install nvidia-driver-410 from the graphics-drivers PPA
Now do a reboot to apply the changes.
Run “nvidia-smi” (without the quotes) which would give you the correct driver version — 410.xx like this:

Install CUDA 10.0 Using the Local.deb
Notice that installing Cuda 10.0 is very different from Cuda 9.0 and 9.2, so don’t use the same instructions for both of them. This is strictly for Cuda 10.0.
Download the CUDA .deb file from the official site. Then, run the instructions given below:
Then restart your system again. Add these two lines to the bottom of your
/.bashrc to complete post-installation configuration:
To apply this change, do:
Now, we need to confirm that our CUDA installation is complete. To do so, we enter these commands:
After it finishes, let’s run two tests:
You should see something like:
You should see something like:
You can even check it using python:
It should return “True”

So, that’s how I installed Cuda for Pytorch in Linux Mint.
Analytics Vidhya
Analytics Vidhya is a community of Analytics and Data…
Источник
Through my Memory Lane.
Rajesh’s Tinkering around with Technologies
Sunday, November 25, 2018
Install CUDA 10 on Linux mint 19 or Ubuntu 18.04
Assuming that you have nvidia GPU with cuda compatibility.
These are the steps for installing CUDA 10 on Linux mint 19 or Ubuntu 18.04
- Install Linux mint 19/Ubuntu 18.04 fresh
- Use the ppa nvidia drivers repo from lauchpad here
- The version 410 is the current long term version as on date
- From «Driver Manager» install the current stable version
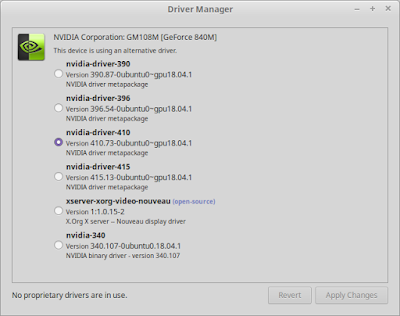
- Reboot; verify the driver installed from terminal using «nvidia-smi» command


- sudo dpkg -i cuda-repo-ubuntu1804-10-0-local-10.0.130-410.48_1.0-1_amd64.deb
sudo apt-key add /var/cuda-repo-10-0-local-10.0.130-410.48/7fa2af80.pub
sudo apt-get update
sudo apt-get install cuda
- That’s it.
- Default location of installation is /usr/local/cuda
- «cuda-install-samples-10.0.sh
/install» installs sample files
- cd into the folder «NVIDIA_CUDA-10.0_Samples»
- make -j2
- Add the «PATH=$PATH:/usr/local/cuda/bin» to your «
/.bashrc» as a last line.
(or)
PATH=$PATH:/usr/local/cuda/bin:/home/rajz/install/NVIDIA_CUDA-9.2_Samples/bin/x86_64/linux/release
run «deviceQuery» to verify the cuda installation. And do the post installation formalitiesИсточник
Through my Memory Lane.
Rajesh’s Tinkering around with Technologies
Tuesday, August 1, 2017
Installing CUDA on Linux Mint and Hello CUDA Program
CUDA ® is a parallel computing platform and programming model invented by NVIDIA. In case you wanted to write parellel programs that runs on GPU. CUDA will be helpful.
Things that are need for CUDA programming.- A machine with Nvidia Graphics Card
- A Supported Linux, Kernel and GCC [refer here]
- NVIDIA CUDA Toolkit
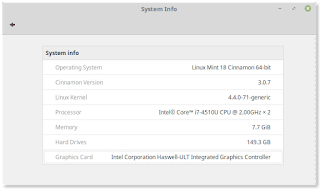
My System Specs is the following:
Dell Inspiron. It has a Nvidia Geforce grapics card.

Installation steps:
WARNING- Read the step completely before starting. I ran into issues with some of these step. Only for expert users or else you may have to endup reinstalling you OS .1. Go here and download NVIDIA CUDA Toolkit deb/runfile. I am using the deb file. It is about 2GB. So, be careful if you got lesser bandwidth or Internet quota.
$ lspci | grep -i nvidia
08:00.0 3D controller: NVIDIA Corporation GM108M [GeForce 840M] (rev a2)
rajz@warriorwithin$ uname -a
Linux warriorwithin 4.4.0-71 -generic #92-Ubuntu SMP Fri Mar 24 12:59:01 UTC 2017 x86_64 x86_64 x86_64 GNU/Linux
rajz@warriorwithin$ gcc —version
gcc (Ubuntu 5.4.0-6ubuntu116.04.4) 5.4.0 20160609
3. If nouveau is enabled, then we need to disable it. If the below command prints details which means that it is active. So, just disable it by doing the steps below.
add above two lines and run the below command.
4. Reboot!!
5. lsmod | grep nouveau to check if it is active.
6. Then run the following command based on your file in Step 1. Mine was the following
rajz@warriorwithin/install $ dpkg -i cuda-repo-ubuntu1604-8-0-local-ga2_8.0.61-1_amd64 .deb
7. Run this sudo apt-get update
8. Run this sudo apt-get install cuda
9. Reboot!!
10. Open/.bashrc file and Add the two lines at the end of file
11. Created a folder under Documents(or wherever you wish) to Install sample files and Run the below
rajz@warriorwithin/Documents $ cuda-install-samples-8.0.sh cuda-samples/
12. cd into/Documents/cuda-samples/NVIDIA_CUDA-8.0_Samples and do make
13. Then do the following14. If it shows up like in the figure. Then it is all fine.
15. So, far so good. Next up is HelloWorldCUDA programI am unsure if the step 3, 4, 5 are really necessary. But still did it for completeness sake.
ALERT.
After Doing these steps. My system went blank after a restart.
I figured it out that My display is by Intel Graphics Controller. Where as after NVIDIA Driver installation it set nvidia as my default display or card. So, I was getting a blank screen; Grub loaded. Linux mint Logo appeared. Even login happened. but I can’t see any thing. even TTY didn’t work.Workaround to fix this.
1. During Grub loading. Press ‘e’. search a line and prefix nomodeset before quick splash and press enter.
2. It will take you to login. But cinnamon may crash.
3. Using terminal Uninstall all drivers of nvidia sudo apt-get remove nvidia**
4. reboot. I reverted the changes I did in step 3,4 of prev installation.
5. Get to know you GPU model from lspci cmd
6. Download http://www.nvidia.com/Download/index.aspx?lang=en-us your driver based on your MODEL, and OS; Mine was this
7. Go to TTY by pressing CTRL+ALT +F1
8. Use cmd to stop display using Card[on Linuxmint] using sudo service mdm stop
8.1 For ubuntu OS; use sudo service lightdm stop
9. sudo ./NVIDIA-Linux-x86_64-384.59.run —no-opengl-files
follow instruction
9.1 I said no only for 32 bit libs; Rest say positively. IMPORTANT.!
10. sudo service mdm start will get you back to GUI mode.
11. Reboot! huh! Hoping that it won’t go blank!Let me know if these steps doesn’t work or even if it works! Hope it helps!
Источник
How to Install CUDA Linux Mint 17 64-bit Easy Guide
Linux Mint 17 CUDA Toolkit Installation Guide
Hello Mint User! The Tutorial Shows You Step-by-Step How to Install the NVIDIA CUDA Library for Mint 17.x Qiana/Rebecca/Rafaela/Rosa LTS amd64 GNU/Linux Desktops.
CUDA is a Parallel Computing Platform and Programming Model invented by NVIDIA.
It enables Dramatic Increases in Computing Performance by Harnessing the Power of the Graphics Processing Unit (GPU).With CUDA Programming you can GPU Accelerating Apps by Incorporating C, C++ and Fortran Extensions of these Languages in the Form of a few Basic Keywords.
Open a Shell Terminal emulator window
(Press “Enter” to Execute Commands)Then Verify on CUDA Capable GPU
But if you do Not see any NVIDIA hardware on Output then first install:
Next Install Ubuntu’s Kernel Headers
If Got “User is Not in Sudoers file” then see: How to Enable sudo
See How Setup CUDA Mint Repo Package
Access the Target location
(Usually Downloads go in the Home folder or when Downloaded with Firefox may be into the Temporary directory /tmp/mozilla*)Or when downloaded with Firefox maybe:
To Verify that it’s there List the contents with:
Источник
Cuda nvidia linux mint
Set of instructions to successful installation of NVIDIA official driver and CUDA Toolkit
Latest commit
Git stats
Files
Failed to load latest commit information.
README.md
Linux Mint 19.2 Cinnamon NVIDIA 940M Driver Installation & CUDA 10.2 Toolkit Installation Instructions
- This repo includes set of steps to successfully install NVIDIA Driver and CUDA 10.2 in Mint 19.2 Cinnamon
Official Driver Installation for NVIDIA 940M
- First make the environment ready for driver installation by running below commands:
Second dowload offical NVIDIA driver from NVIDIA driver websites. It is a .run file which includes necessary scripts to install driver.
Disable Nouveau Nvidia driver
- Confirm Updated files has following contents
- Enter the following linux command to regenerate initramfs:
- Reboot the system when the computer boots up Nouveau Driver has been disabled.
- Stop Desktop Manager. After executing the following linux command the display server will stop, therefore make sure you save all your current work ( if any ) before you proceed:
Hit CTRL+ALT+F1 and login with your username and password to open a new TTY1 session or perform the Nvidia driver installation via SSH bash.
Install Nvidia Driver
- NVIDIA Driver is now installed. Reboot the system
After NVIDIA Driver installation when the splash screen pop-up. Screen will go black hit CTRL+ALT+F1 and login with username and password
Initialize a new X session for the system. GUI Interface will open.
- So, we are back to the GUI now we know that our GPU is NVIDIA Optimus capable so will install nvidia-prime
Reboot the system when the reboot succeed GUI will appear without typing startx or following step 12
Thats it we successfully installed latest Nvidia offical driver to the system. You can configure NVIDIA settings from NVIDIA X Server
Источник