- 10 команд curl, которые вам следует знать
- 12 Essential Curl Commands for Linux and Windows
- How to install Curl on Linux?
- How to install Curl on Windows?
- How to use the Curl command line interface?
- 1. Print page content
- 2. Save URL content to file
- 3. Download multiple files at once
- 5. Check Page HTTP headers
- 6. Force Curl to use HTTP/2
- 7. Do Follow Redirects
- 8. Use proxy server
- 9. Provide additional HTTP headers with request
- 10. Send data to the server
- 11. Change the User-Agent string
- 12. Send Website Cookies
- Generate Code Snippets for Curl Commands Example
- cURL Command Tutorial with Examples
- Install cURL
- Linux
- MacOS
- Windows
- cURL basic usage
- Downloading Files with cURL
- Anatomy of a HTTP request/response
- Following redirects with cURL
- Viewing response headers with cURL
- Viewing request headers and connection details
- Silencing errors
- Setting HTTP request headers with cURL
- Making POST requests with cURL
- Submitting JSON data with cURL
- Changing the request method
- Replicating browser requests with cURL
- Making cURL fail on HTTP errors
- Making authenticated requests with cURL
- Testing protocol support with cURL
- Setting the Host header and cURL’s —resolve option
- Resolve domains to IPv4 and IPv6 addresses
- Disabling cURL’s certificate checks
- Troubleshooting website issues with “cURL timing breakdown”
- cURL configuration files
- Conclusion
10 команд curl, которые вам следует знать
Команда Mail.ru Cloud Solutions перевела статью, автор которой составил краткий справочник часто используемых команд curl для протоколов HTTP/HTTPS. Это не замена официального руководства по cURL, скорее, краткий конспект.
cURL (расшифровывается как Client URL) — программное обеспечение, которое предоставляет библиотеку libcurl и инструмент командной строки curl. Возможности cURL огромны, во многих опциях легко потеряться.
curl — инструмент для передачи данных с сервера или на него, при этом используется один из поддерживаемых протоколов: DICT, FILE, FTP, FTPS, GOPHER, HTTP, HTTPS, IMAP, IMAPS, LDAP, LDAPS, POP3, POP3S, RTMP, RTSP, SCP, SFTP, SMB, SMBS, SMTP, SMTPS, TELNET и TFTP. Команда предназначена для работы без взаимодействия с пользователем.
Команда curl запускается из командной строки и предустановлена в большинстве дистрибутивов Linux.
- доступ без браузера;
- внутри shell-скриптов;
- для тестирования API.
В основном я использовал curl для тестирования API, иногда просто вставляя команды, которые нашел в интернете. Но я хочу разобраться в curl и лучше понять его особенности. Так что поделюсь некоторыми командами, с которыми столкнулся во время работы.
Если никакие аргументы не указаны, то команда curl выполняет HTTP-запрос get и отображает статическое содержимое страницы. Оно аналогично тому, что мы видим при просмотре исходного кода в браузере.
12 Essential Curl Commands for Linux and Windows
Compare Request Timings
How to install Curl on Linux?
Enter the following command to install Curl on Linux:
Then test Curl by running the following command.
How to install Curl on Windows?
Download Curl CLI from the download page and unzip it wherever you want. No installation required.
How to use the Curl command line interface?
The syntax of the URL is protocol-dependent. For the HTTP protocol, the Curl command line syntax is as follows:
Below is a list of the top 10 curl commands that you will use the most.
1. Print page content
If no parameters are specified on the Curl command line, Curl sends an HTTP GET request to the server and prints the source code of the page to standard output (terminal window).
2. Save URL content to file
The -o command-line option tells Curl to save the contents of the URL in the current working directory with the specified file name. The resource is downloaded with the HTTP GET request method.
3. Download multiple files at once
The list of URLs is passed to Curl with one of the command line options -o or -O. The -O option tells Curl to save each resource with its original filename.
5. Check Page HTTP headers
The -I parameter tells Curl to send an HTTP HEAD request to the server instead of a GET. The HEAD request is similar to a GET, except that the server only returns HTTP headers. This is optional if you only want to check URL headers and don’t want to load the page content.
6. Force Curl to use HTTP/2
The —http2 option forces Curl to use the HTTP/2 protocol. Combined with the -I parameter, it can be used to check if a website supports HTTP/2.
7. Do Follow Redirects
By default, curl does not follow redirects (status codes 301 and 302). The -L option tells Curl to do redirects.
8. Use proxy server
If you are behind a proxy server, the -x command-line option will allow you to send requests through the proxy server.
9. Provide additional HTTP headers with request
The -H command-line option allows additional HTTP headers to be passed to the server. You can provide as many HTTP headers as you want using the -H option multiple times.
10. Send data to the server
The -d command line parameter tells Curl to send the supplied data to the server using the HTTP POST request method. The -d option is usually followed by the -H parameter to indicate the data type.
11. Change the User-Agent string
The —user-agent option allows you to pass any string to be used instead of the standard Curl User-Agent string. This can be useful if the server only expects requests from certain browsers.
12. Send Website Cookies
Generate Code Snippets for Curl Commands Example
Convert your Curl Commands request to the PHP, JavaScript/AJAX, Curl/Bash, Python, Java, C#/.NET code snippets using the ReqBin code generator.
cURL Command Tutorial with Examples

cURL is a command line tool and a library which can be used to receive and send data between a client and a server or any two machines connected over the internet. It supports a wide range of protocols like HTTP, FTP, IMAP, LDAP, POP3, SMTP and many more.
Due to its versatile nature, cURL is used in many applications and for many use cases. For example, the command line tool can be used to download files, testing APIs and debugging network problems. In this article, we shall look at how you can use the cURL command line tool to perform various tasks.
Install cURL
Linux
Most Linux distributions have cURL installed by default. To check whether it is installed on your system or not, type curl in your terminal window and press enter. If it isn’t installed, it will show a “command not found” error. Use the commands below to install it on your system.
For Ubuntu/Debian based systems use:
For CentOS/RHEL systems, use:
On the other hand, for Fedora systems, you can use the command:
MacOS
MacOS comes with cURL preinstalled, and it receives updates whenever Apple releases updates for the OS. However, in case you want to install the most recent version of cURL, you can install the curl Homebrew package. Once you install Homebrew, you can install it with:
Windows
For Windows 10 version 1803 and above, cURL now ships by default in the Command Prompt, so you can use it directly from there. For older versions of Windows, the cURL project has Windows binaries. Once you download the ZIP file and extract it, you will find a folder named curl- -mingw . Move this folder into a directory of your choice. In this article, we will assume our folder is named curl-7.62.0-win64-mingw , and we have moved it under C:\ .
Next, you should add cURL’s bin directory to the Windows PATH environment variable, so that Windows can find it when you type curl in the command prompt. For this to work, you need to follow these steps:
- Open the “Advanced System Properties” dialog by running systempropertiesadvanced from the Windows Run dialog (Windows key + R).
- Click on the “Environment Variables” button.
- Double-click on “Path” from the “System variables” section, and add the path C:\curl-7.62.0-win64-mingw\bin . For Windows 10, you can do this with the “New” button on the right. On older versions of Windows, you can type in ;C:\curl-7.62.0-win64-mingw\bin (notice the semicolon at the beginning) at the end of the “Value” text box.
Once you complete the above steps, you can type curl to check if this is working. If everything went well, you should see the following output:
cURL basic usage
The basic syntax of using cURL is simply:
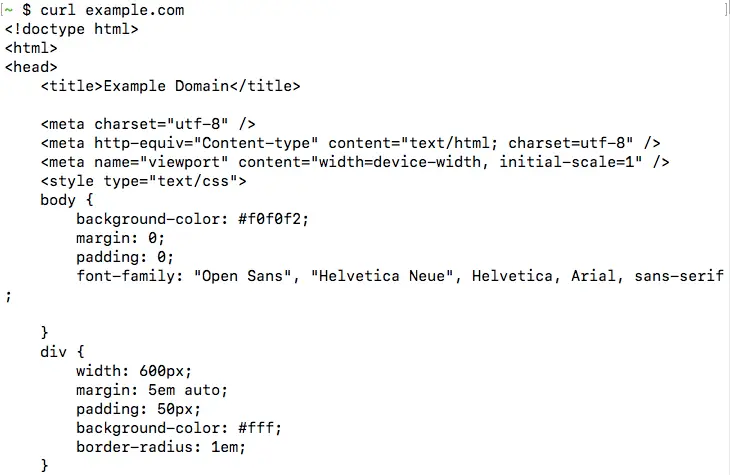
This fetches the content available at the given URL, and prints it onto the terminal. For example, if you run curl example.com , you should be able to see the HTML page printed, as shown below:
This is the most basic operation cURL can perform. In the next few sections, we will look into the various command line options accepted by cURL.
Downloading Files with cURL
As we saw, cURL directly downloads the URL content and prints it to the terminal. However, if you want to save the output as a file, you can specify a filename with the -o option, like so:
In addition to saving the contents, cURL switches to displaying a nice progress bar with download statistics, such as the speed and the time taken:

Instead of providing a file name manually, you can let cURL figure out the filename with the -O option. So, if you want to save the above URL to the file vlc-3.0.4.dmg , you can simply use:
Bear in mind that when you use the -o or the -O options and a file of the same name exists, cURL will overwrite it.
If you have a partially downloaded file, you can resume the file download with the -C — option, as shown below:

Like most other command line tools, you can combine different options together. For example, in the above command, you could combine -O -C — and write it as -OC — .
Anatomy of a HTTP request/response
Before we dig deeper into the features supported by cURL, we will discuss a little bit about HTTP requests and responses. If you are familiar with these concepts, you directly skip to the other sections.
To request a resource such as a webpage, or to submit some data to a server, a HTTP client (such as a browser or cURL) makes a HTTP request to the server The server responds back with a HTTP response, which contains the “contents” of that page.
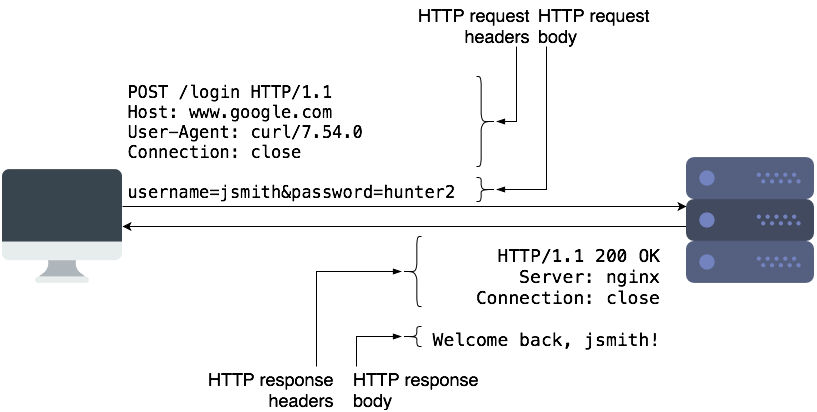
HTTP requests contain the request method, URL, some headers, and some optional data as part of the “request body”. The request method controls how a certain request should be processed. The most common types of request methods are “GET” and “POST”. Typically, we use “GET” requests to retrieve a resource from the server, and “POST” to submit data to the server for processing. “POST” requests typically contain some data in the request body, which the server can use.
HTTP responses are similar and contain the status code, some headers, and a body. The body contains the actual data that clients can display or save to a file. The status code is a 3-digit code which tells the client if the request succeeded or failed, and how it should proceed further. Common status codes are 2xx (success), 3xx (redirect to another page), and 4xx/5xx (for errors).
HTTP is an “application layer protocol”, and it runs over another protocol called TCP. It takes care of retransmitting any lost data, and ensures that the client and server transmit data at an optimal rate. When you use HTTPS, another protocol called SSL/TLS runs between TCP and HTTP to secure the data.
Most often, we use domain names such as google.com to access websites. Mapping the domain name to an IP address occurs through another protocol called DNS.
You should now have enough background to understand the rest of this article.
Following redirects with cURL
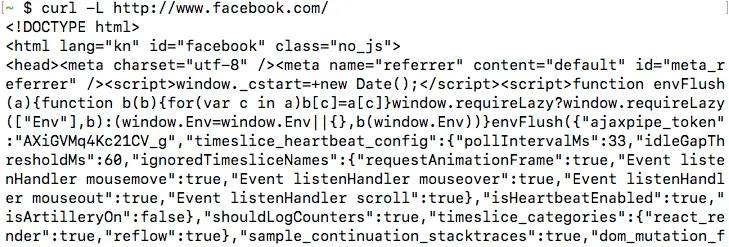
By default, when cURL receives a redirect after making a request, it doesn’t automatically make a request to the new URL. As an example of this, consider the URL http://www.facebook.com . When you make a request using to this URL, the server sends a HTTP 3XX redirect to https://www.facebook.com/ . However, the response body is otherwise empty. So, if you try this out, you will get an empty output:

If you want cURL to follow these redirects, you should use the -L option. If you repeat make a request for http://www.facebook.com/ with the -L flag, like so:
Now, you will be able to see the HTML content of the page, similar to the screenshot below. In the next section, we will see how we can verify that there is a HTTP 3XX redirect.
Please bear in mind that cURL can only follow redirects if the server replied with a “HTTP redirect”, which means that the server used a 3XX status code, and it used the “Location” header to indicate the new URL. cURL cannot process Javascript or HTML-based redirection methods, or the “Refresh header“.
If there is a chain of redirects, the -L option will only follow the redirects up to 500 times. You can control the number of maximum redirects that it will follow with the —max-redirs flag.
If you set this flag to -1 , it will follow the redirects endlessly.
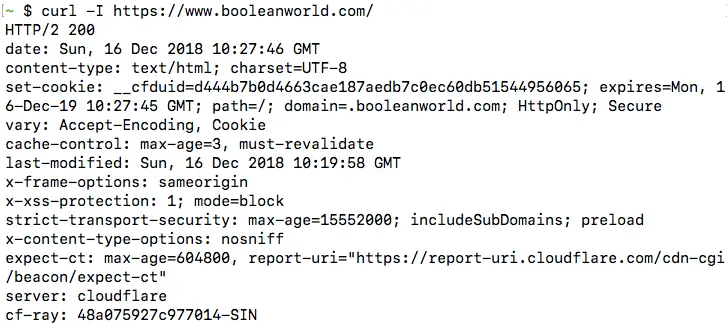
Viewing response headers with cURL
When debugging issues with a website, you may want to view the HTTP response headers sent by the server. To enable this feature, you can use the -i option.
Let us continue with our previous example, and confirm that there is indeed a HTTP 3XX redirect when you make a HTTP request to http://www.facebook.com/ , by running:
Notice that we have also used -L so that cURL can follow redirects. It is also possible to combine these two options and write them as -iL or -Li instead of -L -i .
Once you run the command, you will be able to see the HTTP 3XX redirect, as well as the page HTTP 200 OK response after following the redirect:

If you use the -o / -O option in combination with -i , the response headers and body will be saved into a single file.
Viewing request headers and connection details
In the previous section, we have seen how you can view HTTP response headers using cURL. However, sometimes you may want to view more details about a request, such as the request headers sent and the connection process. cURL offers the -v flag (called “verbose mode”) for this purpose, and it can be used as follows:
The output contains request data (marked with > ), response headers (marked with ) and other details about the request, such as the IP used and the SSL handshake process (marked with * ). The response body is also available below this information. (However, this is not visible in the screenshot below).
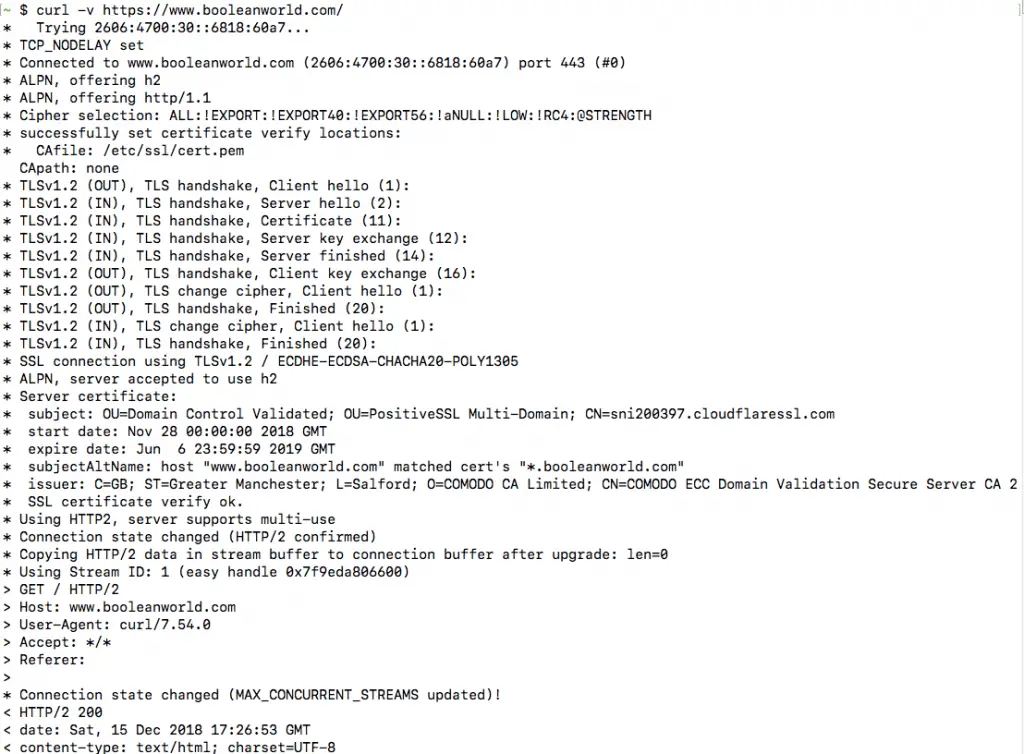
Most often, we aren’t interested in the response body. You can simply hide it by “saving” the output to the null device, which is /dev/null on Linux and MacOS and NUL on Windows:
Silencing errors
Previously, we have seen that cURL displays a progress bar when you save the output to a file. Unfortunately, the progress bar might not be useful in all circumstances. As an example, if you hide the output with -vo /dev/null , a progress bar appears which is not at all useful.
You can hide all these extra outputs by using the -s header. If we continue with our previous example but hide the progress bar, then the commands would be:
The -s option is a bit aggressive, though, since it even hides error messages. For your use case, if you want to hide the progress bar, but still view any errors, you can combine the -S option.
So, if you are trying to save cURL output to a file but simply want to hide the progress bar, you can use:
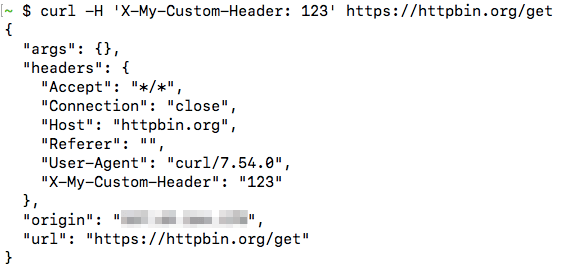
Setting HTTP request headers with cURL
When testing APIs, you may need to set custom headers on the HTTP request. cURL has the -H option which you can use for this purpose. If you want to send the custom header X-My-Custom-Header with the value of 123 to https://httpbin.org/get , you should run:
(httpbin.org is a very useful website that allows you to view details of the HTTP request that you sent to it.)
The data returned by the URL shows that this header was indeed set:
You can also override any default headers sent by cURL such as the “User-Agent” or “Host” headers. The HTTP client (in our case, cURL) sends the “User-Agent” header to tell the server about the type and version of the client used. Also, the client uses the “Host” header to tell the server about the site it should serve. This header is needed because a web server can host multiple websites at a single IP address.
Also, if you want to set multiple headers, you can simply repeat the -H option as required.
However, cURL does have certain shortcuts for frequently used flags. You can set the “User-Agent” header with the -A option:
The “Referer” header is used to tell the server the location from which they were referred to by the previous site. It is typically sent by browsers when requesting Javascript or images linked to a page, or when following redirects. If you want to set a “Referer” header, you can use the -e flag:
Otherwise, if you are following a set of redirects, you can simply use -e ‘;auto’ and cURL will take care of setting the redirects by itself.
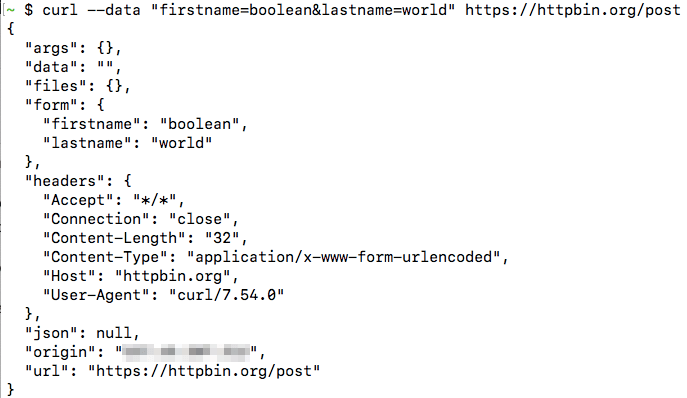
Making POST requests with cURL
By default, cURL sends GET requests, but you can also use it to send POST requests with the -d or —data option. All the fields must be given as key=value pairs separated by the ampersand ( & ) character. As an example, you can make a POST request to httpbin.org with some parameters:
From the output, you can easily tell that we posted two parameters (this appears under the “form” key):
Any special characters such as @ , % , = or spaces in the value should be URL-encoded manually. So, if you wanted to submit a parameter “email” with the value “[email protected]”, you would use:
Alternatively, you can just use —data-urlencode to handle this for you. If you wanted to submit two parameters, email and name , this is how you should use the option:
If the —data parameter is too big to type on the terminal, you can save it to a file and then submit it using @ , like so:
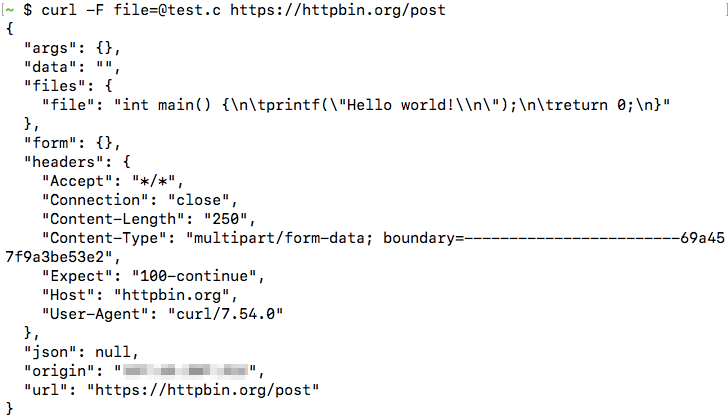
So far, we have seen how you can make POST requests using cURL. If you want to upload files using a POST request, you can use the -F (“form”) option. Here, we will submit the file test.c , under the parameter name file :
This shows the content of the file, showing that it was submitted successfully:
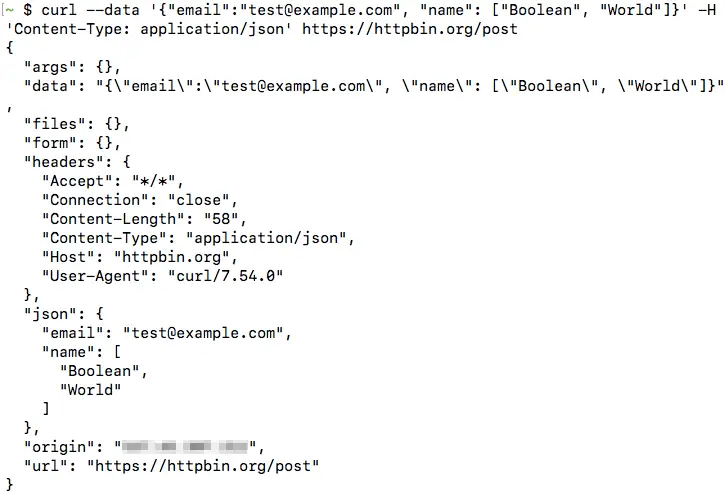
Submitting JSON data with cURL
In the previous section, we have seen how can submit POST requests using cURL. You can also submit JSON data using the —data option. However, most servers expect to receive a POST request with key-value pairs, similar to the ones we have discussed previously. So, you need to add an additional header called ‘Content-Type: application/json’ so that the server understands it’s dealing with JSON data and handles it appropriately. Also, you don’t need to URL-encode data when submitting JSON.
So if you had the following JSON data and want to make a POST request to https://httpbin.org/post:
Then, you can submit the data with:
In this case, you can see the data appear under the json value in the httpbin.org output:
You can also save the JSON file, and submit it in the same way as we did previously:
Changing the request method
Previously, we have seen how you can send POST requests with cURL. Sometimes, you may need to send a POST request with no data at all. In that case, you can simply change the request method to POST with the -X option, like so:
You can also change the request method to anything else, such as PUT, DELETE or PATCH. One notable exception is the HEAD method, which cannot be set with the -X option. The HEAD method is used to check if a document is present on the server, but without downloading the document. To use the HEAD method, use the -I option:
When you make a HEAD request, cURL displays all the request headers by default. Servers do not send any content when they receive a HEAD request, so there is nothing after the headers:
Replicating browser requests with cURL
If you want to replicate a request made through your browser through cURL, you can use the Chrome, Firefox and Safari developer tools to get a cURL command to do so.
The steps involved are the same for all platforms and browsers:
- Open developer tools in Firefox/Chrome (typically F12 on Windows/Linux and Cmd+Shift+I on a Mac)
- Go to the network tab
- Select the request from the list, right click it and select “Copy as cURL”
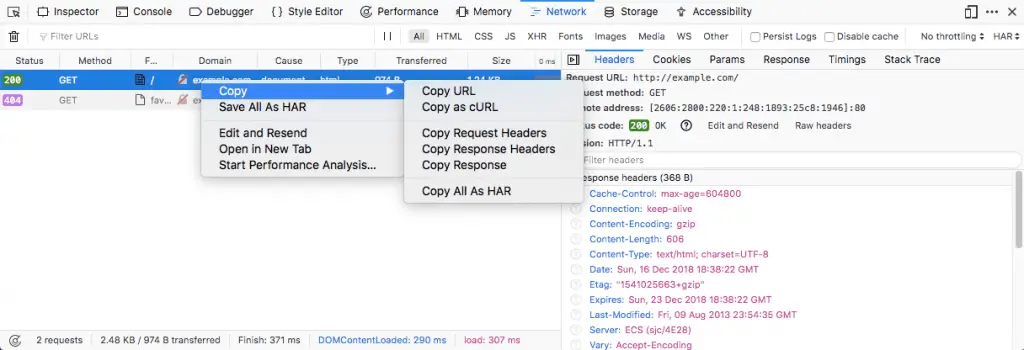
The copied command contains all the headers, request methods, cookies etc. needed to replicate the exact same request. You can paste the command in your terminal to run it.
Making cURL fail on HTTP errors
Interestingly, cURL doesn’t differentiate between a successful HTTP request (2xx) and a failed HTTP request (4xx/5xx). So, it always returns an exit status of 0 as long as there was no problem connecting to the site. This makes it difficult to write shell scripts because there is no way to check if the file could be downloaded successfully.
You can check this by making a request manually:
You can see that curl doesn’t print any errors, and the exit status is also zero:

If you want to consider these HTTP errors as well, you can use the -f option, like so:
Now, you can see that cURL prints an error and also sets the status code to 22 to inform that an error occured:

Making authenticated requests with cURL
Some webpages and APIs require authentication with an username and password. There are two ways to do this. You can mention the username and password with the -u option:
Alternatively, you can simply add it to the URL itself, with the :
@ syntax, as shown:
In both of these methods, curl makes a “Basic” authentication with the server.
Testing protocol support with cURL
Due to the wide range of protocols supported by cURL, you can even use it to test protocol support. If you want to check if a site supports a certain version of SSL, you can use the —sslv or —tlsv flags. For example, if you want to check if a site supports TLS v1.2, you can use:
The request takes place normally, which means that the site supports TLSv1.2. Now, let us check if the site supports SSL v3:
This command throws a handshake_failed error, because the server doesn’t support this version of SSL.
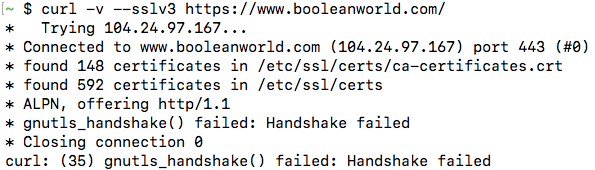
Please note that, depending on your system and the library version/configuration, some of these version options may not work. The above output was taken from Ubuntu 16.04’s cURL. However, if you try this with cURL in MacOS 10.14, it gives an error:

You can also test for HTTP protocol versions in the same way, by using the flags —http1.0 , —http1.1 or —http2 .
Setting the Host header and cURL’s —resolve option
Previously, we have discussed about how a web server chooses to serve different websites to visitors depending upon the “Host” header. This can be very useful to check if your website has virtual hosting configured correctly, by changing the “Host” header. As an example, say you have a local server at 192.168.0.1 with two websites configured, namely example1.com and example2.com . Now, you can test if everything is configured correctly by setting the Host header and checking if the correct contents are served:
Unfortunately, this doesn’t work so well for websites using HTTPS. A single website may be configured to serve multiple websites, with each website using its own SSL/TLS certificate. Since SSL/TLS takes place at a lower level than HTTP, this means clients such as cURL have to tell the server which website we’re trying to access at the SSL/TLS level, so that the server can pick the right certificate. By default, cURL always tells this to the server.
However, if you want to send a request to a specific IP like the above example, the server may pick a wrong certificate and that will cause the SSL/TLS verification to fail. The Host header only works at the HTTP level and not the SSL/TLS level.
To avoid the problem described above, you can use the —resolve flag. The resolve flag will send the request to the port and IP of your choice but will send the website name at both SSL/TLS and HTTP levels correctly.
Let us consider the previous example. If you were using HTTPS and wanted to send it to the local server 192.168.0.1 , you can use:
It also works well for HTTP. Suppose, if your HTTP server was serving on port 8080, you can use either the —resolve flag or set the Host header and the port manually, like so:
The two commands mentioned above are equivalent.
Resolve domains to IPv4 and IPv6 addresses
Sometimes, you may want to check if a site is reachable over both IPv4 or IPv6. You can force cURL to connect to either the IPv4 or over IPv6 version of your site by using the -4 or -6 flags.
Please bear in mind that a website can be reached over IPv4 and IPv6 only if:
- There are appropriate DNS records for the website that links it to IPv4 and IPv6 addresses.
- You have IPv4 and IPv6 connectivity on your system.
For example, if you want to check if you can reach the website icanhazip.com over IPv6, you can use:
If the site is reachable over HTTPS, you should get your own IPv6 address in the output. This website returns the public IP address of any client that connects to it. So, depending on the protocol used, it displays an IPv4 or IPv6 address.
You can also use the -v option along with -4 and -6 to get more details.
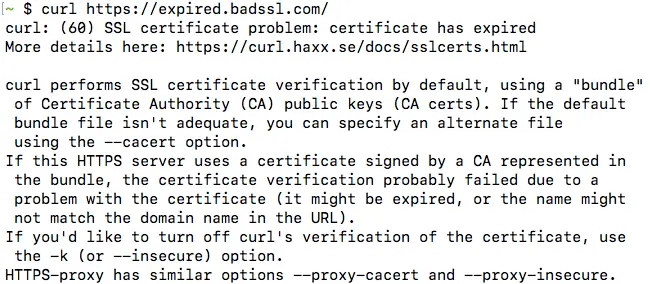
Disabling cURL’s certificate checks
By default, cURL checks certificates when it connects over HTTPS. However, it is often useful to disable the certificate checking, when you are trying to make requests to sites using self-signed certificates, or if you need to test a site that has a misconfigured certificate.
To disable certificate checks, use the -k certificate. We will test this by making a request to expired.badssl.com, which is a website using an expired SSL certificate.
With the -k option, the certificate checks are ignored. So, cURL downloads the page and displays the request body successfully. On the other hand, if you didn’t use the -k option, you will get an error, similar to the one below:
Troubleshooting website issues with “cURL timing breakdown”
You may run into situations where a website is very slow for you, and you would like to dig deeper into the issue. You can make cURL display details of the request, such as the time taken for DNS resolution, establishing a connection etc. with the -w option. This is often called as a cURL “timing breakdown”.
As an example, if you want to see these details for connecting to https://www.booleanworld.com/ , run:
(If you are running this from a Windows system, change the /dev/null to NUL ).
You will get some output similar to this:
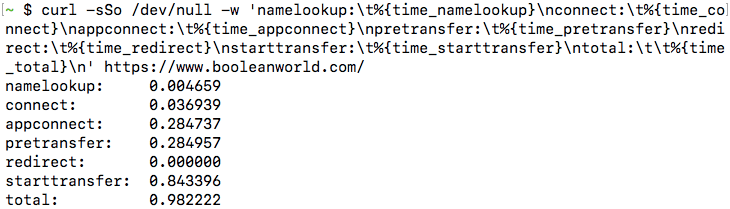
Each of these values is in seconds, and here is what each value represents:
- namelookup — The time required for DNS resolution.
- connect — The time required to establish the TCP connection.
- appconnect — This is the time taken to establish connections for any layers between TCP and the application layer, such as SSL/TLS. In our case, the application layer is HTTP. Also, if there is no such intermediate layer (such as when there is a direct HTTP request), this time will always be 0.
- pretransfer — This is the time taken from the start to when the transfer of the file is just about to begin.
- redirect — This is the total time taken to process any redirects.
- starttransfer — Time it took from the start to when the first byte is about to be transferred.
- total — The total time taken for cURL to complete the entire process.
As an example, say, you are facing delays connecting to a website and you notice the “namelookup” value was too high. As this indicates a problem with your ISP’s DNS server, you may start looking into why the DNS lookup is so slow, and switch to another DNS server if needed.
cURL configuration files
Sometimes, you may want to make all cURL requests use the same options. Passing these options by hand isn’t a feasible solution, so cURL allows you to specify options in a configuration file.
The default configuration file is located in
/.curlrc in Linux/MacOS and %appdata%\_curlrc in Windows. Inside this file, you can specify any options that you need, such as:
After creating the above file, try making a request with curl example.com . You will find that these options have taken effect.
If you want to use a custom configuration file instead of the default one, then you can use -K option to point curl to your configuration file. As an example, if you have a configuration file called config.txt , then you can use it with:
Conclusion
In this article, we have covered the most common uses of the cURL command. Of course, this article only scratches the surface and cURL can do a whole lot of other things. You can type man curl in your terminal or just visit this page to see the man page which lists all the options.
 report this ad


