- Customize Shared Folders
- To create a new Storage registry key
- How to Customize Folders with Desktop.ini
- Instructions
- Using Desktop.ini Files
- Creating a Desktop.ini File
- Add custom Folders to Favorite Links in Windows File Explorer
- Add or Remove Folders to Favorite Links in Explorer
- How to Add a Custom Folder under “This PC” in Explorer?
- How to Add a Custom Folder under “This PC” in Explorer?
- Bonus Tips
- Tip #1: Add the custom folder under “Folders (6)” and/or “Network Locations” section
- Tip #2: Move “My Tools” folder to the top of the This PC hierarchy
- How to add custom folders in This PC in Windows 10 or remove the defaults
- How to add a custom folder into This PC in Windows 10
- How to remove folders from This PC in Windows 10
- About Sergey Tkachenko
- 13 thoughts on “ How to add custom folders in This PC in Windows 10 or remove the defaults ”
Customize Shared Folders
Applies To: Windows Server 2016 Essentials, Windows Server 2012 R2 Essentials, Windows Server 2012 Essentials
By default, the server folders are created on the largest data partition on Disk 0. Partners can customize the location and specify additional server folders by using the following steps:
Using a custom partition configuration, create the factory image, and then create a new Storage registry key before you use sysprep. During Initial Configuration (IC), the storage IC task checks for this registry key. If it exists, the default server folders are created in the C:\ServerFolders directory.
To create a new Storage registry key
On the server, move your mouse to the upper right corner of the screen, and click Search.
In the Search box, type regedit, and then click the Regedit application.
In the navigation pane, expand HKEY_LOCAL_MACHINE, expand SOFTWARE, and then expand Microsoft.
Right-click Windows Server, click New, and then click Key.
Name the key Storage.
In the navigation pane, right-click the new Storage registry key, click New, and then click DWORD (32-bit) Value.
Name the string CreateFoldersOnSystem.
Right-click CreateFoldersOnSystem, and then click Modify. The Edit String dialog box appears.
Set the value of this new key to 1, and then click OK.
Use the PostIC.cmd script to move the folders to a different location or to create additional folders. See the following example: Example 1: Create a custom folder and move the default folders to a new location from PostIC.cmd by using Windows PowerShell.
Use the Windows Server Solutions SDK to move the folders to a different location or to create additional folders. See the following example: Example 2: Create a custom folder and move an existing folder by using the Windows Server Solutions SDK.
Optionally, partners can leave the data folders on drive C. This allows the end user or reseller to determine the layout of the data folders on the data drives.
How to Customize Folders with Desktop.ini
File system folders are commonly displayed with a standard icon and set of properties, which specify, for instance, whether the folder is shared. You can customize the appearance and behavior of an individual folder by creating a Desktop.ini file for that folder.
Instructions
Using Desktop.ini Files
Folders are normally displayed with the standard folder icon. A common use of the Desktop.ini file is to assign a custom icon or thumbnail image to a folder. You can also use Desktop.ini to create an infotip that displays information about the folder and controls some aspects of the folder’s behavior, such as specifying localized names for the folder or items in the folder.
Use the following procedure to customize a folder’s style with Desktop.ini:
- Use PathMakeSystemFolder to make the folder a system folder. This sets the read-only bit on the folder to indicate that the special behavior reserved for Desktop.ini should be enabled. You can also make a folder a system folder from the command line by using attrib +sFolderName.
- Create a Desktop.ini file for the folder. You should mark it as hidden and system to ensure that it is hidden from normal users.
- Make sure the Desktop.ini file that you create is in the Unicode format. This is necessary to store the localized strings that can be displayed to users.
Creating a Desktop.ini File
The Desktop.ini file is a text file that allows you to specify how a file system folder is viewed. The [.ShellClassInfo] section, allows you to customize the folder’s view by assigning values to several entries:
| Entry | Value |
| ConfirmFileOp | Set this entry to 0 to avoid a «You Are Deleting a System Folder» warning when deleting or moving the folder. |
| NoSharing | Not supported under WindowsВ Vista or later. Set this entry to 1 to prevent the folder from being shared. |
| IconFile | If you want to specify a custom icon for the folder, set this entry to the icon’s file name. The .ico file name extension is preferred, but it is also possible to specify .bmp files, or .exe and .dll files that contain icons. If you use a relative path, the icon is available to people who view the folder over the network. You must also set the IconIndex entry. |
| IconIndex | Set this entry to specify the index for a custom icon. If the file assigned to IconFile only contains a single icon, set IconIndex to 0. |
| InfoTip | Set this entry to an informational text string. It is displayed as an infotip when the cursor hovers over the folder. If the user clicks the folder, the information text is displayed in the folder’s information block, below the standard information. |
The following illustrations are of the Music folder with a custom Desktop.ini file. The folder now:
- Has a custom icon.
- Does not display a «You Are Deleting a System Folder» warning if the folder is moved or deleted.
- Cannot be shared.
- Displays informational text when the cursor hovers over the folder.
The folder options in the following illustrations are set to show hidden files so that Desktop.ini is visible. The folder looks like this:
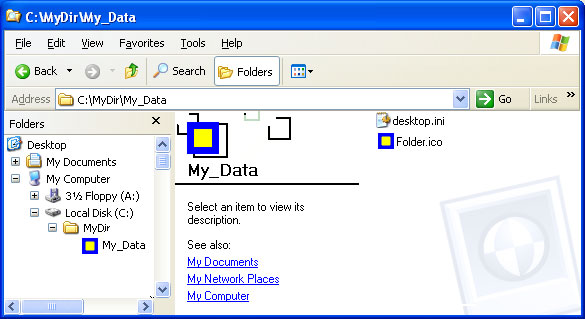
When the cursor hovers over the folder, the infotip is displayed.

The custom icon replaces the folder icon everywhere the folder name appears.
Add custom Folders to Favorite Links in Windows File Explorer
When you open Windows File Explorer or whenever you create a new file, open a new file or save a new file, you are presented with a File Dialog Box, where you can save the files. On the left side, in the Navigation Pane, you will see standard locations or places like Desktop, Computers, Pictures, etc, mentioned, which are easily accessible. This is called the Places Bar or the Favorites Links in Windows 10/8/7/Vista. If needed, you can with this tip, add your desired custom shortcuts to Open and Save dialog boxes in Windows.
Add or Remove Folders to Favorite Links in Explorer
There are several ways to add custom Folders to Favorite Links in Windows 10 File Explorer:
- Create a Shortcut
- Use Add current location to Favorites link
- Use Drag and Drop
- Tweak the Registry
- Using Group Policy Editor
- Using a third-party tool.
Let us look at these options in detail.
1] Open Explorer and navigate to the following folder:
Right-click in the window pane and choose New > Create Shortcut. Paste the path of the folder, which you are desirous of adding > Next > Give Shortcut a Name > Finish. Or else you can simply cut-paste its shortcut in this location.
Your Favorites will now show the custom desired place.
2] You may navigate to the folder you want to add here, then right-click on Favorites
Then select Add current location to Favorites.
3] Simply drag and drop the folder in this Favorites link.
4] Open Registry Editor and navigate to the following key:
Right-click on the Place0 in RHS pane and click on Modify. Add the desired folder path in Value Data and click OK. Do so similarly for other places.
5] The Places bar can also be changed using Group Policy.
To do so, Type gpedit.msc in Start Search bar and hit Enter. Navigate to User Configuration > Administrative Templates > Windows Components > Windows Explorer or File Explorer > Common Open File Dialog > Items Displayed In Places Bar.
Click on Display Properties, to open its Dialog Box. Select Configured, and add the folder paths in the boxes provided. Click Apply > OK.
The valid items you may display in the Places Bar are:
- Shortcuts to local folders — (ex. C:\Windows)
- Shortcuts to remote folders — (\\server\share)
- FTP folders
- web folders
- Common Shell folders.
The list of Common Shell Folders that may be specified: Desktop, Recent Places, Documents, Pictures, Music, Recently Changed, Attachments and Saved Searches.
If you disable or do not configure this setting the default list of items will be displayed in the Places Bar.
In Windows 10/8/7/Vista, this policy setting applies only to applications that are using the Windows XP common dialog box style. This policy setting does not apply to the new Windows Vista common dialog box style.
6] Use some small freeware applications which are available, like the PlacesBar Editor, where you can customize Windows as well as Office Dialog Places. Some other freeware are Shell Places Bar Editor, PlaceBar Constructor, & PlacesBar Tweaker.
How to Add a Custom Folder under “This PC” in Explorer?
You can add custom folders to the the Explorer navigation pane, in pretty much all versions of Windows. This post has the instructions on how to add a custom folder under This PC in the navigation pane in Windows 10 File Explorer.
The easiest way to manually add a custom folder to the navigation pane is to mimic the settings of an existing or built-in shell folder like Music or Videos, and use them with a custom GUID. For example, here is the Videos shell folder’s registry setting that we’ll use with a different GUID and point to a custom folder.
How to Add a Custom Folder under “This PC” in Explorer?
- Copy the above contents to Notepad, and save with .reg extension (e.g. mytools.reg ). Don’t close the file yet.
- Generate a unique ID (GUID) string by running the command New-Guid in PowerShell. Alternately, you can visit GuidGen.com website that generates random GUID strings for you (uses Microsoft’s GUIDGen.exe at the backend.)
- Copy the GUID to Clipboard. In this example, the GUID is
- In Notepad, replace every occurrence of the string
with - Save the .reg file, and close Notepad.
- Double-click the .reg file to apply the settings to the registry.
- Start the Registry Editor ( Regedit.exe ) and navigate to the following branches one by one:
- In the right-pane, change the value data for (Default) and InfoTip accordingly.
(InfoTip text will be shown when you hover the mouse over the custom folder in File Explorer.)
Then navigate to the DefaultIcon subkeys below:
Thats it! The My Tools folder should show up in the navigation pane, as well as in the Folders section in This PC view.
Bonus Tips
Tip #1: Add the custom folder under “Folders (6)” and/or “Network Locations” section
If you’re adding a mapped drive or folder pointing to network location, you can make the item appear under the Network locations section in This PC view. To do so, modify the DescriptionID value (see screenshot #2 above) in this registry key:
Set the DescriptionID to 9 (0x00000009)
- Setting DescriptionID to 3 shows it under Folders category.
- Setting DescriptionID to 9 shows it under Network locations category.
Tip #2: Move “My Tools” folder to the top of the This PC hierarchy
To move My Tools to the top of the This PC hierarchy, create a DWORD (32 bit) value named SortOrderIndex, in the following registry key:
Set the SortOrderIndex to a low value.
For example, setting it to 0x00000030 moves the item up, like this:
How to add custom folders in This PC in Windows 10 or remove the defaults
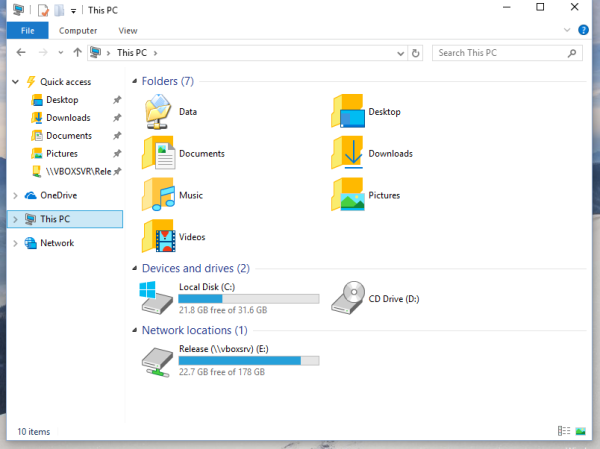
With Windows 8.1, Microsoft introduced a set of folders inside the This PC folder. These folders include Desktop, Documents, Downloads, Music, Pictures and Videos. Windows 10 comes with the same set of folders in This PC. If you are interested in removing the default folders from This PC in Windows 10 and want to add some custom folder there, this article is for you. Today we will see:
- how to remove folders from This PC in Windows 10
- how to add a custom folder to This PC in Windows 10
Let’s see how to do both.
Not every desktop app uses the newer Open File dialog with the navigation pane and Favorites so having these folders in This PC is good. Many desktop apps still use the older Open dialog, which has Recent places and opens in the Computer/This PC location by default.
To customize these folders, you need ActiveX manipulation and some other tricks which aren’t easy for the average user. Recently, I made a freeware, This PC Tweaker, which allows you to customize the This PC folder without Registry editing. This app was created for Windows 8.1, but now I have updated it to support Windows 10.
This PC Tweaker allows you now:
- to add any folder to the This PC Folder
- to remove any folder from This PC
- to change the icon for any folder in This PC
- to add some shell location like God Mode or Recycle Bin inside the This PC Folder.
Note that you cannot change the icon of special shell locations added to This PC. You can only change the icons of custom folders you add yourselves. I designed it this way intentionally to prevent you from breaking folders like Control Panel.
Follow the simple instructions below to customize your This PC folder.
How to add a custom folder into This PC in Windows 10
- Download This PC Tweaker. It is a free portable app and requires no installation.
- Extract the contents of the ZIP file you have downloaded and choose the appropriate version for your PC. This PC Tweaker works with Windows 7, Windows 8, Windows 8.1 and Windows 10. Also, there are different versions for 32-bit and 64-bit Windows (see how to determine which version of Windows you are running).
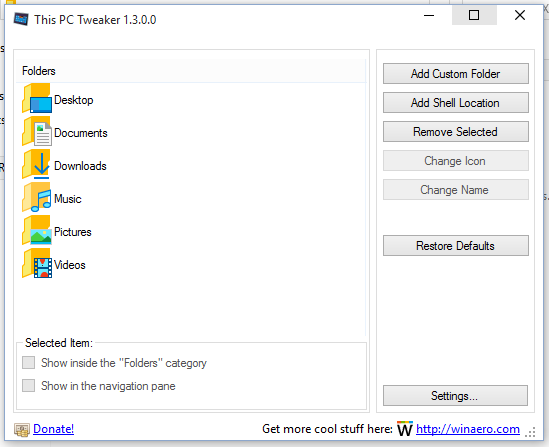
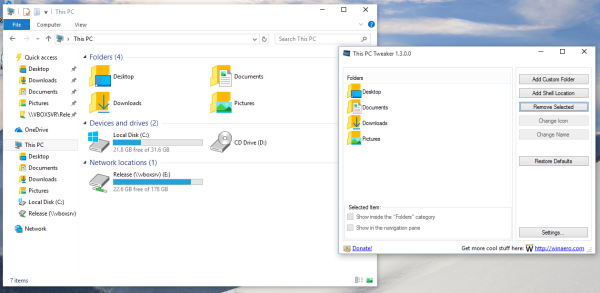
- Run the ThisPCTweaker.exe file. The application’s main window will appear on the screen.
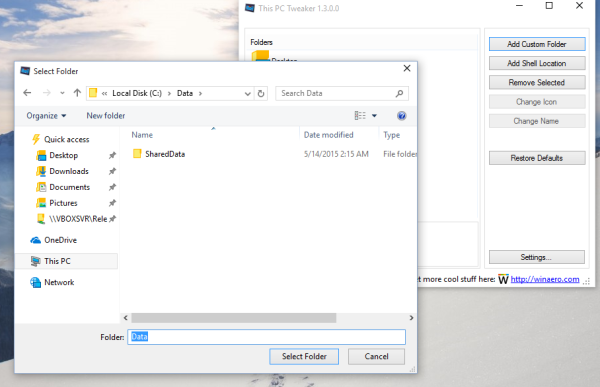
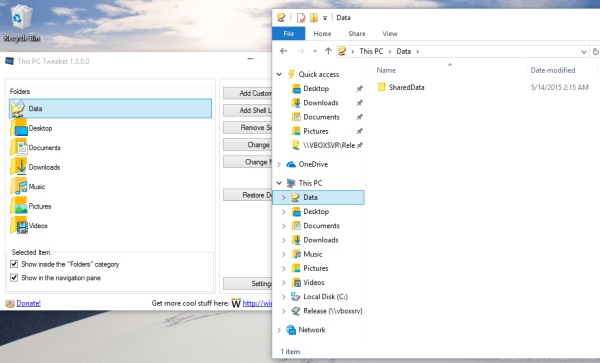
- Click the «Add Custom Folder» button. The Select Folder dialog will appear. Click on the folder that you would like to see in This PC. For example, let’s add the folder C:\Data:

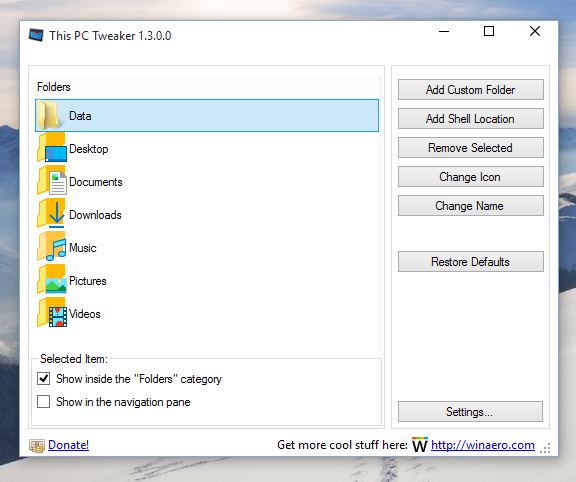
- Click the Select Folder button, and the folder you selected will be added to This PC.
- Let’s set some icon for the folder we just added. Select it in the list and click the «Change Icon» button.
- That’s it. Close the Explorer window and open it again to see the changes:
- You can also make the folder you added visible in the navigation pane. Select it in This PC Tweaker and tick the checkbox «Show in the navigation pane».
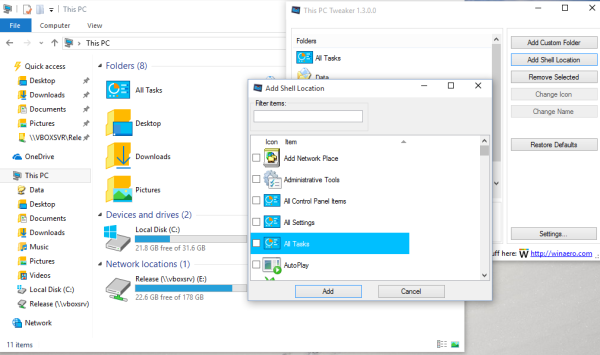
Also, you can add some shell locations to This PC (see the most comprehensive list of shell locations in Windows 8) if you are not familiar with them). There is a special button called «Add Shell Location». Click on it and pick some useful shell location to be added in This PC:
How to remove folders from This PC in Windows 10
In This PC Tweaker, select a folder. If you want to remove multiple folders at once, hold down the CTRL key on the keyboard and click them one by one to select them.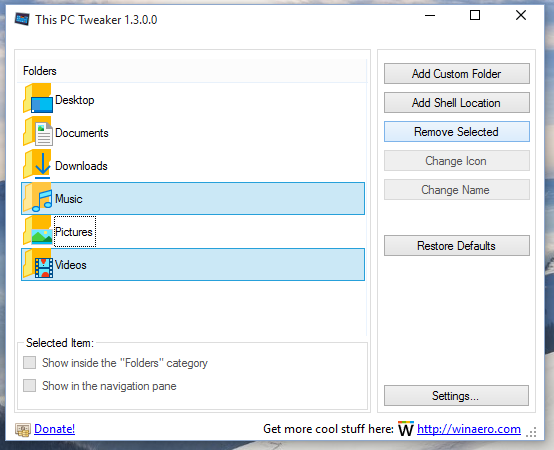
Click the Remove Selected button. The selected folders will be removed from This PC:
That’s it. If you have any questions, suggestions or if you found a bug in this app, leave a comment. I hope you enjoy This PC Tweaker. I worked hard to develop it so it is easy for you to customize This PC. If you like my app, a donation will be appreciated.
Winaero greatly relies on your support. You can help the site keep bringing you interesting and useful content and software by using these options:
Share this post
About Sergey Tkachenko
Sergey Tkachenko is a software developer from Russia who started Winaero back in 2011. On this blog, Sergey is writing about everything connected to Microsoft, Windows and popular software. Follow him on Telegram, Twitter, and YouTube.
13 thoughts on “ How to add custom folders in This PC in Windows 10 or remove the defaults ”
Hi, I hope that you can help. I downloaded this for windows 10, and added my documents and pictures as custom folders, and changed the icon. When I look in explorer the folders are there under This PC, but they don’t open if you click on them. They’re completely unresponsive. If I right click ‘properties’ on them, they show as being the right amount of storage, so they are the right folders not just dummy folders, but they simply don’t open or expand. Any ideas?
Hmm,
Paragraph title:
“How to add a custom folder into This PC in Windows 10”
and then inside the text:
“This PC Tweaker works with Windows 7, Windows 8 and Windows 8.1”
Why do you state that it works for Window 10 and then you do list only previous windows versions.
You should consider updating your article.
I changed the Documents icon in the “This PC” location by removing Documents using your application under “Customize This PC Folders” and adding it back with the custom icon. That part went smoothly….the icon changed in This PC\Documents. When I added the folder with winaero tweaker I directed it to the right location…. C:\Users\User\Documents. After going back to that location in the file browser the Documents folder opened with a short delay, but the folders inside Documents get hung up and crash explorer.exe. Anybody on Windows 10 that is thinking about using this software for that reason should look for other avenues until a fix is present.
Btw, I’m was using WinAero Tweaker 5.0.5 with Windows 10 64-bit
Thanks for the work, however, there is no download link to this, nor does the Winaero Tweaker 0.6.0.8 provide Customize This PC folder.
Which operating system you are running?
Hi, is it possible to do this using a script instead? I would rather not run a GUI on x-number of computers to make this happen, You state the following “To customize these folders, you need ActiveX manipulation and some other tricks which aren’t easy for the average user.” and my immediate thought is that this should be possible through a script ;).
So when I remove folders from This PC with your software does it permanently delete the files from USERS or does it hide them by changing the registry settings? Can I restore the deleted folders?
The folders will be just hidden from This PC.
Click on the “restore this page to defaults” button. Its above the tweak on the toolbar.
Today, I updated to 1803 Creators Update on Windows 10. I have tried both programs This PC Tweaker and Winaero Tweaker, and neither of them will correctly add folders to This PC. It will add the folders, but once you go inside the folder you cannot delete items or open up subfolders. I’m so tired. Windows 10 is a nightmare. Everything I want is broken or will soon be broken. They are replacing everything good with everything bad. Please rescue me! PS – I prefer The PC Tweaker because the only thing that I use these programs for are to delete/add folders to This PC. I don’t need all those additional features in Winaero Tweaker. But I understand that you removed The PC Tweaker and only work on Winaero Tweaker now. I understand. However, I do want to point out that in Winaero Tweaker you can not rename a folder in This PC, but you can in The PC Tweaker.
I see. I will try to fix it.
I don’t want to depend on a third party program for this.
Is it impossible with a Powershell or Batch script? Surely it is possible.
Surely, I could do it manually, even, with the right instructions.


