- Customize Windows 10 Start and taskbar with Group Policy
- Operating system requirements
- How Start layout control works
- Use Group Policy to apply a customized Start layout in a domain
- Use Group Policy to apply a customized Start layout on the local computer
- Update a customized Start layout
- Win10 All Settings — простое изменение настроек, режим бога и управление доступными параметрами Windows 10
- Загрузка Win10 All Settings и русский язык интерфейса
- Использование Win10 All Settings, доступные параметры и инструменты
- Видео обзор
- Use custom settings for Windows 10 devices in Intune
- Before you begin
- OMA-URI settings
- Find the policies you can configure
Customize Windows 10 Start and taskbar with Group Policy
Applies to
In WindowsВ 10 Pro, Enterprise, and Education, you can use a Group Policy Object (GPO) to deploy a customized Start and taskbar layout to users in a domain. No reimaging is required, and the layout can be updated simply by overwriting the .xml file that contains the layout. This enables you to customize Start and taskbar layouts for different departments or organizations, with minimal management overhead.
This topic describes how to update Group Policy settings to display a customized Start and taskbar layout when the users sign in. By creating a domain-based GPO with these settings, you can deploy a customized Start and taskbar layout to users in a domain.
When a full Start layout is applied with this method, the users cannot pin, unpin, or uninstall apps from Start. Users can view and open all apps in the All Apps view, but they cannot pin any apps to Start. When a partial Start layout is applied, the contents of the specified tile groups cannot be changed, but users can move those groups, and can also create and customize their own groups. When you apply a taskbar layout, users will still be able to pin and unpin apps, and change the order of pinned apps.
Operating system requirements
In Windows 10, version 1607, Start and taskbar layout control using Group Policy is supported in WindowsВ 10 Enterprise and WindowsВ 10 Education. In Windows 10, version 1703, Start and taskbar layout control using Group Policy is also supported in WindowsВ 10 Pro.
The GPO can be configured from any computer on which the necessary ADMX and ADML files (StartMenu.admx and StartMenu.adml) for WindowsВ 10 are installed. In Group Policy, ADMX files are used to define Registry-based policy settings in the Administrative Templates category. To find out how to create a central store for Administrative Templates files, see article 929841, written for Windows Vista and still applicable in the Microsoft Knowledge Base.
How Start layout control works
Three features enable Start and taskbar layout control:
The Export-StartLayout cmdlet in Windows PowerShell exports a description of the current Start layout in .xml file format.
To import the layout of Start to a mounted Windows image, use the Import-StartLayout cmdlet.
You can modify the Start .xml file to include or create an .xml file just for the taskbar configuration.
In Group Policy, you use the Start Layout settings for the Start Menu and Taskbar administrative template to set a Start and taskbar layout from an .xml file when the policy is applied. The Group Policy object doesn’t support an empty tile layout, so the default tile layout for Windows is loaded in that case.
To learn how customize Start to include your line-of-business apps when you deploy WindowsВ 10, see Customize the Windows 10 Start layout.
Use Group Policy to apply a customized Start layout in a domain
To apply the Start and taskbar layout to users in a domain, use the Group Policy Management Console (GPMC) to configure a domain-based Group Policy Object (GPO) that sets Start Layout policy settings in the Start Menu and Taskbar administrative template for users in a domain.
The GPO applies the Start and taskbar layout at the next user sign-in. Each time the user signs in, the timestamp of the .xml file with the Start and taskbar layout is checked and if a newer version of the file is available, the settings in the latest version of the file are applied.
The GPO can be configured from any computer on which the necessary ADMX and ADML files (StartMenu.admx and StartMenu.adml) for WindowsВ 10 are installed.
The .xml file with the Start and taskbar layout must be located on shared network storage that is available to the users’ computers when they sign in and the users must have Read-only access to the file. If the file is not available when the first user signs in, Start and the taskbar are not customized during the session, but the user will be prevented from making changes to Start. On subsequent sign-ins, if the file is available at sign-in, the layout it contains will be applied to the user’s Start and taskbar.
For information about deploying GPOs in a domain, see Working with Group Policy Objects.
Use Group Policy to apply a customized Start layout on the local computer
You can use the Local Group Policy Editor to provide a customized Start and taskbar layout for any user who signs in on the local computer. To display the customized Start and taskbar layout for any user who signs in, configure Start Layout policy settings for the Start Menu and Taskbar administrative template. You can use the Start Menu and Taskbar administrative template in User Configuration or Computer Configuration.
This procedure applies the policy settings on the local computer only. For information about deploying the Start and taskbar layout to users in a domain, see Use Group Policy to deploy a customized Start layout in a domain.
This procedure creates a Local Group Policy that applies to all users on the computer. To configure Local Group Policy that applies to a specific user or group on the computer, see Step-by-Step Guide to Managing Multiple Local Group Policy Objects. The guide was written for WindowsВ Vista and the procedures still apply to WindowsВ 10.
This procedure adds the customized Start and taskbar layout to the user configuration, which overrides any Start layout settings in the local computer configuration when a user signs in on the computer.
To configure Start Layout policy settings in Local Group Policy Editor
On the test computer, press the Windows key, type gpedit, and then select Edit group policy (Control panel).
Go to User Configuration or Computer Configuration > Administrative Templates >Start Menu and Taskbar.
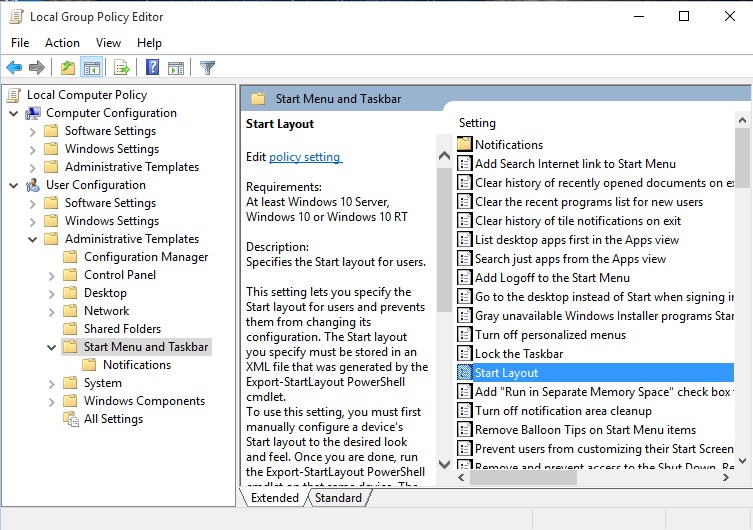
Right-click Start Layout in the right pane, and click Edit.
This opens the Start Layout policy settings.
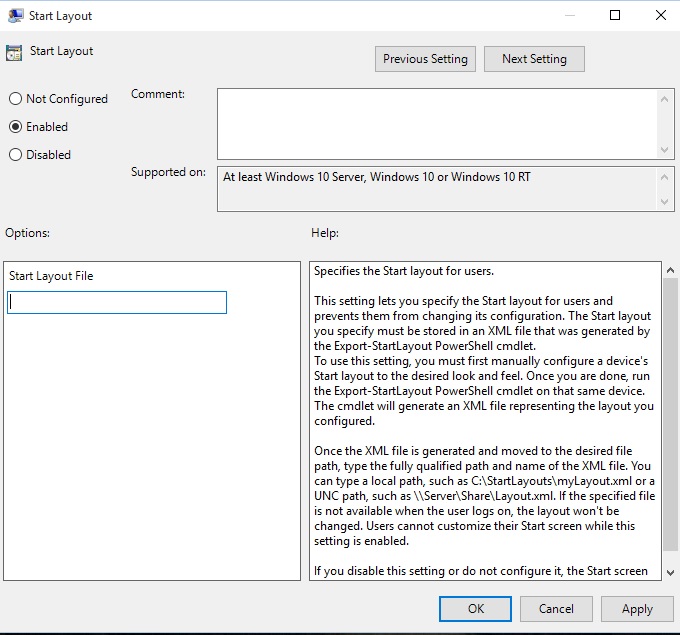
Enter the following settings, and then click OK:
Select Enabled.
Under Options, specify the path to the .xml file that contains the Start and taskbar layout. For example, type C:\Users\Test01\StartScreenMarketing.xml.
Optionally, enter a comment to identify the Start and taskbar layout.
If you disable Start Layout policy settings that have been in effect and then re-enable the policy, users will not be able to make changes to Start, however the layout in the .xml file will not be reapplied unless the file has been updated. In Windows PowerShell, you can update the timestamp on a file by running the following command:
Update a customized Start layout
After you use Group Policy to apply a customized Start and taskbar layout on a computer or in a domain, you can update the layout simply by replacing the .xml file that is specified in the Start Layout policy settings with a file with a newer timestamp.
Win10 All Settings — простое изменение настроек, режим бога и управление доступными параметрами Windows 10
 Различные настройки, параметры, системные инструменты администрирования Windows 10 не всегда просто найти и нельзя сказать, чтобы они были организованы наилучшим образом: часть доступны в параметрах, часть — в панели управления, некоторые отображаются лишь при определенных параметрах вида, существуют и другие проблемы. Win10 All Settings — простая бесплатная программа, которая предоставляет действительно удобный доступ ко всему перечисленному и не только.
В этом обзоре о возможностях программы, о том, как скачать и «установить» её, включить русский язык интерфейса и дополнительная информация, которая может оказаться полезной.
Загрузка Win10 All Settings и русский язык интерфейса
Утилита Win10 All Settings не требует установки на компьютер и прав администратора: достаточно просто скачать её с официального сайта разработчика https://www.wintools.info/index.php/win10-all-settings и запустить её. Если вы планируете использовать инструмент регулярно, рекомендую скопировать файл программы в удобное место (чтобы не лежал на рабочем столе или в «Загрузках»), а затем, при желании включить автоматический запуск при старте Windows в параметрах.
Обновление: в программе появился русский язык интерфейса. У вас есть две возможности, чтобы программа была на русском:
- Нажать правой кнопкой мыши по значку программы в области уведомлений (появится после запуска), выбрать пункт «Languages» (языки), затем — «Translate» и самостоятельно использовать встроенный инструмент перевода для того, чтобы перевести все пункты меню.

- Скачать подготовленный мной перевод программы Win10 All Settings на русский язык: заходим на страницу https://pastebin.com/wMyBPs4y, нажимаем кнопку «Download» и сохраняем файл под именем win10settings-lang.txt в ту же папку, где находится win10settings.exe. Перезапускаем программу (выход через правый клик — Exit и повторный запуск), а затем в меню «Languages» выбираем «Custom». Готово, теперь программа на русском языке.

Использование Win10 All Settings, доступные параметры и инструменты
Как уже было отмечено выше, после запуска Win10 All Settings в области уведомлений Windows 10 появляется значок программы, по простому нажатию на который по умолчанию (можно изменить в параметрах программы) открывается папка «Режим бога» со всеми доступными элементами панели управления и средств администрирования системы.

Если нажать по значку программы правой кнопкой мыши мы попадем в простое меню (пожалуй, примерно такой и должна быть «Панель управления»), в которой обнаружатся следующие пункты:
- Простые инструменты персонализации с возможностью загрузки других утилит для оформления Windows 10, о некоторых из которых я уже писал на сайте.
- Открытие папки «Режим бога» как при простом нажатии на значок.
- Все элементы панели управления.
- Почти все инструменты администрирования Windows 10.
- Быстрый доступ к параметрам Windows 10 (те, которые открываются по клавишам Win+I).
- В разделе «Инструменты» — несколько системных инструментов самой Windows 10, создание папки «Режим бога» на рабочем столе (не будет требовать для работы запущенной программы, будет отображаться без имени) и возможность загрузки нескольких системных утилит от разработчика.
- В параметрах Win10 All Settings вы можете включить автоматический запуск программы, незначительно изменить внешний вид меню программы.


Видео обзор
Как итог: утилита показалась мне очень удобной и достойной того, чтобы опробовать и, если вы постоянно используете какие-либо элементы управления Windows 10, она может оказаться полезной и вам. В контексте темы интересным могут быть полезными материалы: Настройка Windows 10 в Winaero Tweaker, Встроенные системные утилиты Windows, о которых многие не знают.
А вдруг и это будет интересно:
Почему бы не подписаться?
Рассылка новых, иногда интересных и полезных, материалов сайта remontka.pro. Никакой рекламы и бесплатная компьютерная помощь подписчикам от автора. Другие способы подписки (ВК, Одноклассники, Телеграм, Facebook, Twitter, Youtube, Яндекс.Дзен)
29.08.2020 в 17:17
Добрый день,
может подскажете, где можно увеличить этот шрифт —
(скриншот)
30.08.2020 в 13:03
29.08.2020 в 22:00
Спасибо. Интересная и нужная софтина, для простого и быстрого доступа к настройкам и управлению системы.
30.08.2020 в 11:51
Спасибо большое! Очень полезная статья!
30.08.2020 в 13:41
Благодарю. Всё так подробно рассказываете и показываете. Хорошая утилита. Удачи Вам.
30.08.2020 в 14:36
Предпочитаю более простой способ, которым пользуюсь начиная с Windows 7. Создаём в любом угодном месте папку, обзываем её любым именем, после вставляем
Уверен — очень удобная программа! Но русифицировать её не получилось.
31.08.2020 в 17:42
30.08.2020 в 15:07
Здравствуйте Dmitry,
вероятно, предложенные Вами программы, могут быть полезны.
К сожалению, именно то, что мне нужно, в них — не нашёл.
Благодарю Вас за попытку помочь.
31.08.2020 в 13:26
Всё скачал, а не могу руссифицировать.
31.08.2020 в 13:30
02.09.2020 в 09:09
Большущее спасибо за информацию и, конечно же, за русификацию!
06.09.2020 в 11:20
Все сделал по инструкции, однако программа русифицироваться не хочет.
07.09.2020 в 09:22
В системе включен показ расширений файлов? Проверьте — https://remontka.pro/file-extensions/ и, если не включен, включите и посмотрите, чтобы у файла языкового было не .txt.txt а один раз .txt
06.09.2020 в 11:28
Получилось русифицировать. Создается файл win10settings-lang.txt с английским языком, а скачанный файл переименовывает в win10settings-lang.txt.txt. Необходимо английский файл удалить, а русский переименовать.
07.09.2020 в 09:22
Ну вот, то что я и писал не ваш комментарий предыдущий.
Use custom settings for Windows 10 devices in Intune
Intune may support more settings than the settings listed in this article. Not all settings are documented, and won’t be documented. To see the settings you can configure, create a device configuration profile, and select Settings Catalog. For more information, see Settings catalog.
This article describes some of the different custom settings you can control on Windows 10 and newer devices. As part of your mobile device management (MDM) solution, use these settings to configure settings that aren’t built-in to Intune.
For more information on custom profiles, see Create a profile with custom settings.
These settings are added to a device configuration profile in Intune, and then assigned or deployed to your Windows 10 devices.
This feature applies to:
Windows 10 custom profiles use Open Mobile Alliance Uniform Resource Identifier (OMA-URI) settings to configure different features. These settings are typically used by mobile device manufacturers to control features on the device.
Windows 10 makes many Configuration Service Provider (CSP) settings available, such as Policy Configuration Service Provider (Policy CSP).
If you’re looking for a specific setting, remember that the Windows 10 device restriction profile includes many built-in settings. So, you may not need to enter custom values.
Before you begin
OMA-URI settings
Add: Enter the following settings:
Name: Enter a unique name for the OMA-URI setting to help you identify it in the list of settings.
Description: Enter a description that gives an overview of the setting, and any other important details.
OMA-URI (case sensitive): Enter the OMA-URI you want to use as a setting.
Data type: Select the data type you’ll use for this OMA-URI setting. Your options:
- Base64 (file)
- Boolean
- String (XML file)
- Date and time
- String
- Floating point
- Integer
Value: Enter the data value you want to associate with the OMA-URI you entered. The value depends on the data type you selected. For example, if you select Date and time, select the value from a date picker.
After you add some settings, you can select Export. Export creates a list of all the values you added in a comma-separated values (.csv) file.
Find the policies you can configure
There’s a complete list of all configuration service providers (CSPs) that Windows 10 supports in the Configuration service provider reference.
Not all settings are compatible with all Windows 10 versions. Configuration service provider reference tells you which versions are supported for each CSP.
Additionally, Intune doesn’t support all the settings listed in Configuration service provider reference. To find out if Intune supports the setting you want, open the article for that setting. Each setting page shows its supported operation. To work with Intune, the setting must support the Add, Replace, and Get operations. If the value returned by the Get operation doesn’t match the value supplied by the Add or Replace operations, then Intune reports a compliance error.


