- Custom Window Frame Using DWM
- Introduction
- Extending the Client Frame
- Removing the Standard Frame
- Drawing in the Extended Frame Window
- Enabling Hit Testing for the Custom Frame
- Appendix A: Sample Window Procedure
- Appendix B: Painting the Caption Title
- Appendix C: HitTestNCA Function
- How to Install Custom Themes in Windows 10
- Microsoft and Non-Microsoft Themes
- How to Install Microsoft Themes
- How to Install Non-Microsoft Themes
- Conclusion
- How to create custom resolutions on Windows 10 [EXPERT GUIDE]
- How to set custom resolution on Windows 10?
- 1. Use the Nvidia Control Panel
- 2. Use the AMD Catalyst Control Center
- 3. Use Custom Resolutions/Modes for Intel Graphics driver
- 4. Use Custom Resolution Utility (CRU)
Custom Window Frame Using DWM
This topic demonstrates how to use the Desktop Window Manager (DWM) APIs to create custom window frames for your application.
Introduction
In WindowsВ Vista and later, the appearance of the non-client areas of application windows (the title bar, icon, window border, and caption buttons) is controlled by the DWM. Using the DWM APIs, you can change the way the DWM renders a window’s frame.
One feature of the DWM APIs is the ability to extend the application frame into the client area. This enables you to integrate a client UI element—such as a toolbar—into the frame, giving the UI controls a more prominent place in the application UI. For example, Windows Internet Explorer 7 on Windows Vista integrates the navigation bar into the window frame by extending the top of the frame as shown in the following screen shot.

The ability to extend the window frame also enables you to create custom frames while maintaining the window’s look and feel. For example, Microsoft Office Word 2007 draws the Office button and the Quick Access toolbar inside the custom frame while providing the standard Minimize, Maximize, and Close caption buttons, as shown in the following screen shot.

Extending the Client Frame
The functionality to extend the frame into the client area is exposed by the DwmExtendFrameIntoClientArea function. To extend the frame, pass the handle of the target window together with the margin inset values to DwmExtendFrameIntoClientArea. The margin inset values determine how far to extend the frame on the four sides of the window.
The following code demonstrates the use of DwmExtendFrameIntoClientArea to extend the frame.
Note that the frame extension is done within the WM_ACTIVATE message rather than the WM_CREATE message. This ensures that frame extension is handled properly when the window is at its default size and when it is maximized.
The following image shows a standard window frame (on the left) and the same window frame extended (on the right). The frame is extended using the previous code example and the default Microsoft Visual Studio WNDCLASS/WNDCLASSEX background (COLOR_WINDOW +1).

The visual difference between these two windows is very subtle. The only difference between the two is that the thin black line border of the client region in the window on the left is missing from the window on the right. The reason for this missing border is that it is incorporated into the extended frame, but the rest of the client area is not. For the extended frames to be visible, the regions underlying each of the extended frame’s sides must have pixel data with an alpha value of 0. The black border around the client region has pixel data in which all color values (red, green, blue, and alpha) are set to 0. The rest of the background does not have the alpha value set to 0, so the rest of the extended frame is not visible.
The easiest way to ensure that the extended frames are visible is to paint the entire client region black. To accomplish this, initialize the hbrBackground member of your WNDCLASS or WNDCLASSEX structure to the handle of the stock BLACK_BRUSH. The following image shows the same standard frame (left) and extended frame (right) shown previously. This time, however, hbrBackground is set to the BLACK_BRUSH handle obtained from the GetStockObject function.

Removing the Standard Frame
After you have extended the frame of your application and made it visible, you can remove the standard frame. Removing the standard frame enables you to control the width of each side of the frame rather than simply extending the standard frame.
To remove the standard window frame, you must handle the WM_NCCALCSIZE message, specifically when its wParam value is TRUE and the return value is 0. By doing so, your application uses the entire window region as the client area, removing the standard frame.
The results of handling the WM_NCCALCSIZE message are not visible until the client region needs to be resized. Until that time, the initial view of the window appears with the standard frame and extended borders. To overcome this, you must either resize your window or perform an action that initiates a WM_NCCALCSIZE message at the time of window creation. This can be accomplished by using the SetWindowPos function to move your window and resize it. The following code demonstrates a call to SetWindowPos that forces a WM_NCCALCSIZE message to be sent using the current window rectangle attributes and the SWP_FRAMECHANGED flag.
The following image shows the standard frame (left) and the newly extended frame without the standard frame (right).

Drawing in the Extended Frame Window
By removing the standard frame, you lose the automatic drawing of the application icon and title. To add these back to your application, you must draw them yourself. To do this, first look at the change that has occurred to your client area.
With the removal of the standard frame, your client area now consists of the entire window, including the extended frame. This includes the region where the caption buttons are drawn. In the following side-by-side comparison, the client area for both the standard frame and the custom extended frame is highlighted in red. The client area for the standard frame window (left) is the black region. On the extended frame window (right), the client area is the entire window.

Because the entire window is your client area, you can simply draw what you want in the extended frame. To add a title to your application, just draw text in the appropriate region. The following image shows themed text drawn on the custom caption frame. The title is drawn using the DrawThemeTextEx function. To view the code that paints the title, see Appendix B: Painting the Caption Title.

When drawing in your custom frame, be careful when placing UI controls. Because the entire window is your client region, you must adjust your UI control placement for each frame width if you do not want them to appear on or in the extended frame.
Enabling Hit Testing for the Custom Frame
A side effect of removing the standard frame is the loss of the default resizing and moving behavior. For your application to properly emulate standard window behavior, you will need to implement logic to handle caption button hit testing and frame resizing/moving.
For caption button hit testing, DWM provides the DwmDefWindowProc function. To properly hit test the caption buttons in custom frame scenarios, messages should first be passed to DwmDefWindowProc for handling. DwmDefWindowProc returns TRUE if a message is handled and FALSE if it is not. If the message is not handled by DwmDefWindowProc, your application should handle the message itself or pass the message onto DefWindowProc.
For frame resizing and moving, your application must provide the hit testing logic and handle frame hit test messages. Frame hit test messages are sent to you through the WM_NCHITTEST message, even if your application creates a custom frame without the standard frame. The following code demonstrates handling the WM_NCHITTEST message when DwmDefWindowProc does not handle it. To see the code of the called HitTestNCA function, see Appendix C: HitTestNCA Function.
Appendix A: Sample Window Procedure
The following code sample demonstrates a window procedure and its supporting worker functions used to create a custom frame application.
Appendix B: Painting the Caption Title
The following code demonstrates how to paint a caption title on the extended frame. This function must be called from within the BeginPaint and EndPaint calls.
Appendix C: HitTestNCA Function
The following code shows the HitTestNCA function used in Enabling Hit Testing for the Custom Frame. This function handles the hit testing logic for the WM_NCHITTEST when DwmDefWindowProc does not handle the message.
How to Install Custom Themes in Windows 10

Windows 10 is a versatile platform when it comes to customization. One of the best (or at least most visually striking) examples of this is in the huge variety of alternative themes you can apply to it, capable of changing that flat W10 desktop into something different entirely.
Whether you want to stick to the safety of Microsoft’s official online theme collection, or peruse some of the incredibly creative Windows 10 themes at DeviantArt, we’ll show you how to install custom Windows 10 themes, along with all the necessary precautions.
Once you learn how to install your own themes, make sure to check out our list of the best Windows 10 themes.
Microsoft and Non-Microsoft Themes
Themes can be found in a few places. Microsoft actually makes quite a few available from their own website. However, the most interesting themes are available on sites like DeviantArt where independent designers create their own packs.
Non-Microsoft themes can’t be installed by default, however. We’ll first need to loosen Microsoft’s restrictions on theme installations.
How to Install Microsoft Themes
If you want to install one of Microsoft’s themes, it’s very straightforward.
1. Download the desired theme from the Microsoft website.
2. Once the theme has downloaded, double-click on the downloaded “.themepack” file to add the theme to your theme library and immediately apply it.

You can also apply themes from the Personalization menu. Just right-click an empty space on the desktop background and click “Personalize.”
Here you can select a new theme from the pane on the left or make your own adjustments to the existing one – like changing the font style, background and colors. For more on how to use this area, check out our guide on creating your own Windows 10 themes.
How to Install Non-Microsoft Themes
If you’re feeling adventurous, you can also patch your system to allow for the installation of non-Microsoft themes.
1. Make a backup! Using a theme that doesn’t match can nuke your system, and there’s a non-negligible chance of that happening. A restore point is good, but an image backup is even better.

3. Find themes on websites like DeviantArt.

4. Copy theme files into “C:/Windows/Resources/Themes.” If the file contains themes for multiple builds of Windows 10, make sure you’re using the right one. You can find your build by pressing Win + R and typing winver into the command line.

5. Click on the theme you want to apply from Control Panel’s Personalization menu.


Conclusion
It’s not too complicated to install new Windows 10 themes, though you need to be careful with the unofficial ones, as doing the process wrong may bork your PC. With that in mind, have fun giving your Windows 10 desktop a fresh new face!
Content Manager at Make Tech Easier. Enjoys Android, Windows, and tinkering with retro console emulation to breaking point.
How to create custom resolutions on Windows 10 [EXPERT GUIDE]

- Download Restoro PC Repair Tool that comes with Patented Technologies (patent available here).
- Click Start Scan to find Windows issues that could be causing PC problems.
- Click Repair All to fix issues affecting your computer’s security and performance
- Restoro has been downloaded by 0 readers this month.
Sometimes you want to change the resolution of the display to a custom one, and in today’s article we’ll show you how to create custom resolutions on Windows 10.
To do that, just follow the guide below.
How to set custom resolution on Windows 10?
1. Use the Nvidia Control Panel
- Right-click on your desktop and choose NVIDIA Control Panel.
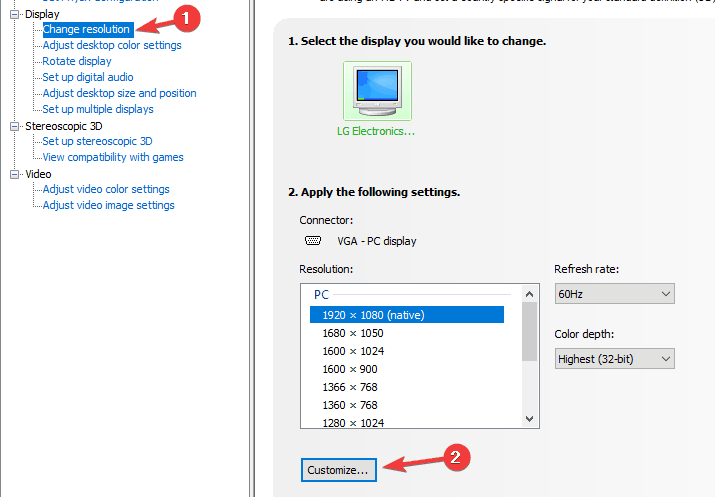
- In the left side-panel, under Display, click on Change resolution.
- In the right section scroll a bit, and under Choose the resolution click the Customize button.

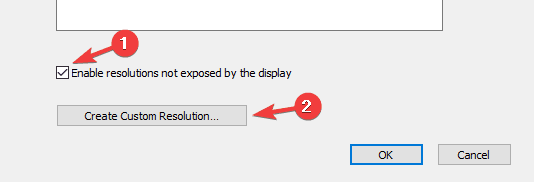
- In the new window that appears, check Enable resolutions not exposed by the display and then click on Create Custom Resolution.
- Now, fill in the boxes with the desired values and then hit the Test button.
- If the test is successful and you’re satisfied with the result, Save the resolution. If not, revert to the previous one.
2. Use the AMD Catalyst Control Center
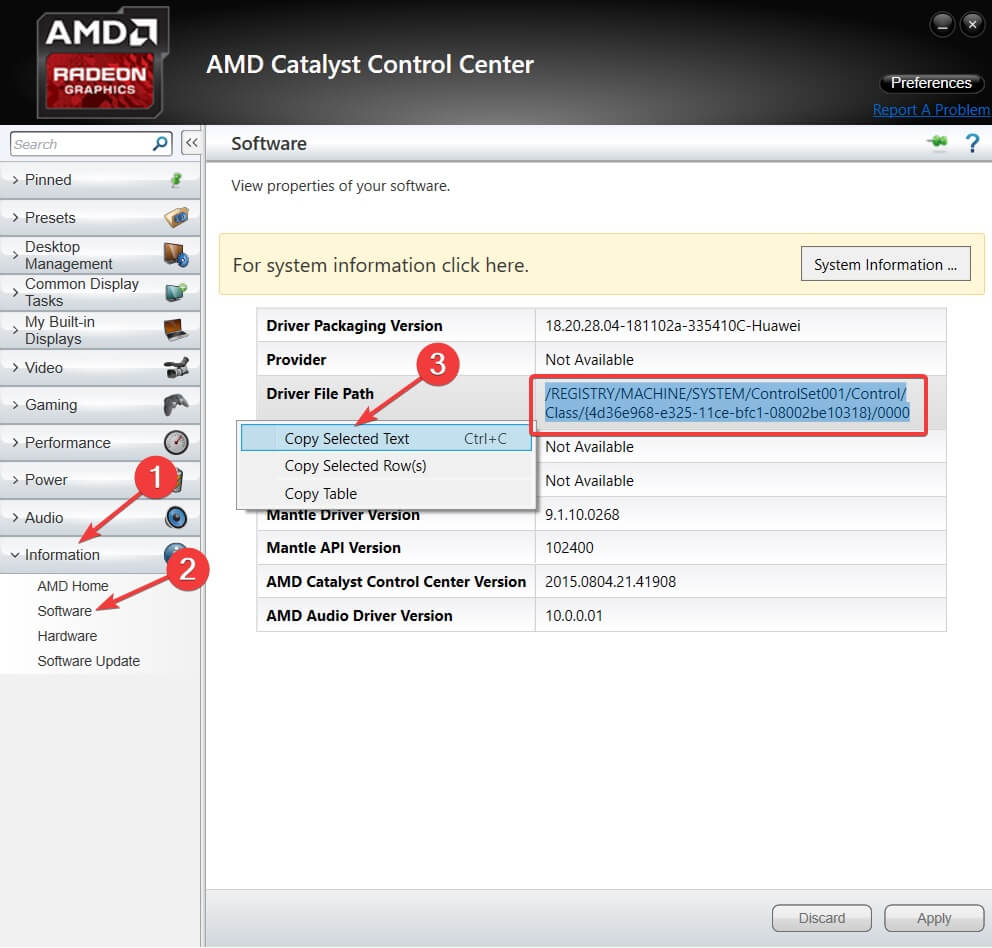
- Right-click on your desktop and choose AMD Catalyst Control Center.
- Navigate to Information > Software > copy the 2D driver file path.
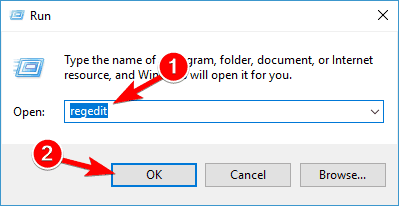
- Now, press Windows key + R to open Run, and type regedit. Hit Enter.
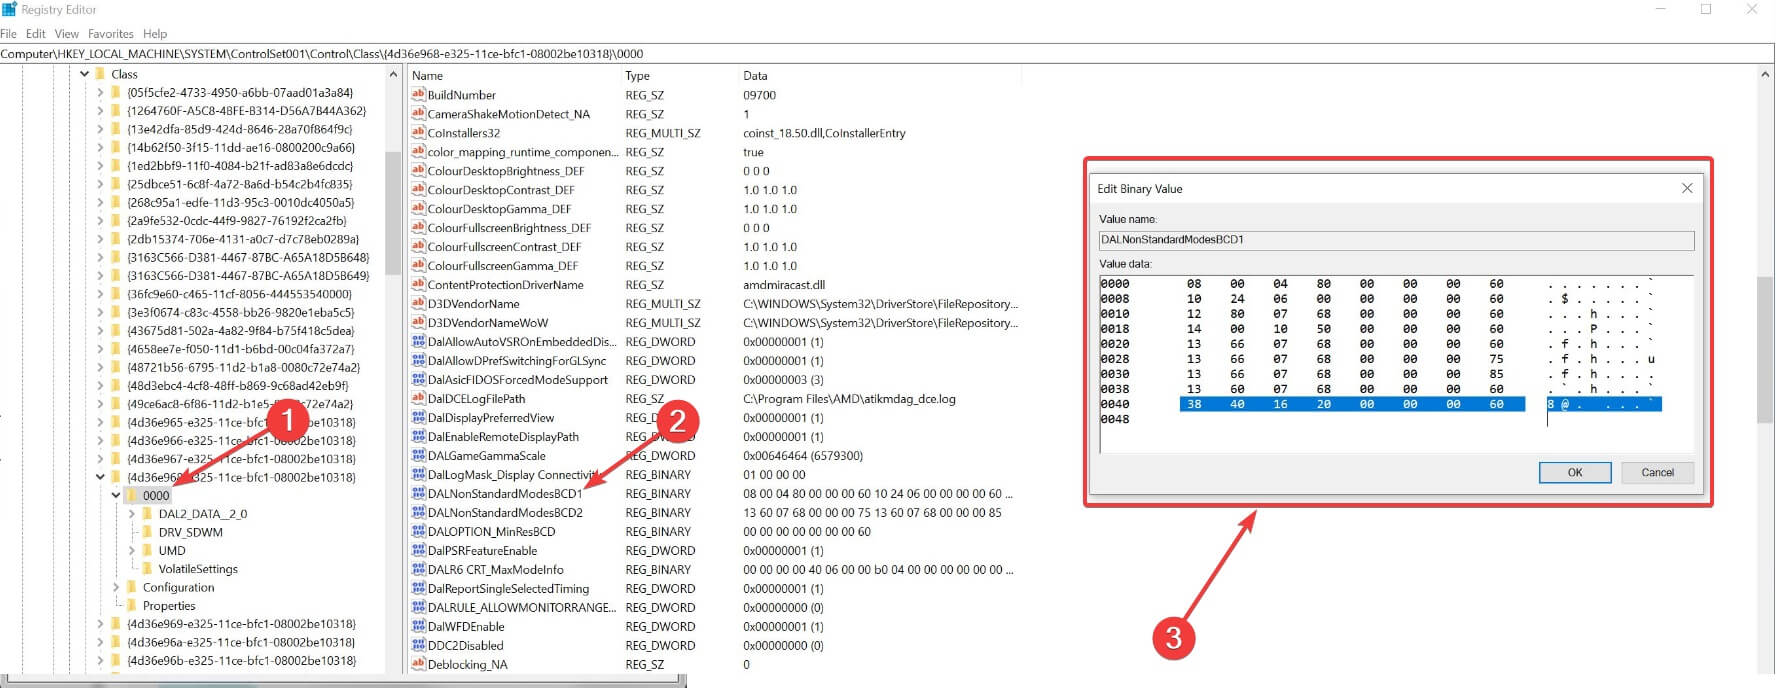
- In the Registry Editor, navigate to the 2D path from step 2.
- Double-click the 0000 folder and inside find the DALNonStandardModesBCD1 registry key. Right-click it, select Edit and then type your desired values in order: The width of the resolution > The height of the resolution > Type four zeros > The refresh rate of your monitor. If any of the values don’t add up to a 4 digit number, then start the number with 0.
- Click OK and Restart your PC.
- After the restart, when you launch the AMD Catalyst Control Center, you should find the custom resolution there.
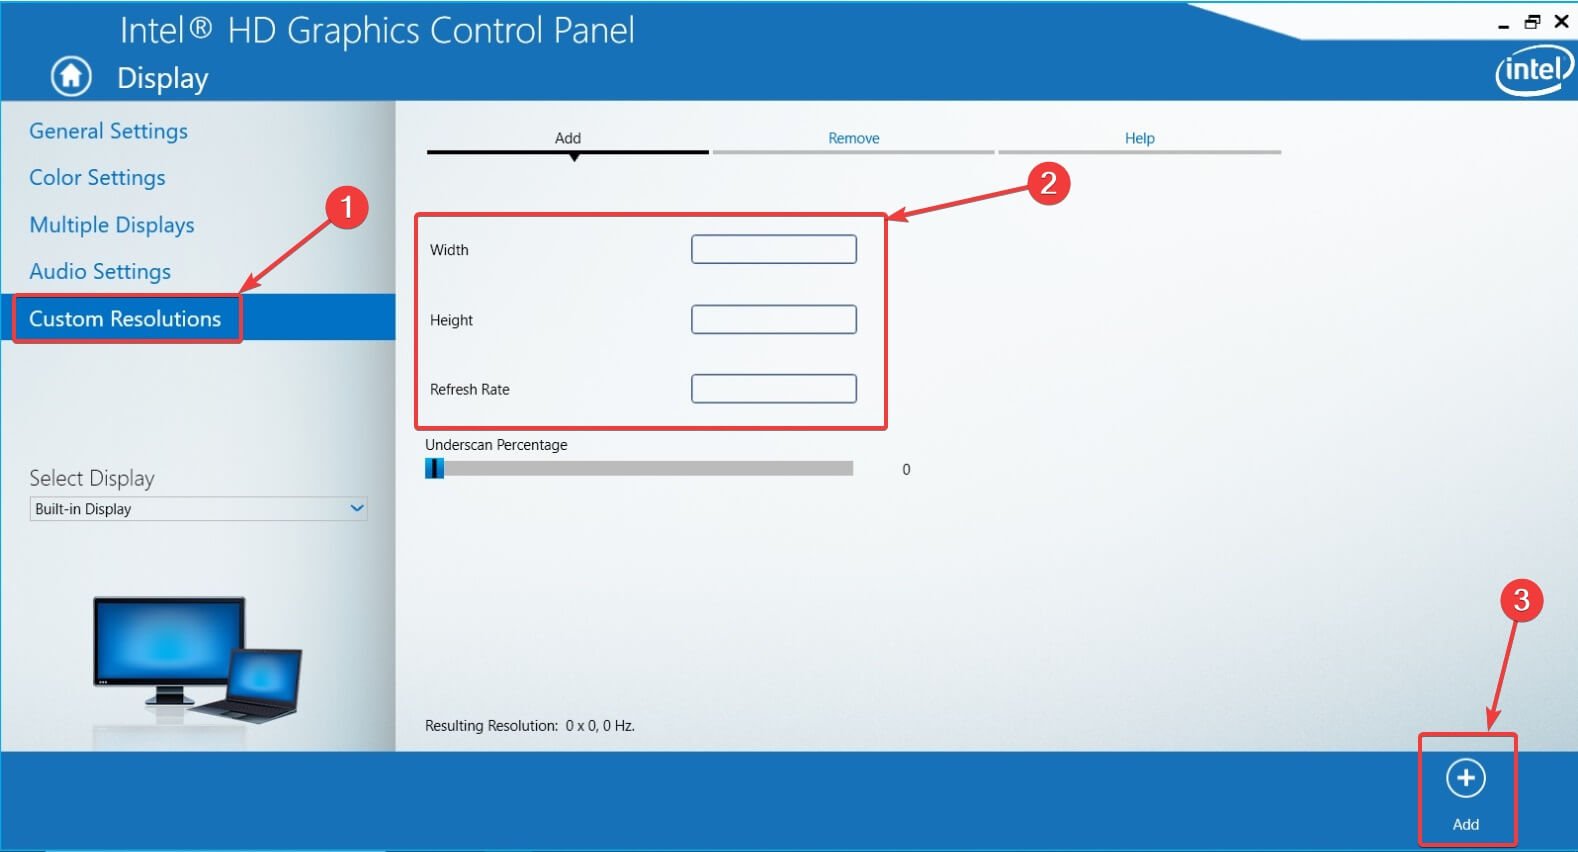
3. Use Custom Resolutions/Modes for Intel Graphics driver
- Right-click on your desktop and choose Graphics Proprieties.
- Select Advanced mode if you’re prompted to select an application mode.
- Under Display Devices tab, check to see if the Custom Resolutions/Modes button is available. If it is, click on it. If it’s not, then go to
and run the app.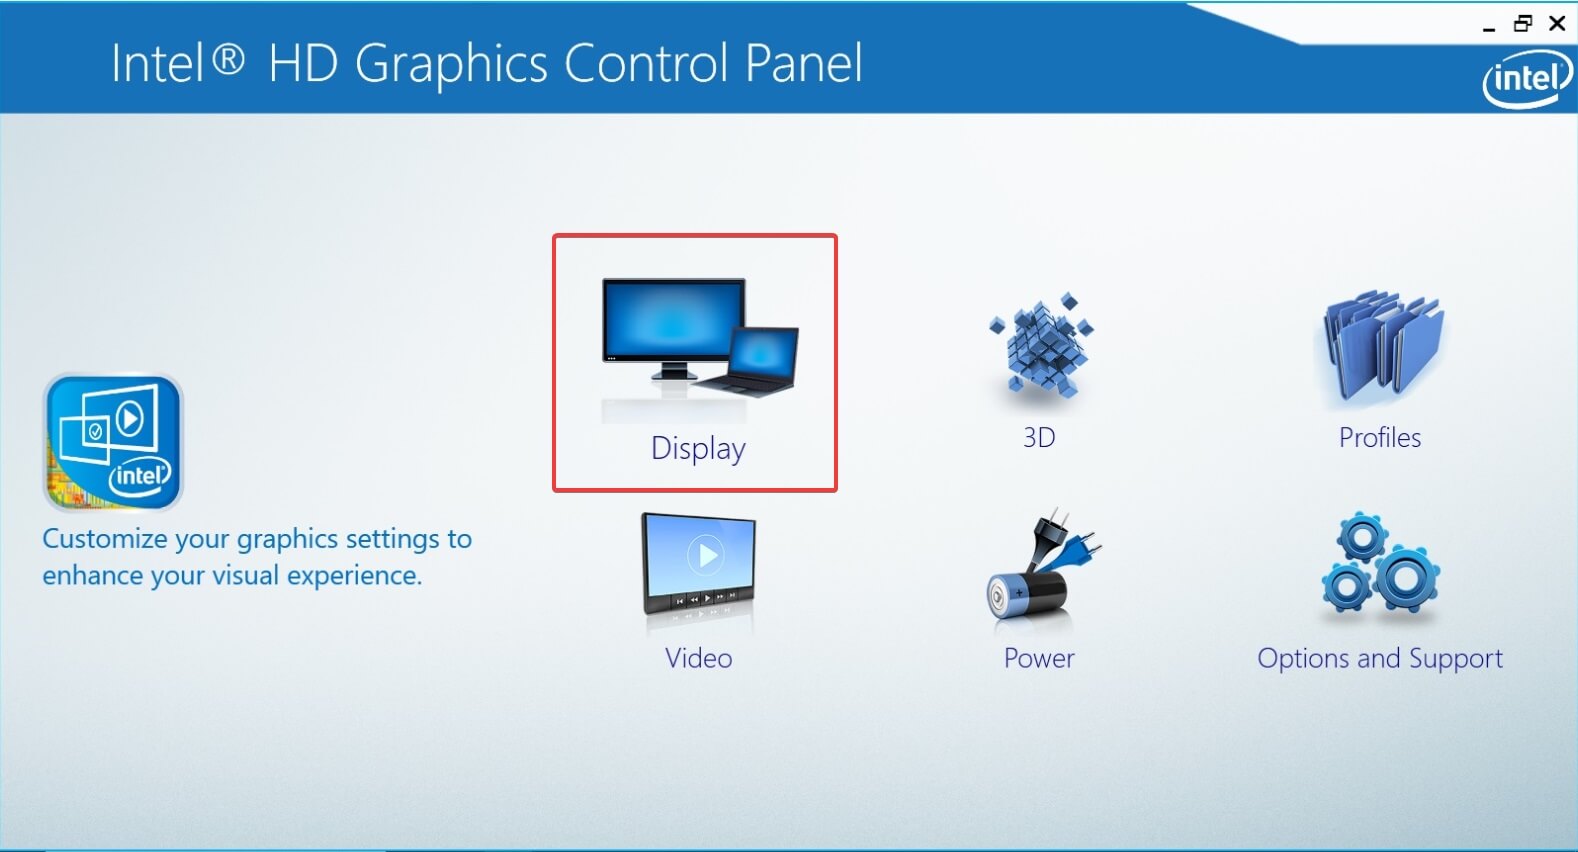
4. Use Custom Resolution Utility (CRU)

- Additionally, you can use Custom Resolution Utility (CRU) to create a resolution.
- The app has support for NVIDIA, AMD and Intel graphics cards so no matter of the system configuration, it will work.
As you can see, it’s not that hard to create and set a custom resolution in Windows 10, regardless of the GPU manufacturer and drivers. What’s your favorite GPU manufacturer and why? Leave the answer along with any other questions you may have in the comments section below.


