- How to Extract Images from PDF on Linux
- How to Extract Images from PDF on Linux
- How to Extract Images from PDF on Windows and Mac
- Step 1: Enter Editing Mode
- Step 2: Extract Images from PDF on Windows
- Step 3: Save the Extracted Image
- Step 1: Extract Images from PDF on Mac
- Step 2: Save the Extracted Image
- How To Split or Extract Particular Pages From A PDF File
- Split Or Extract particular pages from A PDF file using PDFtk
- Install PDFtk on Linux
- Usage
- Extract particular pages from PDF file using default PDF reader application
- Best PDF Editors for Linux to Edit the PDF Content and Extract Pages to Merge in Other PDF Files
- Best PDF editors for Linux for editing the content of the PDF files
- 1. LibreOffice Draw
- How to install LibreOffice?
- 2. Okular
- How to install Okular?
- 3. Scribus
- How to install Scribus?
- 4. Qoppa PDF Studio [Not FOSS]
- How to install PDF Studio?
- 5. Master PDF Editor [Not FOSS]
- How to install Master PDF Editor?
- Best PDF Editors for Linux to merge, split and extract PDF files
- 6. PDF Mix Tool
- 7. PDFsam
- How to install PDFsam Basic?
- 8. PDFArranger
- 9. PDF Chain
- How to install PDF Chain?
- 10. PDF Slicer
- Wrapping Up
How to Extract Images from PDF on Linux

Elise Williams
2021-08-25 19:51:01 • Filed to: Knowledge of PDF • Proven solutions
One of the easiest ways to convert PDF files to editable text on Linux is to use the pdftotext command line tool. But as you may well know, this only works for the text part and you may need to extract images from PDF on Linux. In this guide, we are going to be looking at how you can extract images from PDF in Linux OS. We are also going to provide you with an effective solution to extract images from PDF in Windows and Mac.
How to Extract Images from PDF on Linux
To extract the images from a PDF document on Linux, you need another command tool line known as «pdfimages». This tool is part of the poppler-utils package and may already be installed in your system. If it is not, you can find the steps to install it online. Once it is installed, follow these simple steps to use this tool to extract images from the PDF document:
Step 1: Press «Ctrl + Alt + T» to open a Terminal window on your Linux system and then type in the following command.
pdfimages /home/lori/Documents/SampleWithImages.pdf /home/lori/Documents/ExtractedImages/image
Note: Replace first path and the PDF filename in all commands in this tutorial with the filename of the PDF whose images you want to extract.
Step 2: Once you press «Enter» in the command, the images will be extracted from the document in PPM (portable pixamap) or PBM (portable bitmap) format. To create JPG files from the extracted images, enter the following format.
pdfimages -j /home/lori/Documents/SampleWithImages.pdf /home/lori/Documents/ExtractedImages/image This will however only convert the first images to JPG. If you want to convert all the images in the PDF to JPG, enter the following command:
pdfimages -l 1 -j /home/lori/Documents/SampleWithImages.pdf /home/lori/Documents/ExtractedImages/image
How to Extract Images from PDF on Windows and Mac
Extracting images from a PDF in Windows and Mac is a much simpler process, especially when you have PDFelement. This PDF management tool makes it easier for you to easily extract any images from any PDF document. Some of the features that make it the most ideal solution include the following:
- It is very easy to use. All functions can be completed in just a few simple steps as we shall see shortly.
- It can be used to edit both the text and images in the PDF document. For example, you can delete and add images to the PDF or even change the size and location of any images within the document.
- It can also be used to convert PDF documents to a variety of other formats including Word, Excel, PPT, TXT, HTML, JPG and more.
- You can make comments and markups to the PDF documents.
- It is easy to protect your PDF document by applying passwords, permissions and redaction.
- It is easy for you to share, print the PDF file.
- It has an OCR function that can be very useful when editing scanned PDFs.
The following simple steps show you how you can extract images from a PDF using PDFelement in both Windows and Mac:
Step 1: Enter Editing Mode
Download and install PDFelement on to your computer. After installation, launch the program and in the main window, click on «Open File» to open the PDF document that you want to extract images from. Once the document is open click on «Edit» in the main menu to enter the program’s «Edit Mode».
Step 2: Extract Images from PDF on Windows
Click on the image you would like to extract to select it. Right-click on the image and then choose «Extract Image» from the options presented.
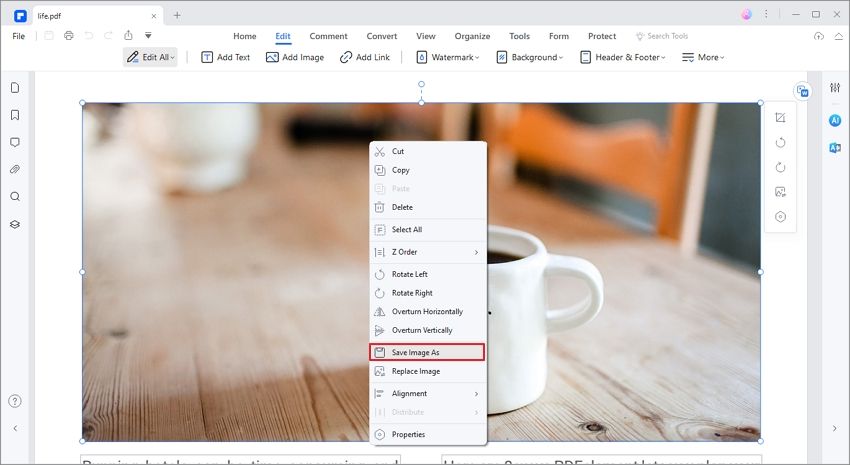
Step 3: Save the Extracted Image
A «Save As» dialogue box will open, allowing you to save the extracted image. Here, you can change the output folder to save the image. In the «Save as Type» section, ensure that the format is «JPG» and then click «Save» to complete the process.

Step 1: Extract Images from PDF on Mac
Open the PDF document you would like to extract the image from. The easiest way to do that is to simply drag and drop the PDF to the program’s main window. Once the document is open, click on «Image» from the tools on the left and then click on the image you want to extract to select it.

Click on the «Extracting» from the tools at the top to begin the extraction process.
Step 2: Save the Extracted Image
A «Save As» popup box will appear. Here, you can change the filename of the exported image and change the output folder under «Where». Once you are happy with your output folder selection, click on «Save» to save the extracted image.
Источник
How To Split or Extract Particular Pages From A PDF File
Let us say you have a PDF file with 100 pages and you want to split or extract particular pages from that file. How can you do that? It’s absolutely easy. You don’t need to any premium PDF editing applications. In this tutorial, I will show you a simple way to split or extract particular pages from a PDF file on Linux. Even though there are many methods to accomplish this task, I find the following methods are the easiest way to extract a page range or a part of a PDF file in Linux. Just follow these simple steps described below to get this job done in couple minutes.
Split Or Extract particular pages from A PDF file using PDFtk
I will explain both command line and GUI way. If you use a system that has only CLI mode, follow these steps.
PDFtk is free graphical tool that can be used to split or merge PDF files. You can use it both in CLI and GUI mode. It is available for free and paid.
Install PDFtk on Linux
PDFtk is available in the official repositories of some Linux distributions.
On Arch Linux, PDFtk is available in [community] repository. To install PDFtk on Arch Linux and its variants, run:
On Debian, Ubuntu:
$ sudo apt install pdftk
Note: You need to enable [universe] repository in Ubuntu to install pdftk.
PDFtk is also available as snap package. Make sure your system has snap installed and run the following command to install PDFtk.
Usage
Once you installed PDFtk, open your Terminal and extract a range of pdf files as shown below.
Here, source.pdf is my original PDF file. We extract pages from 5 to 10. Finally we save the output in output_p5-10.pdf file. Very simple, isn’t it? Of course, it is.
If you want split specific pages from the source file, for example 5, 6, and 10, just run:
The above command will split the pages 5, 6 and 10 from the source.pdf file and save it as output.pdf file.
Extract particular pages from PDF file using default PDF reader application
This is another absolutely easy and handy trick to extract pages from a PDF file using the default PDF viewer application. Most of desktop Linux distributions comes pre-installed with PDF reader application by default. We can use it to extract a particular set of pages from a PDF document.
Here is how I did it in my Arch Linux desktop.
Open the source pdf file using any PDF reader. For the purpose of this tutorial, I use Atril Document Viewer.
Go to File -> Print.
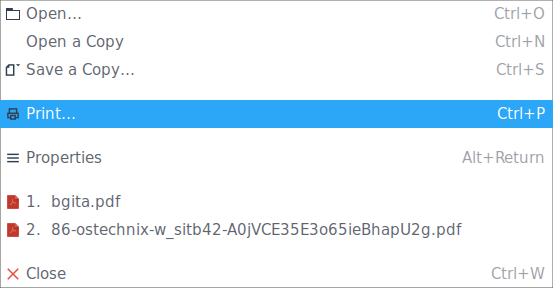
Select Print to file as printer, enter the output filename, select format as PDF, enter the page range (Here 30-40). And finally click Print.

Extract particular pages from PDF file using default PDF reader application
The selected pages will be extracted from the PDF file. That’s it.
Want to know how to merge PDF files? Check the following link,
As you can see, both methods are simple, straight-forward and easy to follow.
Источник
Best PDF Editors for Linux to Edit the PDF Content and Extract Pages to Merge in Other PDF Files
Last updated October 29, 2020 By Ankush Das 152 Comments
Almost all Linux distributions come with a PDF viewer but not necessarily a PDF editor. Don’t worry. There are plenty of PDF editors for Linux that you may install and use.
For the most part, you may be looking to achieve some basic tasks like merging, deleting pages, and similar on a PDF editor. But, you may also have a reason to edit the content in a PDF file.
So, when I talk about how to edit PDF files in Linux, it’s for both the use-cases i.e basic and advanced usage.
In other words, PDF editors can be categorized as follows:
- PDF editors that let you edit the content (annotate, highlight, change text, add/remove images etc)
- PDF editors that let you modify the files by merging files, splitting files, extracting pages from files etc.
In this article, I’m going to list the best PDF editors available for Linux accordingly.
Some applications mentioned here are not open source. They are listed here because they are available on Linux and the article’s focus is on Linux. Such applications are duly marked non-FOSS so that you can make a decision yourself.
Best PDF editors for Linux for editing the content of the PDF files

Just to be clear, I’ve tested this on Pop OS 20.04 but you can easily try them on other Linux distributions as well.
1. LibreOffice Draw
Key Features:
- Edit the text in a file
- Add text/images in the file
- Manipulate the existing content
- Supports creating PDF files
- Cross-platform
LibreOffice draw provides a handy way of editing a PDF file. If your requirements are limited and mostly text editing in a PDF document, Draw will serve your purpose. It may not be a full-fledged PDF editor and comes with some limitations but it’s worth trying out.
In case you’re curious, we also have a detailed article on how to edit PDF files using LibreOffice Draw.
How to install LibreOffice?
LibreOffice is free, open source, and comes bundled with most of the distributions. You will not find it as a separate software — but as a part of the LibreOffice suite.
2. Okular
Key Features:
- Different annotation options as part of its review feature
- Cross-platform
Okular is a popular free and open source document viewer developed by KDE which includes basic PDF editing features.
Once you open a PDF file in Okular, you can copy a part of the text to the clipboard by selecting it, or save it as an image.
You can navigate your way through Tools > Reviews menu to get other options like adding pop-ups notes, inline notes, freehand line drawing, highlighter, stamp and other features.
Okular can pretty much handle your basic PDF editing tasks, however, for advanced editing, it may not be that much useful.
How to install Okular?
Okular is available in the software repository of almost all major Linux distributions. You can install it from your software center.
In either case, you can also build it from source through KDE’s website.
3. Scribus
- Highlight text content
- Add text boxes and other elements
- Move the existing text of a PDF file to re-position it or delete it
Scribus isn’t exactly a PDF editor — but it offers the necessary features to highlight, add content, and a few more things in a PDF file.
It is a useful open-source desktop publishing tool which you can use to make advertisement posters, and write books among other things. For PDF editing, you can surely use it to highlight the text, move the text, add texts, and other objects to improve the PDF file.
Also, it’s a cross-platform open-source tool which makes it even more interesting.
How to install Scribus?
You should find it listed in your software center to easily get it installed. In either case, you can also opt for the Flatpak package available.
I’d suggest going through our Flatpak guide if you don’t know about it.
Also, you can check out its official download page for more options for FreeBSD, macOS, Windows, and others.
4. Qoppa PDF Studio [Not FOSS]
Key Features:
- Edit text contents and properties, shapes and path objects, move and resize images and optimize PDFs to reduce file size.
- Add sticky notes, text boxes, freehand annotations, hyperlinks, headers, footers etc.
- Add password to a PDF document and digitally sign a PDF document.
- Supports advanced features, such as text search, touch mode for laptops, comparing two PDFs side by side, rulers and grid views.
- Cross-platform
PDF Studio is a commercial PDF editor from Qoppa Software that has all the necessary editing features. You can create, review and edit a PDF file.
It’s not a free software, but at least you can try out the full version as a trial. Also, it’s good to see that they offer a one-time purchase. You can compare the editions in their official website and opt for the best one.
How to install PDF Studio?
You can get the .deb package from its official download page and get it installed on Ubuntu distros. If you don’t know, read our guide on how to install DEB files to learn about it.
For any other Linux distribution you can just download the installer script available in official download page and type in the following command from the target directory. The file name may be different — so make sure you verify that.
5. Master PDF Editor [Not FOSS]
Key Features:
- Add or edit text in a PDF file, insert images, change the size of objects and copy objects from a PDF file to the clipboard
- Provides powerful annotation tools, such as sticky notes, measuring tools and shapes as well as enhance capabilities such as strike through, underline and highlights
- Support creation, editing and filling of PDF forms
- Edit scanned documents and documents containing images
- Merge or split a PDF file; create, edit or remove bookmarks
- Supports digital signature and much more
- Cross-platform
Master PDF Editor is yet another proprietary application for editing PDF files. With Master PDF Editor, you can do almost everything ranging from editing a PDF file to editing scanned documents.
You can use it for free — but the unregistered version will have a watermark in your PDF files. If you want to get rid of the watermark, you can choose to purchase it.
How to install Master PDF Editor?
Both .deb and .rpm package are available to download and you can get them from its official download page.
You will also find a Flatpak package on Flathub that you can install. If you don’t know about Flatpak, you may want to follow our tutorial on using Flatpak in Linux. So, you may not find it in your software center unless it supports Flatpak.
Best PDF Editors for Linux to merge, split and extract PDF files
If you don’t really want to edit the content of a PDF file, you have still a lot of things to do like merging, deleting, editing the layout, and so on. So, for all those requirements, let me highlight a few more options:
6. PDF Mix Tool
Key Features:
- Merge files
- Rotate pages
- Split, extract, delete, and add pages
- Edit layout of the pages
PDF Mix tool is an impressive open source application for basic PDF file editing tasks that includes extracting pages, deleting, adding, or merging files.
If you’re curious, we also have a separate article for PDF Mix Tool to explore more about it along with the installation instructions. You can also head right to the official website to download it.
7. PDFsam
Key Features:
- Split, merge, rotate, and extract files
- Optional paid editions to edit PDF files with more advanced features to edit the PDF content
- Cross-platform
PDFsam (basic edition) is a free and open-source tool that lets you easily split, merge, rotate, and extract PDF files.
You may not get the ability to edit the content of a PDF file — but it offers two paid editions with yearly subscription plans (in their official website) that offers more advanced features if you want them and like PDFsam in general.
How to install PDFsam Basic?
PDFsam Basic should be available in the software center of your Linux distribution. In either case, you can head to its official download page to get the portable archive file or the .deb file.
As usual, you can follow our guide to install deb files if you didn’t know already.
8. PDFArranger
Key Features:
- Rotate pages
- Split/Delete pages
- Crop pages
- Drag and drop to re-arrange
- Cross-platform (Windows and Linux)
PDFArranger is a simple open-source tool to re-arrange, merge, split, and rotate pages of a PDF file. It is originally a fork of PDF-Shuffler project which is no longer developed.
Unless you’re looking for more features, you should be good to go with this. You can learn more about its features along with the installation instructions in our separate article on PDFArranger.
9. PDF Chain
Key Features:
PDF Chain is simply a Graphical User Interface (GUI) for PDF Toolkit (PDFtk). Basically, when you use the GUI, it executes the commands necessary to complete the tasks.
Even though PDFtk isn’t directly available on Linux, there’s a port of PDFtk for Linux that uses Java. You need to have it installed for PDF Chain to work. If you’re curious, you can refer PDFtk GitLab page for installation instructions. But, for the most part, you can just use Synaptic Package Manager to install PDFtk-java.
How to install PDF Chain?
You can install PDF chain from the software center itself. If you’re looking to install it on other Linux distributions, you can refer the official website for information.
10. PDF Slicer
Key Features:
- Rotate Pages
- Merge pages
- Delete pages and rotate pages
PDF Slicer is a quite simple open-source tool that helps you extract, rotate, merge, and render PDF files.
You can find it in the software center or simply install the Flatpak package available. If you’ve missed reading our Flatpak guide, you might want to check that.
Wrapping Up
While most of the options available are completely free and open-source — but for some power users, some paid options and proprietary options also exist on Linux.
So, depending on you what you want, you can try the tools mentioned and decide for yourself.
Did we miss any of your favorite tools available for Linux to edit PDF files? Let me know your thoughts in the comments below.
Like what you read? Please share it with others.
Источник


