- 10 цитат на Английском. Развиваем эрудицию
- Installing Vinyl Siding Around Windows
- Cutting and Installing the Molding
- Cutting and Installing the Siding
- Sound Keeps Cutting Out on Windows 10 [Solved]
- Option 1: Update the correct audio driver
- Option 2: Change Sound Enhancement Settings
- Option 3: Change Speaker Settings
- How to Wallpaper a Wall – How to Hang Wallpaper and Cut in Around Windows, Doors and Light Switches
- Wallpapering Tools you will Need
- Preparation Before you Start Papering
- Calculate the Number of Wallpaper Rolls You Need
- Check the Pattern
- Measure the Height of Your Room
- Paper in a Clockwise Direction
- Where to Begin Wallpapering?
- Mixing the Paste
- Getting the Paste on the Paper
- Getting the Paper on the Wall
- Hanging Paper Round an External Corner
- Cutting Wallpaper Round Switches and Sockets
- Papering Round Windows and Door Openings
- Wallpapering Around Arches
- Wallpapering Behind Radiators
- Quick Wallpaper Hanging Tip
- Hanging Wallpaper Troubleshooting Guide
10 цитат на Английском. Развиваем эрудицию
Всем нам иногда сложно оставаться позитивными, ведь жизнь — сложная штука. Эти 10 цитат на английском помогут вам увидеть жизнь с лучшей стороны, открыть потрясающие возможности и улучшить своё настроение!
1. «Success is the child of audacity». (Benjamin Disraeli)
«Успех — дитя смелости». (Бенджамин Дизраэли)
2. «We can easily forgive a child who is afraid of the dark; the real tragedy of life is when men are afraid of the light». (Plato)
«Можно с лёгкостью простить ребёнка, который боится темноты. Настоящая трагедия жизни — когда взрослые люди боятся света». (Платон)
3. «It is not the strongest of the species that survives, nor the most intelligent, but the one most responsive to change». (Charles Darwin)
«Выживает не самый сильный и не самый умный, а тот, кто лучше всех приспосабливается к изменениям». (Чарльз Дарвин)
4. «I am not a product of my circumstances. I am a product of my decisions». (Stephen Covey)
Я не продукт моих обстоятельств. Я продукт моих решений. (Стивен Кови)
5. «You only live once, but if you do it right, once is enough». (Mae West)
«Мы живём один раз, но если правильно распорядиться жизнью, то и одного раза достаточно». (Мэй Уэст)
6. «The two most important days in your life are the day you are born and the day you find out why». (Mark Twain)
Два самых важных дня в вашей жизни: день, когда вы родились, и день когда поняли зачем. (Марк Твен)
7. «Don’t cry because it’s over, smile because it happened». (Dr. Seuss)
«Не плачь, потому что это закончилось, улыбнись, потому что это было». (Доктор Сьюз)
8. «There are no shortcuts to any place worth going». (Helen Keller)
«К достойной цели нет коротких путей». (Хелен Келлер)
9. «Success consists of going from failure to failure without loss of enthusiasm». (Winston Churchill)
«Успех — это умение двигаться от неудачи к неудаче, не теряя энтузиазма». (Уинстон Черчилль)
10. «Never make fun of someone who speaks broken English. It means they know another language». (H. Jackson Brown, Jr.)
«Никогда не смейтесь над человеком, который говорит на ломаном английском. Это значит, что он знает и другой язык». (Х. Джексон Браун — младший)
Следите за новостями, подписывайтесь на канал и изучайте английский язык с удовольствием!
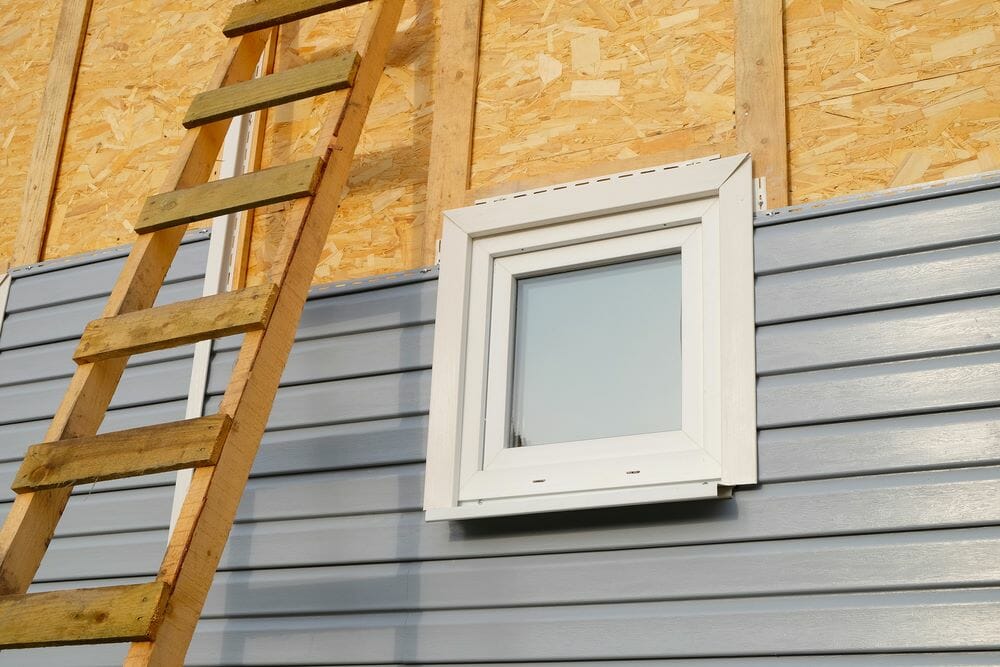
Installing Vinyl Siding Around Windows
In both the construction and real estate sectors, vinyl siding is the most preferred by both contractors and homeowners. It comes in different shapes and colors, making it customizable to the satisfaction of the homeowner. Apart from being attractive, vinyl siding is also durable, and its maintenance costs are also very pocket-friendly.
Vinyl siding is also easy to install, meaning that you can opt for DIY. However, this might not be easy when you are installing the vinyl around the windows. When working around the windows, there is always the desire to waterproof it. Sticking to the recommended procedures, you will be able to seal out water to get professional-standards results in the place that the window trim meets the siding. If you have some problems give Ideal Siding services a call.
Cutting and Installing the Molding
The first step involves inspecting the flashing and the building wrap around the window.
On the vertical sides of the window, the flashing should be able to overlap the bottom flashing by at least two inches. Just above the window, you should ensure that the building paper overlaps the flashing by two inches.
The second step involves the use of tin snips which will help you cut the length of the J molding. Ensure that the molding is two inches longer than the width of the window. Use a utility knife to cut 1-inch notch off the J molding on both ends across the top side. You should then cut in from the tin snips ends along the corner. Snap off the resulting piece.
In the third step, you will be installing the J molding. You should do this on the bottom edge of the window. Proceed to drive in roofing nails using a hammer. Ensure that you push them eight inches in the middle of the nailing slot. Loosely do the nailing such that the J molding can slide back and forth to provide room for expansion and contraction.
In the fourth step, you will have to cut two lengths of the J molding. Ensure that the lengths are two inches longer than the height of the window. Trim out an inch from either side. You can then nail the J molding loosely along the sides of the window. Ensure that the notched section is overlapping the piece that you initially placed at the bottom of the window.
In the fifth step, you will be creating the top piece. You can achieve this by cutting a length of the J molding two inches longer in comparison to the width of the window. Use the tin snips to cut an inch of either side. Ensure that you don’t snap the piece too much to leave a tab. In this step also, you will nail the J molding loosely on top of the window. Proceed to fold the flaps created. These folds should overlap the vertical pieces.
Cutting and Installing the Siding
Step 1: Place the piece of siding you intend to install underneath the window along the bottom edge. Hold it horizontally along the wall. At the Вј inch on both sides, mark the siding. This provides room for expansion.
Step 2: Measure the distance from the inside top of the J channel up to the locking tab of the course below and subtract the Вј inch. Put a marking on the siding to indicate where you intend to cut. Proceed to notch out the siding on the created marks. For vertical cuts, you should use tin snips while the straight edge should be cut using a utility knife.
Step 3: Lock locking the siding into place. You should ensure that it can fit in the J channel. In case you made a wider and horizontal cut on the siding’s profile, then the siding will fit firmly in the J channel. If it fails to fit aptly, remove the notched piece. Into the J channel, install the undersill trim. Fit the top edge of your notched siding into this undersill trim. The notched siding should be nailed into its place loosely.
Step 4: Proceed with the installation of the courses of the siding along window sides. You should ensure that you leave Вј inch spaces in the J channel at the end of every piece. This gives room for expansion. Place a mark then proceed to cut and notch the top piece. It will fit into the J channel. Here also, you should leave Вј inch space for expansion. Snap it into place then proceed tom loosely nail it.
Mark, cut and notch the top piece so that it fits into the J channel, again leaving 1/4-inch space for expansion. Snap it into place and nail it loosely.
These steps will help you install your vinyl along with the window expertly.
If you are living in Victoria, call us for getting high-quality service of siding in Victoria.
Copyright В© 2019-2020 Ideal Siding Franchising.
All Rights Reserved.
Sound Keeps Cutting Out on Windows 10 [Solved]
Last Updated: 4 years ago

Many Windows 10 users have reported saying that their sound cut in and out so rapidly that they can’t even finish watching a video on YouTube.
If you’re also bothering by this annoying issue, calm down please. We’ve found some effective ways that are going to fix the problem for you.
Read on and follow the easy-doing images below!
Option 1: Update the correct audio driver
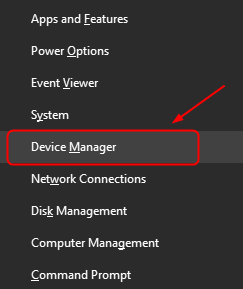
1) On your keyboard, press Windows key and X at the same time, then choose Device Manager.
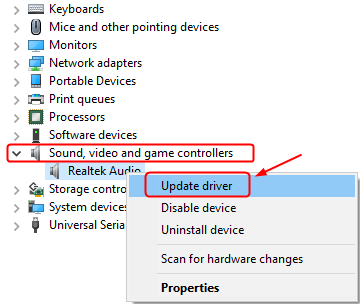
2) Locate and expand category Sound, video and game controllers. Then right click the audio device driver that you have and choose Update driver.
3) Choose Browse my computer for driver software.

4) Then choose Let me pick from a list of available drivers on my computer.

5) Make sure the box for Show compatible hardware it TICKED. Then choose High Definition Audio Device from the list, and hit Next to continue.
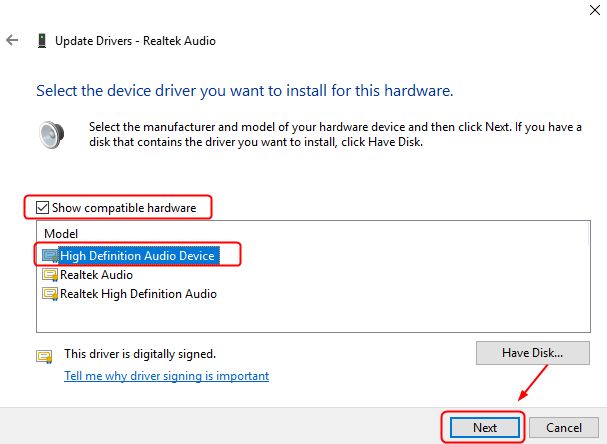
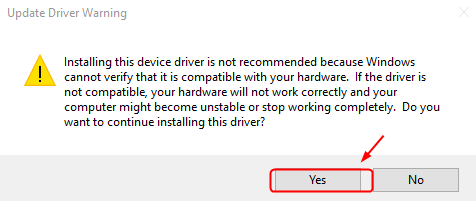
You will see the warning asking you whether you want to go on with the install, click Yes to continue.
6) Restart your computer when the install finishes.
Your sound problem is probably being caused by driver issues. The steps above may resolve it, but if they don’t, or you’re not confident playing around with drivers manually, you can do it automatically with Driver Easy.
Driver Easy will automatically recognize your system and find the correct drivers for it. You don’t need to know exactly what system your computer is running, you don’t need to risk downloading and installing the wrong driver, and you don’t need to worry about making a mistake when installing.
You can update your drivers automatically with either the FREE or the Pro version of Driver Easy. But with the Pro version it takes just 2 clicks (and you get full support and a 30-day money back guarantee):
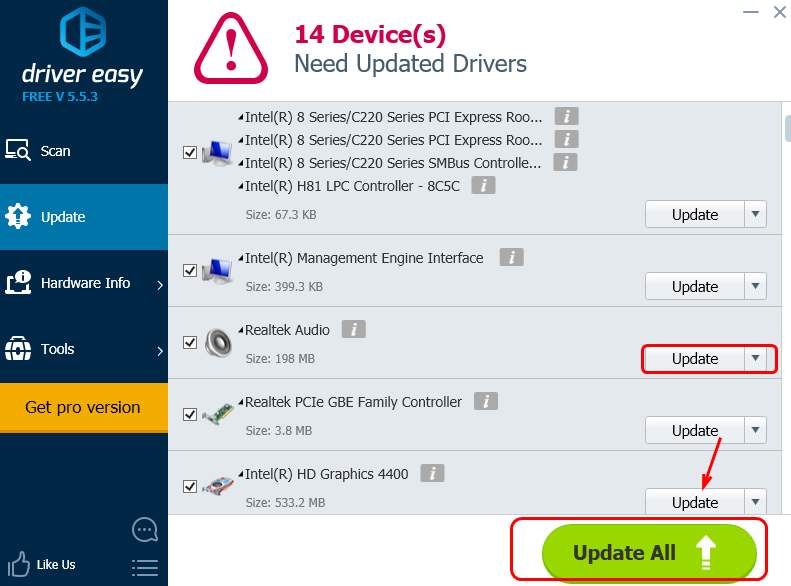
2) Run Driver Easy and click the Scan Now button. Driver Easy will then scan your computer and detect any problem drivers.

3) Click the Update button next to a flagged audio driver to automatically download and install the correct version of this driver (you can do this with the FREE version).
Or click Update All to automatically download and install the correct version of all the drivers that are missing or out of date on your system (this requires the Pro version – you’ll be prompted to upgrade when you click Update All).
Option 2: Change Sound Enhancement Settings
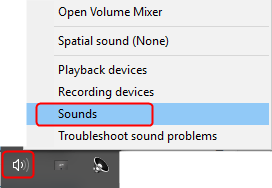
1) Right-click the sound icon on the bottom right corner and choose Sounds.
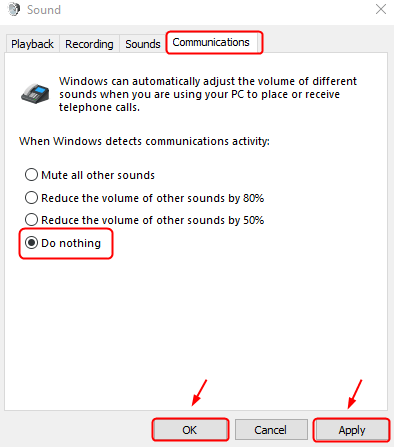
2) Navigate to Communications tab. Then choose Do nothing and click Apply and OK to save the change.
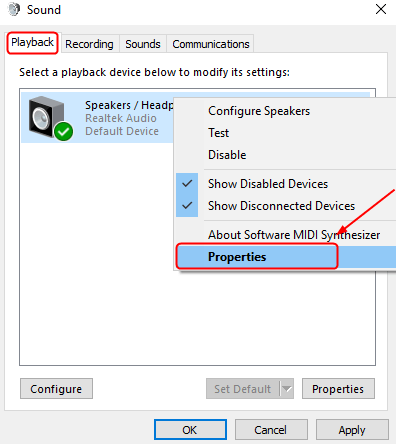
3) Navigate to Playback tab. Right click your default sound device here and choose Properties.
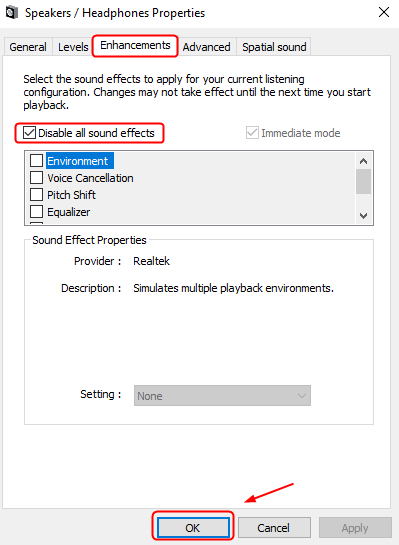
4) Navigate to Enhancements tab, then tick the box for Disable all sound effects. Then click OK to save the change.
Option 3: Change Speaker Settings
1) Right click the sound icon on the bottom right corner and choose Sounds.
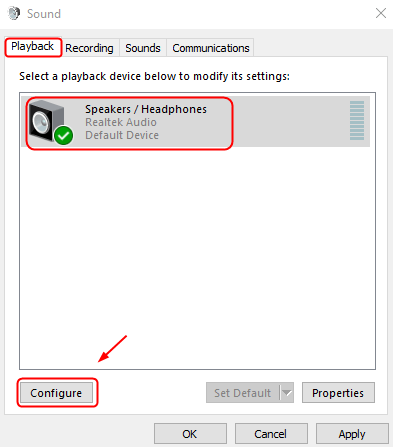
2) Go to Playback tab, then select your default audio device and choose Configure.
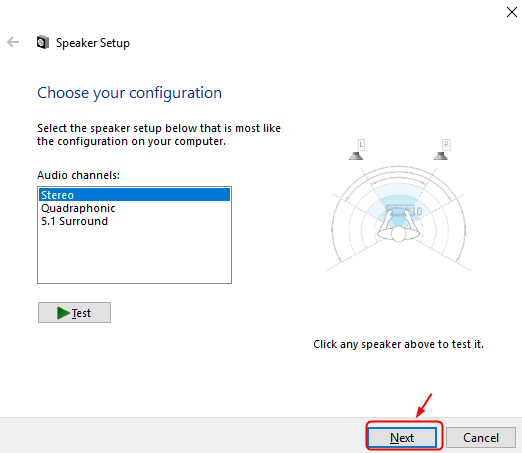
3) Click Next to move forward from the sound test.
4) Un-tick the box for Front left and right and then hit Next.
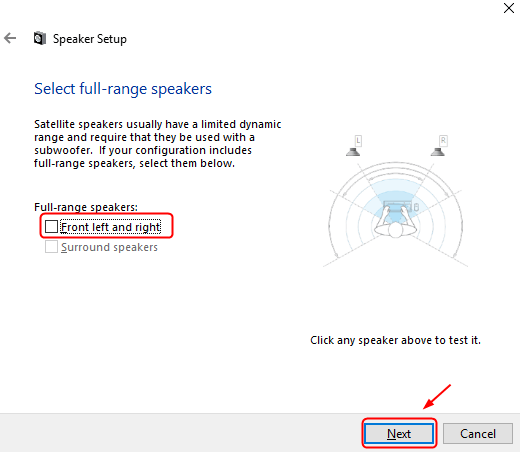
5) Click Finish to end the configuration.
How to Wallpaper a Wall – How to Hang Wallpaper and Cut in Around Windows, Doors and Light Switches
In this project you will learn how to hang wallpaper correctly to ensure that you complete your job to a high standard. Advice on wallpapering around windows and doors, papering behind radiators, mixing paste correctly, tips on cutting strips and pieces and everything else you need to know about how to wallpaper a room.
If you are going to use wallpaper in your home you will need the right tools. As we have pointed out many times, get the best tools you can afford as this will save you a lot of time and hassle. In this project we will take you through the steps involved in how to wallpaper a room, wallpapering around windows and doors and how to hang wallpaper correctly.
Wallpapering Tools you will Need
You will need the following items:
- tape measure
- pencil
- spirit level
- paperhanging scissors
- pasting table
- paste bucket
- pasting brush
- paper-hanging brush
- seam roller
- sharp hobby knife or proprietary wallpaper trimming knife
- overlap adhesive if you are using washable or vinyl paper
Preparation Before you Start Papering
Make sure the surface of your wall is free from flaking paint or grease and never paper over existing wallpaper. The paste on the new wallpaper can soak through to any existing wallpaper, dissolving it and before you know it you will have both wall coverings on the floor. There is a problem solving section at the bottom of this project.
If the wall you are papering is already painted it’s a great idea to paint a line with a 25mm brush on the wall where it meets the ceiling or skirting. The line should be as close to the colour of the paper as possible so if your cuts are not 100% neat the backing wall does not stick out like a sore thumb.
Most wallpapers come in a standard size of 530mm wide and 10.5m long. Woodchip paper and lining paper along with a few other “specials” come in longer or differing width rolls.
Measure round the room for the number of rolls you need using the chart below. Make sure all the rolls of paper you buy all have the same batch number on them and do not be tempted to try and “stretch” the quantity you need.
If there are windows and doors in the room do not deduct rolls for them. There will be wastage and if you run out of paper it may be very hard to get 1 roll extra with exactly the same colour match. It is much better to buy 1 roll more than you need. You will always have some paper left over to patch up if necessary.
Calculate the Number of Wallpaper Rolls You Need
| Perimeter of Room | |||
| 2.3m – 2.4m | 2.4m – 2.6m | 2.6m – 2.7m | |
| 10m | 5 rolls | 5 rolls | 6 rolls |
| 12m | 6 | 6 | 7 |
| 14m | 7 | 7 | 8 |
| 16m | 8 | 8 | 9 |
| 18M | 9 | 9 | 10 |
| 20m | 10 | 10 | 11 |
Check the Pattern
Before you start to measure and cut, check the pattern on the paper (the label will help here). Some papers have a random pattern so it does not matter where you join the lengths.
Some have a pattern which only matches at specific distances so having cut your first length it does not necessarily follow that the next length will follow automatically; there may be a little more wastage with this type of match. Generally even a staggered match is repeated within 100mm.
Measure the Height of Your Room
Always measure the height of your room in a number of places. It will probably vary by a few mm. When you cut your paper to length add 100mm (more if the pattern requires it) to the longest measurement to allow for trimming.
Paper in a Clockwise Direction
We always suggest you wallpaper round the room in a clockwise direction in a room with no focal point, e.g a fireplace.
Where to Begin Wallpapering?
If the room has such a prominent point then begin there, especially with large patterned paper, by centering the pattern over the focal point. In both cases you will need to mark a vertical, plumb line to start your papering on.
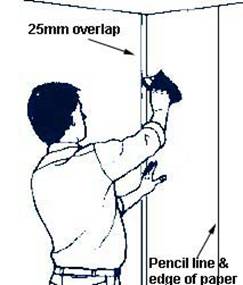
Try and start the papering on a wall where no window or item of a similar exists then (Its important to remember that the corners of your room are extremely unlikely to be absolutely vertical or square so you need to make sure the very first strip of paper you put up is plumb) measure along the wall, from one corner of the room, the width of your wallpaper less 25mm and mark a vertical line from ceiling to skirting board with a spirit level.
This line is the leading edge of your paper and when the first strip is hung it will go round the corner by about 25mm.
Allowing for pattern repetitions, cut some lengths of wallpaper and lay them face down on the pasting table. The ends can be prevented from curling back up into a roll by tying a piece of string, across the table, to the legs.
Pasting the paper with wallpaper paste
Mixing the Paste
Mix the paste in the bucket as per the instructions and tie another piece of string across the bucket at the point where the handle joins the top of the bucket. This will give you something to rest the brush bristles on to avoid getting the handle covered in paste.
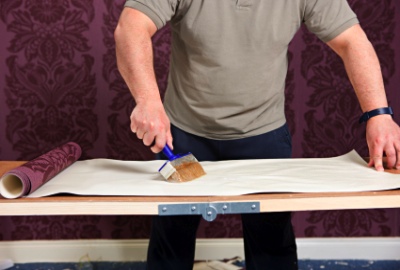
Getting the Paste on the Paper
Paste the paper by working from the middle of each length to the outside and store by folding the wet sides together as shown. If you are careful and by lining up the lengths you have cut with the top edge of the table you should be able to paste 3 or 4 lengths at the same “sitting”.
Some papers need to soak for a while before hanging so check the instructions on the label.
While the paste is soaking in, mark the wall as described above.
Getting the Paper on the Wall
Take the first length and place the edge against the line on the wall. Unfold the paper gently onto the wall using your hanging brush to brush down the middle and out towards both edges. This brushing makes sure that the paper makes contact with the wall and at the same time brushes out any air bubbles which may have got trapped under the paper.
Brush the paper up to the crease between ceiling and wall and also the crease between skirting board and wall. Then double check the edge of the paper is on the line you drew on the wall and press the paper into both the creases with the back edge of your paperhanging scissors. This should give you a line to cut along.
Overlapping the paper
Pull the paper off the wall enough to cut and then brush it back into place.
Brush the paper tightly into the corner and you should have about 25mm overlap on the adjoining wall. This can be trimmed back to about 5 or 10mm and the length of wallpaper (which will be hung later) will overlap it.
The next length of paper to be hung goes on the line also so you are guaranteed to be hanging vertical lengths around the room.
Hanging Paper Round an External Corner
To hang paper round an external corner the same method is applied. The first length should turn round the corner by about 25mm (turnover) and the next length, on the second wall should be laid to a vertical line so it overlaps the turnover by as little as possible.
Extra care must be taken here when working to a pattern and sometimes a large overlap will be required onto the turn over as it will need to be cut back until it matches the pattern.
Cutting Wallpaper Round Switches and Sockets
When you get to a switch or socket, make sure you first turn off the power supply to that unit. Mark the four corners as shown in the diagram and cut diagonally across to leave an opening slightly smaller than the face plate of the socket or switch.
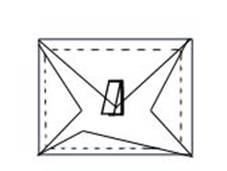
Cutting around sockets and switches
Cut off most of the four flaps as shown by the dotted line. Leave enough to tuck behind the socket or switch. Unscrew the face plate from the wall a little and wiggle it through the cut paper, pushing the paper against the wall as you do.
Tighten the faceplate back to the wall and turn the power back on when the adhesive is dry.
Papering Round Windows and Door Openings
The first overlap on a window should be cut as shown in the diagram. The flap of the cut fold round into the window reveal with the rest of the paper going over, and under, the window. There will be a slight cut out for the window cill.

Papering around window and door openings
Next the two top lengths are cut and pasted above the window folding down and under the head of the window opening.
The two corresponding strips are pasted under the window also. Strip number 3 is as strip 1.
When there is a window in the wall the cut widths may not work out evenly at either side of the window so measure to see if the joint between the strips of paper marked 2 in the diagram come close to the centre of the window.
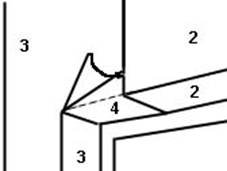
Papering around windows
If it does not then it is fine to start hanging paper at point 2, either side of the centre of the window and work out in both directions to the corner of the room. This way you should avoid silly strips of paper running down the window frame.
Finally pieces (4) are cut in under the head of the window opening. It is as well to cut and paste the pieces numbered 4 before finally pasting lengths 1 and 3. These pieces can then be turned up onto the wall above the window where lengths 1 and 3 will cover them.
Wallpapering Around Arches
The start of an arch is the same as a window. Paper up to, and over the arch (C). Then trim round the shape of the arch allowing a 25 -40mm overhang. Then cut small triangles out of the overhang, forming a series of wedges, or tabs, to allow you to fold it back under the arch.
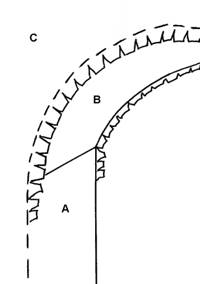
If you just cut slits the paper will crease and possibly tear. When all tabs are folded in a strip of paper, just less than the width of the arch is stuck up under the arch and down the sides (A&B).
Sometimes the strip is cut first, with 25mm of overlap on either side of the arch and this is cut in the same way to allow it to be folded back onto the wall. Then the walls are papered and cut round the shape of the arch.
The drawback to this method is that it involves a very neat circular cut for the arch, nut if you feel up to it. It’s up to you!
Wallpapering Behind Radiators
Wherever possible take the radiator off after draining down the system if necessary. This make for a much better job. If this is not possible, cut the paper to the required shape to drop down over the radiator brackets, then smooth it out using a radiator paint roller.
Quick Wallpaper Hanging Tip
When your paste is mixed well into the bucket, tip it into a roller tray and paste the paper with a long haired roller.
Hanging Wallpaper Troubleshooting Guide
Q: My overlaps at corners will not stay stuck down?
A: If using washable or vinyl papers apply a special overlap adhesive. If using ordinary paper use some more of the original paste and go over the joint with a seam roller.
Q: Patchy stains are appearing through the wallpaper?
A: See the project on blocking water stains. Stains such as grease, soot, water, nicotine etc will keep “bleeding” through unless they are sealed.
Q: The paper has blisters all over it?
A: The paste may not have soaked into the paper for long enough or is not completely pasted. Check also that the walls are not damp or greasy.
In our video sections relating to «decorating basics» and «wallpapering» you will find various films on how to hang wallpaper.
All project content written and produced by Mike Edwards , founder of DIY Doctor and industry expert in building technology.


