- How and when to use the Creative Cloud Cleaner tool | Advanced steps
- What is the Creative Cloud Cleaner tool?
- When should I use the Adobe Creative Cloud Cleaner tool?
- Important first steps
- macOS
- Windows
- macOS
- Windows
- How to use the Creative Cloud Cleaner tool
- Use Creative Cloud Cleaner tool for Windows
- How to Cut Video in After Effects
- Recommended: FilmoraPro to cut video
- How to Cut Videos in After Effects
- 1. Launch After effects and import your video
- 2. Editing the video
- 3. Additional tools
- 4. Exporting the file
- Conclusion
- Keyboard shortcuts
- Keys for selecting tools
- Keys for working with comments
- Keys for navigating a PDF
- Keys for working with Forms
- Keys for working with PDF Portfolios
How and when to use the Creative Cloud Cleaner tool | Advanced steps

某些 Creative Cloud 应用程序、服务和功能在中国不可用。
What is the Creative Cloud Cleaner tool?
The Creative Cloud Cleaner tool is a utility for experienced users to clean up corrupted installations. It removes or fixes problem files and resolves permission issues in registry keys.
When should I use the Adobe Creative Cloud Cleaner tool?
Use the Creative Cloud Cleaner tool with the necessary precautions (such as taking backups of relevant folders) in the case of these issues.
- You have already tried repairing or uninstalling the Creative Cloud desktop app, but still can’t update or install your Creative Cloud app.
- You want to remove older Adobe software completely.
- Your Creative Cloud app fails to launch even though you have already tried uninstalling and reinstalling the app.
- You cannot sign in to Adobe apps even after multiple attempts even after trying these common solutions.
- You cannot connect to Adobe servers and have limited access to Adobe apps and services even after trying these common solutions.
Important first steps
Make sure to follow these steps before you run the Creative Cloud Cleaner tool to avoid potential data loss. Always ensure that you have taken the necessary backups for your files and folders.
Run the log collector tool to take a back-up of your log files.
Why run the log collector tool?
The logs make it easier for Adobe Customer Care to help you in case your run into an error with the Creative Cloud Cleaner tool and decide to contact us.
Check the sync status of your Creative Cloud files in the Creative Cloud desktop app. Wait for all your files to sync completely.
Files that are not synced to your Creative Cloud account could be potentially lost.
Close Adobe Desktop Service and Core Sync in Task manager (Windows) or Activity Monitor (macOS).
Save a copy of the following:
macOS
Windows
Don’t have enough space? If you have run out of space, find the cloudnative folder in the following path and save its copy.
macOS
Windows
Quit any open Adobe apps, including the Creative Cloud desktop app itself.
Close the remaining Adobe background processes in Task Manager (Windows) or Activity Monitor (macOS).
- Creative Cloud
- CCXProcess
- CCLibrary
- CoreSync helper
- Adobe IPC Broker
- armsvc
- AGS Service
Save a copy of all content stored in Adobe product folders, including third-party plug-ins and preference files.
For example, is there a third-party plug-in you have been using for Adobe XD, or a Photoshop workspace you have saved? Keep a copy of the folders where you have them. For details on how to migrate presets, actions, and settings in Photoshop, see Migrate presets, actions, and settings.
If removing older Adobe apps, save a copy of your old installer files.
Adobe only provides downloads to install the two most recent versions of your Creative Cloud apps. If you need continued access to older versions, don’t remove them without first ensuring you have a means to reinstall such as discs or previously saved installers (downloads for older versions are no longer provided by Adobe).
Ensure you’ve completed all the necessary precautions by making recommended backups before you run the tool.
How to use the Creative Cloud Cleaner tool
Choose your operating system to access specific instructions.
Use Creative Cloud Cleaner tool for Windows
Download the Adobe Creative Cloud Cleaner tool.
If prompted, click Save File to download the file on your device.
Right-click the downloaded file and choose Run as Administrator.

If Run as Administrator is not available when you right-click, double-click AdobeCreativeCloudCleanerTool.exe to run the file.
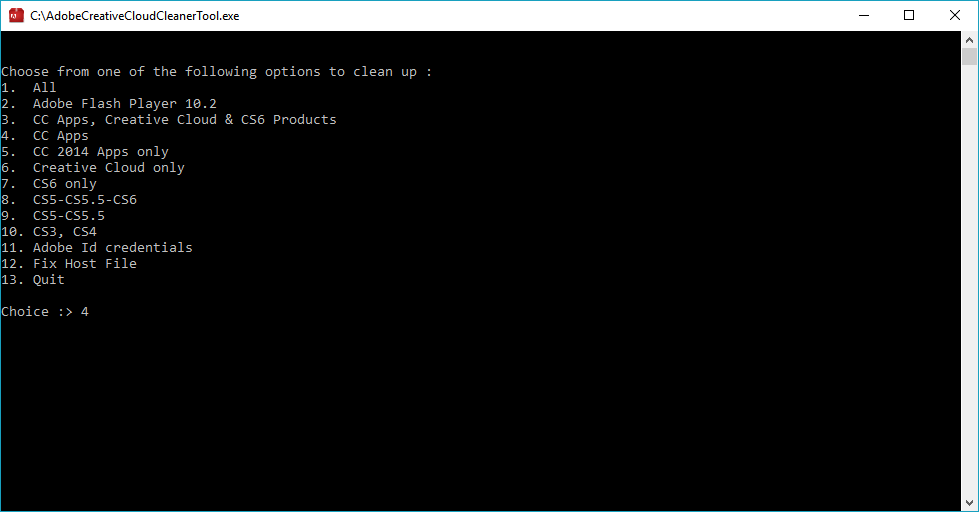
Follow the onscreen instructions in this order:
a) Choose your language: Type e for English or j for Japanese, and then press Enter .
b) Review the Adobe End-User License Agreement: Type y to accept or n to decline (if you decline, the script stops). Press Enter .
c) Type the number that corresponds to the option you want to select, and then press Enter . For example, type 4 (CC Apps) if you want to uninstall a Creative Cloud app.
d) Subsequently, to remove an app, select the app that you want to remove by typing the number that corresponds to the app name, and then press Enter .
If you are facing issues with file syncing, you might have to remove CoreSync . To do this, type 1 or 4 and press Enter . Then type the number that corresponds to CoreSync and press Enter .
e) Confirm that you want to remove the entry: Type y and then press Enter .
f) (Optional) If you’re unable to connect to Adobe’s servers, repeat these steps to fix your host file. After accepting the End-User License Agreement, type 12 to select the host file option. Confirm that you want to fix the host file: Type y and then press Enter . The Cleaner tool creates a backup of the host file (named hosts_bkup) in the same directory, which you can revert to if a problem occurs.
When you see the message «Adobe Creative Cloud Cleaner tool completed successfully,» press Enter and restart your computer.
Once you have successfully run the Adobe Creative Cloud Cleaner tool, install your Creative Cloud or Creative Suite application.
How to Cut Video in After Effects

Liza Brown
Mar 24, 2021• Proven solutions
After Effects is an extremely flexible software program, and whilst its main focus is on effects and add one to video production, it can be used to do some editing as well. And today we are discussing cutting video, and whether it can be done in After Effects or not.
Recommended: FilmoraPro to cut video
This is a basic tutorial about Adobe After Effects, professional video editing software. However, if you think After Effects is too difficult, consider Wondershare FilmoraPro. This is a professional video editor, but easy-to-use tool for users who want to enter a new editing level. You just need to use the split functionality in the toolbar to cut video. So easy! Download it below (Free) and cut your video footage with FilmoraPro.


How to Cut Videos in After Effects
1. Launch After effects and import your video
The first task is to open a new project, and load your video into it. First off from the main menu is to select new composition. Which then opens up the composition menu, choose the resolution and so on you want, and then create your composition.

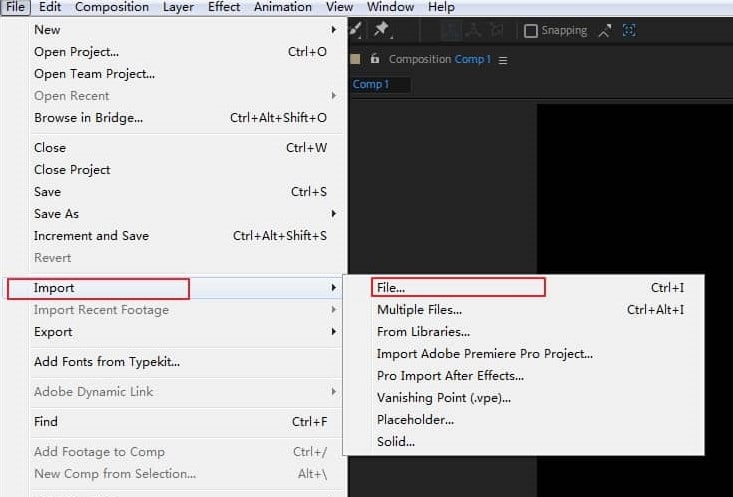
You are now ready to import your video. This is achieved through the file/import menu as we see here
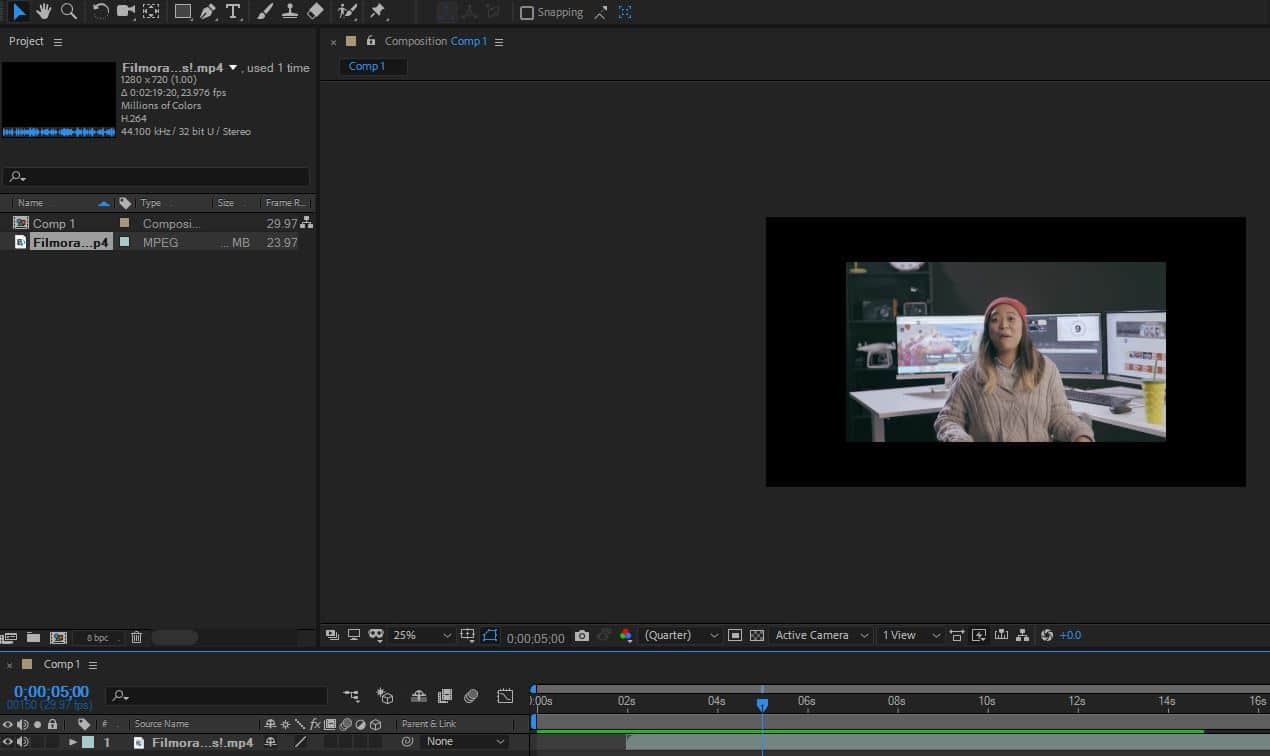
Once you have your video, you can drag it into the timeline as we see below. Now here my video clip is a lot smaller and shorter than my composition, but for purposes of this it doesn’t really matter. You can use this effect though, as in After Effects, you can have the actual video bounce around inside the composition as it is playing, an interesting effect to try.
2. Editing the video
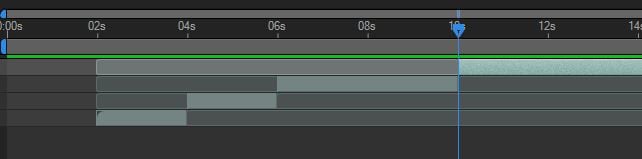
To make things clearer, my first step is to zoom in on the timeline so I can see clearly the start and end of my video track. Now I can begin to cut the video track into the pieces I want. This is very easy, select the video track in the timeline, move the guide to the exact point you want to cut the track, and then you can either use the edit menu edit>split layer or the shortcut Control+Shift+D.
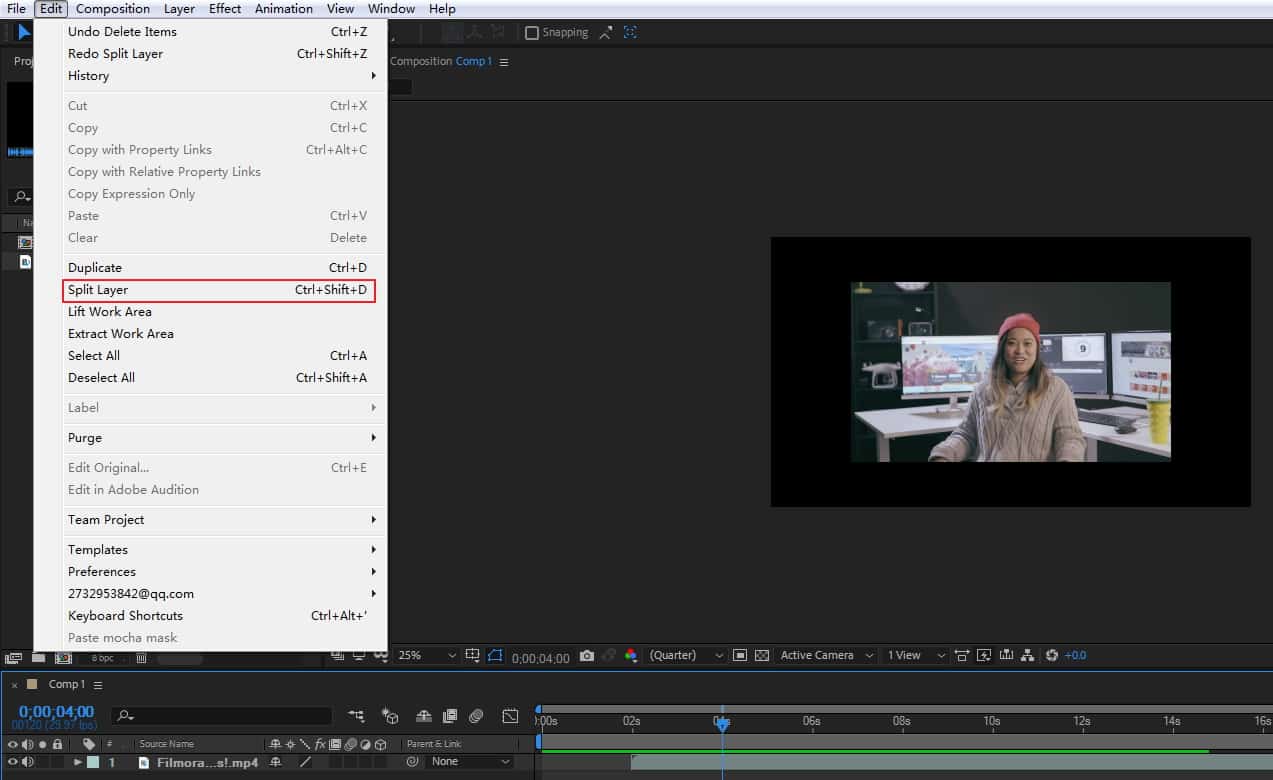
Whichever way you accomplish it, this leaves you with your video track split, and the second part is shifted off into a separate layer too so you can add in transition effects and so on as you want. Of course, you are not restricted to one cut, you can make as many as you want and be able to do re-organize them and so on if you wish.
3. Additional tools
There are several advantages in cutting this way, in that the separate layers enable quite complex effects and processing to be done on each part of the video entirely independently, they can easily be reordered as well without problem.
As we can see here, the video will play in an entirely different order now. One of the things you can do very easily once you have this is to add transition effects, simply highlight a point on the timeline where the transition is to begin, and choose one from the effect menu.
![]()
Once added you can adjust the time taken and so on to get the precise effect you want. You can of course delete any clip you do not want by simply deleting the layer.
4. Exporting the file
Once you are happy you can then export the finished file from the file>export menu. Choosing ‘add to render queue’ presents you with the render menu allowing you to choose the settings, filename and destination of the final output as you need.
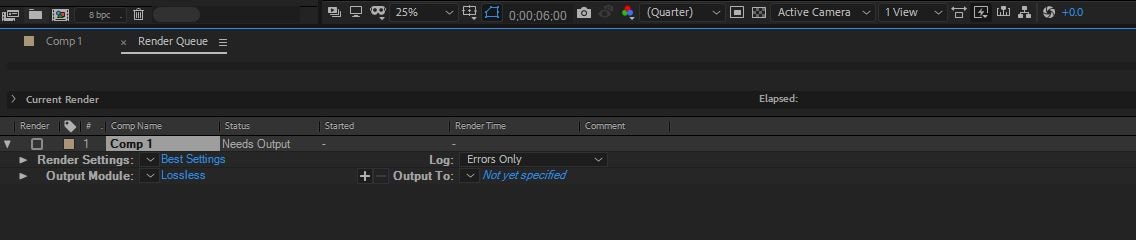
And that is how simple cutting video is with Adobe After Effects.
Conclusion
As we have shown, Adobe’s own Premiere Pro offers a much braoder range of tools for cutting and trimming and makes a much better platform for the process. In addition there are many video editors at all budgets designed specifically for cutting and trimming video and perhaps present a better option than using After effects to accomplish it.
As we said before, cutting in Adobe After Effects may be difficult for video editing beginners. Then try to use FilmoraPro to cut videos. It is the best editor that can make excellent video, yet easy to use. Watch the video below to get more ideas about FilmoraPro.
Keyboard shortcuts
某些 Creative Cloud 应用程序、服务和功能在中国不可用。
For common keyboard shortcuts you can use with Windows, see http://support.microsoft.com/kb/126449.
Keys for selecting tools
To enable single-key shortcuts, open the Preferences dialog box (Edit > Preferences), and under General, select the Use Single-Key Accelerators To Access Tools option.
Temporarily select the Hand tool
Marquee Zoom tool
Cycle through zoom tools: Marquee Zoom, Dynamic Zoom, Loupe
Temporarily select Dynamic Zoom tool (when Marquee Zoom tool is selected)
Temporarily zoom out (when Marquee Zoom tool is selected)
Temporarily select Zoom In tool
Select Object tool
Edit Object tool
Enter/Exit Forms editing
Text Field tool
Cycle through tools in forms authoring mode: Text Field, Check Box, Radio Button, List Box, Dropdown Box, Button, Digital Signature, Barcode
Cycle through Multimedia tools: 3D object, SWF, Sound, Video
Edit Document Text tool
Insert Blank Pages tool
Open Output Preview
Touch Up Reading Order tool (or if already selected, return focus to dialog box)
Keys for working with comments
To enable single-key shortcuts, open the Preferences dialog box (Edit > Preferences), and under General, select the Use Single-Key Accelerators To Access Tools option.
Sticky Note tool
Text Edits tool
Current highlighting tool
Cycle through highlighting tools: Highlighter, Underline Text , Cross Out Text
Shift+U (Windows only)
Current drawing markup tool
Cycle through drawing markup tools: Cloud, Arrow, Line, Rectangle, Oval, Polygon Line , Polygon, Pencil Tool , Eraser Tool
Shift+D (Windows only)
Current Stamp or Attach tool
Cycle through Stamp, Attach File , Record Audio Comment
Move focus to the next comment or form field
Move focus to previous comment or form field
Open pop-up note (or text field in the Comments List) for comment that has the focus
Close or exit pop-up (or text field in the Comments List) for comment that has the focus
Keys for navigating a PDF
Page Up or Shift+Enter
Page Up or Shift+Return
Page Down or Enter
Page Down or Return
Home or Shift+Ctrl+ Page Up or Shift+Ctrl+Up Arrow
Home or Shift+Command+ Up Arrow
End or Shift+Ctrl+Page Down or Shift+Ctrl+Down Arrow
End or Shift+Command+ Down Arrow
Left Arrow or Ctrl+ Page Up
Left Arrow or Command+ Page Up
Right Arrow or Ctrl+Page Down
Right Arrow or Command+Page Down
Previous open document
Next open document
Scroll (when Hand tool is selected)
Keys for working with Forms
To enable single-key shortcuts, open the Preferences dialog box (Edit > Preferences), and under General, select the Use Single-Key Accelerators To Access Tools option.
Keys for working with PDF Portfolios
These keys are available in the files list of the Details pane.
Move focus to the next or previous row when in the body of the file list on the left
Up Arrow or Down Arrow
Up Arrow or Down Arrow
If pressed in the body of the file list, navigate one level up from within a folder
Press the Go Back button in a folder if focus is on the button.
Enter or Spacebar
Enter or Spacebar
If pressed when focus is on a row in the file list representing a subfolder, navigate to a subfolder, or open an attachment in Preview mode.
If in the body of the file list, move to the first or last row
If in the body of the file list, move to the next or last set of rows to fit the screen
Page Down or Page Up
Page Down or Page Up
Select or deselect all files
Ctrl+A or Shift+Ctrl+A
Command+A or Shift+Command+A
If in the body of the file list, extend the selection by adding the next row above or below the selected row
Shift+ Up Arrow or Shift+ Down Arrow
Shift+ Up Arrow or Shift+ Down Arrow
Change whether the row with focus is in the selection
Move focus up or down one row without changing the selection


