- 6 утилит для восстановления данных с поврежденных жестких дисков в Linux
- 1. Testdisk
- 2. ddrescue
- 3. Foremost
- 4. scalpel
- 5. PhotoRec
- 6. grep
- Заключение
- Top 5 Software for Linux data recovery
- Top 5 software for Linux data recoveryпјљThis tutorial displays 5 most important data recovery software programs that are available in the market.
- Part 1: 5 Linux Data Recovery Software
- 1. Mondo Rescue
- 2. Test Disk
- 3. Safe Copy
- 4. Photo Rec
- 5. DD rescue
- Part 2: Tips to manage Hard Drive on Linux
- Part 3: Free Data Recovery Software for Windows and Mac
6 утилит для восстановления данных с поврежденных жестких дисков в Linux
Оригинал: 6 Linux Tools to Help Recover Data from Corrupted Drives
Автор: MTE Staff
Дата публикации: 11 сентября 2018 года
Перевод: А. Кривошей
Дата перевода: октябрь 2019 г.
Ваш экран просто стал черным или ваш ноутбук завис без предупреждения? Может быть, ваш жесткий диск начал барахлить. Хуже того, может быть, вы вдруг не можете сохранить данные в свой домашний раздел?
Все эти признаки поврежденного или неисправного диска, но нет причин немедленно выбрасывать компьютер. Прочитайте эту статью, чтобы узнать о шести утилитах Linux, которые могут помочь вам восстановить ваши данные и вернуть вашу цифровую жизнь в обычное русло.
1. Testdisk
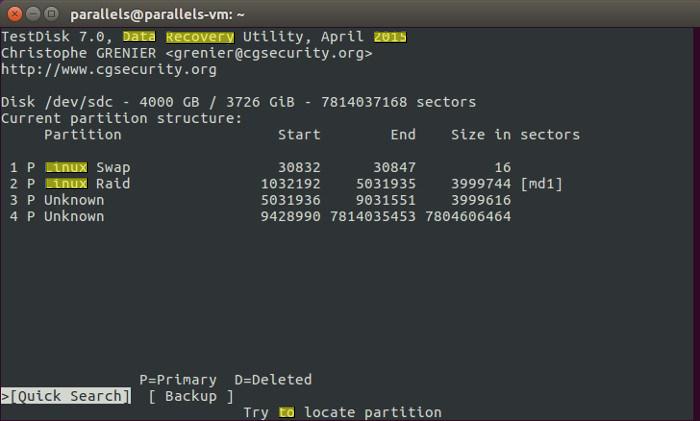
Некоторые инструменты восстановления Linux пытаются сохранить ваши данные, копируя все, что можно извлечь из поврежденного раздела. Это может сработать, но не гарантированно, так как проблемы с самим разделом могут скрывать данные, которые вы хотите получить.
Testdisk очень удобен, поскольку он может на самом деле исправлять ошибки на уровне раздела, упрощая восстановление данных с помощью самого Testdisk или другого инструмента восстановления данных. Он может даже исправить поврежденный жесткий диск и снова заставить ваш ПК с Linux работать, чтобы вы могли получить прямой доступ к данным.
Помимо выполнения глубоких операций, таких как восстановление загрузочных секторов и таблиц файловой системы, Testdisk также способен восстанавливать данные,даже удаленные, с жестких дисков с файловыми системами NTFS, FAT, exFAT и ext.
Чтобы установить Testdisk в Linux, перейдите в терминал и введите:
Если вы хотите узнать больше об использовании Testdisk, вы можете прочитать руководство по Testdisk здесь .
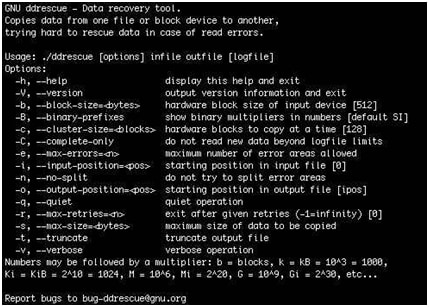
2. ddrescue
Хотя ddrescue не является инструментом восстановления данных, он должен стать вашим первым шагом на пути к извлечению ваших файлов. Ddrescue создает образ вашего поврежденного диска или раздела, чтобы вы могли проанализировать копию вашего сломанного диска.
Всегда копируйте свой диск в отдельный образ, прежде чем начинать операции восстановления файлов с помощью инструментов, перечисленных ниже. Чем дольше вы используете неисправный диск, тем больший ущерб вы можете причинить.
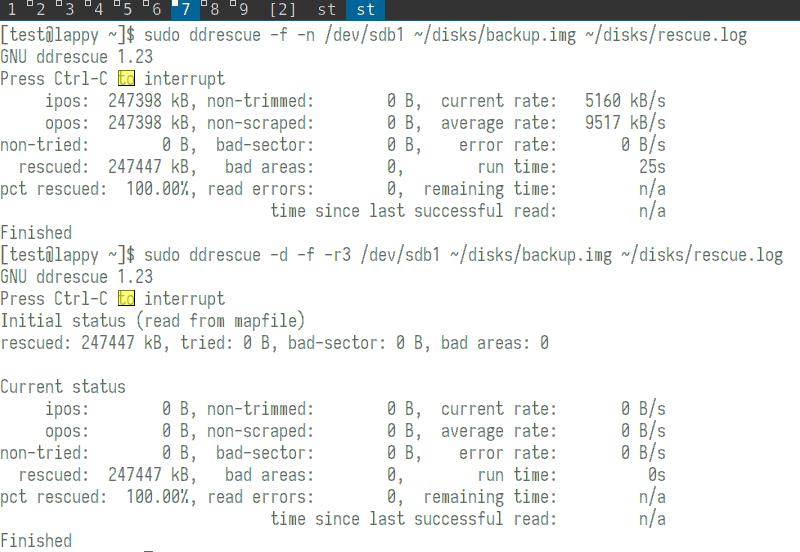
Здесь вы видите некоторые результаты ddrescue в действии. В первой команде он копирует весь диск в образ с именем «backup.img». Вторая команда затем копирует в тот же образ только плохие блоки, проходя каждый раз по этим блокам, чтобы попытаться их прочитать.
Когда вы запускаете эти команды, всегда используйте файл журнала. Резервное копирование может занять несколько часов или дней, и без лог-файла любые прерывания заставят вас начать процесс заново с самого начала.
Когда этот процесс завершен, вы можете смонтировать скопированный образ и использовать приведенные далее утилиты для извлечения из него файлов. Дальнейшее использование других инструментов восстановления Linux из этой статьи позволит получить данные из того же «backup.img», созданного здесь.
3. Foremost
Foremost использует структуры данных общих типов файлов для извлечения данных. Вы можете просканировать весь образ диска для всех его файлов или указать определенные типы файлов, которые вам наиболее интересны.
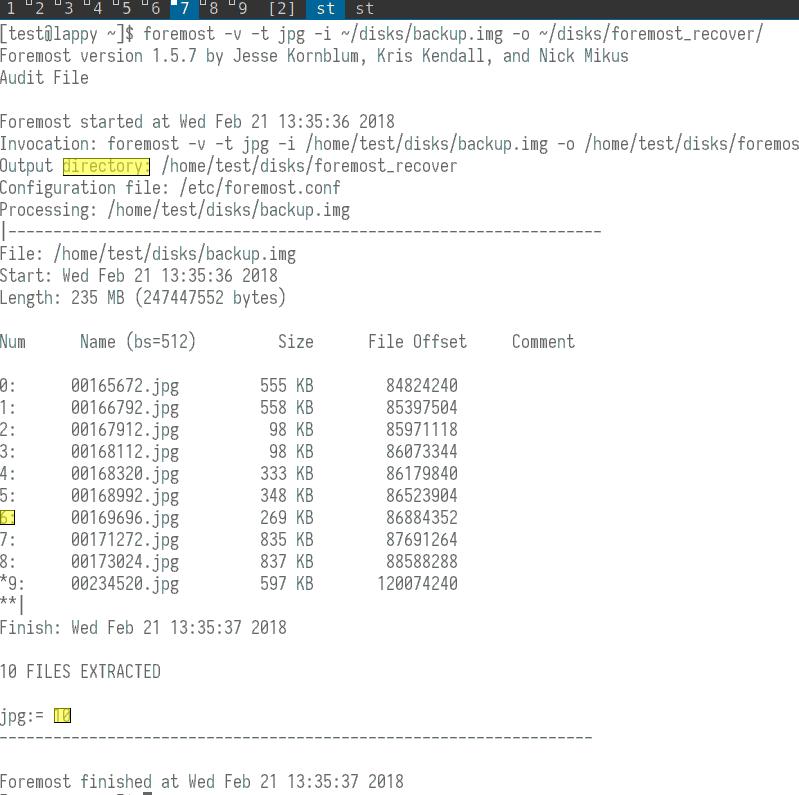
Здесь вы можете увидеть вывод Foremost в подробном режиме (опция -v). Опция -t ищет типы файлов jpg, а опции -i и -o отмечают соответствующий входной файл и выходной каталоги.
Вы можете видеть, что Foremost анализирует образ, созданный на предыдущем шаге; этот образ содержит несколько JPEG-файлов. Foremost смог найти десять таких файлов, и когда он закончил сканирование образа, он скопировал эти десять файлов в указанную выходную папку.
4. scalpel
Scalpel , изначально основанный на Foremost, стремится быть экономным в своей работе. Он использует многопоточность и асинхронный ввод/вывод для эффективного поиска.
Пользователи также могут указать типы файлов, которые они хотят восстановить, отредактировав файл конфигурации Scalpel. Конфигурация по умолчанию производит много выходных данных, даже без подробного режима (параметр -v).

На этом снимке экрана вы можете увидеть окончательный результат анализа Scalpel для «backup.img». Базовая команда (приведенная в нижней части снимка экрана) требует только выходной каталог и образ для анализа.
5. PhotoRec
PhotoRec отстает от своих конкурентов, сосредоточившись на восстановлении фотографий, видео и текстовых документов. Он также работает как интерактивная утилита внутри консоли.
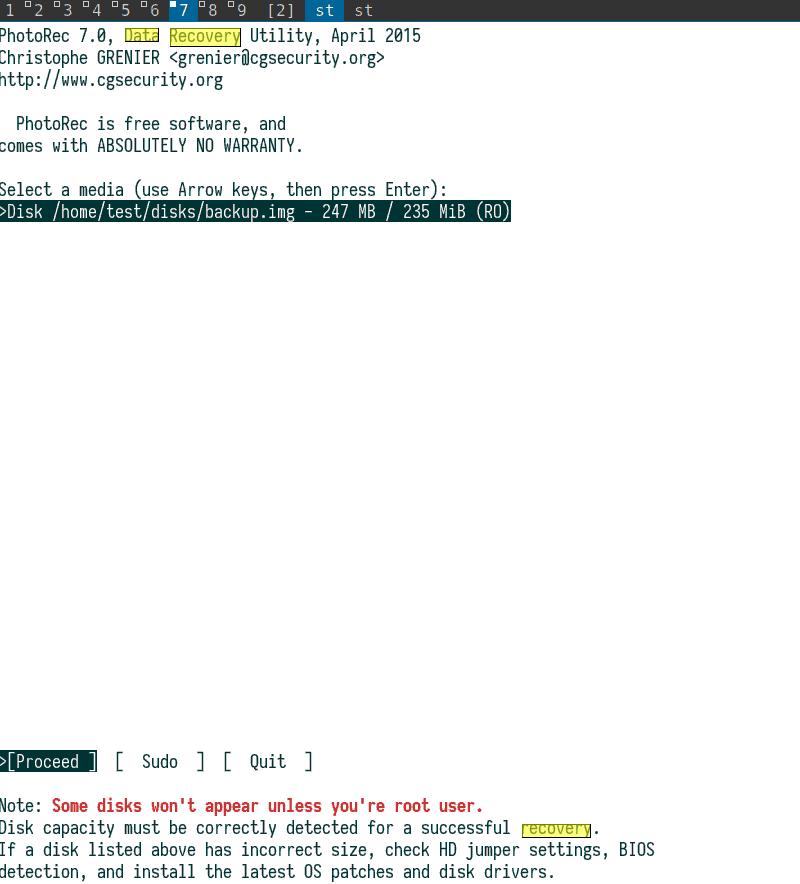
В команде PhotoRec должен быть указан желаемый образ (наш backup.img) и выходная папка. Затем PhotoRec помещает пользователя в графическое окружение. Скриншот здесь показывает размер образа. На следующих экранах запрашивается тип раздела диска и хотите ли вы искать файлы по всему образу.
6. grep
Наконец, мы подошли к grep . Он может показаться не самым простым вариантом восстановления, но grep может находить удаленные или потерянные текстовые файлы путем поиска строк, присутствующих на блочном устройстве или образе диска.
В образе backup.img существует файл с именем «myfile». Он содержит только одну строку текста: «This is the file I will try to recover.»
Grep использует эту строку в качестве отправной точки для восстановления файлов. Помимо нескольких других параметров, вы можете видеть, что в этом примере он выводит найденную строку в новый двоичный файл с именем «foundtext».
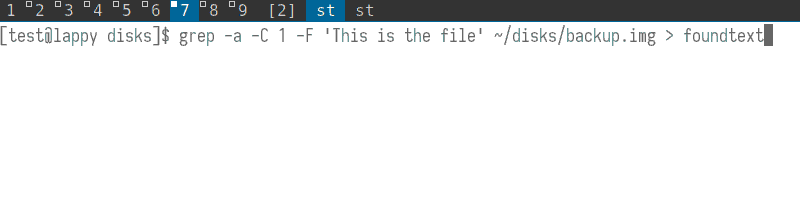
Также, вы можете изменить параметр -C, который печатает дополнительный контекст, окружающий строку в исходной команде. В этом примере команда указывает grep найти одну строку текста до и одну после указанной строки.
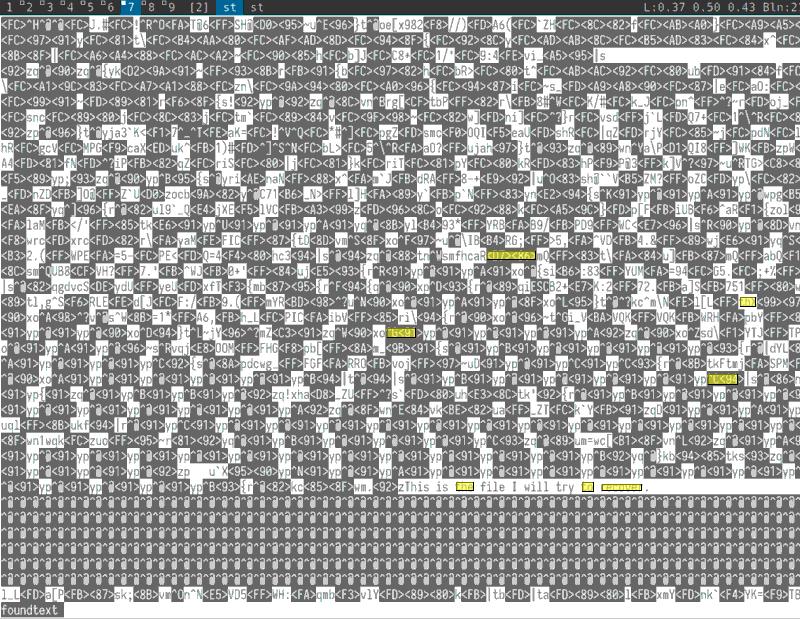
Начиная с -C 200, grep найдет 200 строк как до, так и после строки. Такой охват здесь не нужен, но он может быть важен для больших текстовых файлов с сотнями строк. Конечно, вам нужно знать содержимое ваших файлов, чтобы у grep была отправная точка для начала поиска.
Grep создаст в качестве вывода двоичный файл. Тем не менее, некоторые части будут удобочитаемыми, например желаемая строка текста этого примера в нижней части этого снимка экрана. Ваша задача — вручную выбрать нужные данные. Конечно, это тяжелая работа, но она лучше альтернативы отсутствия файлов.
Заключение
Итак, сначала скопируйте ваш диск или раздел с помощью ddrescue, а затем работайте с этой копией с помощью любых инструментов восстановления Linux, которые вам нужны. Не бойтесь попробовать более одного инструмента, особенно если ваш первый выбор не нашел данных, которые вы хотели найти. Будьте терпеливыми. Если вам повезет, вы вернете свои драгоценные файлы еще до того, как узнаете об этом.
Источник
Top 5 Software for Linux data recovery
Top 5 software for Linux data recoveryпјљThis tutorial displays 5 most important data recovery software programs that are available in the market.

David Darlington
Sep 14, 2021 • Filed to: Windows Computer Solutions • Proven solutions
Data recovery is to make sure that the contents of the hard drive are restored without any issue and problem either with the help of the built-in functionalities of the computer or by installing any third-party software program. The best way to avoid the crisis is by making sure that enough preparation has been done in this regard so that the Disaster Recovery or DR plan could be launched. This tutorial has been written to make sure that the user gets the knowledge about the 5 most important data recovery software programs that are available in the market. It will also make sure that the user gets to know the interface so that the implementation of different commands becomes easy and effective.
Part 1: 5 Linux Data Recovery Software
The list that will be mentioned later comprises of those programs which are not only of high quality but also make sure that the data recovery is made simple and straightforward for all those users who are using Linux but are not tech-savvy at all. These Linux data recovery programs are stand-alone and for the same reason, they work on their own without any other software program installation. It means that only installing any of the 5 programs mentioned will make sure that the data is recovered from those sectors of the Linux operating system from where it cannot be accessed or recovered using the traditional methods.
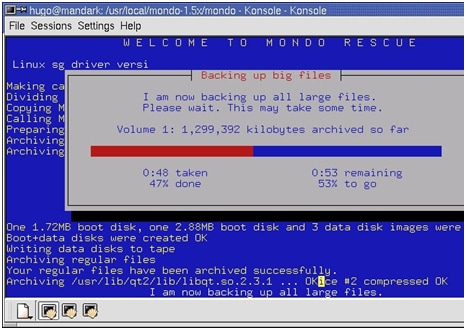
1. Mondo Rescue
This program can be regarded as the best Linux data recovery software that is available for the disaster recovery of the Linux OS. It supports all old and new versions of Linux starting from i386 to FreeBSD. The best features according to which the users have rated this program are that it also supports the external storage devices such as tapes and CD/DVDs as storage devices for the data backup.
Advantages and disadvantages
- The non-raidВ file system can be backup using this program and when it comes to restoration it can be done in the form of a raid file system which also includes the root partition.
- TheВ hard disk partitionsВ can be restructured.
- The interface of the program is complex and for a normal user, it is very difficult to use.
2. Test Disk
Everyone loves to get free programs online and for all such users. Test Disk is a boon as it is free to use and no charges apply. It has been exclusively developed to make sure that the lost disk partitions are recovered all those sectors of the disk that are no bootable are fixed to make sure that they become bootable again. The error fixing caused by viruses and malware can also be fixed using this tool which makes the Linux data recovery very swift and easy.
Advantages and disadvantages
- The partition table can be fixed by using this software and if the partition has been deleted accidentally then it can also be recovered.
- NTFSВ boot sector backup recovery is also possible.
- The program is open-sourced which makes that several developers are updating which causes bugs and errors sometimes. It also causes faulty recovery of data.

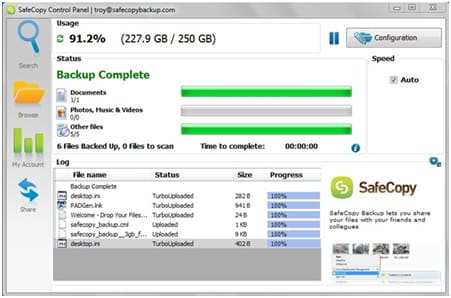
3. Safe Copy
Yet another powerful and awesome tool that makes sure that the Linux data recovery is fast and reliable. Safe copy as its name suggests makes sure that as much data volume as possible is recovered without any issue and problem. This tool also uses the external storage media such as CD, DVD, and Bluray as the source of the data recovery which is one of the best features offered.
Advantages and disadvantages
The following are some of the advantages and disadvantage of using the tool for Linux data recovery:
- It gives new life to the file that is located on the damaged media.
- The overall usage of the tool is very easy and the data recovery can be done in just a few clicks.
- It specifies and skips the hard disk sizes which might cause issues in recovering data from the source.
4. Photo Rec
It is another stunning tool that has been developed to make sure that the data is recovered fromВ the damaged and old hard drives, CD-ROMS, DVD ROMS which are malfunctioning. As the name suggests this program is also used to make sure that the data is recovered from the digital camera memory as well which is actually in the form of pictures. It directly goes for the data ignoring the file system in place due to which data from severely damaged media can also be restored without any issue and problem.
Advantages and disadvantages
- The interface of the program increases its usability as a novice user can also operate the program easily.
- As mentioned before the data recovery from badly damaged media is also possible without any issue.
- Again the tool is open source which makes it is a bad choice for all those users who are of advanced level due to glitches and bugs that are encountered.

5. DD rescue
It is one of the most intelligent Linux data recovery programs that are free and open-sourced. The contents from the block disk are copied to the other drive by this program and during this process, if the read data encounters errors then the program does its best to make sure that the data is backed up immediately to the destination drive. The only thing user needs to do is to make sure that the log file is read and run in reverse.
Advantages and disadvantages
- The tool works automatically and the data restoration is very effective and efficient.
- The bad sectors of the disk that need fixtures and detected by the program and highlighted.
- The log file can be used to read multiple commands that copy different areas of the files. It makes the process messy and muddled at times.
Part 2: Tips to manage Hard Drive on Linux
Following is a list of most important commands to make sure that the hard disk is managed effectively using the Linux OS:
- View partitions of hard drivesВ # fdisk -l /dev/sdaВ command is to be used.
- Once the partition is created it can be formatted using theВ # mkfs.ext3 /dev/sda7В command.
- To view the size of the partitionВ # fdisk -s /dev/sda7 4843566В command should be run.
- Partition table issues lead to most of the issues in hard drives running on Linux OS. The code might be ling for the novice users but it has to be run in the same manner to avoid the hard drive related issues in Linux:
$ fdiskВ /dev/sda
The number of cylinders for this disk is set to 9729.
There is nothing wrong with that, but this is larger than 1024,
and could in certain setups cause problems with:
1) software that runs at boot time (e.g., old versions of LILO)
2) booting and partitioning software from other OSs
(e.g., DOS FDISK, OS/2 FDISK)
Command (m for help): p
Disk /dev/sda: 80.0 GB, 80026361856 bytes
255 heads, 63 sectors/track, 9729 cylinders
Units = cylinders of 16065 * 512 = 8225280 bytes
Disk identifier: 0xf6edf6ed
Device BootВ В В В В StartВ В В В В В В В EndВ В В В В BlocksВ В IdВ System
/dev/sda1В В В В В В В В В В В В В В 1В В В В В В В 1959В В В 15735636В В В cВ W95 FAT32 (LBA)
/dev/sda2В В В В В В В В В В В 1960В В В В В В В 5283В В В 26700030В В В fВ W95 Ext’d (LBA)
/dev/sda3В В В В В В В В В В В 5284В В В В В В В 6528В В В 10000462+В В 7В HPFS/NTFS
/dev/sda4В В В В В В В В В В В 6529В В В В В В В 9729В В В 25712032+В В cВ W95 FAT32 (LBA)
/dev/sda5В В *В В В В В В В 1960В В В В В В В 2661В В В В 5638752В В 83В Linux
/dev/sda6В В В В В В В В В В В 3265В В В В В В В 5283В В В 16217586В В В bВ W95 FAT32
/dev/sda7В В В В В В В В В В В 2662В В В В В В В 3264В В В В 4843566В В 83В Linux
Partition table entries are not in disk order
Command (m for help): x
Expert command (m for help): f
Done.
Expert command (m for help): w
The partition table has been altered!
Calling ioctl() to re-read partition table.
Part 3: Free Data Recovery Software for Windows and Mac
Here I would like to recommend a professional data recovery software for you.RecoveritВ andВ Recoverit for Mac, a safe and effective data recovery software, retrieves your lost videos, photos, music, documents, emails, etc. from your PC’s hard drive as well as from USB drives, external hard drives, and other storage devices.
- Completely recover deleted, formatted, and lost data.
- Recover documents, images, videos, audio, emails, and archives.
- Recover data from Windows and Mac hard drives and most storage devices.
- Preview lets you enjoy data recovery in advance.
- An easy-to-use wizard, no prior recovery skills needed
Источник


