- How to set or change a computer’s date and time
- Setting the date and time in BIOS or CMOS setup
- Setting date and time in the operating system
- Windows 10
- Windows 8
- Windows 7 and Vista
- Windows XP, 2000, 98, 95, NE, and NT 4
- MS-DOS and Windows command line
- Linux command line
- FreeBSD
- Setting the date and time on the Apple operating system
- Setting the date and time on a mobile device
- How to change the time and date on Windows 10
- How to change the time on Windows 10?
- date and time display in system tray WINDOWS 10
- Replies (8)
How to set or change a computer’s date and time

This page contains steps on how to change the computer’s date and time in the computer’s operating system, or in the BIOS settings. It also describes how to change the date and time on a mobile device.
If the date and time is resetting to an old date or the wrong time, the CMOS battery is bad and needs to be replaced. For help with CMOS battery issues, see: Why is computer asking for the time and date each time it boots?
If you are using Windows on a virtual machine, change the date and time on the host machine, not the virtual machine. The virtual machine gets the current date and time information from the host.
Setting the date and time in BIOS or CMOS setup
- Open the CMOS setup.
- How to enter the BIOS or CMOS setup.
- In the system setup menu, locate the date and time.
- Using the arrow keys, navigate to the date or time, adjust them to your liking, and then select Save and Exit.
Steps may vary for your BIOS. For additional information, see: Computer BIOS help and support.
If, after rebooting the computer the date and time have to be set again, your CMOS battery is most likely bad, consider replacing the CMOS battery. See: How to replace the CMOS battery.
Setting date and time in the operating system
To change the system time in your operating system, follow these steps.
Windows 10
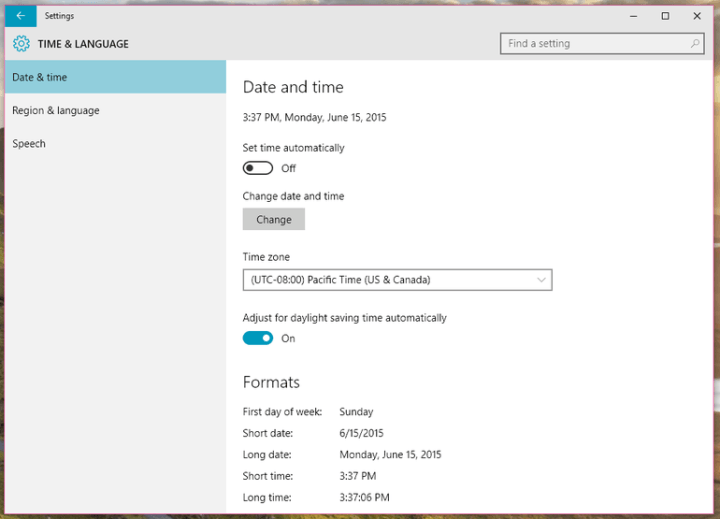
Windows 10 automatically adjusts your date and time for you and only allows you to adjust the time if you disable this feature. If the wrong date and time are set, or you need to change the time or time zone, follow the steps below.
- Right-click or tap the date and time in the Windows Notification Area in the bottom-right corner of the screen.
- Click Adjust date/time.
- Make sure your Time zone is set properly if your computer is displaying the wrong time.
- To manually adjust the time, turn off the Set time automatically option, then click the Change button.
- Change the date or time as desired, then click the Change button.
There is no ability to add seconds to the time displayed in the Windows Notification Area on the Taskbar. However, if you click the date and time, a pop-up window opens and displays the time with seconds included.
Windows 8
- Click or tap the date and time in the Windows Notification Area in the bottom-right corner of the screen.
- Select Change date and time settings at the bottom of the window that appears (shown below).

- In the Date and Time window, under the Date and Timetab, click the Change date and time button.
- Make your adjustments and click OK.
- Click OK on the main Date and Time window to save the changes.
There is no ability to add seconds to the time displayed in the Windows Notification Area on the Taskbar. However, if you click the date and time, a pop-up window opens and displays the time with seconds included.
To change the time zone, follow these steps.
- In the Date and Time window from above, under the Date and Time tab, click the Change time zone button.
- Select the new time zone in the Time zone drop-down field and click OK.
- Click OK on the main Date and Time window to save the time zone change.
Windows 7 and Vista
In Windows 7 and Windows Vista, follow these steps to adjust the date and time.
- Press Windows key + D or navigate to the Windows desktop.
- Click or tap the date and time in the Windows Notification Area in the bottom-right corner of the screen.
- Select Change date and time settings in the bottom of the window that appears (shown below).
- In the Date and Time window, under the Date and Timetab, click the Change date and time button.
- Make your adjustments and click OK.
- Click OK on the Date and Time window to save the changes.
There is no ability to add seconds to the time displayed in the Windows Notification Area on the Taskbar. However, if you click the date and time, a pop-up window opens and displays the time with seconds included.
To change the time zone, follow these steps.
- In the Date and Time window from above, under the Date and Time tab, click the Change time zone button.
- Select the new time zone in the Time zone drop-down field and click OK.
- Click OK on the main Date and Time window to save the time zone change.
Windows XP, 2000, 98, 95, NE, and NT 4
In Windows XP and earlier versions, follow these steps to set the date and time.
- Navigate to the Windows desktop.
- Right-click the time in your Systray, usually located at the bottom-right of your screen.
- Click the Adjust Date/Time menu item.
- This action opens the Date/Time Properties window, where you can adjust the date, time, and time zone.
- Once the proper date and time are set, click Apply, and then Ok.
You may also double-click the time to open the Date/Time Properties window.
If you want to change how the computer handles daylight savings, click the Time Zone tab and check or uncheck the Automatically adjust clock for daylight saving changes option.
MS-DOS and Windows command line
Setting the date through MS-DOS or the Windows command line is accomplished via use of the date command. See our date command page for further information.
Setting the time through MS-DOS or the Windows command line is accomplished via use of the time command. See our time command page for further information.
Linux command line
In Linux, use the date command to manually set the system date and time.
Or, to synchronize your system clock with a network time server, use ntpdate . For example, on Ubuntu or Debian:
Specify a network time server to the ntpdate command, for example us.pool.ntp.org .
To keep your system time synchronized regularly, install the ntp system service.
The service starts immediately, and starts automatically at system boot. To configure the service, edit the file /etc/ntp.conf , then restart the service.
To access the hardware clock directly, use the hwclock command.
FreeBSD
In FreeBSD, ntp can be installed with the pkg package manager.
Setting the date and time on the Apple operating system
- Open the Apple Menu and select System Preferences.
- Click Date & Time, and then click Date & Time again.
- In the Date & Time window, set the date, time, time zone.
Setting the date and time on a mobile device
To set the date and time on a mobile device, follow these steps.
How to change the time and date on Windows 10

- Microsoft went all-in with Windows 10. This OS truly embodied the wind of change bringing tons of new features to users worldwide.
- However, some things remained pretty much the same and we can live with that. After all, why fix something if it’s not broken?
- The Date and Time settings remained almost identical to previous versions, with a small twist. Read on to see what it’s all about. You can find more information about Windows Settings here.
- Don’t be shy and visit our Tutorials Hub for more tech tips and tricks.

- Download Restoro PC Repair Tool that comes with Patented Technologies (patent available here).
- Click Start Scan to find Windows issues that could be causing PC problems.
- Click Repair All to fix issues affecting your computer’s security and performance
- Restoro has been downloaded by 0 readers this month.
Windows 10 brought many changes comparing to Windows 8 such as new and improved Start Menu for example. Other parts of the operating system have been changed as well, and today we’re going to see what has been changed in the Date and Time section in Windows 10.
The Date and Time section in Windows 10 is almost identical to the one found in Windows 8. However, there is a catch. Unlike in previous versions of Windows, you cannot change the date and time settings by clicking the clock on the taskbar.
How to change the time on Windows 10?
Here’s how to quickly tweak these settings:
- The first thing you need to do is right-click the clock on the taskbar
- From the list of results, select Adjust date/time

- You’ll be directed to Time & Language tab in the Settings app. (Note: You can still access the Date and Time window from the Control Panel as well).
- Click the Change button under Change date and time, then use the drop down menu to select the desired values.
- If you prefer, you can choose to Set time automatically (which will automatically sync your PC clock with the Internet clock).
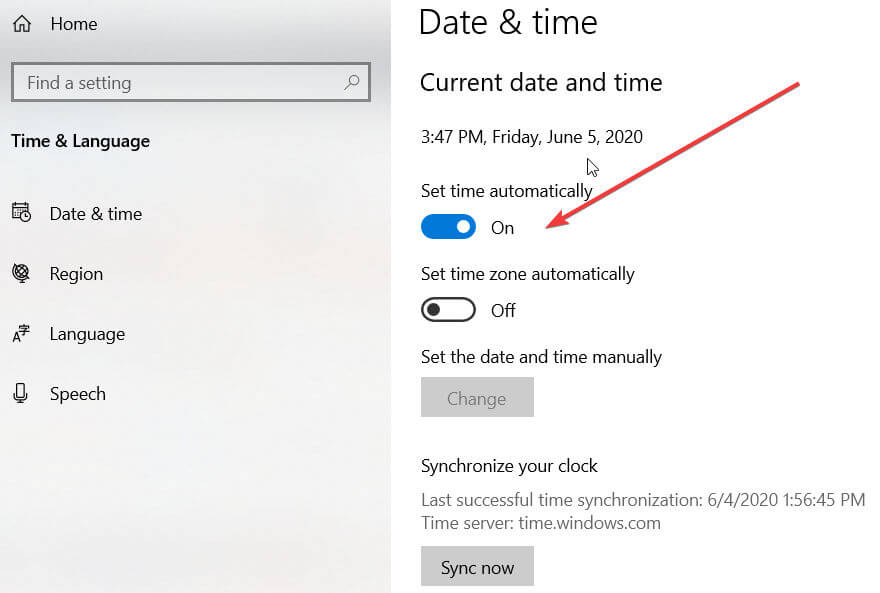
- Next, you will see the Related settings section. Click on the link Date, time & regional formatting to modify the format according to your needs (you can set the first day of the week, short date, long date, short time and long time and so on).
That’s it! As you can see, this option has not changed much, and if you have used this feature on Windows 8 you should feel familiar with it.
Perhaps the biggest change is that you cannot click the clock in the taskbar and change the time and date quickly like before, instead, you have to rely on the Date and Time section in the Settings app.
Let us know if this post was useful via the comments section below.
date and time display in system tray WINDOWS 10
i had my system tray set to show just the time, I updated some system drivers and after the reload I now have the time then uder that the day and under that the date I ONLY WANT THE TIME AS IT WAS BEFORE just the time
jeez you search on here stating WINDOWS 10 and every time the results are for XP 7 or 8
Replies (8)
![]()
Thank you for posting on Microsoft Communities.
I will be glad to help you with the issue you have with the computer. I understand the frustration when things don’t work the way it should.
Please follow the steps below and see If it helps:
1. Type notification and actions in search bar
2. Select notification and actions
3. Click on select which icons appear on the task bar
4. under the options turn on which icons you want to see in the notification area.
Hope this helps. If the issue remains unresolved, please get back to us and we would be happy to help.
12 people found this reply helpful
Was this reply helpful?
Sorry this didn’t help.
Great! Thanks for your feedback.
How satisfied are you with this reply?
Thanks for your feedback, it helps us improve the site.
How satisfied are you with this reply?
Thanks for your feedback.
23 people found this reply helpful
Was this reply helpful?
Sorry this didn’t help.
Great! Thanks for your feedback.
How satisfied are you with this reply?
Thanks for your feedback, it helps us improve the site.
How satisfied are you with this reply?
Thanks for your feedback.
![]()
Thank you for the update and I apologize for the late response.
Please follow the below steps and check if that helps.
a) Right click on the Taskbar and select “Properties”.
b) On the “Taskbar” tab, uncheck the option “Use small Taskbar buttons”.
c) Click on “Apply” and then “OK”.
d) Now check if that display the date with the time on the notification area.
Let us know if you need further assistance. We will be happy to help.
95 people found this reply helpful
Was this reply helpful?
Sorry this didn’t help.
Great! Thanks for your feedback.
How satisfied are you with this reply?
Thanks for your feedback, it helps us improve the site.
How satisfied are you with this reply?
Thanks for your feedback.
10 people found this reply helpful
Was this reply helpful?
Sorry this didn’t help.
Great! Thanks for your feedback.
How satisfied are you with this reply?
Thanks for your feedback, it helps us improve the site.
How satisfied are you with this reply?
Thanks for your feedback.
2 people found this reply helpful
Was this reply helpful?
Sorry this didn’t help.
Great! Thanks for your feedback.
How satisfied are you with this reply?
Thanks for your feedback, it helps us improve the site.
How satisfied are you with this reply?
Thanks for your feedback.
You could try White-Tiger’s T-Clock Redux, which supports Windows 10 and is described as an enhanced fork of Stoic Joker’s T-Clock 2010.
You could probably change the Custom Format string (see step 12, below, for T-Clock 2010, and should be similar in T-Clock Redux) to only show the time in the System Tray. To the best of my knowledge, both programs are open source freeware, there is no bundled adware or spyware, and they don’t use much memory or processing power. On my computer, T-Clock only uses about 400 KB of RAM.
I’m using Windows 7 x64 Professional and Ultimate and macOS High Sierra and I don’t use Windows 10 (ever), so I can’t confirm that T-Clock Redux works as expected on Win10. I use LonelyPixel’s 2013 enhancement to T-Clock 2010 and it works great on Win7.
For what it’s worth, here is how I configure LonelyPixel’s 2013 enhanced version of T-Clock 2010 in Win7; the process to configure T-Clock Redux in Win10 would probably be quite similar.
Configuration suggestions for LonelyPixel’s 2013 version of T-Clock 2010:
- Download the 2013 improved version of T-Clock 2010.
- Create a folder called «T-Clock 2013» and extract the program into this folder.
- Copy the T-Clock 2013 folder to C:\Program Files\.
- Open this folder’s x64 subfolder and double click on the Clock executable.
- Right click on T-clock’s date and time that now appear in the System Tray.
- Click on T-Clock Properties.
- Go to the Clock Text tab.
- Change the Color. I use a color that is peaceful and relaxing (not nerve-jangling), but still easily readable in the System Tray, such as green or teal.
- Change size to 10 and check Bold.
- Go to the Time Format tab.
- Check the checkbox for Custom Format to the left of «Advanced Clock Configuration Options».
- Change the date and time to your desired custom format. My favorite custom format for T-Clock (all on one line, with no line feed or carriage return):
ddd, dd mmm yyyy, «time» = hh:nn tt
If you copy and paste this string into your Custom Format box, be careful to take out any spurious LF or CR after the string. - Click on the Mouse tab.
- Choose Mouse Click — Left Button.
- Select Single Click and from the drop-down dialog, choose Action = Show Calendar.
- Note: Either my T-Clock or Windows 7 has a bug here and it is difficult to see the drop down to see Show Calendar. You may or may not experience this bug.
- Click on the About tab.
- Check the checkbox to «Start T-Clock 2010 x64 when Windows starts».
- Click OK.
- Optionally, reboot to confirm that T-Clock starts automatically.


