- dblue Glitch VST — 8 в одном
- Общие характеристики dblue Glitch
- Управление dblue Glitch
- Эффекты.
- download.elearningpathshala.co
- Download dblue Glitch VST
- Versions of Glitch VST plugin
- How does a Glitch VST function?
- Dblue Glitch For Mac Download
- Upgrade your experience with Glitch VST 2.1.0
- dblue Glitch VST Video Tutorial
- Download dBlue Tapestop
- How to installdblue tapestop Vst Plugin?
- How to start working on Dblue Tape-stop
- Dblue Crusher
- Dblue Tape-stop is the easiest way to add tape-stop effect
- Dblue Glitch For Mac High Sierra
dblue Glitch VST — 8 в одном
dblue Glitch — это VST-плагин, который не похож ни на один из всех существующих. Выдает потрясающие по звучанию и эффектности звуки, обладает достаточным количеством настроек и идеально подходит для преобразования ударных.
Общие характеристики dblue Glitch
Плагин состоит из 8-ми встроенных эффектов:
Обладает встроенным секвенсором на 16 паттернов длинной до 62 step’ов, общим фильтром, фильтром для каждого из 8-ми основных интегрированных эффектов, встроенным Overdrive-эффектом.
Glitch поддерживается следующими программами:
- Ableton Live (4 и 5)
- ACID Pro 5
- Aodix 4
- Audiomulch
- Bidule
- BuzzTracker (Polac VST Adapter v1.1)
- Cakewalk Project 5 v2
- Cubase (VST5, SX2)
- Energy XT (v1.3.5 and v1.4 beta)
- Fruityloops Studio 5 и выше
- Logic Platinum 5.5
- MadTracker 2
- Orion Platinum 6.1
- Renoise 1.5
- Sonar 4
- Tracktion 1.6
Минимальный рекомендуемый темп для dblue Glitch — 80 bpm.
Управление dblue Glitch
Плагин визуально и функционально разделен на 3 основных зоны:
- Основная (управление настройками, применяемыми ко всем эффектам)
- Зона секвенсора (установки последовательности эффектов в каждом из 16-ти паттернов, длины полосы секвенсора)
- Зона эффектов (управление настройками эффектов и их фильтров)

Основная зона dblue Glitch
Кнопка Initialize — сбрасывает параметры секвенсора в значения по умолчанию.
Регулятор Seed — изменяет случайные значения каждого эффекта. При использовании одних и тех же настроек на всех эффектах, звук можно полностью изменять, просто регулируя уровень Seed.
Регулятор Timing. В некоторых программах (например, в FL Studio) dblue Glitch может не совсем корректно синхронизировать темп своего секвенсора и темп трека (причина, видимо в буфере, который он использует при добавлении эффектов). Поэтому приспособить плагин к Вашему треку позволит этот регулятор. Изменяя значения от -100 до 100, Вы как бы сдвигаете тепм секвенсора dblue Glitch. Разработчики уверяют, что большинству программ этот регулятор не требуется.
De-click. Этот регулятор определяет, насколько плавно происходит переключение от одного эффекта к другому. Особенно важен регулятор для эффектов типа Retrigger и Shuffler (смотри ниже), в основе которых лежит разрезание аудио на части (переход между ними в этом случае получается резкий и в моментах таких переходов слышны щелчки). Щелчки слышны особенно отчетливо тогда, когда эффект dblue Glitch накладывается на низкочастотные инструменты (басы и Kick-барабаны).
До применения De-Click: 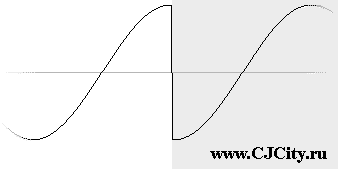 Здесь виден резкий переход от одной части к другой, что и создает нежелательные щелчки при воспроизведении. |
После применения De-Click: 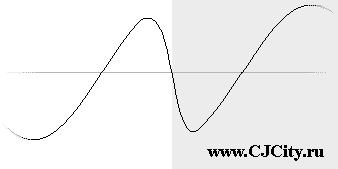 De-Click позволяет создавать более гладкий переход из окончания звучания одной части в начало звучания следующей. |
Envelope. Может применяться к каждому из 8-ми эффектов, установленных в секвенсоре dblue Glitch.
Фактически, это Fade Out, состоящий из двух регуляторов:
Len — управляет шириной шага;
Vol — устанавливает уровень громкости, в который переходит звук к концу шага, установленного в Len. Можно, к примеру, создать полное затухание воспроизведения после проигрывания 8-ми степов секвенсора, задав параметры Len=8, Vol=0. Странно лишь то, что максимальное значение Len равно 8, в то время как максимальное колличество степов в паттерне — 64.
Overdrive. — обычный Overdrive-эффект. Регуляторы:
DRV — уровень Overdrive;
MIX — уровень включенности эффекта в аудио.
Filter. Общий программный фильтр, применяется ко всем эффектам (в дополнение к фильтрам на каждом из 8-ми эффектов dblue Glitch). Типы фильтров переключаются кликом по пиктограмме (LP — фильтр высоких частот, HP — фильтр низких частот, BP — фильтр высоких и низких частот, BS — фильтр средних частот).
Регуляторы:
Cut — уровень сокращения выбранной частоты;
Res — уровень резонанса;
Mix — уровень наложения фильтра на звуковой поток.
Output — выходное звучание.
Регуляторы:
Mix — уровень наложения всех эффектов и фильтров;
Vol — уровень громкости звука.

Зона секвенсора (Sequencer) в dblue Glitch
Секвенсор в dblue Glitch — зона, где редактируется последовательность эффектов. Редактирование
Левый клик — включение/выключение эффекта для каждого степа (step). Удерживая левую кнопку и передвигая курсор можно включить сразу несколько областей.
После того, как Вы включили нужные Вам области секвенсора, правым кликом выбираете для каждой из них любой эффект из 8-ми. Выбирая «?», Вы включаете случайный выбор эффекта.
Sequencer Leight
Устанавливает длину секвенсора (от 4 до 64). Применяется ко всем паттернам.
Совет : При удерживании мыши с нажатой левой кнопкой на прибавлении/убавлении длины секвенсора, вы не добьетесь быстрого его увеличения/уменьшения. Но немного ускорить этот процесс можно — правый клик изменяет длину секвенсора на 4 позиции.
Clear Pattern
Сброс текущего секвенсора, установка случайных эффектов через 16/8/4/2/0 степов.
Pattern Selector
Выбор одного из 16-ти паттернов.
Совет : Правым кликом можно переписывать содержание секвенсора одного паттерна в другой. Например, чтобы копировать содержание 1-ого паттерна во 2-й, правым кликом щелкаем по первому, затем по второму.
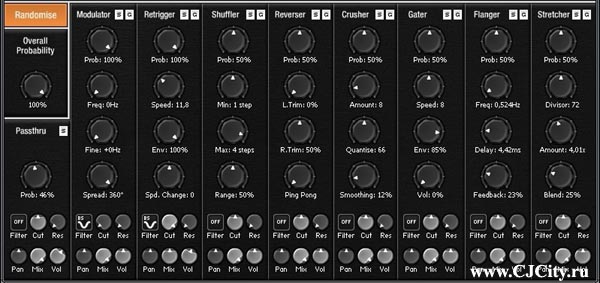
Зона эффектов в dblue Glitch
Randomise
Установка случайных основных параметров для каждого эффекта.
Overall Probability
Регулятор общей вероятности появления эффектов при выборе случайных эффектов в секвенсоре.
Пример : устанавливаем в секвенсоре все значения на «?» (Randomize). Когда установлено 100 % все эффекты будут вести себя как обычно, когда установлено 50 %, вероятность появления всех эффектов будет разделена на два, и т.д.
Probability
Кроме общего уровня вероятности (Overall Probability — полная вероятность), такой регулятор существует для каждого из 8-ми эффектов и Passthru (см. ниже), который определяет «шансы» на появление этого эффекта в случайном ряду.
Пример : Если для всех 9-ти (включая Passthru) эффектов установлены одинаковые значения Probability, это означает, что каждый эффект имеет 1 из 9 «шансов» на то, что он будет включен в случайный ряд. Или если, к примеру, уровень Probability для Retrigger установлен на 50 %, а для всех остальных эффектов — на 100 %, то Retrigger имеет в два раза меньшую вероятность появления, чем остальные эффекты, то есть 1 шанс из 17.
Solo Effect
Включает/выключает соло на выбранном эффекте (при включенном Solo работает только этот эффект). Может пригодиться, чтобы прослушать отдельный эффект, не изменяя секвенсор.
Совет : правый клик на кнопке Solo задает значение данного эффекта для всех включенных областей в секвенсоре.
Global Effect
При установке Global на выбранном эффекте, он применяется вместе с другими, смешиваясь с ними.
Пример : установив Global для Flanger, последний может применятся вместе с Reverser, Gater и т.д.
Filter
Кроме общего фильтра, существует фильтр для каждого из 8-ми эффектов и Passthru. Переключение между типами фильтра — левый клик по пиктограмме.
Регуляторы:
Cut — уровень сокращения выбранной частоты (с приблизительным диапазоном 20Hz — 20,000Hz).
Res — уровень резонанса.
Output
Группа из трех осцилляторов, регулирующих общие параметры звучания эффекта:
Pan (stereo panning) — распределение по каналам;
Mix (dry/wet) — уровень включенности эффекта;
Vol — регулирует уровень громкости каждого эффекта (до 200 % от общего уровня).
Эффекты.
Passthru
По своей сути не является эффектом, хотя включен в их ряд, имеет свой фильтр и output-осцилляторы. Предназначен для установки звучания в первоначальном виде, без применения эффектов dblue Glitch, чтобы в каждом паттерне могли сочетаться и эффекты и обычное звучание, сменяя друг друга.
Modulator
Частотные модуляции. Осцилляторы:
Freq управляет главной частотой генератора (0Hz — 10,000Hz);
Fine — подстройка частоты (0Hz — 100Hz)*.
Spread распространение звука по каналам в градусах.
* Полный частотный диапазон — 0Hz — 10,100Hz.
Retrigger
Повторяет звучание каждого степа секвенсора (в отличие от Delay — перекрывает все последующие степы, создает «заикающийся» звук). Регуляторы:
Speed — скорость повторения;
Env — длина повторяемого звука (0-100%);
Spd. Change — изменение скорости повторения (от -100 до -1 — замедление, от +1 до +100 — ускорение).
Shuffler
Беспорядочно повторяет степы во время воспроизведения, «перемешивает» звук.
Значения Min и Max определяют пределы размера повторяемого звука .
Range определяет, сколько степов из буфера воспроизведения будen повторяться.
Reverser
Реверс звука, «разворачивает» аудио-волну каждого степа и проигрывает её в определенном порядке.
L. Trim и R. Trim — определяют диапазон реверса.
- Ping Pong — поток проигрывается в обычном направлении, пока не достигнет уровня, заданного в R.Trim, после чего звуки «переворачиваются». Реверсированный поток играет до уровня, заданного в L.Trim, после чего звук воспроизводится снова в обычном направлении, и т.д.
- Half Reverse — поток проигрывается в обычном направлении, пока не достигнет уровня, заданного в R.Trim. Затем звук терпит реверс, а после достижения уровня, заданного в L.Trim, реверсированный звук повторяется циклично до появления в секвенсоре dblue Glitch следующего эффекта.
- Full Reverse — полный реверс потока.
Примечание: т.к. dblue Glitch — эффект реального времени, важно обратить внимание на то, что фактически невозможно сразу реверсировать аудио-поток, сначала необходимо, чтобы в буфере было достаточно звуков. Поэтому, когда эффект Reverser стоит в секвенсоре первым, реверса сразу не происходит и сначала воспроизведение идет в обычном направлении.
Crusher
LoFi-эффект («Crusher» — «дробилка»).
Amount — уровень редукции звука;
Quantise — амплитуда редукции;
Smoothing (сглаживание) — плавный переход.
Gater
Гейтер, сокращает звуки, ритмично их повторяя.
Speed — скорость повторения;
Env — устанавливает меру сокращения звука;
Vol — уровень звука в его первоначальном виде (при 100 % Vol эффект Gater не применяется).
Flanger
Обычный Flanger, волновые частотные модуляции.
Freq — частотный уровень;
Delay — уровень задержки;
Feedback — уровень возврата звука.
Stretcher
Этот эффект «растягивает» звук во времени (разрезает звук каждого степа и повторяет каждую его часть).
Divisor -размер отрезков;
Amount — уровень «растяжения» — от 1x (нормальная скорость) до 8x (8-микратное замедление);
Blend — количество соединенных между собой отрезков, сглаживание звука.
Итак, dblue Glitch — полифункциональный комбо-эффект, фильтр и секвенсор одновременно. Звучание музыки с грамотным применением плагина действительно впечатляет. Так что, если Вам удасться его приручить, Вы, возможно, откроете для себя новые границы и возможности в музыкальном творчестве.
Источник
download.elearningpathshala.co
If you’re looking for dBlue Glitch VST, then you came to the right place! Check out our Glitch VST guide to learn more.
Dblue Glitch 2 Free Download Apk; Illformed new release Glitch 2, a new VST Plugin Effect for Windows, MAC and Linux. Give more effects to you sounds in music production. Slide, align, and match. Four distinct modes of play. These little guys always huddle in a group, and they need your help to sort themselves out. Slide rows of Chuzzles.
For enhancing the audio quality and add effects all the artists and sound engineers rely on Virtual Studio Technology or VST. It serves as a lifesaver as it transforms the boring tracks into an exciting track that you keep on listening several times.
Following the bandwagon of using VST, currently, the internet is full of these plugins where each has its specialized area of work. Moreover, for unique, wacky effect in the track Glitch VST plugins prominently opted by most of the artists.
But to not goof up among several Glitch VST, look for its reviews. Here is generous information about it.
Download dblue Glitch VST
- Hysteresis by Glitchmachines. Let’s start off with a pinch of some smeared out granular delay.
- Download dblueGlitchv13.dll About dblueGlitchv13.dll errors. When an application requires dblueGlitchv13.dll, Windows will check the application and system folders for this.dll file.
- Glitch 2 Vst Plugin Crack Full Version Free Download Here. Glitch 2 Vst Crack is one of the coolest free VST effects plugin available. The latest version of Glitch by DBlue (Kieran Foster) is a good multi-effects processor with some unique features that allow it to stand out from the long list of free VST effects available.
- Illformed Glitch 2 Free Download is a very capable and effective tool, whether you are using it to invoke the glitch for which it is intended, or simply as an interesting multi-effect processor. Glitch 2 V2.1.0 Crack Mac & Windows Latest Free Download: The infamous FSU plugin is back, And yes, finally there is a Mac version!
Glitch VST is a plugin which meant to generate glitches that are the energetic chain of alterations in the audio. You can say that these glitches sound like some technical fault or error. For instance, irregular skipping, distortion in the beat, repetition of the beat, starching sound, clicks and many other digital artifacts that acquainted with in the track.
Most of the audiences who don’t know the nitty-gritty of music production also have no idea about how these glitches created in the music files. But kudos to these Glitch VST for helping the music producers in making the most refreshing track than ever.
The most distinguished Glitch VST plugin of the all present and accessed is the one from Illformed. It is for all the operating system used in the system be it Windows,
Mac OS or the Linux. The Mac OS version of this plugin was a recent launch which is available in VST/AU format. Moreover, these versions are in 32-bit and 64-bit type. Consists of multiple features which allow the users to play with the loops and create climatic transition, the authorized version of the plugin are available in just € 49.95.
Recommended Resource: Also check out dBlue Tapestop VST Plugin here.
Versions of Glitch VST plugin
Similar to other VST, Glitch VST by Illformed keep updating and adding new features to it. From the initial release which was Glitch 1.3 to the new Glitch 2.1.0, there are a lot of changes in its features and GUI.
The Glitch 2.1.0 is far ahead and upgraded when compared with previous versions. It inhouse the latest sequencer and multiple effects creating ability which helps in composing the grooviest track.
How does a Glitch VST function?
Dblue Glitch For Mac Download
Working on Glitch VST is like a cakewalk, all thanks to its simple and user-friendly graphical user interface. The improved Multi-lane sequencer in the recent version helps in creating a lot of variations consisting of its 128 scenes.
Triggering these scenes is smooth with the MIDI notes, and each of them comprises of their sequence, effect and time settings. A range of advanced effects provides an edge in twisting, slicing and mixing the sound for the desired result.

The precise time setting of the tempo-synced effects will allow for dropping at particular notes. You can also randomize or mute the functions whenever you want which further let you instigate remarkable difference in the track. It has pre-lane randomize function for continuous generation of sequences. Apart from this, its modulator consists of attack and release control.
Upgrade your experience with Glitch VST 2.1.0
The current Glitch VST 2.1.0 is not free like the previous versions but it worth all your money. As far as it is the new Glitch VST by Illformed, no other Glitch plugin can offer you such experience.
In the list of features one thing which standout in it is its user interface which is visually appealing and organized. You won’t get baffled by the options while programming and navigate them. Compose a wild, ear-popping track by triggering these scenes with your keyboard and engaging a bunch of unique effects in it such as tape stop, reverser, lo-fi gloss.
dblue Glitch VST Video Tutorial
If you’re looking for dBlue tapestop, Then you came to the right place!
These days it is hard to imagine any song composed without employing multiple effects in the track. After all, it refreshingly spices them up, and we can’t help but listen to them over and over. With the passing years, these VST plugins became advanced in its technology and features.
There are outnumber plugins accessible through the internet, as freeware or paid. No wonder it is difficult to use them all and to figure out which is the best suited to your composition.
Mainly, if you look at the VST effect plugins necessarily added to the oomph factor has an extensive collection. They include reverb, distortion, tape-stop and many more such plugins.
Download dBlue Tapestop
Tape-stop is a VST effect plugin, and the function assigned is to slow down the pitches or to add breaks in the track. This effect is not something new, and you must have listened to it earlier. Often due to the tape recorder functioning problems, the music tempo gets slow down, or there are special breaks.
This effect duplicates the same thing but only when you want. DJs and sound producers use it in quite some tracks to make it more exciting for their listeners.
Dblue Tape-stop is one of the best performing VST effect plugins for tape-stop which is available exclusively without any cost. Savefrom net for mac. Dblue Tape-stop has a simplified design and quite easier to work on with all the kind of music.
Be it hip-hop, pop or any music. As a free to use VST plugin, almost all the DAW which include FL studio also support it in their system. Dblue Tape-stop is present in 32-bit and 64-bit version as VST or AU plugin.
How to installdblue tapestop Vst Plugin?
Follow the steps below to install dblue tapestop VST to your prefer DAW:
Step 1. First Download Dblue Tapestop Plugin by clicking above download button.
Step 2. A plugin should be in a zip file.
Step 3. Extract the plugin zip file in a folder, You’ll see dblue_TapeStop.dll file.
Step 4. Copy that (.dll) file to The ‘Program FilesVST3’ folders (32 Bit plugins on 32 Bit Windows OR 64 Bit plugins on 64 Bit Windows)
Step 5. Open your DAW and refresh plugins and dblue tapestop should be there 🙂
How to start working on Dblue Tape-stop
Of course, the initial step to take is installing the Dble Tape-stop in your DAW or FL Studio. Download the plugin from any of the sites on the internet.
Dblue Crusher
After the download completes, open up the FL studio, to refresh the plugin list. The Dblue Tape-stop is now in your plugin list, and you can use it now. When to use the Dblue Tape-stop, well it does not follow any guidelines.
It is all up to the artists and DJ. For knowing how to work with this Plugin, you can search down Google or YouTube and find a suitable tutorial. Moreover, to work on it is not brainstorming.
Initially, select the track and amid of its being playing select the plugin from the list featuring plugin. The display shows only three knobs slow down, trigger and delay with each having its specific role. The slow down knob will reduce the speed of the beat while the trigger will keep control over the amount of effect.
For instance, if you keep its setting on 0, then there won’t be any effect, but when you change the setting at one, you will be endowing full effect to the track.
Furthermore, setting automation in the amount of impact in the entire playlist is also possible. With this, your job of getting trigger knob started will get comfortable. The delay knob is for generating delays before the happening of effect.
Note: Give it a try to our free soundcloud to mp3tool.
Dblue Tape-stop is the easiest way to add tape-stop effect
Although there are several techniques to add the tape-stop effect to your track none of them can beat the ease of Dblue Tape-stop plugin. No doubt it is effortless to add impact to this plugin which becomes more comfortable after using it a few times.
Dblue Glitch For Mac High Sierra
Apart from this, it has some other pros like available at no cost and visually simplified. With just three knobs you have the choice of using tape-stop effect differently in the track.
Источник


