- BuildADebianKernelPackage
- Install the Required Packages
- Extracting the Kernel Source
- Configuring the Kernel
- Using your current Debian kernel configuration as a starting point
- Building the Debian Package
- See also
- Jensd’s I/O buffer
- random technotes…
- Install a newer kernel in Debian 10 (buster) stable
- Youtube Video
- Introduction
- Installing a newer kernel in Debian Buster
- Install a specific kernel version
- Uninstalling unused kernels in Debian
- 4 thoughts on “ Install a newer kernel in Debian 10 (buster) stable ”
- How to Install Kernel Headers in Ubuntu and Debian
- Install Kernel Headers in Ubuntu and Debian
- If You Appreciate What We Do Here On TecMint, You Should Consider:
- Сборка и установка ядра под Debian
- BuildADebianKernelPackage
This is an obsolete now guide on how to build the Linux Kernel into a .deb package. Don’t use this, or take with a grain of salt. Instead, see https://kernel-team.pages.debian.net/kernel-handbook/ch-common-tasks.html#s-common-official
Install the Required Packages
To download and compile the Linux Kernel source we will need the following packages:
- build-essential — Essential packages required for compiling.
- linux-source — The Linux Kernel Source
- libncurses5-dev — Development files for ncurses5. Optional for using curses based menu driven configuration.
To install these packages run the following command as root:
sudo apt-get install build-essential linux-source bc kmod cpio flex libncurses5-dev libelf-dev libssl-dev
Extracting the Kernel Source
Under /usr/src you will find a file looking like linux-source-x.x.tar.xz. Please note that x.x will match the current Linux Kernel source for your release of Debian. In this example we will be using the 4.15 Kernel under Sid.
Extract the Kernel Source with the following command (NOTE: You will need to change 4.15 to match the .tar.xz file in /usr/src):
tar xavf /usr/src/linux-source-4.15.tar.xz
Configuring the Kernel
Change directories to the newly extracted linux source (again, match 4.15 to your version):
Create a defconfig with the following command, please change ARCH=i386 to match your target architecture:
make ARCH=i386 defconfig
Using your current Debian kernel configuration as a starting point
Alternatively, you can use the configuration from a Debian-built kernel that you already have installed by copying the /boot/config-* file to .config and then running make oldconfig to only answer new questions.
If you do this, ensure that you modify the configuration to set:
otherwise the build may fail:
Building the Debian Package
Use make bindeb-pkg target to build the kernel. the -j`nproc` argument sets the build to use as many cpu’s as you have.
nice make -j`nproc` bindeb-pkg
This will take quite some time and it’s worth noting that it doesn’t necessarily have to be done on the target machine (or even the target architecture, search in your engine of choice for kernel cross-compiling if you want to set it up). Choosing your most powerful machine may reduce the time of this operation from many hours to under 1.
It’s also worth noting that if you’re using not much of a deviation from the default configuration that ships with debian, you’ll need upwards of about 7GB or so of space to do this operation.
When complete, a number of files get created in the parent directory. Here’s the important and perhaps confusing ones:
- linux-image-VERSION_ARCH.deb
- linux-image-VERSION-dbg_VERSION_ARCH.deb
The first one will replace your current default menulist item in grub upon installation. This means that if you install it then next time you reboot, you’ll boot into that kernel.
The second are debug symbols for the first. This is useful if say, you want to do kernel debugging. It’s worth noting that when extracted the debug symbols are about 5GB.
See also
The «Compiling a Kernel» section in the Debian Administrator’s Guide (WARNING: outdated)
Источник
Jensd’s I/O buffer
random technotes…

Install a newer kernel in Debian 10 (buster) stable
When using the latest version of Debian 10 stable, also known as buster, even with all updates installed, by default, you can’t get the most recent kernel via the standard repositories in your package manager. While the idea of using Debian stable is to remain stable and rather conservative, there are several benefits with installing a newer kernel and in some cases it’s the only option to get the OS to support all your hardware. The risk and impact on stability is small and the process is rather simple.
Youtube Video
If you are interested, I also created a YouTube video from this blogpost. If you prefer classic text, you can just follow the rest of this article.
Introduction
Some of the benefits of upgrading your kernel are:
- Support for previously unsupported hardware: every kernel release has a list of added drivers. Especially when you have recent hardware, a newer kernel could be required to fully support your video card for example.
- Performance improvements and bug fixes: newer kernels often contain a lot of bug fixes, have new functions and performance tweaks. Here again, the most is to gain on newer hardware.
- New kernel options and security fixes
The most recent (stable) kernel that is available at the moment of writing is version 5.9, released October 11 – 2020. You can find a complete overview of changes in every kernel version at https://www.kernel.org/ or http://kernelnewbies.org/LinuxVersions
The latest version of the kernel available, at the time of writing, via the standard repositories for Debian 10 is/was 4.19. This one was release about 2 years ago on October 22 – 1018.
There are basically two options to install a newer kernel in Debian stretch. The first is the easiest and this is what I will explain in this post. The second is not so easy. It is simply to compile a newer kernel yourself. While compiling a kernel nowadays isn’t rocket science anymore, the first way is still preferable and will save you a lot of time because others have been through the second method and present you the result of their work 🙂
Installing a newer kernel in Debian Buster
The easiest way to install a newer kernel in Debian, is to install it from the backports. Backports are packages taken from the next Debian release, adjusted and recompiled for usage on the stable release. For this post, I’m starting with a minimal install (system tools only), the only packages I added after finishing the installation were sudo and aptitude.
In order to install a kernel from the backports, we need to add the backports-repository for your Debian version to the apt-sources and update the list of available packages:
Now, you can browse the available kernels in the backports-repository by adding -t buster-backports to your apt commands. Or just search for all available:
At this point, you can either install a specific version manually or choose to go for the latest release. To install the latest release, including necessary dependencies:
After the upgrade, you can simply perform a reboot and the new kernel should be activated as the new default.
In most cases this is probably what you but if you experience issues with this new kernel, maybe due to issues with a change or difference in the kernel modules, you can easily switch back to the previous, or any installed, version with grub.
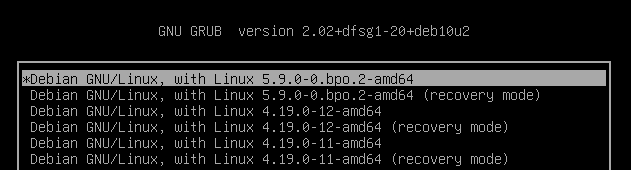
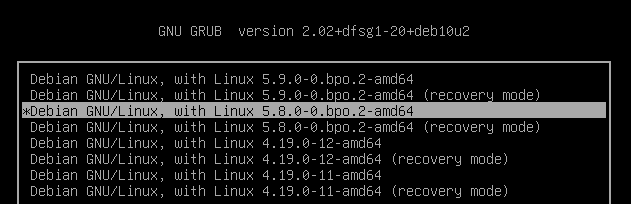
During boot, before the timeout expires, select “Advanced options for Debian GNU/Linux”:

In the next screen choose the working, or desired, kernel:
Install a specific kernel version
If, for some reason, you prefer a specific kernel version, you choose a kernel from the list in the aptitude output above and install it with apt. Most of the kernel images in the backports repo have suffixes. The rt-suffix stands for realtime and is mostly interesting for embedded projects or machines that will drive industrial hardware. dbg stands for debugging. And bpo is for the standard kernel from backports.
After the installation, reboot your system and select the newly installed kernel from the selection displayed in GRUB, after selecting “Advanced options for Debian GNU/Linux”:
To verify that the new kernel is used after booting:
Uninstalling unused kernels in Debian
When everything works as expected, you can safely uninstall the older kernel in order to clean up your system and to free up some space in /boot
To check which kernels are currently installed:
Uninstall the old one:
That should be all it takes in order to install a recent kernel and cleanup older kernels on a Debian system. Not so difficult as you thought probably 🙂
4 thoughts on “ Install a newer kernel in Debian 10 (buster) stable ”
Hi there, I also commented on your youtube video:
I am about to receive a brand new laptop and am hoping to run Buster on it, at least until Bullseye has been out for a couple months or so. How does this method affect security updates or future kernel versions? Also, doesn’t that command upgrade ALL packages from backport, not just the kernel to the latest versions from that repository?
As far as I understand it the backports do contain the patches/security fixes that would be part of the main kernel. There is less testing as can be seen in the backports FAQ. The command does upgrade all packages from backport. Without that you would run into issues with dependencies.
Источник
How to Install Kernel Headers in Ubuntu and Debian
In our last article, we have explained how to install kernel headers in CentOS 7. Kernel Headers contain the C header files for the Linux kernel, which offers the various function and structure definitions required when compiling any code that interfaces with the kernel, such as kernel modules or device drivers and some user programs.
It is very important to note that the kernel headers package you install should match with the currently installed kernel version on your system. If your kernel version ships with the default distribution installation or you have upgraded your Kernel using dpkg or apt package manager from the Ubuntu or Debian base repositories, then you must install matching kernel headers using package manager only. And if you’ve compiled kernel from sources, you must also install kernel headers from sources.
In this article, we will explain how to install Kernel Headers in Ubuntu and Debian Linux distributions using default package manager.
Install Kernel Headers in Ubuntu and Debian
First check your installed kernel version as well as kernel header package that matches your kernel version using following commands.
![]() Check Kernel Version and Kernel Headers in Ubuntu
Check Kernel Version and Kernel Headers in Ubuntu
On Debian, Ubuntu and their derivatives, all kernel header files can be found under /usr/src directory. You can check if the matching kernel headers for your kernel version are already installed on your system using the following command.
![]() Check Kernel Headers in Ubuntu
Check Kernel Headers in Ubuntu
From the above output, it’s clear that the matching kernel header directory doesn’t exist, meaning the package is not yet installed.
Before you can install the appropriate kernel headers, update your packages index, in order to grab information about the latest package releases, using the following command.
Then run the following command that follows to install the Linux Kernel headers package for your kernel version.
![]() Install Kernel Headers in Ubuntu
Install Kernel Headers in Ubuntu
Next, check if the matching kernel headers have been installed on your system using the following command
![]() Verify Installed Kernel Headers in Ubuntu
Verify Installed Kernel Headers in Ubuntu
That’s all! In this article, we have explained how to install kernel headers in Ubuntu and Debian Linux and other distributions in the Debian family tree.
Always keep in mind that to compile a kernel module, you will need the Linux kernel headers. If you have any quires, or thoughts to share, use the comment form below to reach us.
If You Appreciate What We Do Here On TecMint, You Should Consider:
TecMint is the fastest growing and most trusted community site for any kind of Linux Articles, Guides and Books on the web. Millions of people visit TecMint! to search or browse the thousands of published articles available FREELY to all.
If you like what you are reading, please consider buying us a coffee ( or 2 ) as a token of appreciation.

We are thankful for your never ending support.
Источник
Сборка и установка ядра под Debian
Тут речь идти будет не просто про компиляцию ядра Linux, а про компиляцию ядра и его сборку в deb-пакет. Потом этим deb’ом можно будет поделиться с знакомыми, похвастаться перед любимой девушкой/парнем или просто, при необходимости, использовать повторно.
Для начала ставим пакеты fakeroot, kernel-package, libncurses5-dev:
Все зависимости будут подтянуты автоматом…
Затем берём нужный архив с kernel.org и сливаем и распаковываем его в /usr/src (берём для примера ядро 2.6.31.4).
Тут есть один момент. Так как у нас уже есть рабочее ядро в установленной системе то, если не хотим выставлять все галочки в конфигурации нового ядра с нуля, берём готовый config либо из /boot либо из /proc:
В итоге имеем предварительную заготовку к конфигурации нашего нового ядра.
Теперь конфигурируем ядро под специфические для нас цели, либо добавляем опции для новых модулей, либо… Одним словом — творчество:
Тут интересно будет отметить, что если мы сразу-же выйдем из меню, то можем увидеть что-то подобное этому:
имеет смысл найти эти опции при конфигурировании нового ядра и посмотреть что да к чему…
Или, как мне подсказали, использовать:
для компиляции новой версии, которая все совпадающие опции трогать не будет, а насчёт остальных, которые изменились, спросит.
Кстати, если кому интересно под X-ами заниматься конфигурированием, то может сделать так:
Важно! Не забываем сказать «Kernel module loader» в «Loadable module support», так как возможны варианты.
Ну всё. Пимпочки поотмечали, кнопочки понажимали, из окошек вышли, новый конфиг сохранили, теперь приступим к сборке. Для начала сделаем:
Увидим что-то наподобие этого:
Ну, а теперь, собственно, собираем ядро:
og.091015.00 — означает лишь ревизию нашей сборки (меньше букв, но больше цифр, иначе получите ошибку в под самый конц сборки и придётся всё повторять с самого начала), а в остальном может быть любой — у кого насколько фантазии хватит 🙂
После того как предыдущая команда нормально выполнится, можно также дать такой «джентельменский набор»:
После этого получим набор из следующих deb-пакетов:
- linux-image-2.6.31.4_og.091015.00_i386.deb
- linux-headers-2.6.31.4_og.091015.00_i386.deb
- linux-manual-2.6.31.4_og.091015.00_all.deb
- linux-doc-2.6.31.4_og.091015.00_all.deb
- linux-source-2.6.31.4_og.091015.00_all.deb
располагаться они будут в /usr/src.
Нам остаётся их только установить через dpkg:
и т.д.
Конфигурация к GRUB’у должна будет выполниться автоматически, равно как и собраться initrd.
Финальный шаг:
Источник


