- Debugging Managed Code Using the Windows Debugger
- Introduction to Managed Code
- Debugging Managed Code
- Getting the SOS Debugging Extension (sos.dll)
- Loading mscordacwks.dll and sos.dll (live debugging)
- Loading mscordacwks.dll and sos.dll (dump file)
- Using the SOS Debugging Extension
- Notes
- Debugging Tools for Windows (WinDbg, KD, CDB, NTSD)
- Install Debugging Tools for Windows
- Get started with Windows Debugging
- Debugging environments
- Windows debuggers
- Symbols and symbol files
- Blue screens and crash dump files
- Tools and utilities
- Additional documentation
- Debug C++ in Visual Studio Code
- Windows debugging with GDB
- Conditional breakpoints
- Function breakpoints
- Expression evaluation
- Multi-threaded debugging
- Memory dump debugging
- Additional symbols
- Locate source files
- GDB, LLDB, and LLDB-MI Commands (GDB/LLDB)
- Other debugging features
- Natvis framework
- Debug remotely
- Debug the debugger
- Known limitations
- Symbols and code navigation
- Debugging
- Next steps
Debugging Managed Code Using the Windows Debugger
You can use the Windows debuggers (WinDbg, CDB, and NTSD) to debug target applications that contain managed code. To debug managed code, you must load the SOS debugging extension (sos.dll) and a data access component (mscordacwks.dll).
The Windows debuggers are separate from the Visual Studio debugger. For information about the distinction between the Windows debuggers and the Visual Studio debugger, see Windows Debugging.
Introduction to Managed Code
Managed code is executed together with the Microsoft .NET Common Language Runtime (CLR). In a managed-code application, the binary code that the compiler produces is in Microsoft Intermediate Language (MSIL), which is platform-independent.
When managed code is run, the runtime produces native code that is platform-specific. The process of generating native code from MSIL is called just-in-time (JIT) compiling. After the JIT compiler has compiled the MSIL for a specific method, the method’s native code remains in memory. Whenever this method is later called, the native code executes and the JIT compiler does not have to be involved.
You can build managed code by using several compilers that are manufactured by a variety of software producers. In particular, Microsoft Visual Studio can build managed code from several different languages including C#, Visual Basic, JScript, and C++ with managed extensions.
The CLR is not updated every time the .NET Framework is updated. For example, versions 2.0, 3.0, and 3.5 of the .NET Framework all use version 2.0 of the CLR. The following table shows the version and filename of the CLR used by each version of the .NET Framework.
| .NET Framework version | CLR version | CLR filename |
|---|---|---|
| 1.1 | 1.1 | mscorwks.dll |
| 2.0 | 2.0 | mscorwks.dll |
| 3.0 | 2.0 | mscorwks.dll |
| 3.5 | 2.0 | mscorwks.dll |
| 4.0 | 4.0 | clr.dll |
| 4.5 | 4.0 | clr.dll |
Debugging Managed Code
To debug managed code, the debugger must load these two components.
NoteВ В For all versions of the .NET Framework, the filename of the DAC is mscordacwks.dll, and the filename of the SOS debugging extension is sos.dll.
Getting the SOS Debugging Extension (sos.dll)
The SOS debugging extension (sos.dll) files are not included in the current version of Debugging Tools for Windows.
For .NET Framework versions 2.0 and later, sos.dll is included in the .NET Framework installation.
For version 1.x of the .NET Framework, sos.dll is not included in the .NET Framework installation. To get sos.dll for .NET Framework 1.x, download the 32-bit version of Windows 7 Debugging Tools for Windows.
Windows 7 Debugging Tools for Windows is included in the Windows SDK for Windows 7, which is available at these two places:
If you are running an x64 version of Windows, use the ISO, so that you can specify that you want the 32-bit version of the SDK. Sos.dll is included only in the 32-bit version of Windows 7 Debugging Tools for Windows.
Loading mscordacwks.dll and sos.dll (live debugging)
Assume that the debugger and the application being debugged are running on the same computer. Then the .NET Framework being used by the application is installed on the computer and is available to the debugger.
The debugger must load a version of the DAC that is the same as the version of the CLR that the managed-code application is using. The bitness (32-bit or 64-bit) must also match. The DAC (mscordacwks.dll) comes with the .NET Framework. To load the correct version of the DAC, attach the debugger to the managed-code application, and enter this command.
.cordll -ve -u -l
The output should be similar to this.
To verify that the version of mscordacwks.dll matches the version of the CLR that the application is using, enter one of the following commands to display information about the loaded CLR module.
lmv mclr (for version 4.0 of the CLR)
lmv mscorwks (for version 1.0 or 2.0 of the CLR)
The output should be similar to this.
In the preceding example, notice that the version of the CLR (clr.dll) matches the version of the DAC (mscordacwks.dll): v4.0.30319. Also notice that both components are 64-bit.
When you use .cordll to load the DAC, the SOS debugging extension (sos.dll) might get loaded automatically. If sos.dll doesn’t get loaded automatically, you can use one of these commands to load it.
.loadby sos clr (for version 4.0 of the CLR)
.loadby sos mscorwks (for version 1.0 or 2.0 of the CLR)
As an alternative to using .loadby, you can use .load. For example, to load version 4.0 of the 64-bit CLR, you could enter a command similar to this.
.load C:\Windows\Microsoft.NET\Framework64\v4.0.30319\sos.dll
In the preceding output, notice that the version of the SOS debugging extension (sos.dll) matches the version of the CLR and the DAC: v4.0.30319. Also notice that all three components are 64-bit.
Loading mscordacwks.dll and sos.dll (dump file)
Suppose you use the debugger to open a dump file (of a managed-code application) that was created on another computer.
The debugger must load a version of the DAC that is the same as the version of the CLR that the managed-code application was using on the other computer. The bitness (32-bit or 64-bit) must also match.
The DAC (mscordacwks.dll) comes with the .NET Framework, but let’s assume that you do not have the correct version of the .NET Framework installed on the computer that is running the debugger. You have three options.
- Load the DAC from a symbol server. For example, you could include Microsoft’s public symbol server in your symbol path.
- Install the correct version of the .NET Framework on the computer that is running the debugger.
- Get the correct version of mscordacwks.dll from the person who created the dump file (on another computer) and manually copy it to the computer that is running the debugger.
Here we illustrate using Microsoft’s public symbol server.
Enter these commands.
.sympath+ srv\* (Add symbol server to symbol path.)
!sym noisy
.cordll -ve -u -l
The output will be similar to this.
In the preceding output, you can see that the debugger first looked for mscordacwks.dll and sos.dll on the local computer in C:\Windows\Microsoft.NET and in the symbol cache (C:\ProgramData\dbg\sym). When the debugger did not find the correct versions of the files on the local computer, it retrieved them from the public symbol server.
To verify that the version of mscordacwks.dll matches the version of the CLR that the application was using, enter one of the following commands to display information about the loaded CLR module.
lmv -mclr (for version 4.0 of the CLR)
lmv -mscorwks (for version 1.0 or 2.0 of the CLR)
The output should be similar to this.
In the preceding example, notice that the version of the CLR (clr.dll) matches the product version of the DAC (mscordacwks.dll): v4.0.30319. Also notice that both components are 64-bit.
Using the SOS Debugging Extension
To verify that the SOS debugging extension loaded correctly, enter the .chain command.
To test the SOS debugging extension, enter !sos.help. Then try one of the command provided by the SOS debugging extension. For example, you could try !sos.DumpDomain or the !sos.Threads command.
Notes
Sometimes a managed-code application loads more than one version of the CLR. In that case, you must specify which version of the DAC to load. For more information, see .cordll.
Debugging Tools for Windows (WinDbg, KD, CDB, NTSD)
Start here for an overview of Debugging Tools for Windows. This tool set includes WinDbg and other debuggers.
Install Debugging Tools for Windows
You can get Debugging Tools for Windows as part of a development kit or as a standalone tool set:
As part of the WDK
Debugging Tools for Windows is included in the Windows Driver Kit (WDK). To get the WDK, see Download the Windows Driver Kit (WDK).
As part of the Windows SDK
Debugging Tools for Windows is included in the Windows Software Development Kit (SDK). To download the installer or an ISO image, see Windows 10 SDK on Windows Dev Center.
As a standalone tool set
You can install the Debugging Tools for Windows alone, without the Windows SDK or WDK, by starting installation of the Windows SDK and then selecting only Debugging Tools for Windows in the list of features to install (and clearing the selection of all other features). To download the installer or an ISO image, see Windows 10 SDK on Windows Dev Center.
Get started with Windows Debugging
To get started with Windows debugging, see Getting Started with Windows Debugging.
To get started with debugging kernel-mode drivers, see Debug Universal Drivers — Step by Step Lab (Echo Kernel-Mode). This is a step-by-step lab that shows how to use WinDbg to debug Echo, a sample driver that uses the Kernel-Mode Driver Framework (KMDF).
Debugging environments
If your computer has Visual Studio and the WDK installed, then you have six available debugging environments. For descriptions of these environments, see Debugging Environments.
All of these debugging environments provide user interfaces for the same underlying debugging engine, which is implemented in the Windows Symbolic Debugger Engine (Dbgeng.dll). This debugging engine is also called the Windows debugger, and the six debugging environments are collectively called the Windows debuggers.
Visual Studio includes its own debugging environment and debugging engine, which together are called the Visual Studio debugger. For information on debugging in Visual Studio, see Debugging in Visual Studio. For debugging managed code, such as C#, using the Visual Studio debugger is often the easiest way to get started.
Windows debuggers
The Windows debuggers can run on x86-based, x64-based, or ARM-based processors, and they can debug code that is running on those same architectures. Sometimes the debugger and the code being debugged run on the same computer, but other times the debugger and the code being debugged run on separate computers. In either case, the computer that is running the debugger is called the host computer, and the computer that is being debugged is called the target computer. The Windows debuggers support the following versions of Windows for both the host and target computers.
- WindowsВ 10 and Windows ServerВ 2016
- WindowsВ 8.1 and Windows ServerВ 2012В R2
- WindowsВ 8 and Windows ServerВ 2012
- WindowsВ 7 and Windows ServerВ 2008В R2
Symbols and symbol files
Symbol files store a variety of data that are not required when running the executable binaries, but symbol files are very useful when debugging code. For more information about creating and using symbol files, see Symbols for Windows debugging (WinDbg, KD, CDB, NTSD).
Blue screens and crash dump files
If Windows stops working and displays a blue screen, the computer has shut down abruptly to protect itself from data loss and displays a bug check code. For more information, see Bug Checks (Blue Screens). You analyze crash dump files that are created when Windows shuts down by using WinDbg and other Windows debuggers. For more information, see Crash dump analysis using the Windows debuggers (WinDbg).
Tools and utilities
In addition to the debuggers, Debugging Tools for Windows includes a set of tools that are useful for debugging. For a full list of the tools, see Tools Included in Debugging Tools for Windows.
Additional documentation
For additional information related to Debugging Tools for Windows, see Debugging Resources. For information on what’s new in Windows 10, see Debugging Tools for Windows: New for Windows 10.
Debug C++ in Visual Studio Code
After you have set up the basics of your debugging environment as specified in the configuration tutorials for each target compiler/platform, you can learn more details about debugging C/C++ in this section.
Visual Studio Code supports the following debuggers for C/C++ depending on the operating system you are using:
- Linux: GDB
- macOS: LLDB or GDB
- Windows: the Visual Studio Windows Debugger or GDB (using Cygwin or MinGW)
Windows debugging with GDB
You can debug Windows applications created using Cygwin or MinGW by using VS Code. To use Cygwin or MinGW debugging features, the debugger path must be set manually in the launch configuration ( launch.json ). To debug your Cygwin or MinGW application, add the miDebuggerPath property and set its value to the location of the corresponding gdb.exe for your Cygwin or MinGW environment.
Cygwin/MinGW debugging on Windows supports both attach and launch debugging scenarios.
If you are debugging with GDB on Windows, see Windows Debugging with MinGW64.
Conditional breakpoints
Conditional breakpoints enable you to break execution on a particular line of code only when the value of the condition is true. To set a conditional breakpoint, right-click on an existing breakpoint and select Edit Breakpoint. This opens a small peek window where you can enter the condition that must evaluate to true in order for the breakpoint to be hit during debugging.
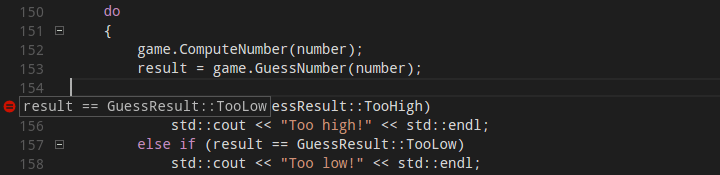
In the editor, conditional breakpoints are indicated by a breakpoint symbol that has a black equals sign inside of it. You can place the cursor over a conditional breakpoint to show its condition.
Function breakpoints
Function breakpoints enable you to break execution at the beginning of a function instead of on a particular line of code. To set a function breakpoint, on the Run view right-click inside the Breakpoints section, then choose Add Function Breakpoint and enter the name of the function on which you want to break execution.
Expression evaluation
VS Code supports expression evaluation in several contexts:
- You can type an expression into the Watch section of the Run view and it will be evaluated each time a breakpoint is hit.
- You can type an expression into the Debug Console and it will be evaluated only once.
- You can evaluate any expression that appears in your code while you’re stopped at a breakpoint.
Expressions in the Watch section take effect in the application being debugged; an expression that modifies the value of a variable will modify that variable for the duration of the program.
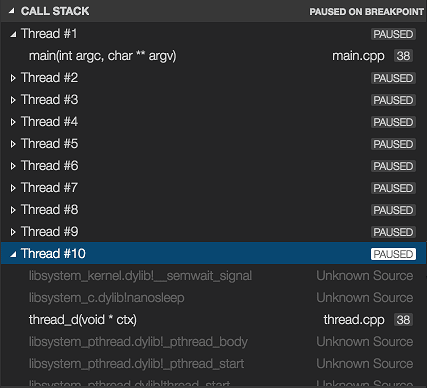
Multi-threaded debugging
The C/C++ extension for VS Code has the ability to debug multi-threaded programs. All threads and their call stacks appear in the Call Stack section:
Memory dump debugging
The C/C++ extension for VS Code also has the ability to debug memory dumps. To debug a memory dump, open your launch.json file and add the coreDumpPath (for GDB or LLDB) or dumpPath (for the Visual Studio Windows Debugger) property to the C++ Launch configuration, set its value to be a string containing the path to the memory dump. This will even work for x86 programs being debugged on an x64 machine.
Additional symbols
If there are additional directories where the debugger can find symbol files (for example, .pdb files for the Visual Studio Windows Debugger), they can be specified by adding the additionalSOLibSearchPath (for GDB or LLDB) or symbolSearchPath (for the Visual Studio Windows Debugger).
Locate source files
The source file location can be changed if the source files are not located in the compilation location. This is done by simple replacement pairs added in the sourceFileMap section. The first match in this list will be used.
GDB, LLDB, and LLDB-MI Commands (GDB/LLDB)
For the C++ (GDB/LLDB) debugging environment, you can execute GDB, LLDB and LLDB-MI commands directly through the debug console with the -exec command, but be careful, executing commands directly in the debug console is untested and might crash VS Code in some cases.
Other debugging features
- Unconditional breakpoints
- Watch window
- Call stack
- Stepping
For more information on debugging with VS Code, see this introduction to debugging in VS Code.
For additional ways to configure the launch.json file so that you can debug your C/C++ app, see Configuring C/C++ debugging.
Natvis framework
You create custom views of C++ object in the debugger with the Natvis framework. You can read the Custom views for native objects topic for details on using Natvis with the C/C++ extension.
Debug remotely
For information about attaching to a remote process, such as debugging a process in a Docker container, see Pipe transport.
Debug the debugger
If you are experiencing a debugging problem with the extension that we can’t diagnose based on information in your issue report, we might ask you to enable logging and send us your logs. See Enable logging for the debug adapter to learn how to get C/C++ extension logs.
Known limitations
Symbols and code navigation
- Because the extension doesn’t parse function bodies, Peek Definition and Go to Definition don’t work for symbols defined inside the body of a function.
Debugging
- GDB on Cygwin and MinGW cannot break a running process. To set a breakpoint when the application is running (not stopped under the debugger), or to pause the application being debugged, press Ctrl-C in the application’s terminal.
- GDB on Cygwin cannot open core dumps.
- You may see an error saying: ptrace: Operation not permitted . This is due to GDB needing elevated permissions in order to attach to a process. This can be solved using the solutions below:
When using attach to process, you need to provide your password before the debugging session can begin.
To disable this error temporarily, use the following command:
echo 0 | sudo tee /proc/sys/kernel/yama/ptrace_scope
To remove the error permanently, add a file called 10-ptrace.conf to /etc/sysctl.d/ and add the following kernel.yama.ptrace_scope = 0 .
- LLDB:
- When debugging with LLDB, if the Terminal window is closed while in break mode, debugging does not stop. Debugging can be stopped by pressing the Stop button.
- When debugging is stopped the Terminal window is not closed.
- GDB:
- Additional manual install steps are required to use GDB on macOS. See Manual Installation of GDB for OS X in the README.
- When attaching to a process with GDB, the application being debugged cannot be interrupted. GDB will only bind breakpoints set while the application is not running (either before attaching to the application, or while the application is in a stopped state). This is due to a bug in GDB.
- Core dumps cannot be loaded when debugging with GDB because GDB does not support the core dump format used in macOS.
- When attached to a process with GDB, break-all will end the process.
Next steps
Read on to find out about:
- Configure VS Code for Windows Subsystem for Linux
- Configure VS Code for Mingw-w64 and GCC
- Configure VS Code for macOS
- Configure C/C++ debugging — Learn about additional debugger configuration options.
- Basic Editing — Learn about the powerful Visual Studio Code editor.
- Code Navigation — Move quickly through your source code.
- Tasks — use tasks to build your project and more.
- Debugging — find out about the Visual Studio Code debugger.
If you have any other questions or run into any issues, please file an issue on GitHub.


