- Debugging with GDB in VSCode on Windows
- Debugging with GDB on Windows using Visual Studio Code
- Краткий гайд по использованию GDB
- Подготовка файлов
- Использование GDB
- Remotely debugging a Linux process from Windows with gdb and gdbserver: what exactly is needed on the Windows side?
- C: отладка с gdb — примеры
- Запуск gdb
- backtrace
- Break Point
Debugging with GDB in VSCode on Windows
I’m at a bit of a loss here, I hadn’t really expected this to be difficult. I usually work on Linux, but today I had some work that I needed to do and only had a Windows machine. I thought this would be no problem, I can install git for windows, clone my project, and get right to work. Its just been a huge mess. I’m really hoping someone can help me understand where I went wrong in setting all this up on Windows. It isn’t something I plan to do frequently, but definitely something I want to be able to do on a Windows machine in a reasonable amount of time.
I’m using WSL and have set my default VSCode Windows integrated terminal to C:\WINDOWS\System32\bash.exe
I installed Windows 10 SDK to fix crtdbg.h include errors as a dependency against
I installed gdb with MinGW — 
I set the path environment variable

I created a launch.json —
My MinGW bin contains the following

I launch my debug task in VSCode and I get the following error
I can provide more information if needed. I’m really hoping I missed something simple here that would be obvious to someone who works on Windows.. Thank you in advance, I really appreciate the help!
Debugging with GDB on Windows using Visual Studio Code

Jun 6, 2020 · 4 min read
So you are someone who likes developing in C/C++, and prefers to work on Linux with GCC. For some reason, you need to work on Windows now and you find yourself wondering : ‘Can I compile and debug C/C++ on Windows without using Microsoft’s MSVC compiler, or downloading the clunky Visual Studio ?(Aficionados, please don’t take offence here). And can my build commands and ‘feel’ stay similar to that on Linux?’. Yes! Wonder no more.
So MinGW is the GCC port f or Windows that allows you to build native Windows applications [1]. An installer for MinGW is available here. Bundled with this installation comes GDB, a classic debugger for C/C++ [2]. You can find it at path\\to\\MinGW\\bin\\gdb.exe `. So now you have a C/C++ compiler and a debugger. You compile your target. How do you debug it?
Tangent Note : In order to compile C/C++ code using MinGW and CMake, you need to generate MinGW specific makefiles before using the mingw make utility. Specifying a debug build type using the CMake option is necessary for the debugger to be able to find the breakpoints (no symbol file will be created otherwise).[3]
It is possible to debug with GDB on a terminal using its minimalist GUI [4]. However, using an editor that has built in support for GDB can make your debugging life easier by providing friendly UI for setting breakpoints, and stepping over/into/out-of/etc. [5] functions and loops during the debugging process. Visual Studio is one such fairly light weight and very functional editor that provides good support for GDB. Let’s see how to configure it to debug with GDB.
You can follow the following steps to set up a debugger in your visual studio code :

2. Click on the debugger symbol on the left-side panel. This will prompt you to create a ‘launch.json’. When asked to choose a debugger, choose ‘gdb’.

3. Create a ‘tasks.json’ under the ‘.vscode’ directory at the root of your project and paste the following into it. We will use this file to configure commands to be executed before the debugger is launched.
The “command” field specifies a bat file named “debug_compilation_commands”. These are the commands that will be associated with the “build” label and be used later as tasks that need to be executed before launching the debugger. An example bat file is presented below:
4. Into the launch.json in your ‘.vscode’ directory, paste the following.
5. Edit the “miDebuggerPath” in ‘launch.json’ to point it to the ‘gdb’ bundled with your MinGW installation (refer the previous step for ‘launch.json’). In the snippet above, it’s specified as “C:/MinGW/bin/gdb.exe”
6. Edit the “program” in ‘launch.json’ to point it to the path of the executable that you want to debug (somewhere in your build directory). Note that the “preLaunchTask” specifies “build”. This is the task configured in task.json in step 3.
7. In one of the source files used by the executable you want to debug, place a breakpoint.

8. Click again on the debugger symbol on the left side pane. From the ‘run and debug’ menu, choose gcc.exe debug

9. Now click on the play symbol to start debugging.

If everything went as expected, you will see a debug navigation menu along with a cursor pointing to the line in the file where you set your breakpoint.


If you want to learn more about navigation in the debug process, refer to [5]. If you found this article useful, leave me some claps and comments. Cheers.
Краткий гайд по использованию GDB
В этом коротком туториале мы рассмотрим базовые приёмы работы с GDB, а также посмотрим как можно (и нужно) подготавливать файлы к отладке для GDB.
GDB — переносимый отладчик проекта GNU, который работает на многих UNIX-подобных системах и умеет производить отладку многих языков программирования, включая Си, C++, Free Pascal, FreeBASIC, Ada, Фортран, Python3, Swift, NASM и Rust.
Почему именно GDB? Всё легко, он уже установлен на многих UNIX-подобных системах, лёгок в использовании и поддерживает много языков. Работа с ним оказывается очень лёгкой, а также его можно подключить к VSCode и другим редакторам кода (Включая Vim, NeoVim (ясное дело), Emacs, Atom и далее)
Подготовка файлов
Для примера мы возьмём файлы .cpp и будем проходиться по ним вдоль и поперёк.
Для того чтобы нам пройтись по такому файлу нам нужно скомпилировать его с помощью G++ с использованием флага -g (это действительно важно, без этого флага, программа не будет корректно работать в GDB).
Python-файл вы можете продебажить с помощью этой команды:
Для Java вы просто можете использовать jdb, который уже идёт в комплекте c JDK.
Также, если вам не хочется компилировать всё ручками, вы можете просто использовать сайт OnlineGDB, там просто нужно вставить код и нажать debug, а затем внизу откроется консоль, где вы сможете писать команды.
Использование GDB
Как только мы зашли в GDB нам выводится следующее сообщение:
Последняя строка говорит о том, нормально ли запустился файл.
Теперь нужно посмотреть, где в нашем файле точка вхождения (строка, откуда наша программа начинает свою работу), в случае cpp это метод main() . Находим номер этой строки c помощью команды list и пишем её порядковый номер с буквой b (также можно просто указать имя функции b main тоже работает):
Далее запускаем программу с помощью комманды r :
Также вы можете включить TUI, с помощью комбинации клавиш
Для того, чтобы посмотреть на какой мы сейчас строке, нужно написать f :
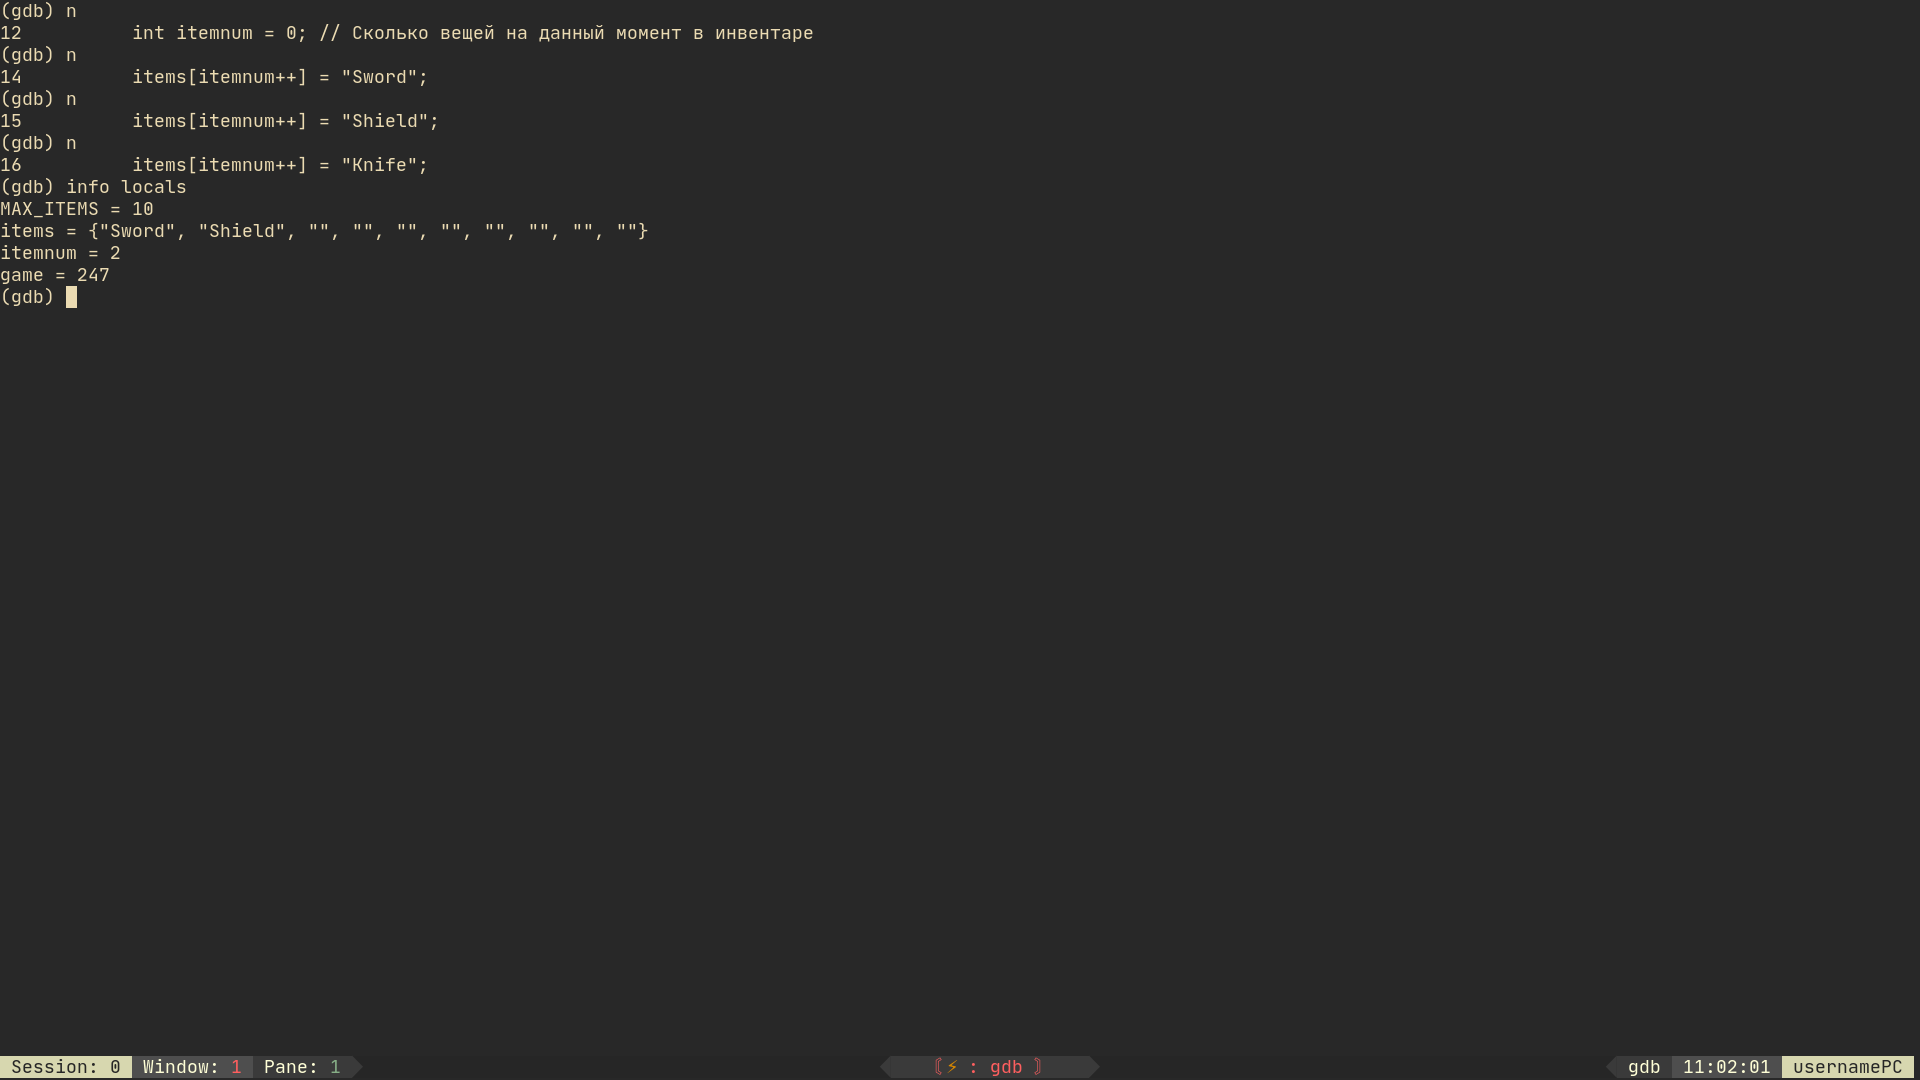
Для того, чтобы сделать шаг, нужно нажать n (от слова next):
Как мы видим GDB сразу пропускает пустые строки (или строки с комментариями) и переходит к следующей строке.
Предположим, что у нас есть функция, при нажатии n наш отладчик быстро пройдет функцию, не заходя в неё, чтобы зайти в функцию нужно сделать «шаг внутрь» (step-in) или просто клавиша s :
(В примере нет функции, однако шаг step-in все равно будет работать и с обычными инициализациями, условиями и циклами)
Чтобы узнать какие переменные (локальные) сейчас инициализированны в программе нужно написать комманду info locals :
Чтобы вывести только одну переменную, нужно написать print имя_переменной :
Мы можем также изменить переменную с помощью set :
Мы можем также следить за переменными с помощью watch :
Также, если нужно можно посмотреть что в данный момент находится в регистрах ( info registers ):
Чтобы посмотреть какие в данный момент есть breakpoints (точки останова) нужно написать info breakpoints :
Чтобы удалить точку останова del breakpoint_num :
Чтобы прыгнуть к следующей точке останова нужно нажать c :
Мы можем вызывать функции из программы (локальные) с помощью call :
Чтобы продолжить выполнение функции и остановить программу когда она (функция) завершится нужно написать finish или fin :
Стоит уточнить, что нельзя использовать finish в главном методе.
Чтобы завершить выполнение программы, нужно написать kill :
Также можно написать help в любой момент и получить краткую справку, как пользоваться отладчиком
Remotely debugging a Linux process from Windows with gdb and gdbserver: what exactly is needed on the Windows side?
I am running Eclipse CDT on Windows to develop C code that is built & tested on remote Linux systems. Currently, the code is never compiled on Windows.
I am able to use CDT to begin the remote process on the Linux target under gdbserver, and then attach gdb from the Windows host. However, gdb immediately fails with errors like:
Debugging between two Linux systems works fine, so it’s clear that I’m doing something wrong on the Windows host side. My specific questions are:
Is the Cygwin version of gdb sufficient to debug remote Linux processes, or do I need a special cross-gdb in order to run it on Windows and work with Linux processes? If so, is there anywhere can I get hold of such a gdb?
Remote debugging with gdb requires that symbols are available on the host system. What is the easiest way to achieve this? Can I just copy the symbols produced by the build on the Linux target to the Windows host, or do have to get a full build going on Windows? Is there a way to avoid this requirement, such that I can supply symbols only on the target?
More info: The RSE FAQ provides some pointers, but unfortunately I’m still blocked. The FAQ describes two approaches:
- Launch the gdb client on the remote system over ssh. Problem here is that certain fields in the CDT debug launcher are tied to the local system (project path, executable path etc. ).
- Build/obtain a cross-debugging version of gdb that supports debugging Linux processes from Windows. Problem here is that there’s little info on how to achieve this.
C: отладка с gdb — примеры
gdb (GNU Project Debugger) используется при отладке/дебаге кода.
Ниже приводятся примеры работы с кодом на С.
Используем такой код:
Собираем его с опцией -g , что бы включить отладочную информацию:
Запускаем, и получаем ошибку:
В результате получаем Segmentation fault, которая сигнализирует об ошибочном обращении к памяти.
Теперь используем gdb , что бы найти причину проблемы.
Запуск gdb
Запускаем gdb , и первым аргументом передаём исполняемый файл для запуска:
Теперь можно начать выполнение программы, используя команду run (или r ):
backtrace
backtrace указывает gdb на необходимость вывести список всех вызываемых функций из стека программы:
Тут видно, что debug.c в строке 33 вызывает printSum() , printSum () в строке 22 вызывает sprintf() , которая далее начинает выполнение более низкоуровневых функций, и в результате падает.
Всё, что выполняется после sprintf() нам неподконтрольно, и проблема возникает в данных, которые мы передаём в sprintf() , так что давайте изучим их внимательнее:
Далее — используем breakpoint-ы, что бы изучить значения переменных.
Break Point
Для того, что бы приостановить выполнение программы на каком-то этапе — мы можем задать один или цепочку брейкпоинтов, используя break ( b ).
Например, что бы сделать паузу перед вызовом sprintf() на строке 26 — указываем break 26 , и запускаем программу заново — run ( r ):


