- Set Default Folder When Opening Explorer in Windows 10
- Set Default Folder to This PC
- Set Any Folder as Default for Explorer
- Pin Folders to Quick Access
- How to set a default Folder View for all folders in Windows 10
- What are Folder Templates
- Set a default Folder View for all folders
- Default Folder X 5.1.5 (2017) Релиз состоялся: 11 мая 2017 Тип издания: OS X Software Поддерживаемая ОС: OS X 10.10 + Разработчик: St. Clair Software Официальный сайт: ссылка Язык интерфейса: Английский, Французский и др. Лечение: не требуется (инсталлятор уже пролечен) Системные требования: Intel, 64-bit processor OS X 10.10 или более новая Описание: Default Folder X — Расширяет функциональные возможности окна открытия/сохранения, прикрепляя к нему дополнительную панель. Эта панель обеспечивает быстрый доступ к различным папкам (избранное, последние использованные и т.д.), командам (управление файлами и папками в окне) и настройкам. Помимо этого стоит отметить возможность быстрого предпросмотра мультимедийных файлов прямо в окне. Если вы часто работаете с файлами, то рано или поздно вам надоест при открытии, сохранении «шариться» по директориям в диалоговых окнах, ища требуемую папку. К сожалению Mac OS часто по умолчанию предлагает совершенно не те папки которые нам требуются, а если требуемый каталог хранится не на системном разделе, да еще и не в первостепенной директории или это сетевая директория… После установки программа прописывается в «Системные настройки» и интегрируется в диалоговые окна Cocoa приложений. При последующей попытке что-либо открыть/сохранить, вы обнаруживаете кардинальные изменения во внешнем виде диалоговых окон. Дополнительное меню позволяет в пару кликов перейти к требуемой папке, добавить комментарий/теги к файлу, переименовать, удалить, создать архив, изменить права, просмотреть свойства и многое другое — полный контроль над файлами, не прибегая к помощи Finder. Самая важная, наверное, возможность это выбор дефолтной папки для используемого приложения. Теперь вы можете указывать приложению какая папка будет открываться по умолчанию, изменить папку не составит труда, осуществляется это в настройках. Есть возможность для папок фаворитов назначать шорткат, кроме этого приложение способно различать открытые окна Finder под «слоями» активных приложений и при клике автоматически подставлять директорию диалоговому окну. В настройках есть возможность отключения работы Default Folder X для определённых программ, а так же, можно выбрать один из трёх доступных вариантов оформления. • Смонтировать образ и перетащить иконку приложения в папку Программы K’ed by The Shark Скриншоты: Change Default Installation Folder in Windows 10 When we install new programs on our System, by default they will be installed in System drive which is C drive mostly. The programs which are 32 bit will be installed in “C:\Program Files(x86)” folder and the programs which are 64 bit will install in “C:\Program Files” folder by default. If you are running out of space in your C drive, you can move some files to other drives. Program Files is one of the most important folders in C drive which takes a lot of space if more software are installed in the system. One way of freeing up space in C drive is to change the default installation location of C:\Program Files. This will not move the currently installed programs but all future programs will be installed in the new location without manually changing the default installation path while installing the application. Let’s see how we can change the default installation folder in Windows 10. The same can be applied to Windows 7 and Windows 8.1. Changing the default installation folder Proceed with following steps to change the default location of installation folder for new installing programs. Type the “regedit” in start menu and open the first result it shows. Go for following keys “HKEY_LOCAL_MACHINE\SOFTWARE\Microsoft\Windows\CurrentVersion”. And double click on “CurrentVersion”. Then on right hand side window will expand. Go for ProgramFilesDir from list. If your Operating System is 64 bit then there will be two entries ProgramFilesDir and ProgramFilesDir(x86). Double click on any one of them and see the entries. It is C drive first. You can edit any drive where you want to save all installations. And then press Ok after editing. Restart the system for changes to take effect. And new installation will be done in your new folder. Apply these manageable and painless steps to change your default folder of installation. This may help you in making your System drive’s space manageable and in control. Now move any of your large files, games, or software between storage drives in few clicks
- Change Default Installation Folder in Windows 10
- Changing the default installation folder
Set Default Folder When Opening Explorer in Windows 10
How to change from Quick Access to This PC
After upgrading to Windows 10 recently, I noticed that whenever I opened Explorer, it would always show me Quick Access. I like the new Quick Access feature, but I preferred to have Explorer open to This PC instead.
For me, being able to access the different drives on the computer and my network devices was far more important than accessing frequently used folders or recently opened files. It’s a useful feature, but I don’t mind having to click once to access it.
In this post, I’ll show you how to change the default folder from Quick Access to This PC when opening Explorer. In addition, I’ll also show you a trick whereby you can set any folder to be the default folder when opening Explorer in Windows 10.
Set Default Folder to This PC
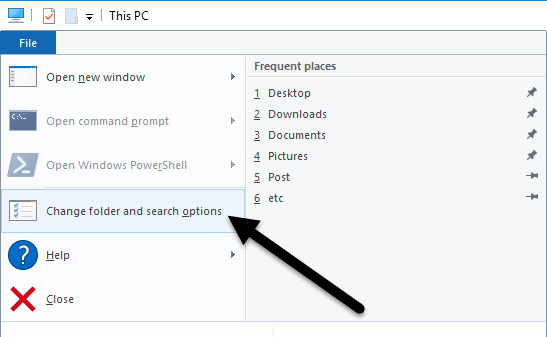
To change the setting, open Explorer, click on File and then click on Change folder and search options.
In the dialog that pops up, you should already be on the General tab. At the very top, you’ll see Open File Explorer to where you can select from This PC and Quick Access.
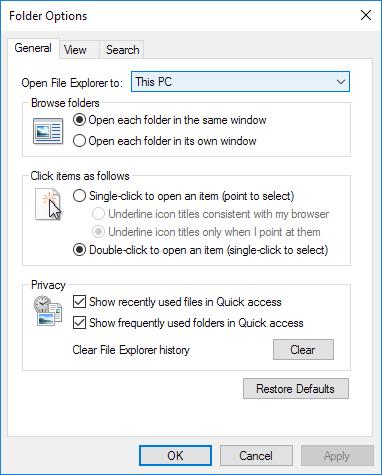
Just pick whichever folder you prefer and you’re good to go! Now when you open Explorer, you should see it open to This PC selected instead of Quick Access.
If you need to do this on many machines in a corporate environment, you’ll be happy to know that there is a registry entry that controls this setting also. Just navigate to the following key:
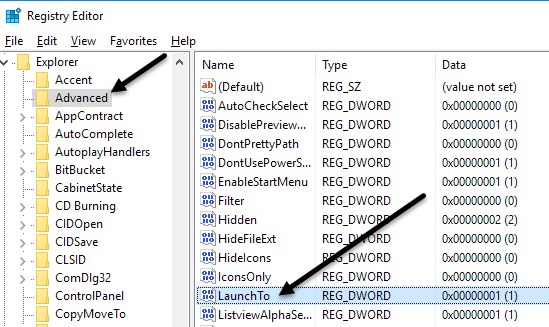
On the right hand side, look for a DWORD key named Launch To. 1 means This PC and 2 means Quick Access.
Finally, let’s talk about how we can configure Explorer to open up to any folder as the default folder.
Set Any Folder as Default for Explorer
Since there really isn’t any official way to do this, we have to kind of hack Windows to get it to do what we want. I’ve tested it out and the process seems to work just fine. To get started, find your folder and create a shortcut to the folder on your desktop.

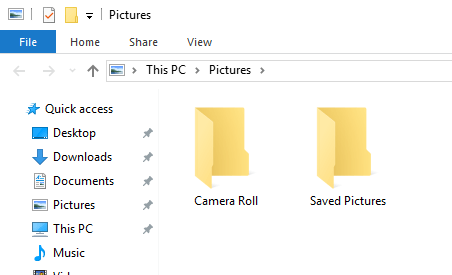
For example, if I wanted to use the Pictures folder as my default folder, I would right-click on it, choose Send to and then click on Desktop (create shortcut). Next, we need to copy that shortcut into a special location in Windows. First, let’s open Explorer and go to that special location. Just copy and paste the following path into the address bar in another Explorer window:
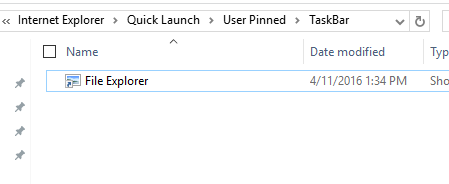
Make sure to press Enter after you paste the path into Explorer. Depending on what else is pinned to your taskbar, you might see shortcuts to several programs here, but you should always see a File Explorer shortcut.
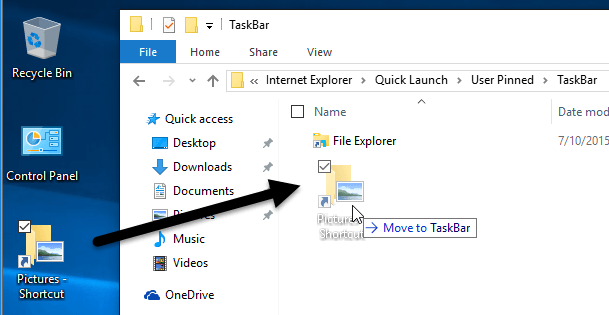
Now go ahead and drag the shortcut that we just created from your desktop into the special folder you have open in Explorer. Now we have to do one last thing. Go ahead and delete the File Explorer shortcut and rename the Pictures Shortcut to File Explorer. If you chose a different folder than Pictures, then change whatever the name of that shortcut is to File Explorer.
That’s about it! Now open File explorer from your taskbar and you should be viewing the contents of whichever folder you chose to be the default folder.
It’s worth noting that this little trick will only work when you click on the Explorer icon on your taskbar. If you open Explorer by double-clicking on This PC on the desktop or by clicking on Start and then File Explorer, you’ll either see This PC or Quick Access, depending on which option is chosen in the settings.
If you want to undo what we just did above, all you have to do is right-click on Explorer in the taskbar and choose Unpin from taskbar. After that, just drag the This PC icon from your desktop and drop it onto the taskbar again. This will create a new Explorer shortcut and it’ll work normally.
Pin Folders to Quick Access
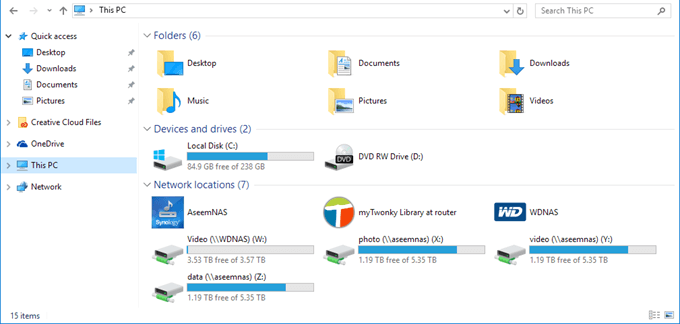
If you don’t like any of the two options above, you do have one other choice in Windows 10. You could use the new pinned folders feature that is associated with Quick Access. When you open Explorer, you’ll see a pin icon next to several folders under Quick Access.
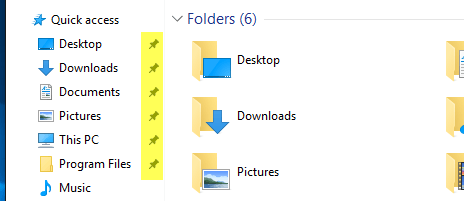
The Desktop, Downloads, Documents, Pictures, This PC and Music folders are pinned by default in Windows 10. If you want to remove any of them, just right-click and choose Unpin from Quick Access.
However, if you want one click access to any folder on your computer, navigate to that folder, then right-click on Quick Access and choose Pin current folder to Quick Access.
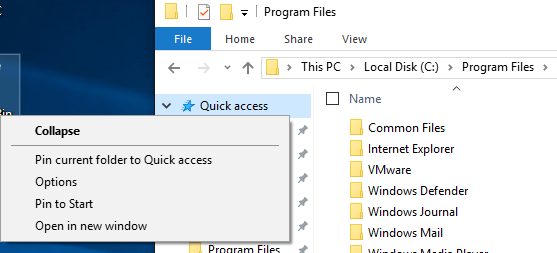
As you can see, this is how I pinned the Program Files folder to my Quick Access section. Using this method, you don’t have to resort to any hacks and you can also quickly access any folder on your system with two clicks.
Lastly, you can also get to that pinned folder quickly by simply right-clicking on the File Explorer icon in your taskbar and choosing your pinned folder, which will show up in the jumplist.

So in summary, if you want to change the default folder system-wide, you can only pick between This PC and Quick Access. If you use the second method involving the shortcut hack, then you have to use the shortcut from the taskbar.
Lastly, if you just need quick access to a folder, try using the pin to Quick Access option as that will also be system-wide and will remain in the left-hand side even as you browse through other folders. If you have any questions, post a comment. Enjoy!
Founder of Online Tech Tips and managing editor. He began blogging in 2007 and quit his job in 2010 to blog full-time. He has over 15 years of industry experience in IT and holds several technical certifications. Read Aseem’s Full Bio
How to set a default Folder View for all folders in Windows 10
In Windows File Explorer, you might have noticed the different folder layout settings for different folders. Some of the folders have smaller icons while some puts on a large icons view layout. There are several folder layouts available in Windows 10/8/7 which you can choose from, for any folder. While Windows has set these defaults based on the nature of the files in the folder, if you wish, you can set a default Folder View for all folders. In this post, we will how to set & apply the same view settings of the current folder, as the default, for all other folders on your PC.
What are Folder Templates
Before rolling on to change the folder’s view settings, let’s take a look at how folder templates work. You might have noticed that folders that contain pictures have a different view layout than that which contains videos or documents. This is the folder optimization technique in play which chooses one of the five templates for any folder based on the content that is stored in it. These templates are:
- General Items – Applies to any folder that contains a mixed combination of files and other sub-folders.
- Documents – Applies to the folders that contain documents (Word files, text files, etc.)
- Pictures – Applies to the folders that contain image files (.jpg, .png files, etc.)
- Music – Applies to all such folders which contain music files (.mp3, .wav, etc.)
- Videos – Applies to any folder that contains just video items (.mp4, .avi, etc.)
Whenever you create a new folder and put some files in it, Windows does its best to decide the folder template based on the content. If you’re storing mixed type of files in any folder, Windows automatically assigns General Items as the folder template. If you want to view any folder’s template, right-click the folder icon and open its Properties window. In here, navigate to the Customize tab where you can see the correct template optimized for the folder in question.
Set a default Folder View for all folders
Now that we are clear on basics, let’s roll over to the task at hand. You can apply a folder’s view settings to only those folders which are optimized for the same folder template type. Once the view layout is generalized for a folder template type (say, Music), every time you change the layout of file icons (from tile icons to large icons), the same will be reflected in other folders as well that are optimized for Music template. Now, you can follow the below steps to apply the folder view settings across a folder template type:
1. Open File Explorer by using key combination Windows Key + E and navigate to the folder you want to use as a source for view layout settings.
2. Navigate to the View tab in ribbon bar on the top and change the settings per your wish. You can change the layout and choose the folder details to display, add extra panes, adjust column width, etc.
3. Once done with the changes, click Options to open Folder Options window.
4. Navigate to View tab in Folder Options window.
5. Click/Tap on Apply to Folders button.
6. Click/Tap Yes on the confirmation window that pops up.
7. Click/Tap OK on the Folder Options window to save the settings.
That is it. You have just generalized the view settings for a particular folder template type across the OS. Hope this works for you.
Default Folder X 5.1.5 (2017)


Релиз состоялся: 11 мая 2017
Тип издания: OS X Software
Поддерживаемая ОС: OS X 10.10 +
Разработчик: St. Clair Software
Официальный сайт: ссылка
Язык интерфейса: Английский, Французский и др.
Лечение: не требуется (инсталлятор уже пролечен)
Системные требования:
Intel, 64-bit processor
OS X 10.10 или более новая
Описание:
Default Folder X — Расширяет функциональные возможности окна открытия/сохранения, прикрепляя к нему дополнительную панель. Эта панель обеспечивает быстрый доступ к различным папкам (избранное, последние использованные и т.д.), командам (управление файлами и папками в окне) и настройкам. Помимо этого стоит отметить возможность быстрого предпросмотра мультимедийных файлов прямо в окне.
Если вы часто работаете с файлами, то рано или поздно вам надоест при открытии, сохранении «шариться» по директориям в диалоговых окнах, ища требуемую папку. К сожалению Mac OS часто по умолчанию предлагает совершенно не те папки которые нам требуются, а если требуемый каталог хранится не на системном разделе, да еще и не в первостепенной директории или это сетевая директория…
После установки программа прописывается в «Системные настройки» и интегрируется в диалоговые окна Cocoa приложений. При последующей попытке что-либо открыть/сохранить, вы обнаруживаете кардинальные изменения во внешнем виде диалоговых окон.
Дополнительное меню позволяет в пару кликов перейти к требуемой папке, добавить комментарий/теги к файлу, переименовать, удалить, создать архив, изменить права, просмотреть свойства и многое другое — полный контроль над файлами, не прибегая к помощи Finder. Самая важная, наверное, возможность это выбор дефолтной папки для используемого приложения.
Теперь вы можете указывать приложению какая папка будет открываться по умолчанию, изменить папку не составит труда, осуществляется это в настройках.
Есть возможность для папок фаворитов назначать шорткат, кроме этого приложение способно различать открытые окна Finder под «слоями» активных приложений и при клике автоматически подставлять директорию диалоговому окну.
В настройках есть возможность отключения работы Default Folder X для определённых программ, а так же, можно выбрать один из трёх доступных вариантов оформления.
• Смонтировать образ и перетащить иконку приложения в папку Программы
K’ed by The Shark
Скриншоты:
Change Default Installation Folder in Windows 10
When we install new programs on our System, by default they will be installed in System drive which is C drive mostly. The programs which are 32 bit will be installed in “C:\Program Files(x86)” folder and the programs which are 64 bit will install in “C:\Program Files” folder by default.
If you are running out of space in your C drive, you can move some files to other drives. Program Files is one of the most important folders in C drive which takes a lot of space if more software are installed in the system. One way of freeing up space in C drive is to change the default installation location of C:\Program Files. This will not move the currently installed programs but all future programs will be installed in the new location without manually changing the default installation path while installing the application.
Let’s see how we can change the default installation folder in Windows 10. The same can be applied to Windows 7 and Windows 8.1.
Changing the default installation folder
Proceed with following steps to change the default location of installation folder for new installing programs.
- Type the “regedit” in start menu and open the first result it shows.
- Go for following keys
“HKEY_LOCAL_MACHINE\SOFTWARE\Microsoft\Windows\CurrentVersion”. And double click on “CurrentVersion”. Then on right hand side window will expand. Go for ProgramFilesDir from list. If your Operating System is 64 bit then there will be two entries ProgramFilesDir and ProgramFilesDir(x86). - Double click on any one of them and see the entries. It is C drive first. You can edit any drive where you want to save all installations. And then press Ok after editing.
- Restart the system for changes to take effect. And new installation will be done in your new folder.
Apply these manageable and painless steps to change your default folder of installation. This may help you in making your System drive’s space manageable and in control. Now move any of your large files, games, or software between storage drives in few clicks


