- How to Open Folder Options in Windows 10?
- How to Open Folder Options in Windows 10
- About Nick
- Configuration of the My Documents folder
- Summary
- More Information
- How to Change the My Documents Folder Storage Location
- Restoring the Default My Documents Path
- Windows 10 Folder options (Restore default and apply) not working
- Replies (1)
- How to Change File Explorer Default Start Folder in Windows 10
- Open File Explorer to This PC or Quick access
- Open File Explorer to the Downloads folder by default
- Open File Explorer to Any folder of your choice
- One small request: If you liked this post, please share this?
- About the author
- 3 thoughts on “How to Change File Explorer Default Start Folder in Windows 10”
- Set Default Folder When Opening Explorer in Windows 10
- Set Default Folder to This PC
- Set Any Folder as Default for Explorer
- Pin Folders to Quick Access
How to Open Folder Options in Windows 10?
Folder Options is an important aspect in Windows operating system and it is needless to say the importance of folders. Folders are the building blocks of file organization and storing. Most users are expected to know how to access Folders and open the folder option. But incase you do not know, we are there for you. You can do multiple things with folder, copy files from one folder to another, delete items from a folder, hide a folder and show that hidden folder. We are discussing some easy steps which you may find helpful.
How to Open Folder Options in Windows 10
1. Open the File Explorer.
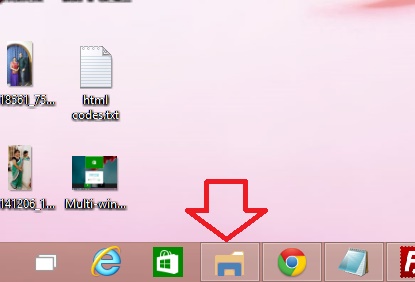
2. Tap on View and click on Options.

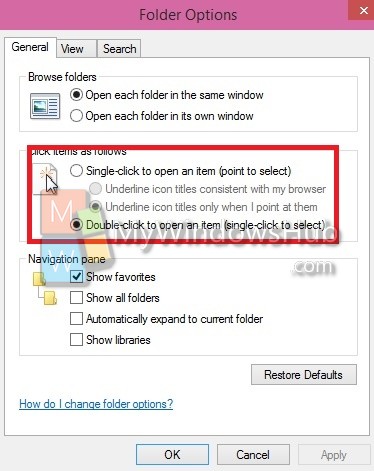
3. If you want to open folders in just a single click, then select the single click option. By default opening folders with double click is enabled.
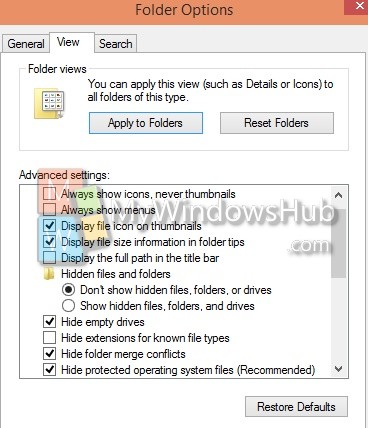
4. Under View Tab, you can enable options by reading them. For e.g. you can hide hidden folders or show them. Similarly you can disable thumbnail views and many more. In case you want to go back to default settings, just hit Restore Defaults.
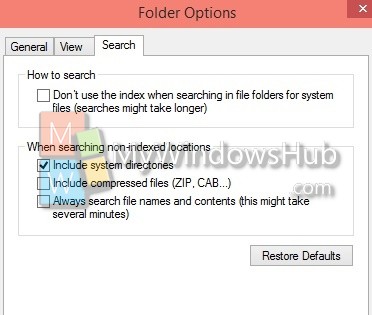
5. The search folder will help you how you would like to search items from your computer. Since search is an important and prominent feature in Windows 10, so checking right options is very important. We recommend to keep the default settings.
About Nick
Nick is a Software Engineer. He has interest in gadgets and technical stuffs. If you are facing any problem with your Windows, feel free to ask him.
Configuration of the My Documents folder
Summary
The My Documents folder is a component of the user profile that is used as a unified location for storing personal data. By default, the My Documents folder is a folder in the user’s profile that is used as a default storage location for saved documents.
If you are an administrator, you can use folder redirection in a group policy to modify the location of My Documents to reside on a network share. When users save documents to the My Documents folder, the files are actually saved on an assigned network location and can be backed up by the administrator.
More Information
The path to the My Documents folder is stored in the following registry key, where complete path to storage location is the path to your storage location:
Value Name: Personal
Value Type: REG_SZ
Value Data: complete path to storage location
Any modification from the default is recorded in the following location and the preceding path is also updated:
HKEY_CURRENT_USER\Software\Microsoft\Windows\CurrentVersion\Explorer\User Shell Folders
Value Name: Personal
Value Type: REG_SZ
Value Data: complete path to storage locationIf you redirect My Documents by using group policy folder redirection, the path is present in this value and the option to modify the location of the My Documents folder is not available when you view properties of the My Documents folder.
How to Change the My Documents Folder Storage Location
When the properties of the My Documents folder (the desktop icon) are displayed and a group policy has not been established to redirect the folder, you can change the path to the My Documents folder and you can move the contents from the old location to the new location:
Right-click My Documents (on the desktop), and then click Properties.
In the Target box, type the new path to the My Documents folder, or click Move to browse to the folder and if needed, create a new My Documents folder. If the path you type does not exist, you are prompted to confirm that you want to create a new folder.
Click Yes to move files from the old My Documents location to the new location, or click No if you do not want to move these files. Note that if you click No, the files in the old location are not deleted, but they are no longer visible from My Documents after the change.
Restoring the Default My Documents Path
If the current My Documents path is incorrect or is no longer available, you can use the Restore Default option to restore the default path:
NOTE: This option is not displayed when group policy folder redirection is in effect for this folder.
Right-click My Documents (on the desktop), and then click Properties.
Click Restore Default.
The following registry value is used to determine the default location based on the user’s profile and appends «\My Documents» to form a complete path:
HKEY_LOCAL_MACHINE\Software\Microsoft\Windows NT\CurrentVersion\ProfileList\ user ID
Value Name: ProfileImagePath
Value Type: REG_EXPAND_SZ
where user ID is the appropriate user ID.
Windows 10 Folder options (Restore default and apply) not working
Since updating windows 10 to version 1709, I’ve observed that the folder options check boxes changes by itself. When I turn on the system, it will be ok. After a few minutes of use, the folder options changes itself automatically. Since I haven’t found any of this issue posted elsewhere to look for solutions, anyone out here who knows what this issue might be and how I can fix it.
I have a fully licensed and regularly updated Bitdefender total security running. So, I’m hoping it is not an issue of virus infection.
Replies (1)
Hi Khieya. I’m Greg, an installation specialist and 8 year Windows MVP, here to help you.
Right click Start button to open Task Manager, show More Details, then choose Processes tab, scroll down to Windows Processes, then further down to Windows Explorer. Right click to Restart, click OK. Restart PC. See if it’s enough to reset File Explorer — which actually doesn’t happen when you restart PC until you do those steps.
Next go over this checklist to make sure the install is set up correctly, optimized for best performance, and any needed repairs get done: http://answers.microsoft.com/en-us/windows/wiki.
Start with Step 4 to turn off Startup freeloaders which can conflict and cause issues, then Step 7 to check for infection the most thorough way, then step 10 to check for damaged System Files. Then continue with the other steps to go over your install most thoroughly.
I would uninstall any 3rd party antivirus and try running only built-in Defender which gives adequate protection, least issues, and is from Microsoft who knows how to protect their OS best. If you want the best on-demand scanners install and run Malwarebytes and AdwCleaner free scanners.
At least disable or uninstall AV long enough to test thoroughly as we often solve problems by doing this.
If nothing else helps then run a Repair Install by installing the Media Creation Tool and choosing from it to Upgrade Now. This solves many problems and will also bring it up to the latest version which you need anyway and by the most stable method. http://windows.microsoft.com/en-us/windows-10/m.
But remember that Factory or Upgrade installs are inferior installs which most enthusiasts won’t even run because they’d expect endless issues. Consider doing the Clean Install in this link which compiles the best possible install that will stay that way as long as you stick with the tools and methods given: http://answers.microsoft.com/en-us/windows/wiki.
There is also an automated Refresh that reinstalls WIndows while shedding corrupting factory bloatware, saves your files, but doesn’t clear the drive to get it cleanest: https://www.howtogeek.com/265054/how-to-easily-.
I hope this helps. Feel free to ask back any questions and let us know how it goes. I will keep working with you until it’s resolved.
Over 100,000 helped in forums for 11 years. I don’t quit for those who are polite and cooperative.
How to Change File Explorer Default Start Folder in Windows 10
The Windows 10 File Explorer opens to Quick access by default. Quick access is a section where you can place shortcuts to your favorite folders. It also displays recently viewed files and frequently used folders. If you’re not a fan of the Quick access feature and want File Explorer to default to “This PC”, Downloads or any other custom folder by default, this post tells you how to do it.
Open File Explorer to This PC or Quick access
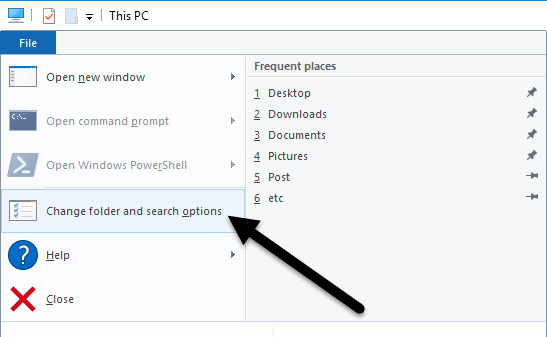
- Start File Explorer, and click the File menu.
- Click Folder and search options
- In the Folder Options dialog that opens, select This PC from the drop-down box, and click OK.


There is also another choice (“Downloads”) you can make which Microsoft doesn’t tell you. But it requires editing the registry.
Open File Explorer to the Downloads folder by default
Here is how to set File Explorer to open the “Downloads” folder every time you press WinKey + E or click the File Explorer Taskbar shortcut.
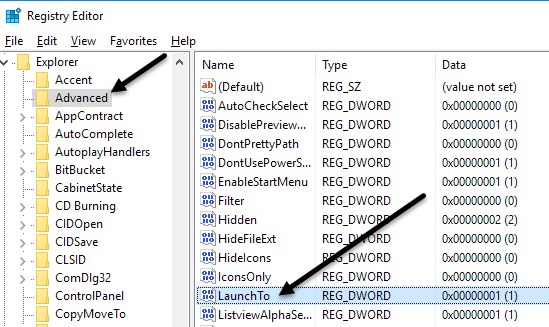
The Folder Options setting “Open File Explorer to:” is saved in the following registry key:
Value name: LaunchTo
Data: 1, 2 or 3
- 1 – File Explorer opens to “This PC”
- 2 – File Explorer opens to Quick access
- 3 – This is undocumented. If the value data is set to 3 (not configurable via Folder Options dialog), File Explorer opens to the Downloads folder.
Launch the Registry Editor ( regedit.exe ) and go to the above key:
Set the LaunchTo value data to 3 and exit the Registry Editor.
Note that after setting the value data to 3 , the drop-down box in the Folder Options dialog would appear like this.
One of the Windows 10 Anniversary Update insider preview builds included “Downloads” in the drop-down list, and Microsoft removed the option in the subsequent releases. However, the registry edit still works in version 1903 through 20H2.
Open File Explorer to Any folder of your choice
To make File Explorer start to a custom folder location other than the three options, use the registry edit and script method described in the article How to Change WinKey + E and File Explorer Shortcut Target in Windows 10
One small request: If you liked this post, please share this?
About the author
Ramesh Srinivasan founded Winhelponline.com back in 2005. He is passionate about Microsoft technologies and he has been a Microsoft Most Valuable Professional (MVP) for 10 consecutive years from 2003 to 2012.
Microsoft → Windows → Windows 10 → How to Change File Explorer Default Start Folder in Windows 10
3 thoughts on “How to Change File Explorer Default Start Folder in Windows 10”
Is there a tweak to have Explorer open with the highlighted folder at the top of the left panel list instead of near the bottom.
Latest Windows 10 registry does not have Launchto.
Tried this today, works as of 2020-10-09. Thanks!
Set Default Folder When Opening Explorer in Windows 10
How to change from Quick Access to This PC
After upgrading to Windows 10 recently, I noticed that whenever I opened Explorer, it would always show me Quick Access. I like the new Quick Access feature, but I preferred to have Explorer open to This PC instead.
For me, being able to access the different drives on the computer and my network devices was far more important than accessing frequently used folders or recently opened files. It’s a useful feature, but I don’t mind having to click once to access it.
In this post, I’ll show you how to change the default folder from Quick Access to This PC when opening Explorer. In addition, I’ll also show you a trick whereby you can set any folder to be the default folder when opening Explorer in Windows 10.
Set Default Folder to This PC
To change the setting, open Explorer, click on File and then click on Change folder and search options.
In the dialog that pops up, you should already be on the General tab. At the very top, you’ll see Open File Explorer to where you can select from This PC and Quick Access.
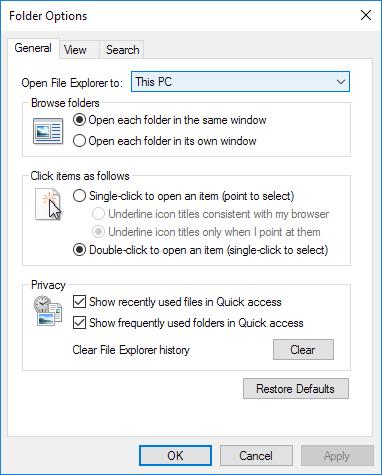
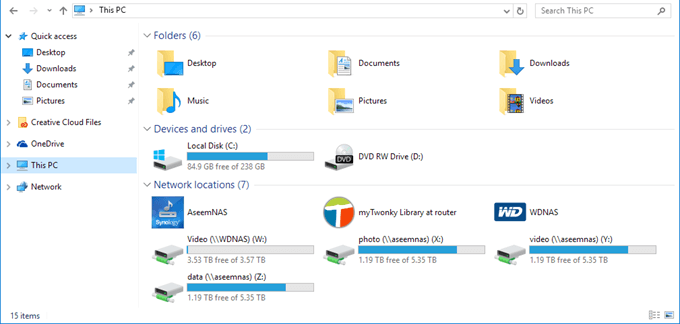
Just pick whichever folder you prefer and you’re good to go! Now when you open Explorer, you should see it open to This PC selected instead of Quick Access.
If you need to do this on many machines in a corporate environment, you’ll be happy to know that there is a registry entry that controls this setting also. Just navigate to the following key:
On the right hand side, look for a DWORD key named Launch To. 1 means This PC and 2 means Quick Access.
Finally, let’s talk about how we can configure Explorer to open up to any folder as the default folder.
Set Any Folder as Default for Explorer
Since there really isn’t any official way to do this, we have to kind of hack Windows to get it to do what we want. I’ve tested it out and the process seems to work just fine. To get started, find your folder and create a shortcut to the folder on your desktop.

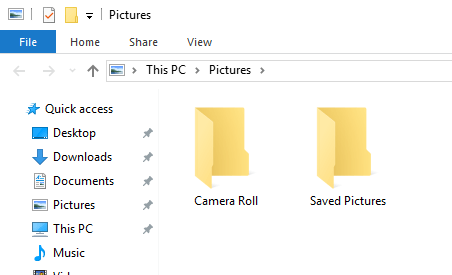
For example, if I wanted to use the Pictures folder as my default folder, I would right-click on it, choose Send to and then click on Desktop (create shortcut). Next, we need to copy that shortcut into a special location in Windows. First, let’s open Explorer and go to that special location. Just copy and paste the following path into the address bar in another Explorer window:
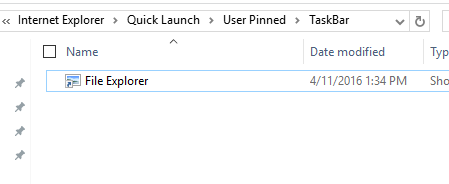
Make sure to press Enter after you paste the path into Explorer. Depending on what else is pinned to your taskbar, you might see shortcuts to several programs here, but you should always see a File Explorer shortcut.
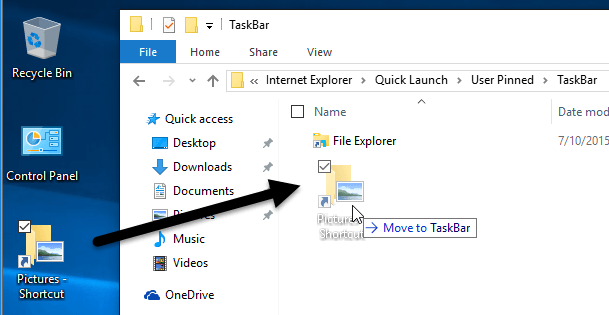
Now go ahead and drag the shortcut that we just created from your desktop into the special folder you have open in Explorer. Now we have to do one last thing. Go ahead and delete the File Explorer shortcut and rename the Pictures Shortcut to File Explorer. If you chose a different folder than Pictures, then change whatever the name of that shortcut is to File Explorer.
That’s about it! Now open File explorer from your taskbar and you should be viewing the contents of whichever folder you chose to be the default folder.
It’s worth noting that this little trick will only work when you click on the Explorer icon on your taskbar. If you open Explorer by double-clicking on This PC on the desktop or by clicking on Start and then File Explorer, you’ll either see This PC or Quick Access, depending on which option is chosen in the settings.
If you want to undo what we just did above, all you have to do is right-click on Explorer in the taskbar and choose Unpin from taskbar. After that, just drag the This PC icon from your desktop and drop it onto the taskbar again. This will create a new Explorer shortcut and it’ll work normally.
Pin Folders to Quick Access
If you don’t like any of the two options above, you do have one other choice in Windows 10. You could use the new pinned folders feature that is associated with Quick Access. When you open Explorer, you’ll see a pin icon next to several folders under Quick Access.
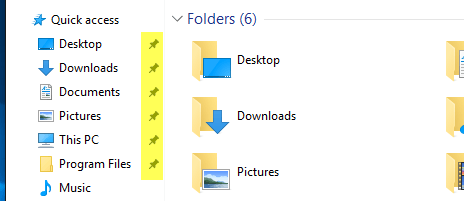
The Desktop, Downloads, Documents, Pictures, This PC and Music folders are pinned by default in Windows 10. If you want to remove any of them, just right-click and choose Unpin from Quick Access.
However, if you want one click access to any folder on your computer, navigate to that folder, then right-click on Quick Access and choose Pin current folder to Quick Access.
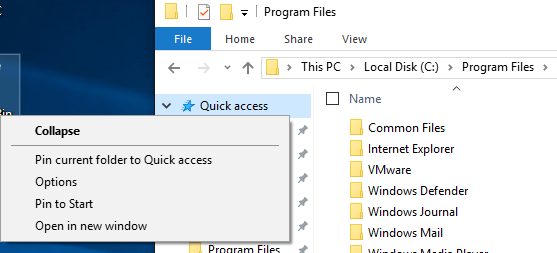
As you can see, this is how I pinned the Program Files folder to my Quick Access section. Using this method, you don’t have to resort to any hacks and you can also quickly access any folder on your system with two clicks.
Lastly, you can also get to that pinned folder quickly by simply right-clicking on the File Explorer icon in your taskbar and choosing your pinned folder, which will show up in the jumplist.

So in summary, if you want to change the default folder system-wide, you can only pick between This PC and Quick Access. If you use the second method involving the shortcut hack, then you have to use the shortcut from the taskbar.
Lastly, if you just need quick access to a folder, try using the pin to Quick Access option as that will also be system-wide and will remain in the left-hand side even as you browse through other folders. If you have any questions, post a comment. Enjoy!
Founder of Online Tech Tips and managing editor. He began blogging in 2007 and quit his job in 2010 to blog full-time. He has over 15 years of industry experience in IT and holds several technical certifications. Read Aseem’s Full Bio


