- Appearance profile settings in Windows Terminal
- Color scheme
- Font face
- Font size
- Font weight
- Retro terminal effects
- Cursor
- Cursor shape
- Cursor height
- Background image
- Background image path
- Background image stretch mode
- Background image alignment
- Background image opacity
- Acrylic
- Enable acrylic
- Acrylic opacity
- Window
- Padding
- Scrollbar visibility
- Color settings
- Tab color
- Foreground color
- Background color
- Selection background color
- Cursor color
- Unfocused appearance settings
- Unfocused appearance settings (Preview)
- Pixel shader effects
- General profile settings in Windows Terminal
- Command line
- Starting directory
- Tab title
- Hide profile from dropdown
- Getting Started with Windows Terminal
- Installation
- Requirements
- Windows Terminal Preview
- Windows Terminal
- First launch
- Profiles
- Default profile
- Adding a new profile
- Settings.json structure
- Basic customizations
- Background image
- Color scheme
- Font face
- Great resources
- Cheers
Appearance profile settings in Windows Terminal
The settings listed below are specific to each unique profile. If you’d like a setting to apply to all of your profiles, you can add it to the defaults section above the list of profiles in your settings.json file.
Color scheme
This is the name of the color scheme used in the profile. Color schemes are defined in the schemes object. More detailed information can be found on the Color schemes page.
Property name: colorScheme
Necessity: Optional
Accepts: Name of color scheme as a string
Default value: «Campbell»
Font face
This is the name of the font face used in the profile. The terminal will try to fallback to Consolas if this can’t be found or is invalid. To learn about the other variants of the default font, Cascadia Mono, visit the Cascadia Code page.
Property name: fontFace
Necessity: Optional
Accepts: Font name as a string
Default value: «Cascadia Mono»
Font size
This sets the profile’s font size in points.
Property name: fontSize
Necessity: Optional
Accepts: Integer
Default value: 12
Font weight
This sets the weight (lightness or heaviness of the strokes) for the profile’s font.
Property name: fontWeight
Necessity: Optional
Accepts: «normal» , «thin» , «extra-light» , «light» , «semi-light» , «medium» , «semi-bold» , «bold» , «extra-bold» , «black» , «extra-black» , or an integer corresponding to the numeric representation of the OpenType font weight
Default value: «normal»
Retro terminal effects
When this is set to true , the terminal will emulate a classic CRT display with scan lines and blurry text edges. This is an experimental feature and its continued existence is not guaranteed.
If experimental.pixelShaderPath is set, it will override this setting.
Property name: experimental.retroTerminalEffect
Necessity: Optional
Accepts: true , false
Default value: false
 Configuration: Retro Command Prompt
Cursor
Cursor shape
This sets the cursor shape for the profile. The possible cursors are as follows: «bar» ( в”ѓ ), «vintage» ( в–ѓ ), «underscore» ( в–Ѓ ), «filledBox» ( в–€ ), «emptyBox» ( в–Ї ), «doubleUnderscore» ( ‗ )
Property name: cursorShape
Necessity: Optional
Accepts: «bar» , «vintage» , «underscore» , «filledBox» , «emptyBox» , «doubleUnderscore»
Default value: «bar»
Cursor height
This sets the percentage height of the cursor starting from the bottom. This will only work when cursorShape is set to «vintage» .
Property name: cursorHeight
Necessity: Optional
Accepts: Integer from 25-100
Background image
Background image path
This sets the file location of the image to draw over the window background. The background image can be a .jpg, .png, or .gif file. «desktopWallpaper» will set the background image to the desktop’s wallpaper.
Property name: backgroundImage
Necessity: Optional
Accepts: File location as a string or «desktopWallpaper»
Background image stretch mode
This sets how the background image is resized to fill the window.
Property name: backgroundImageStretchMode
Necessity: Optional
Accepts: «none» , «fill» , «uniform» , «uniformToFill»
Default value: «uniformToFill»
 Background image source
Background image alignment
This sets how the background image aligns to the boundaries of the window.
Property name: backgroundImageAlignment
Necessity: Optional
Accepts: «center» , «left» , «top» , «right» , «bottom» , «topLeft» , «topRight» , «bottomLeft» , «bottomRight»
Default value: «center»
 Background image source
Background image opacity
This sets the transparency of the background image.
Property name: backgroundImageOpacity
Necessity: Optional
Accepts: Number as a floating point value from 0-1
Default value: 1.0
Acrylic
Enable acrylic
When this is set to true , the window will have an acrylic background. When it’s set to false , the window will have a plain, untextured background. The transparency only applies to focused windows due to OS limitations.
Property name: useAcrylic
Necessity: Optional
Accepts: true , false
Default value: false

Acrylic opacity
When useAcrylic is set to true , this sets the transparency of the window for the profile. This accepts floating point values from 0-1.
Property name: acrylicOpacity
Necessity: Optional
Accepts: Number as a floating point value from 0-1
Default value: 0.5

Window
Padding
This sets the padding around the text within the window. This will accept three different formats: «#» and # set the same padding for all sides, «#, #» sets the same padding for left-right and top-bottom, and «#, #, #, #» sets the padding individually for left, top, right, and bottom.
Property name: padding
Necessity: Optional
Accepts: Values as a string in the following formats: «#» , «#, #» , «#, #, #, #» or value as an integer: #
Default value: «8, 8, 8, 8»
Scrollbar visibility
This sets the visibility of the scrollbar.
Property name: scrollbarState
Necessity: Optional
Accepts: «visible» , «hidden»
Color settings
Tab color
This sets the color of the profile’s tab. Using the tab color picker will override this color.
Property name: tabColor
Necessity: Optional
Accepts: Color as a string in hex format: «#rgb» or «#rrggbb»
Foreground color
This changes the foreground color of the profile. This overrides foreground set in the color scheme if colorScheme is set.
Property name: foreground
Necessity: Optional
Accepts: Color as a string in hex format: «#rgb» or «#rrggbb»
Background color
This changes the background color of the profile with this setting. This overrides background set in the color scheme if colorScheme is set.
Property name: background
Necessity: Optional
Accepts: Color as a string in hex format: «#rgb» or «#rrggbb»
Selection background color
This sets the background color of a selection within the profile. This will override the selectionBackground set in the color scheme if colorScheme is set.
Property name: selectionBackground
Necessity: Optional
Accepts: Color as a string in hex format: «#rgb» or «#rrggbb»
Cursor color
This sets the cursor color of the profile. This will override the cursorColor set in the color scheme if colorScheme is set.
Property name: cursorColor
Necessity: Optional
Accepts: Color as a string in hex format: «#rgb» or «#rrggbb»
Unfocused appearance settings
Unfocused appearance settings (Preview)
An object you can add to a profile that applies settings to the profile when it is unfocused. This setting only accepts appearance settings.
Property name: unfocusedAppearance
Necessity: Optional
Accepts: backgroundImage , backgroundImageAlignment , backgroundImageOpacity , backgroundImageStretchMode , cursorHeight , cursorShape , cursorColor , colorScheme , foreground , background , selectionBackground , experimental.retroTerminalEffect , experimental.pixelShaderPath
Example:
This feature is only available in Windows Terminal Preview.
Pixel shader effects
This setting allows a user to specify the path to a custom pixel shader to use with the terminal content. This is an experimental feature and its continued existence is not guaranteed. For more details on authoring custom pixel shaders for the terminal, see this documentation.
If set, this will override the experimental.retroTerminalEffect setting.
Property name: experimental.pixelShaderPath
Necessity: Optional
Accepts: A path to an .hlsl shader file, as a string
General profile settings in Windows Terminal
The settings listed below are specific to each unique profile. If you’d like a setting to apply to all of your profiles, you can add it to the defaults section above the list of profiles in your settings.json file.
This is the name of the profile that will be displayed in the dropdown menu. This value is also used as the «title» to pass to the shell on startup. Some shells (like bash ) may choose to ignore this initial value, while others ( Command Prompt , PowerShell ) may use this value over the lifetime of the application. This «title» behavior can be overridden by using tabTitle .
Property name: name
Necessity: Required
Accepts: String
Command line
This is the executable used in the profile.
Property name: commandline
Necessity: Optional
Accepts: Executable file name as a string
Default value: «cmd.exe»
Starting directory
This is the directory the shell starts in when it is loaded.
Property name: startingDirectory
Necessity: Optional
Accepts: Folder location as a string
Default value: «%USERPROFILE%»
Example: Start the PowerShell profile in the GitHubRepos folder of your Documents directory by finding the powershell.exe profile and adding «startingDirectory»: «%USERPROFILE%/Documents/GitHubRepos»,
Example with WSL: When setting the starting directory for a Linux distribution installed via WSL, use the format: «startingDirectory»: «\\\\wsl$\\DISTRO NAME\\home\\USERNAME» , replacing with the placeholders with the proper names of your distribution. For example, «startingDirectory»: «\\\\wsl$\\Ubuntu-20.04\\home\\user1» .
Default behavior: When the startingDirectory value is not specified, you will get different results depending on where you launch Terminal:
- If you run Windows Terminal from the Start menu: C:\windows\system32
- If you run wt.exe from the Start menu: C:\windows\system32
- If you run wt.exe from Win+R: %USERPROFILE%
- If you run wt.exe from the explorer address bar: whatever folder you were looking at.
Backslashes need to be escaped. For example, C:\Users\USERNAME\Documents should be entered as C:\\Users\\USERNAME\\Documents .
This sets the icon that displays within the tab, dropdown menu, jumplist, and tab switcher.
Property name: icon
Necessity: Optional
Accepts: File location as a string, or an emoji
Example: By placing the icon image ubuntu.ico in the folder located at %LOCALAPPDATA%\Packages\Microsoft.WindowsTerminal_8wekyb3d8bbwe\RoamingState , you can display the icon by adding this line to the profile in your settings.json: «icon»: «ms-appdata:///roaming/ubuntu.ico» .
Tab title
If set, this will replace the name as the title to pass to the shell on startup. Some shells (like bash ) may choose to ignore this initial value, while others ( Command Prompt , PowerShell ) may use this value over the lifetime of the application. If you’d like to learn how to have the shell set your title, visit the tab title tutorial.
Property name: tabTitle
Necessity: Optional
Accepts: String
Hide profile from dropdown
If hidden is set to true , the profile will not appear in the list of profiles. This can be used to hide default profiles and dynamically generated profiles, while leaving them in your settings file. To learn more about dynamic profiles, visit the Dynamic profiles page.
Getting Started with Windows Terminal
December 17th, 2020
Installation
Windows Terminal is available in two different builds: Windows Terminal and Windows Terminal Preview. Both builds are available for download from the Microsoft Store and from the GitHub releases page.
Requirements
In order to run either Windows Terminal build, your machine must be on Windows 10 1903 or later.
Windows Terminal Preview
Windows Terminal Preview is the build where new features arrive first. This build is intended for those who like to see the latest features as soon as they are released. This build has a monthly release cadence with the newest features each month.
Windows Terminal
Windows Terminal is the main build for the product. Features that arrive in Windows Terminal Preview appear in Windows Terminal after a month of being in production. This allows for extensive bug testing and stabilization of new features. This build is intended for those who want to receive features after they have been introduced and tested by the Preview community.
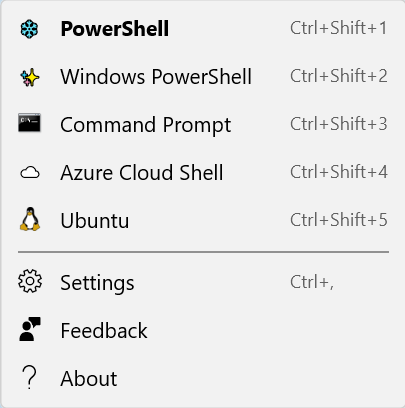
First launch
After installing the terminal, you can launch the app and get started right away with the command line. By default, the terminal includes Windows PowerShell, Command Prompt, and Azure Cloud Shell profiles inside the dropdown. If you have Windows Subsystem for Linux (WSL) distributions installed on your machine, they should also dynamically populate as profiles when you first launch the terminal.
Profiles
Profiles act as different command line environments that you can configure inside the terminal. By default, each profile uses a different command line executable, however you can create as many profiles as you’d like using the same executable. Each profile can have its own customizations to help you differentiate between them and add your own flair to each one.
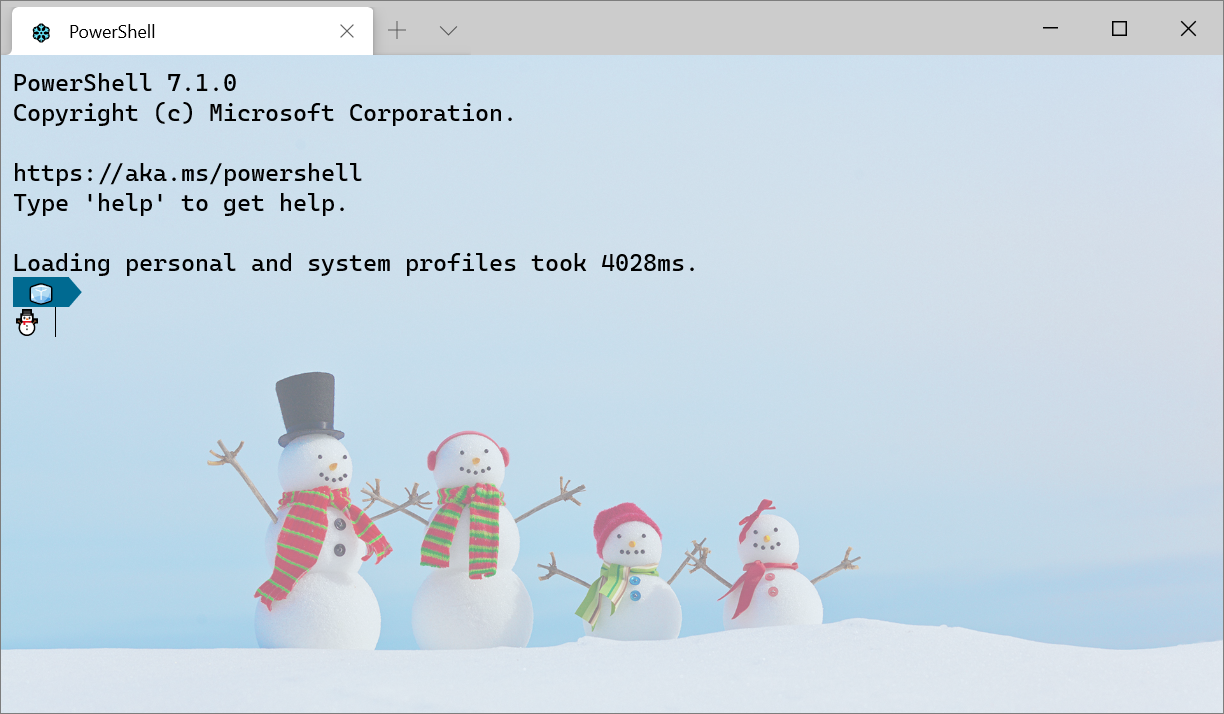
Default profile
Upon first launch of Windows Terminal, the default profile is set to Windows PowerShell. The default profile is the profile that always opens when you launch the terminal and it is the profile that will open when clicking the new tab button. You can change the default profile by setting «defaultProfile» to the name of your preferred profile in your settings.json file.
Adding a new profile
New profiles can be added dynamically by the terminal or by hand. Windows Terminal will create profiles for PowerShell and WSL distributions automatically. These profiles will have a «source» property that tells the terminal where it can find the proper executable.
If you’d like to create a new profile by hand, you just need to generate a new «guid» , provide a «name» , and provide the executable for the «commandline» property.
👉 Note: You will not be able to copy the «source» property from a dynamically generated profile. The terminal will just ignore this profile. You will have to replace «source» with «commandline» and provide the executable in order to duplicate a dynamically generated profile.
Settings.json structure
There are two settings files included in Windows Terminal. One is defaults.json, which can be opened by holding the Alt key and clicking the Settings button in the dropdown. This is an unchangeable file that includes all of the default settings that come with the terminal. The second file is settings.json, which is where you can apply all of your custom settings. This can be accessed by clicking the Settings button in the dropdown menu.
The settings.json file is split into four main sections. The first is the global settings object, which lives at the top of the JSON file inside the first < . Settings applied here will affect the entire application.
Looking down the file, the next main section is the «profiles» object. The «profiles» object is split into two sections: «defaults» and «list» . You can apply profile settings to the «defaults» object and these will apply to all profiles in your «list» . The «list» contains each profile object that represents the profiles described above and these are the items that appear in your terminal’s dropdown menu. Settings applied to individual profiles in the «list» will override settings applied in the «defaults» section.
Further down in the file is the «schemes» array. This is where custom color schemes can be placed. A great tool to help you generate your own color schemes is terminal.sexy.
Lastly, at the bottom of the file, lives the «actions» array. Objects listed here add actions to your terminal, which can be invoked by the keyboard and/or found inside the command palette.
Basic customizations
Here are some basic settings to get you started with customizing your terminal.
Background image
One of our most popular settings is the custom background image. This is a profile setting, so it can either be placed inside the «defaults» object inside the «profiles» object to apply to all profiles or inside a specific profile object.
The «backgroundImage» setting accepts the file location of the image you would like to use as your profile background. Accepted file types include .jpg, .png, .bmp, .tiff, .ico, and .gif.
Color scheme
The list of available color schemes can be found on our docs site. Color schemes are applied at the profile level, so you can place the setting inside «defaults» or in a specific profile object.
This setting accepts the name of the color scheme. You can also create your own color scheme and place it inside the «schemes» list, then set the profile setting to the name of that new scheme to apply it.
Font face
By default, Windows Terminal uses Cascadia Mono as its font face. The font face is a profile level setting. You can change your font face by setting «fontFace» to the name of the font you would like to use.
💡 Tip: Windows Terminal also ships with the Cascadia Code font face, which includes programming ligatures (see gif below). If you are using Powerline, Cascadia Code also comes in a PL version which can be downloaded from GitHub.

Great resources
Cheers
We hope this post helped you get set up with Windows Terminal! If you have any questions, feel free to reach out to Kayla (@cinnamon_msft) on Twitter. If you have any feature requests or find any bugs, you can file an issue on GitHub. Our next release is planned for January, so we will see you then!

Kayla Cinnamon
Program Manager, Windows Terminal, Console, Command Line, & Cascadia Code


