- How to create a bootable installer for macOS
- What you need to create a bootable installer
- Download macOS
- Use the ‘createinstallmedia’ command in Terminal
- Safely open apps on your Mac
- View the app security settings on your Mac
- Open a developer-signed or notarized app
- If you see a warning message and can’t install an app
- If macOS detects a malicious app
- If you want to open an app that hasn’t been notarized or is from an unidentified developer
- Privacy protections
- 2 Ways to Change the Default Application to Open Files With in Mac OS X
- 1: How to Set the Default Application for a Specific File in Mac OS
- 2: How to Set Default Applications to Open All Files of a Format Type in Mac OS X
How to create a bootable installer for macOS
You can use an external drive or secondary volume as a startup disk from which to install the Mac operating system.
These advanced steps are primarily for system administrators and others who are familiar with the command line. You don’t need a bootable installer to upgrade macOS or reinstall macOS, but it can be useful when you want to install on multiple computers without downloading the installer each time.
What you need to create a bootable installer
- A USB flash drive or other secondary volume formatted as Mac OS Extended, with at least 14GB of available storage
- A downloaded installer for macOS Big Sur, Catalina, Mojave, High Sierra, or El Capitan
Download macOS
- Download: macOS Big Sur, macOS Catalina, macOS Mojave, or macOS High Sierra
These download to your Applications folder as an app named Install macOS [ version name ]. If the installer opens after downloading, quit it without continuing installation. To get the correct installer, download from a Mac that is using macOS Sierra 10.12.5 or later, or El Capitan 10.11.6. Enterprise administrators, please download from Apple, not a locally hosted software-update server. - Download: OS X El Capitan
This downloads as a disk image named InstallMacOSX.dmg. On a Mac that is compatible with El Capitan, open the disk image and run the installer within, named InstallMacOSX.pkg. It installs an app named Install OS X El Capitan into your Applications folder. You will create the bootable installer from this app, not from the disk image or .pkg installer.
Use the ‘createinstallmedia’ command in Terminal
- Connect the USB flash drive or other volume that you’re using for the bootable installer.
- Open Terminal, which is in the Utilities folder of your Applications folder.
- Type or paste one of the following commands in Terminal. These assume that the installer is in your Applications folder, and MyVolume is the name of the USB flash drive or other volume you’re using. If it has a different name, replace MyVolume in these commands with the name of your volume.
Big Sur:*
Catalina:*
Mojave:*
High Sierra:*
El Capitan:
* If your Mac is using macOS Sierra or earlier, include the —applicationpath argument and installer path, similar to the way this is done in the command for El Capitan.
After typing the command:
- Press Return to enter the command.
- When prompted, type your administrator password and press Return again. Terminal doesn’t show any characters as you type your password.
- When prompted, type Y to confirm that you want to erase the volume, then press Return. Terminal shows the progress as the volume is erased.
- After the volume is erased, you may see an alert that Terminal would like to access files on a removable volume. Click OK to allow the copy to proceed.
- When Terminal says that it’s done, the volume will have the same name as the installer you downloaded, such as Install macOS Big Sur. You can now quit Terminal and eject the volume.


Источник
Safely open apps on your Mac
macOS includes a technology called Gatekeeper, that’s designed to ensure that only trusted software runs on your Mac.
The safest place to get apps for your Mac is the App Store. Apple reviews each app in the App Store before it’s accepted and signs it to ensure that it hasn’t been tampered with or altered. If there’s ever a problem with an app, Apple can quickly remove it from the store.
If you download and install apps from the internet or directly from a developer, macOS continues to protect your Mac. When you install Mac apps, plug-ins, and installer packages from outside the App Store, macOS checks the Developer ID signature to verify that the software is from an identified developer and that it has not been altered. By default, macOS Catalina and later also requires software to be notarized, so you can be confident that the software you run on your Mac doesn’t contain known malware. Before opening downloaded software for the first time, macOS requests your approval to make sure you aren’t misled into running software you didn’t expect.
Running software that hasn’t been signed and notarized may expose your computer and personal information to malware that can harm your Mac or compromise your privacy.
The warning messages displayed below are examples, and it’s possible that you could see a similar message that isn’t displayed here. Please use caution if you choose to install any software for which your Mac displays an alert.
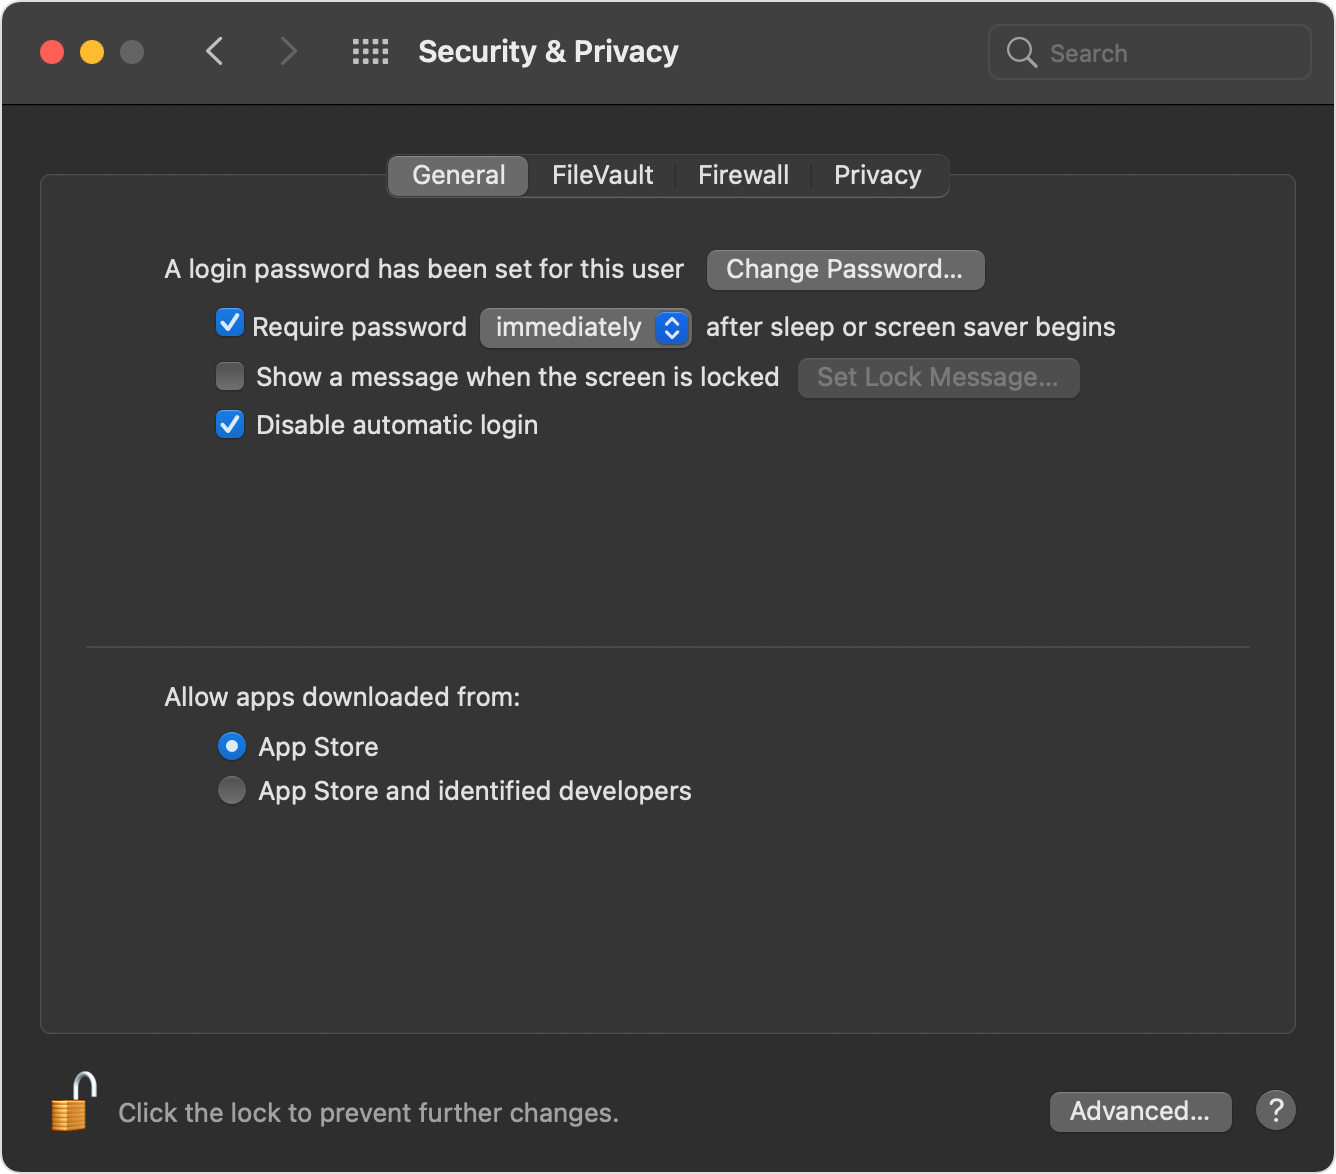
View the app security settings on your Mac
By default, the security and privacy preferences of your Mac are set to allow apps from the App Store and identified developers. For additional security, you can chose to allow only apps from the App Store.
In System Preferences, click Security & Privacy, then click General. Click the lock and enter your password to make changes. Select App Store under the header “Allow apps downloaded from.”
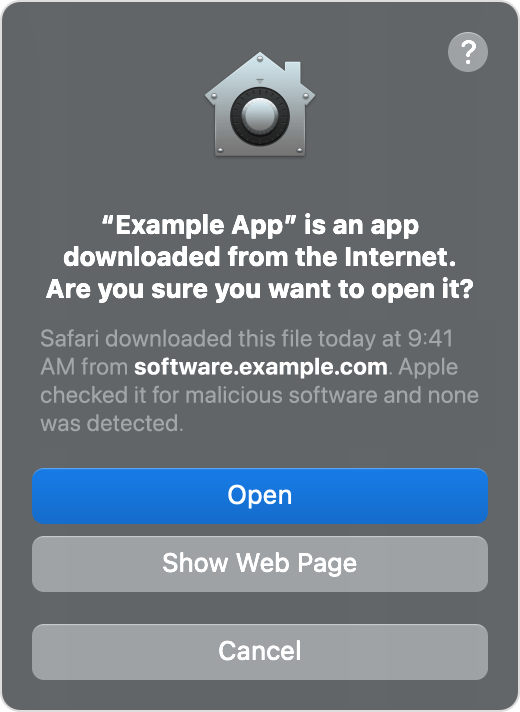
Open a developer-signed or notarized app
If your Mac is set to allow apps from the App Store and identified developers, the first time that you launch a new app, your Mac asks if you’re sure you want to open it.
An app that has been notarized by Apple indicates that Apple checked it for malicious software and none was detected.
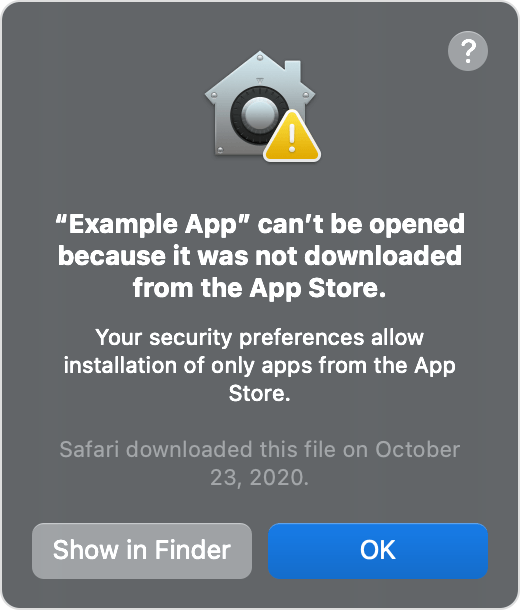
If you see a warning message and can’t install an app
If you have set your Mac to allow apps only from the App Store and you try to install an app from elsewhere, your Mac will say that the app can’t be opened because it was not downloaded from the App Store.*
If your Mac is set to allow apps from the App Store and identified developers, and you try to install an app that isn’t signed by an identified developer and—in macOS Catalina and later—notarized by Apple, you also see a warning that the app cannot be opened.
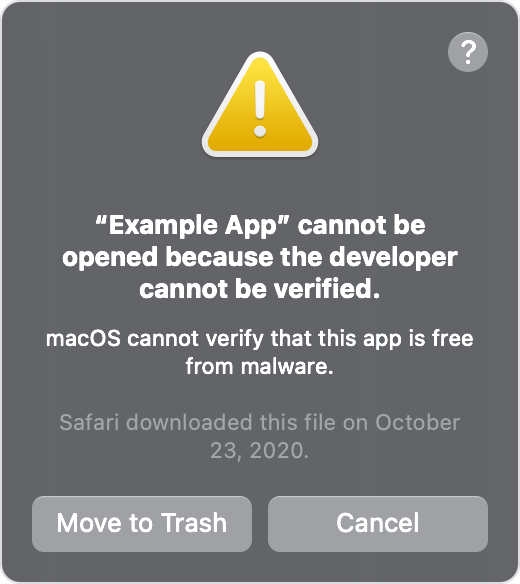
If you see this warning, it means that the app was not notarized, and Apple could not scan the app for known malicious software.
You may want to look for an updated version of the app in the App Store or look for an alternative app.
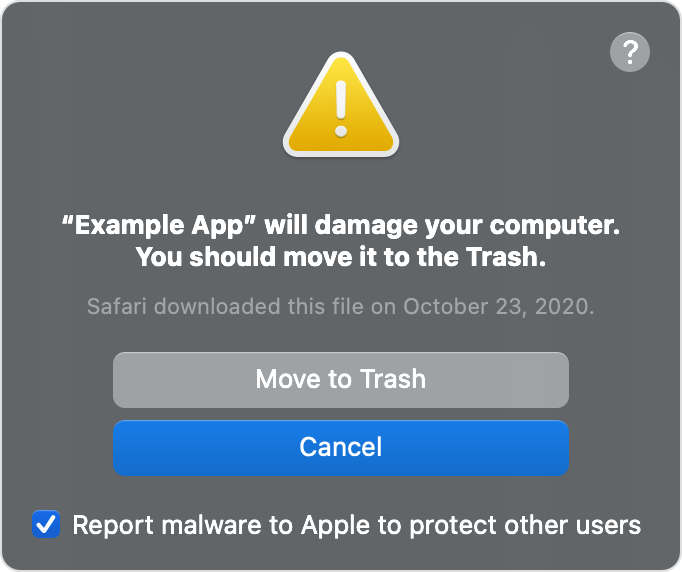
If macOS detects a malicious app
If macOS detects that software has malicious content or its authorization has been revoked for any reason, your Mac will notify you that the app will damage your computer. You should move this app to the Trash and check «Report malware to Apple to protect other users.»
If you want to open an app that hasn’t been notarized or is from an unidentified developer
Running software that hasn’t been signed and notarized may expose your computer and personal information to malware that can harm your Mac or compromise your privacy. If you’re certain that an app you want to install is from a trustworthy source and hasn’t been tampered with, you can temporarily override your Mac security settings to open it.
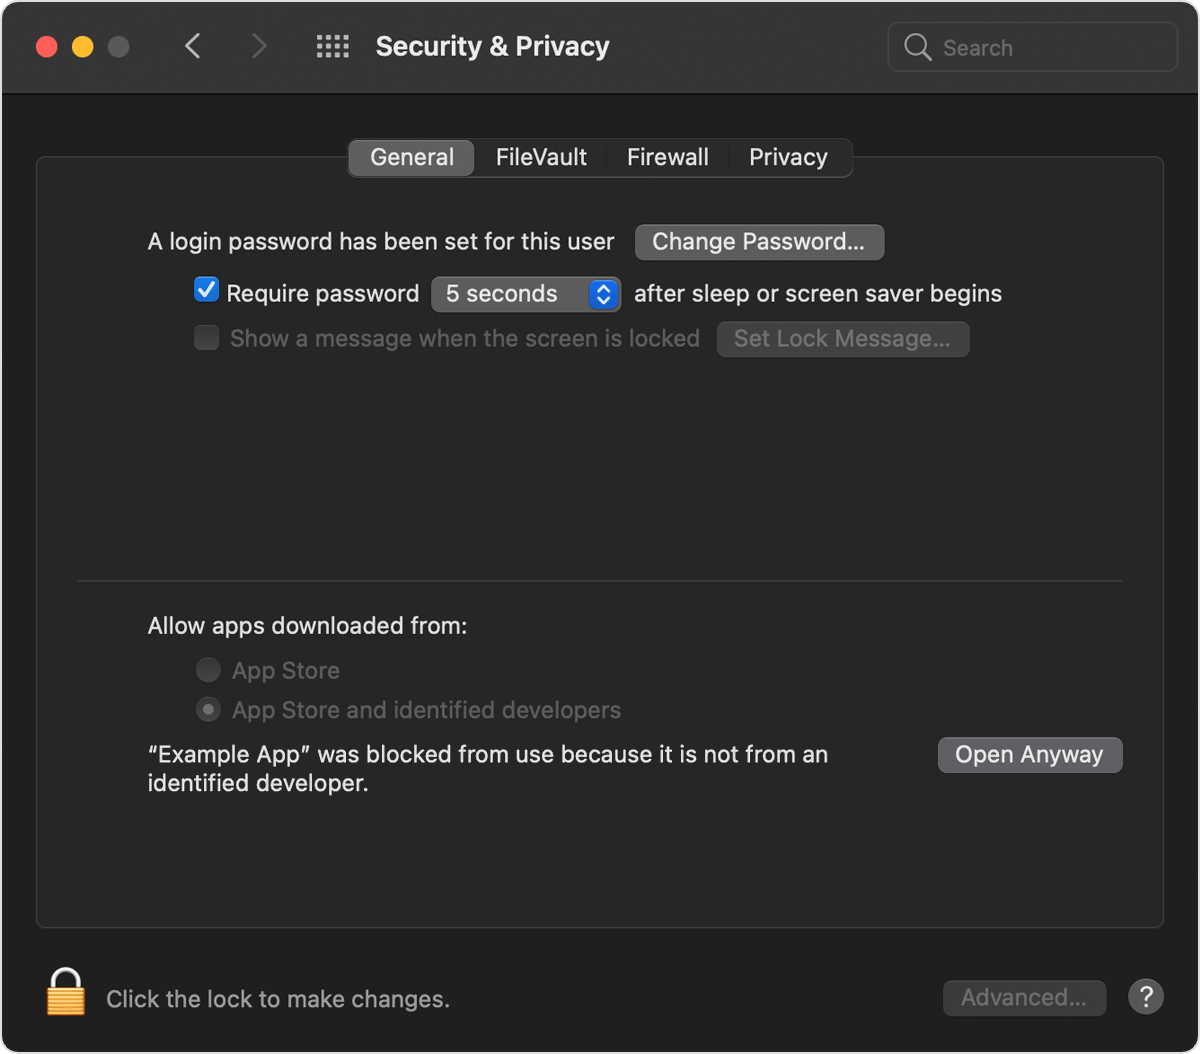
If you still want to open an app for which the developer cannot be verified, open System Preferences.*
Go to Security & Privacy. Click the Open Anyway button in the General pane to confirm your intent to open or install the app.
The warning prompt reappears, and if you’re absolutely sure you want to open the app anyway, you can click Open.
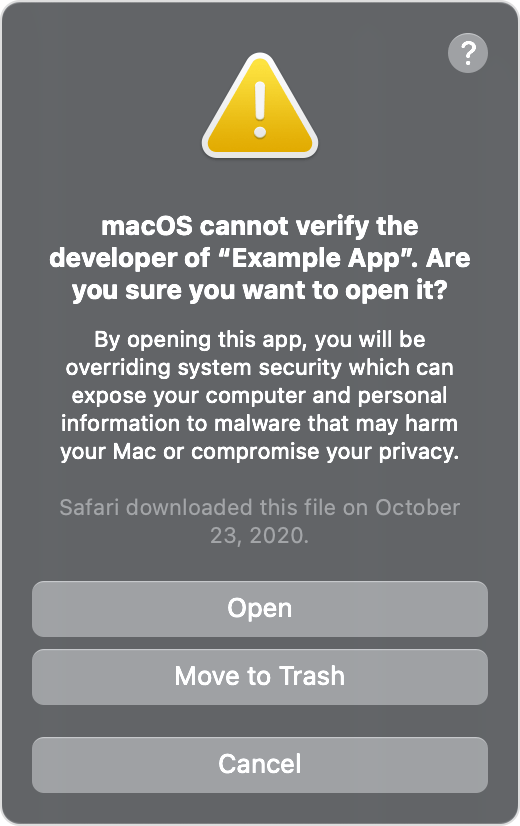
The app is now saved as an exception to your security settings, and you can open it in the future by double-clicking it, just as you can any authorized app.
Privacy protections
macOS has been designed to keep users and their data safe while respecting their privacy.
Gatekeeper performs online checks to verify if an app contains known malware and whether the developer’s signing certificate is revoked. We have never combined data from these checks with information about Apple users or their devices. We do not use data from these checks to learn what individual users are launching or running on their devices.
Notarization checks if the app contains known malware using an encrypted connection that is resilient to server failures.
These security checks have never included the user’s Apple ID or the identity of their device. To further protect privacy, we have stopped logging IP addresses associated with Developer ID certificate checks, and we will ensure that any collected IP addresses are removed from logs.
In addition, over the the next year we will introduce several changes to our security checks:
- A new encrypted protocol for Developer ID certificate revocation checks
- Strong protections against server failure
- A new preference for users to opt out of these security protections
* If you’re prompted to open the app in Finder and you’re sure you want to open it despite the warning, you can control-click the app, choose Open from the menu, and then click Open in the dialog that appears. Enter your admin name and password to open the app.
Information about products not manufactured by Apple, or independent websites not controlled or tested by Apple, is provided without recommendation or endorsement. Apple assumes no responsibility with regard to the selection, performance, or use of third-party websites or products. Apple makes no representations regarding third-party website accuracy or reliability. Contact the vendor for additional information.
Источник
2 Ways to Change the Default Application to Open Files With in Mac OS X

Each file type has a default application that is associated with it on the Mac. This means that when you double-click a file from the Finder it will open a specific application, for example on a fresh Mac OS installation, all image files (png, jpg, gif, pdf, etc) will default to opening in Preview, and all text documents (txt, rtf, etc) will open in TextEdit.
Over time, the default applications and file associations can change as you install more applications, which sometimes set themselves as the new default app to open a file format with.
If you want to change these default file format associations and have files open in other applications of your choosing, you’ll find there are two simple ways to do this: the first method defines the default application to launch for a specific single file, and the second method will change the application associated with all files of a given format type.
1: How to Set the Default Application for a Specific File in Mac OS
This provides file-specific control over default applications, meaning you can have a document or two that open in one app, while the overall general file type defaults to open in another application. For example, you could set one single PSD file to always open exclusively in Pixelmator, while all other PSD formatted documents continue to open in Adobe Photoshop.
- From the Mac Finder, right-click (or Control+Click) on the file to change the default app for and hold down the OPTION key so that the “Open With” menu becomes “Always Open With”
- Continue to hold OPTION and select the application you want to set as the default for this file
The file will open in the application you selected, and that file will now associate the chosen application as it’s new default to always open within.
By the way, if you’re setting a file type this way and notice duplicate entries in that Open With menu, you can remove those duplicate entries with this quick trick to clean up the Open With contextual menu.
Again, this is specific to the file you chose, and this method will not apply to all files sharing that same file format. If you want to set the default application universally for a file type, that’s what the next tip is for.
2: How to Set Default Applications to Open All Files of a Format Type in Mac OS X
This approach will change the default application universally for all files of a specific format. For example, you could use this to set all files of the type PNG to open within Skitch, all TXT files to open with TextWrangler, and all ZIP files to open with The Unarchiver.
- From the Mac file system, select a file of the general format type you wish to change the default application for
- Pull down the “File” menu and choose “Get Info” (or hit Command+i) to access the Get Info window
- Click the “Open with:” sub menu, then click on the contextual menu and select the new application to associate all files of this format type with
Click the “Change All” button and confirm the change when requested
(Note: if the Change All button is greyed out and unclickable it’s because you have not set an application that is different than the currently set default app. Use the pulldown menu to choose the new application for the Change All button to be usable and to apply the adjustment to all files of the file format type)
This change carries throughout all files of that format used within Mac OS for the active user account, and the filetype-to-application association will stay in place until it has been changed again through the same “Get Info” trick, or until a third party application claims the file format and associates with it directly.
You’ll find this one particularly useful if a newly installed application has assumed control over a file format, like what often happens with Adobe Reader claiming all PDF documents. This ‘Change All‘ trick will allow you to quickly reclaim PDF file types to reopen again in Preview (or your app of choice), which is typically much faster than launching such files in more resource heavy apps like Reader.
The video below demonstrates the latter trick, changing the default application for all files of a given type:
Note these tricks work to set the default application for files in all versions of macOS, Mac OS X, and OS X, including Big Sur, Catalina, Mojave, High Sierra, Sierra, Yosemite, El Capitan, Snow Leopard, Lion, Mountain lion, Tiger, and earlier releases too. Therefore it does not matter which version of Mac system software you are running, you can always changes the default application that opens with a file or file type.
Have any other tips or suggestions for changing application file associations on the Mac? Share in the comments!
Источник


