- How to Remove Unused Drivers from Driver Store
- How to Find and Delete Old Driver Versions in Windows 7
- How to Delete Old Drivers in Windows 10/8 Using Disk Cleanup
- Add and Remove Drivers to an offline Windows Image
- Driver types
- Add drivers to an offline Windows image
- Remove drivers from an offline Windows image
- Add drivers to an offline Windows image by using an unattended answer file
- Удаление старых версий драйверов из хранилища Windows
- Поиск и удаление старых версий драйверов в Windows 7
- Удаление старых драйверов в Windows 10/8 с помощью утилиты очистки диска
How to Remove Unused Drivers from Driver Store
When you install or update device drivers in Windows, older driver versions are still stored in the system. Thus, a user can roll back to the previous driver version if the new driver is unstable (a useful opportunity, as in the case of rolling back a Wi-Fi driver). However, Windows does not automatically clean and delete old driver versions, so as the time goes the size of disk space occupied by drivers becomes quite large. In this article, we’ll discuss how to remove old driver versions (duplicates) using the integrated system tools (without any third-part software).
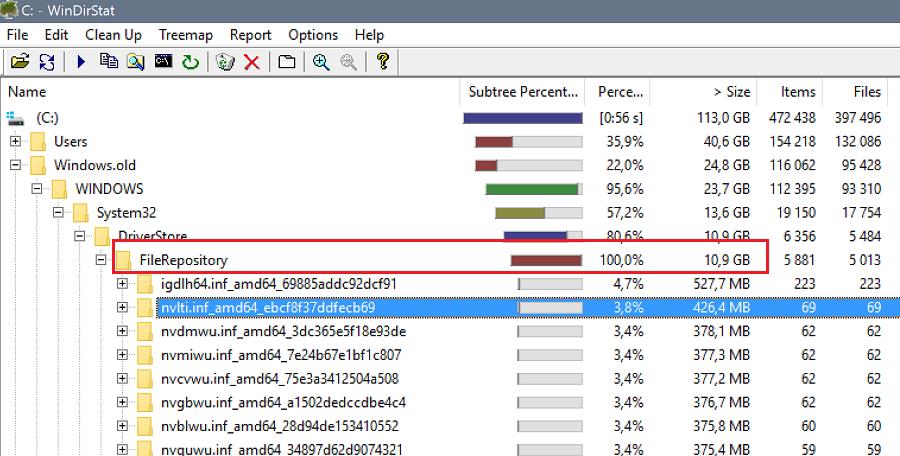
Windows stores all driver files in its driver repository (Driver Store) located in %WINDIR%\System32\DriverStore\FileRepository. In my case on my home laptop running Windows 7 (installed almost 8 years ago), FileRepository folder occupies about 11 GB and contains over 5,000 files. It’s a good many! In particular, over 20 Nvidia driver versions are stored here.

- Never delete any files from DriverStore manually.
- Prior to clearing up the Driver Store, it is strongly recommended that you create a system restore point ( Checkpoint-Computer -Description «BeforeDriversDelete» ) or back up your system image.
- After cleaning the storage, you may have to download and install drivers manually if a new device is connected.
How to Find and Delete Old Driver Versions in Windows 7
Let’s see how to find and delete obsolete drivers in Windows 7. (In Windows 8 and Windows 10, easier ways to delete old drivers are used, these are described below).
Get the list of all third-party drivers available in the system and export them to a text file. To do it, run the following command in the command prompt with the administrator privileges:
dism /online /get-drivers /format:table > c:\tmp\drivers.txt

Import this text file into Excel, and delete all odd data in a way that only the table containing the list of drivers in the repository is left. The table should contain the number of the driver in the system (oemXXX.inf), the name of the original INF file, device class, manufacturer, installation date and driver version.
Sort this table by column B (containing the name of the original INF file) and column F (driver installation date). Among the drivers with the same name mark for removal all driver versions except the last one. In my case, you can see that the most part of old drivers are refer to the NVIDIA video adapter.
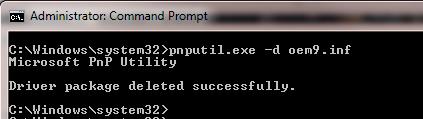
To delete a driver, you can use pnputil command:
pnputil.exe -d oemxxx.inf
To make it more convenient, we will create in the empty column the commands to remove each driver using the formula: =CONCATENATE(«pnputil.exe -d «;A21)
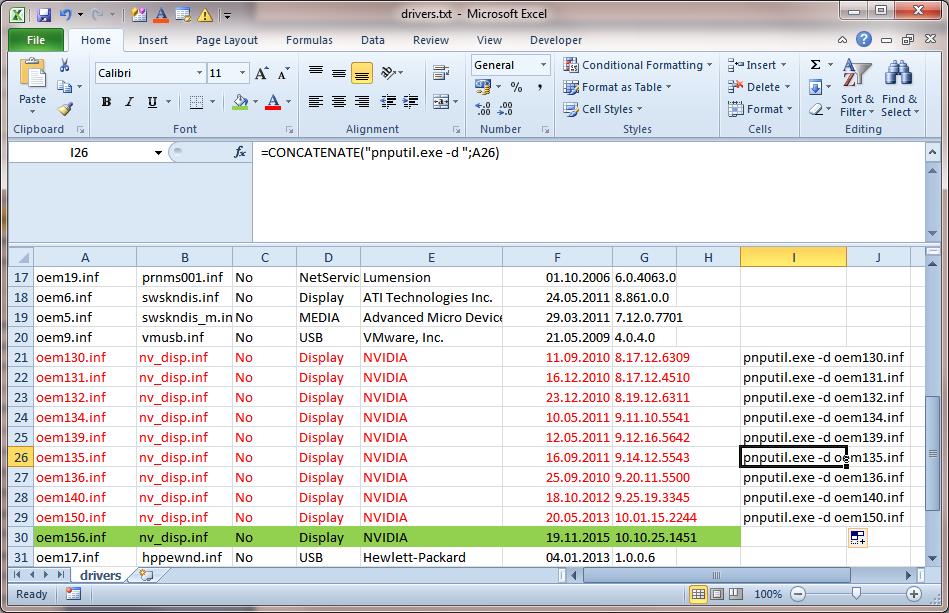
Copy and run these commands in the command prompt or a BAT file.

pnputil.exe –d oem9.inf
Microsoft PnP Utility
Driver package deleted successfully
Thus, I have deleted about 40 old driver versions and freed about 8 GB of space (mostly due to removing of NVIDIA drivers).
How to Delete Old Drivers in Windows 10/8 Using Disk Cleanup
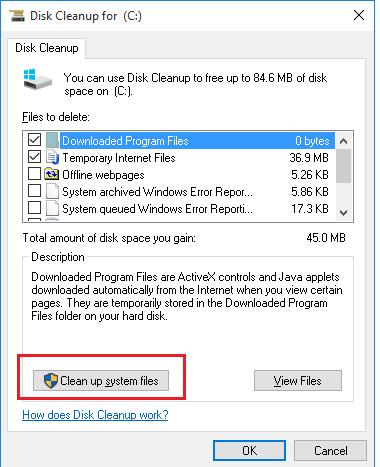
In Windows 10 / 8.1, there is a more convenient tool to delete earlier driver versions — familiar Disk Cleanup tool (cleanmgr.exe) that also allows to delete deprecated updates.
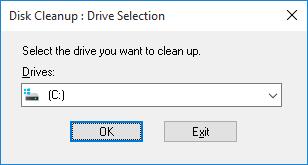
- Run Disk Cleanup: Win+R ->cleanmgr
- Select the system disk

- Click Clean up system files
- Check Device driver packages in the list

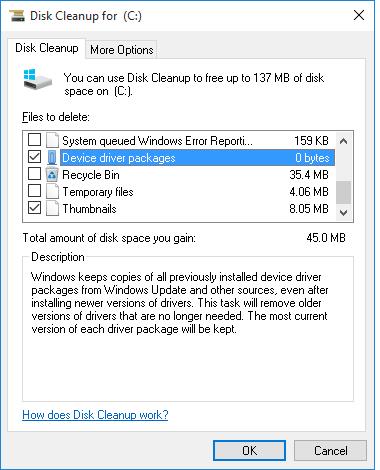
Cleanmgr will delete all old unused driver versions. However, you should understand that the Roll back driver button in Driver Properties tab of Device Manage will become inactive.
Add and Remove Drivers to an offline Windows Image
You can use DISM to install or remove driver (.inf) files in an offline Windows or WinPE image. You can either add or remove the drivers directly by using the command prompt, or apply an unattended answer file to a mounted .wim, .ffu, .vhd, or .vhdx file.
When you use DISM to install a device driver to an offline image, the device driver is added to the driver store in the offline image. When the image is booted, Plug and Play (PnP) runs and associates the drivers in the store to the corresponding devices on the computer.
To add drivers to a WindowsВ 10 image offline, you must use a technician computer running WindowsВ 10, Windows ServerВ 2016, or Windows Preinstallation Environment (WinPE) for WindowsВ 10. Driver signature verification may fail when you add a driver to a WindowsВ 10 image offline from a technician computer running any other operating system.
To learn how to add a driver on a running Windows PC, see Add a driver online in audit mode or Install a plug and play device. To learn how to add a driver to a PC running WinPE, see Drvload command line options.
Driver types
- .inf-style drivers: Many drivers include an information file (with an .inf extension) to help install the driver. These can be installed using tools described in this topic.
- .exe-style drivers: Drivers without an .inf file often must be installed like typical Windows desktop applications. To learn how to add these, see Add a driver online in Audit Mode
- Boot-critical drivers: Graphics and storage drivers may sometimes need to be added to the Windows image (as shown in this topic), as well as the Windows PE image, and in the Windows recovery (WinRE) image.
Add drivers to an offline Windows image
To add drivers to an offline image, you have to mount an image prior to adding drivers.
If you’re adding drivers to a WinPE image, you can add them to the WinPE image in the output folder you specified when you ran copype, for example: C:\WinPE_amd64\media\sources\boot.wim . This ensures that drivers will be included in WinPE each time you build WinPE media from that folder.
- Mount a Windows image. For example:
- Add a driver to the image.
To install all of the drivers from a folder and all its subfolders, point to the folder and use the /Recurse option.
To see all DISM driver servicing command line options, see DISM driver servicing command-line options.
Using /Recurse can be handy, but it’s easy to bloat your image with it. Some driver packages include multiple .inf driver packages, which often share payload files from the same folder. During installation, each .inf driver package is expanded into a separate folder. Each individual folder has a copy of the payload files. We’ve seen cases where a popular driver in a 900MB folder added 10GB to images when added with the /Recurse option.
To install an unsigned driver, use /ForceUnsigned to override the requirement that drivers installed on X64-based computers must have a digital signature.
- Check to see if the driver was added. Drivers added to the Windows image are named Oem*.inf. This guarantees unique naming for newly added drivers. For example, the files MyDriver1.inf and MyDriver2.inf are renamed Oem0.inf and Oem1.inf.
- Commit the changes and unmount the image.
Remove drivers from an offline Windows image
- At an elevated command prompt, mount the offline Windows image:
- Remove a specific driver from the image. Multiple drivers can also be removed on one command line.
Removing a boot-critical driver package can make the offline Windows image unbootable. For more information, see DISM Driver Servicing Command-Line Options. пїЅ
- Commit the changes and unmount the image.
Add drivers to an offline Windows image by using an unattended answer file
- Gather the device driver .inf files that you intend to install on the Windows image.
All drivers in the directory and subdirectories that are referenced in the answer file are added to the image. You should manage the answer file and these directories carefully to address concerns about increasing the size of the image with unnecessary driver packages.
- Use WindowsВ System Image Manager (WindowsВ SIM) to create an answer file that contains the paths to the device drivers that you want to install.
- Add the Microsoft-Windows-PnpCustomizationsNonWinPE\DriverPaths\PathAndCredentials\Credentials component to your answer file in the offlineServicing configuration pass.
For each location that you intend to access, add a separate PathAndCredentials list item by right-clicking on DriverPaths in the Answer File pane and clicking Insert New PathAndCredentials.
See Configure components and settings in an answer file for information on how to modify an answer file.
- For each path in Microsoft-Windows-PnpCustomizationsNonWinPE , specify the path to the device driver and the credentials that are used to access the file, if the file is on a network share.
When you include multiple device driver paths by adding multiple PathAndCredentials list items, you must increment the value of Key for each path. For example, you can add two separate driver paths where the value of Key for the first path is equal to 1 and the value of Key for the second path is equal to 2.
- Save the answer file and exit WindowsВ SIM. The answer file must resemble the following sample.
- Mount the Windows image that you intend to install the drivers to by using DISM:
If you’re working with a VHD or FFU, specify /Index:1 .
- Apply the answer file to the mounted Windows image:
For more information about how to apply an answer file, see DISM Unattended Servicing Command-Line Options.
The .inf files referenced in the path in the answer file are added to the Windows image.
- Check to see if the driver was added. Drivers added to the Windows image are named Oem*.inf. This guarantees unique naming for newly added drivers. For example, the files MyDriver1.inf and MyDriver2.inf are renamed Oem0.inf and Oem1.inf.
For example, type:
- Unmount the .wim file and commit the changes. For example, type:
If you need drivers for WinPE to see the local hard disk drive or a network, you must use the windowsPE configuration pass of an answer file to add drivers to the WinPE driver store and to reflect boot-critical drivers required by WinPE. For more information, see Add Device Drivers to Windows During Windows Setup.
Удаление старых версий драйверов из хранилища Windows
В Windows при установке или обновлении драйверов устройств, старые версии драйверов сохраняются в системе. Тем самым пользователю предоставляется возможность в любой момент вернуть старую версию драйвера, если новый драйвер работает нестабильно (полезная возможность, как показал кейс с в которой пришлось откатить версию драйвера Wi-Fi). Однако Windows автоматически не чистит и не удаляет старые версии драйверов, поэтому со временем, размер места, занимаемого драйверами на системном диске становится довольно большим. В этой статье мы поговорим о способах удаления старых версий драйверов (дубликатов) с помощью внутренних средств системы (без использования стороннего ПО).
Windows хранит все файлы в драйверов в своем репозитории драйверов (Driver Store), находящемся в каталоге %WINDIR%\System32\DriverStore\FileRepository.
В моем случае на домашнем ноутбуке с Windows 7 (дата установки системы почти 8 лет назад), каталог FileRepository занимает на диске около 11 Гб и содержит >5000 файлов. Немало! В частности в этом каталоге хранится более 20 различных версий видеодрайвера Nvidia.
Важно!
- Ни в коем случае нельзя удалять файлы драйверов из каталога DriverStore вручную.
- Перед очисткой драйверов настоятельно рекомендуется создать точку восстановления системы ( Checkpoint-Computer -Description «BeforeDriversDelete» ) или резервную копию образа системы.
- После очистки хранилища, при подключении новых устройств возможно придется качать и устанавливать драйвера вручную.
Поиск и удаление старых версий драйверов в Windows 7
Рассмотрим способ поиска и удаления устаревших драйверов для Windows 7 (в Windows 8 и Windows 10 есть более простые методы удаления старых драйверов, о них написано ниже).
Получим список всех сторонних драйверов, имеющихся в системе, и выгрузим их в текстовый файл. Для этого в командной строке с правами администратора выполним команду:
dism /online /get-drivers /format:table > c:\tmp\drivers.txt
 Полученный файл импортируем в Excel и удаляем все лишние данные так, чтобы осталась только таблица со списков драйверов репозитория в формате: номер драйвера в системе (oemXXX.inf), имя оригинального inf файла, класса устройства, производителя, даты установки и версии драйвера.
Полученную таблицу отсортируем по столбцу B (содержит имя оригинального inf файл) и столбцу F (дата установки драйвера). Среди групп одноименных драйверов помечаем для удаления все версии драйверов, кроме последней. В моем случае видно, что большинство старых версий драйверов принадлежит NVIDIA.
Для удаления драйвера можно использовать команду pnputil:
pnputil.exe -d oemxxx.inf
Для удобства сформируем в пустом столбце команды для удаления каждого драйвера с помощью формулы =CONCATENATE(«pnputil.exe -d «;A21)
 Осталось сформированные команды скопировать и выполнить в командной строке или bat файле.
 Таким образом, я удалил из системы порядка 40 старых версий драйверов, освободив тем самым около 8 Гб места (в основном за счет видеодрайверов NVIDEA).
Удаление старых драйверов в Windows 10/8 с помощью утилиты очистки диска
В Windows 10 / 8.1 есть более удобный инструмент для удаления старых версий драйверов — всем знакомая утилита очистки диска cleanmgr.exe, позволяющая в том числе очистить диск от устаревших обновлений.
Примечание. В Windows 10 и Windows 8 Upd 1 и есть возможность экспортировать средствами PowerShell все сторонние драйвера, имеющиеся в системе в отдельный каталог.
- Запустите утилиту «Очистка диска»: Win+R ->cleanmgr
- Выберите системный диск
- Нажмите на кнопку Clean up system files
- Отметьте в списке Device driver packages (Пакеты драйверов устройств)


Утилита cleanmgr удалит все старые неиспользуемые версии драйверов. Однако при этом, нужно понимать, что в свойствах драйверов в диспетчере устройств кнопка «Откатить драйвер» станет неактивной.


