- Add and Remove Drivers to an offline Windows Image
- Driver types
- Add drivers to an offline Windows image
- Remove drivers from an offline Windows image
- Add drivers to an offline Windows image by using an unattended answer file
- Using Device Manager to Uninstall Devices and Driver Packages
- Как удалить драйвер в Windows 7 и Windows 10
- Удаление через «Диспетчер устройств»
- Удаление через «Программы и компоненты»
- Как полностью удалить драйверы из системы
Add and Remove Drivers to an offline Windows Image
You can use DISM to install or remove driver (.inf) files in an offline Windows or WinPE image. You can either add or remove the drivers directly by using the command prompt, or apply an unattended answer file to a mounted .wim, .ffu, .vhd, or .vhdx file.
When you use DISM to install a device driver to an offline image, the device driver is added to the driver store in the offline image. When the image is booted, Plug and Play (PnP) runs and associates the drivers in the store to the corresponding devices on the computer.
To add drivers to a WindowsВ 10 image offline, you must use a technician computer running WindowsВ 10, Windows ServerВ 2016, or Windows Preinstallation Environment (WinPE) for WindowsВ 10. Driver signature verification may fail when you add a driver to a WindowsВ 10 image offline from a technician computer running any other operating system.
To learn how to add a driver on a running Windows PC, see Add a driver online in audit mode or Install a plug and play device. To learn how to add a driver to a PC running WinPE, see Drvload command line options.
Driver types
- .inf-style drivers: Many drivers include an information file (with an .inf extension) to help install the driver. These can be installed using tools described in this topic.
- .exe-style drivers: Drivers without an .inf file often must be installed like typical Windows desktop applications. To learn how to add these, see Add a driver online in Audit Mode
- Boot-critical drivers: Graphics and storage drivers may sometimes need to be added to the Windows image (as shown in this topic), as well as the Windows PE image, and in the Windows recovery (WinRE) image.
Add drivers to an offline Windows image
To add drivers to an offline image, you have to mount an image prior to adding drivers.
If you’re adding drivers to a WinPE image, you can add them to the WinPE image in the output folder you specified when you ran copype, for example: C:\WinPE_amd64\media\sources\boot.wim . This ensures that drivers will be included in WinPE each time you build WinPE media from that folder.
- Mount a Windows image. For example:
- Add a driver to the image.
To install all of the drivers from a folder and all its subfolders, point to the folder and use the /Recurse option.
To see all DISM driver servicing command line options, see DISM driver servicing command-line options.
Using /Recurse can be handy, but it’s easy to bloat your image with it. Some driver packages include multiple .inf driver packages, which often share payload files from the same folder. During installation, each .inf driver package is expanded into a separate folder. Each individual folder has a copy of the payload files. We’ve seen cases where a popular driver in a 900MB folder added 10GB to images when added with the /Recurse option.
To install an unsigned driver, use /ForceUnsigned to override the requirement that drivers installed on X64-based computers must have a digital signature.
- Check to see if the driver was added. Drivers added to the Windows image are named Oem*.inf. This guarantees unique naming for newly added drivers. For example, the files MyDriver1.inf and MyDriver2.inf are renamed Oem0.inf and Oem1.inf.
- Commit the changes and unmount the image.
Remove drivers from an offline Windows image
- At an elevated command prompt, mount the offline Windows image:
- Remove a specific driver from the image. Multiple drivers can also be removed on one command line.
Removing a boot-critical driver package can make the offline Windows image unbootable. For more information, see DISM Driver Servicing Command-Line Options. пїЅ
- Commit the changes and unmount the image.
Add drivers to an offline Windows image by using an unattended answer file
- Gather the device driver .inf files that you intend to install on the Windows image.
All drivers in the directory and subdirectories that are referenced in the answer file are added to the image. You should manage the answer file and these directories carefully to address concerns about increasing the size of the image with unnecessary driver packages.
- Use WindowsВ System Image Manager (WindowsВ SIM) to create an answer file that contains the paths to the device drivers that you want to install.
- Add the Microsoft-Windows-PnpCustomizationsNonWinPE\DriverPaths\PathAndCredentials\Credentials component to your answer file in the offlineServicing configuration pass.
For each location that you intend to access, add a separate PathAndCredentials list item by right-clicking on DriverPaths in the Answer File pane and clicking Insert New PathAndCredentials.
See Configure components and settings in an answer file for information on how to modify an answer file.
- For each path in Microsoft-Windows-PnpCustomizationsNonWinPE , specify the path to the device driver and the credentials that are used to access the file, if the file is on a network share.
When you include multiple device driver paths by adding multiple PathAndCredentials list items, you must increment the value of Key for each path. For example, you can add two separate driver paths where the value of Key for the first path is equal to 1 and the value of Key for the second path is equal to 2.
- Save the answer file and exit WindowsВ SIM. The answer file must resemble the following sample.
- Mount the Windows image that you intend to install the drivers to by using DISM:
If you’re working with a VHD or FFU, specify /Index:1 .
- Apply the answer file to the mounted Windows image:
For more information about how to apply an answer file, see DISM Unattended Servicing Command-Line Options.
The .inf files referenced in the path in the answer file are added to the Windows image.
- Check to see if the driver was added. Drivers added to the Windows image are named Oem*.inf. This guarantees unique naming for newly added drivers. For example, the files MyDriver1.inf and MyDriver2.inf are renamed Oem0.inf and Oem1.inf.
For example, type:
- Unmount the .wim file and commit the changes. For example, type:
If you need drivers for WinPE to see the local hard disk drive or a network, you must use the windowsPE configuration pass of an answer file to add drivers to the WinPE driver store and to reflect boot-critical drivers required by WinPE. For more information, see Add Device Drivers to Windows During Windows Setup.
Using Device Manager to Uninstall Devices and Driver Packages
This page describes how to uninstall a device or driver package on Windows 10. Before uninstalling a device, it is recommended that the device is unplugged from the system. If the device is uninstalled before it is unplugged, the operating system may rediscover the device and give it new settings in the time between the uninstall and unplugging the device.
First, open Settings (you can do this using the Windows+I keyboard shortcut) and type Remove. Select Add or remove programs. If the device or driver package that you wish to remove appears in the list of programs, select uninstall.
If your device or driver package does not appear in the list, then the device can be uninstalled via Device Manager. If that device is the only device using the driver package, then the driver package can also be removed via Device Manager. To launch Device Manager, click the Start button, type Device Manager, and press Enter.
Then follow these steps:
- Click on the View menu and turn on «Show Hidden Devices»
- Expand the node that represents the type of device that you want to uninstall, right-click the device entry for the device you want to uninstall, and select Uninstall.
- On the Confirm Device Removal dialog box, if you wish to remove the driver package in addition to uninstalling the device, select the Delete the driver software for this device option. When ready to complete the operation, select OK.
With some devices, if the device is still plugged in when it is uninstalled, the device might continue to function until the system has been restarted.
For more information about uninstalling driver and driver packages, see How Devices and Driver Packages are Uninstalled.
Как удалить драйвер в Windows 7 и Windows 10
Необходимость в удалении драйверов может возникнуть при замене комплектующих или периферийных устройств, а также при их обновлении до новой версии. В этой инструкции мы рассмотрим несколько способов, как удалить драйвер в операционной системе Windows 7 и Windows 10.
Удаление через «Диспетчер устройств»
Существует несколько способов удаления драйверов из операционной системы Windows. Самый простой и часто используемый – это удаление через « Диспетчер устройств ».
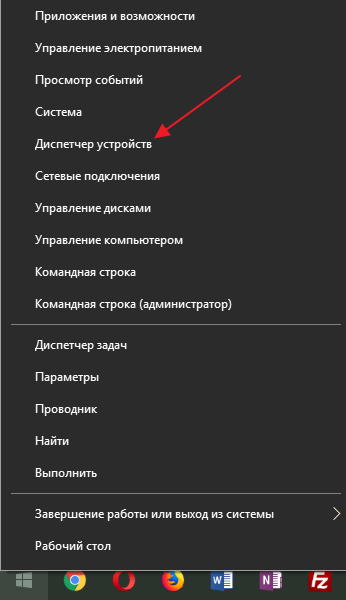
Если вы пользуетесь операционной системой Windows 10, то для того, чтобы открыть « Диспетчер устройств » вы можете просто кликнуть правой кнопкой мыши по меню « Пуск » или нажать комбинацию клавиш Windows-X и выбрать соответствующий пункт меню.
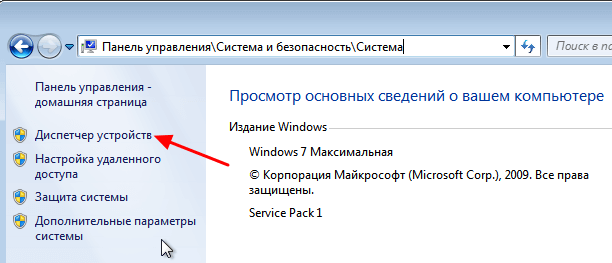
В Windows 7 можно открыть « Панель управления » и перейти в раздел « Система и безопасность – Система – Диспетчер устройств ».
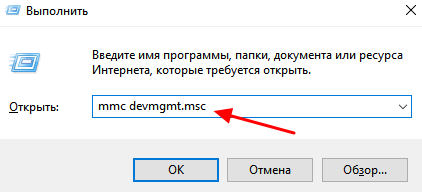
Также можно просто нажать Windows-R и выполнить команду « mmc devmgmt.msc ». Этот вариант сработает как в Windows 7, так и в Windows 10.
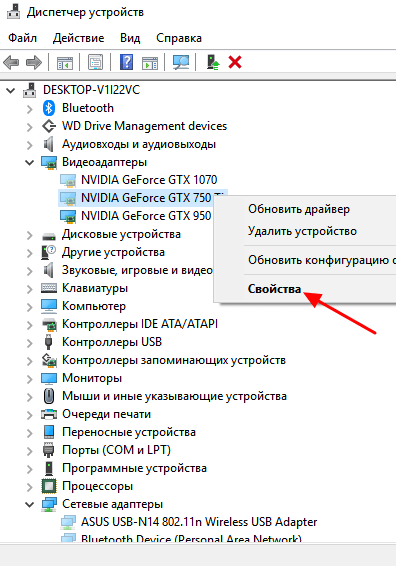
Так или иначе, перед вами появится окно « Диспетчера устройств ». Здесь будут отображаться все устройства, которые подключены к вашему компьютеру. Для того чтобы удалить драйвер одного из устройств кликните на него правой кнопкой мышки и перейдите в « Свойства ».
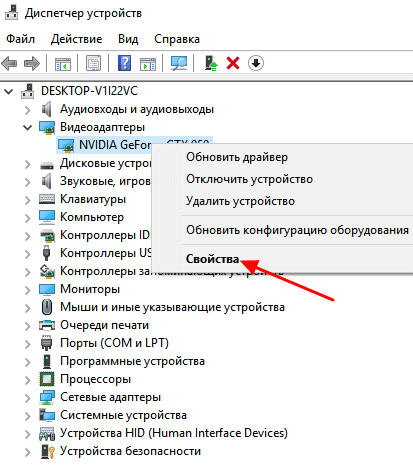
В свойствах выбранного устройства нужно перейти на вкладку « Драйвер » и нажать на кнопку « Удалить » или « Удалить устройство ».
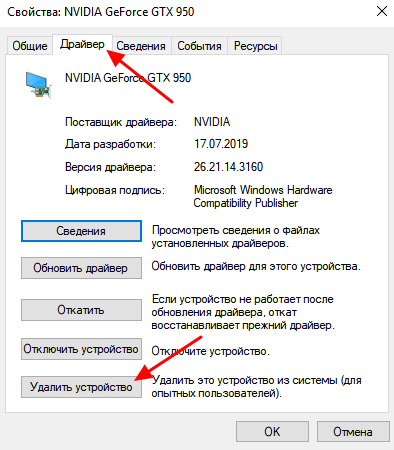
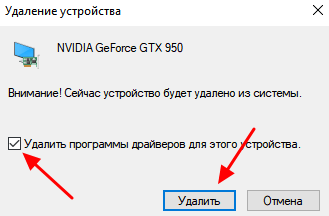
После этого появится окно для удаления устройства. Здесь нужно активировать опцию « Удалить программы драйверов для этого устройства » и нажать на кнопку « Удалить ».
Нужно отметить, что после удаления драйвера операционная система Windows может попытаться сразу скачать новый драйвер из интернета и немедленно его установить. Это особенно актуально для Windows 10, которая делает это очень быстро. Если вы не хотите, чтобы это происходило, то просто отключите интернет на то время пока вы удаляете и переустанавливаете драйверы.
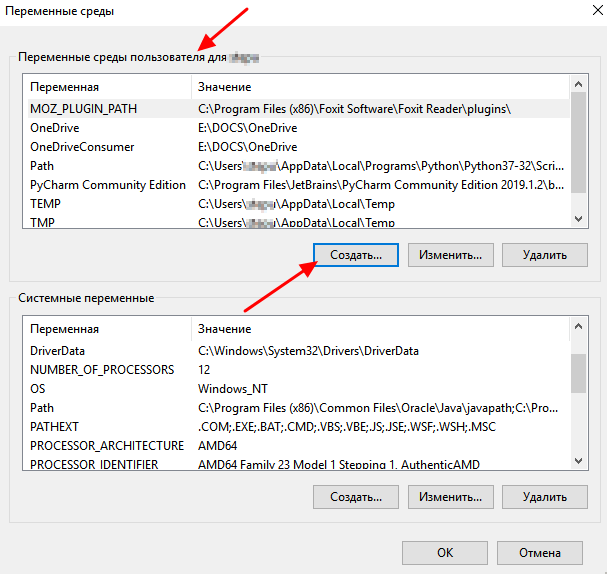
Описанный выше способ предполагает, что устройство подключено к компьютеру. Если же вам нужно удалить драйвер отключенного устройства, то это требует некоторых дополнительных настроек. Для этого вам нужно открыть « Панель управления – Система и безопасность – Система » либо нажать комбинацию клавиш Windows-Pause/Break и перейти в « Дополнительные параметры системы ».
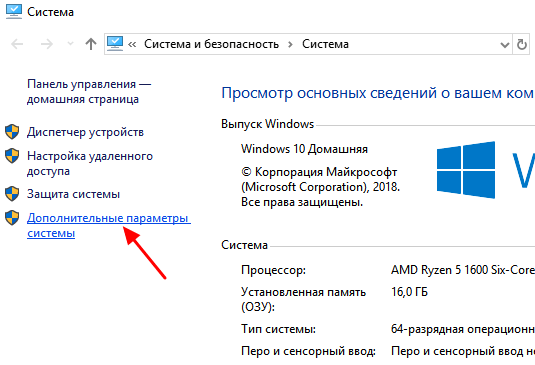
После этого открываем вкладку « Дополнительно » и нажимаем на кнопку « Переменные среды ».
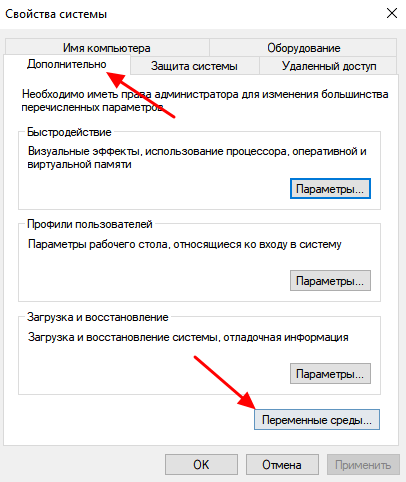
В результате должно появиться окно « Переменные среды ». Здесь нужно нажать на кнопку «Создать», которая находится в блоке « Переменные среды пользователя ».
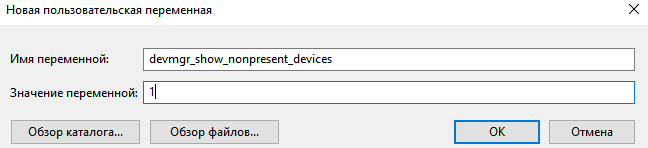
Дальше вводим имя переменной « devmgr_show_nonpresent_devices » и задаем ей значение « 1 », после чего закрываем все открытые окна нажатием на кнопку « ОК ».
После этого возвращаемся в окно « Диспетчера устройств », открываем меню « Вид » и включаем опцию « Показать скрытые устройства ».
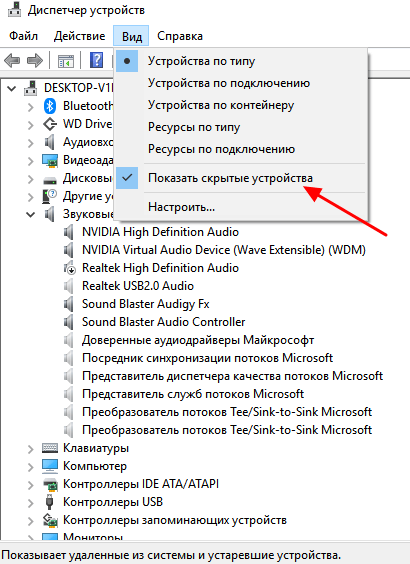
После этого в окне « Диспетчера устройств » начнут отображаться устройства, которые сейчас не подключены к компьютеру, и вы сможете удалить их драйверы.
В большинстве случаев удаление драйверов через « Диспетчер устройств » работает хорошо. Но, после такого удаления на компьютере могут остаться файлы или записи в реестре. Если вы хотите добиться полного удаления драйверов, то для этого нужно использовать специализированные программы, которые мы рассмотрим ниже.
Удаление через «Программы и компоненты»
В большинстве случаев драйверы, которые вы устанавливали вручную, можно удалять как обычные программы, то есть через « Панель управления ».
Для этого нужно открыть « Панель управления » (в Windows 10 для этого нужно нажать Windows-R и выполнить команду CONTROL ) и перейти в раздел « Программы – Программы и компоненты ».
Здесь вы увидите список всех программ, которые установлены на вашем компьютере. Для того чтобы найти нужный драйвер можно воспользоваться поиском.
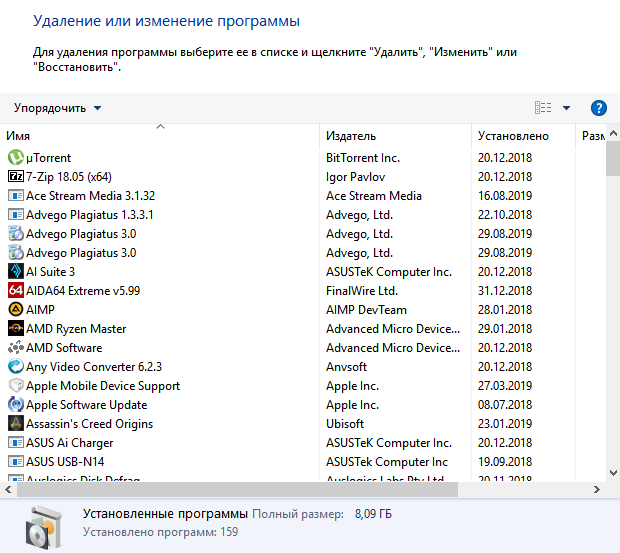
Для удаления драйвера просто кликните по нему правой кнопкой мышки и выберите вариант « Удалить » или « Удалить / Изменить ».
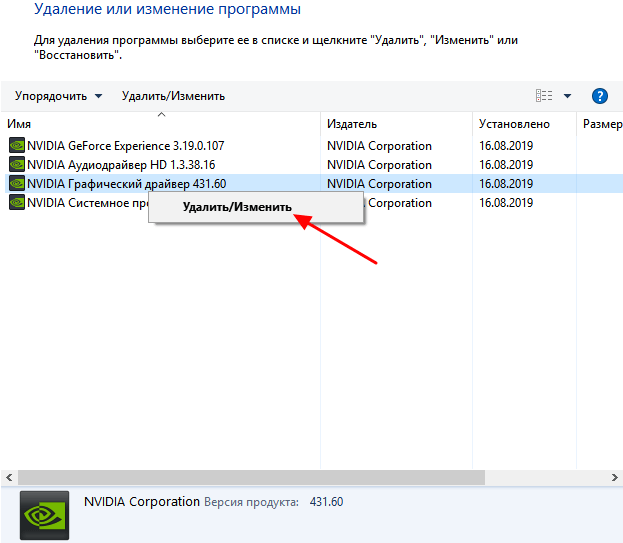
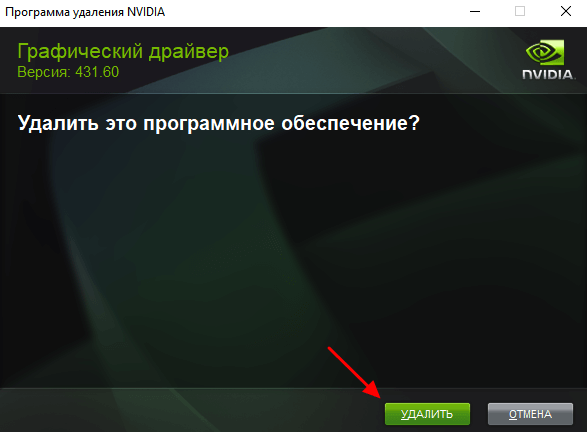
После этого запустится установщик, отвечающий за установку и удаление программного обеспечения. С его помощью вы сможете удалить драйвер, как и любую другую программу на компьютере.
Если вы пользуетесь Windows 10, то вы можете запустить удаление программ через меню «Параметры». Для этого откройте « Параметры » (например, с помощью комбинации Windows-i ) и перейдите в раздел « Приложения – Приложения и возможности ».
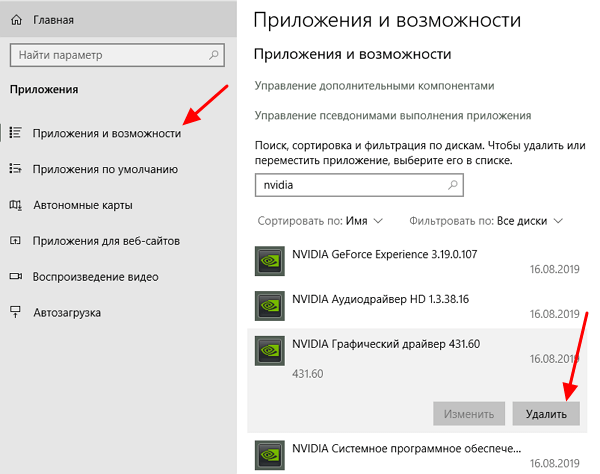
Здесь будет точно такой же список установленных программ, как и в « Панели управления ». Здесь вы сможете найти нужный драйвер и удалить его с компьютера.
Как полностью удалить драйверы из системы
Если описанные выше способы не помогают или вы хотите добиться полного удаления, то вы можете попробовать удалить драйвер с помощью специальных программ. Ниже мы рассмотрим несколько таких программ, коротко описав из возможности.
- Display Driver Uninstaller ( DDU) – бесплатная программа для удаления драйверов видеокарт от AMD и NVIDIA. DDU позволяет полностью удалить драйвер и все его следы в операционной системе. Для максимально надежного удаления рекомендуется загрузить компьютер в безопасном режиме, запустить DDU и выполнить удаление. Более подробно о данной программе можно почитать в статье «Как полностью удалить драйвер NVIDIA GeForce или AMD Radeon».
- Driver Sweeper – бесплатная программа для удаления различных драйверов и очистки операционной системы от их следов. Driver Sweeper умеет делать резервную копию старых версий драйверов, что позволяет восстановить ранее удаленные драйверы в системе.
- Driver Genius – условно-бесплатная программа, мощный менеджер драйверов. Позволяет делать резервные копии, а также удалять и восстанавливать драйверы.


