- 990x.top
- Простой компьютерный блог для души)
- Windows Fast Mode на компьютере при загрузке — что это и как убрать?
- Разбираемся
- Возможно дело в опции
- Что делать?
- Откуда появляется этот пункт?
- Вывод
- How to delete large folder extremely fast on Windows 10
- Delete large folder fast using Command Prompt
- Delete large folder fast adding context menu option
- How to Delete Everything on Windows 7 and Start Over [Work Fast] [Partition Magic]
- Summary :
- Quick Navigation :
- Preparatory Work for Deleting Everything on Windows 7 and Windows 10
- How to Completely Wipe a PC Windows 7 or Windows 10
- Method 1. Factory Reset
- Method 2. Wipe a Computer with Commands
- Method 3. Wipe a PC with a Third-Party Program
- Bottom Line
- How to Delete Everything on Windows 7 FAQ
- ABOUT THE AUTHOR
990x.top
Простой компьютерный блог для души)
Windows Fast Mode на компьютере при загрузке — что это и как убрать?

Приветствую друзья! Сегодня у нас тема — Windows Fast Mode на компьютере, я узнаю что это и все вам расскажу, простыми словами, обещаю не грузить. Скажу сразу — связано с Windows.. Fast — переводится как быстро, Mode — режим.. вырисовывается картина — надпись означает какой-то быстрый режим винды)) Но это только первая мысль, а теперь начинаем разбираться!
Разбираемся
Я рванул в интернет, начал искать, но.. сразу столкнулся с нереальным обломом — информации то в интернете нет. Удивительно, но по поводу Windows Fast Mode инфы нет вообще! Все что я узнал — это то, что представляет из себя пункт в меню, которое может появиться при включении Windows:
 Обычно в этом меню показываются все Windows, которые установлены на ПК. Их может быть несколько, и в меню выбирается та, которую нужно запустить. Однако я никогда в таком меню не видел такого пункта.. именно никогда..
Возможно дело в опции
Как мы уже выяснили, Windows Fast Mode переводится как быстрый режим Windows, возможно имеется ввиду быстрый запуск? Ускоренная загрузка? Дело в том, что в Windows 10 есть некая опция… Смотрите, идете в панель управления, далее находите значок Электропитание > Действие кнопок питания > Изменение параметров, которые сейчас недоступны:

И вот потом открываются настройки.. где есть пункт Включить быстрый запуск:

У меня мысль — может быть именно включение этой опции и приводит к появлению пункта? Кстати опция может быть не только в Windows 10.. но и в Windows 7 (правда не проверял).
Что делать?
Проблема в том, что загрузочная запись, а именно ней выступает пункт Windows Fast Mode при включении — оч важная запись. Например если удалить загрузочную запись Windows — то система не загрузится. Но Windows Fast Mode — я так понимаю не Windows, а.. что-то левое, или последствия каких-то настроек, не совсем понятно((
Пункт мог появиться вообще из-за вируса.. Правда смысл не особо понятен.
Можно ли эту надпись удалить? Можно, но какие будут последствия — я не знаю. Нет уверенности что будет все окей. Может надпись — как дополнительный пункт загрузки, а при удалении ее — она затронет и основную загрузочную запись.. Я покажу как ее удалить, но если будете делать — только на свой страх и риск:
- Зажимаете Win + R, пишите команду:

Нажимаете ОК.
Откроется окно Конфигурация системы, перейдите на вторую вкладку — Загрузка, на ней будут отображены все загрузочные записи. Там будет и Windows Fast Mode — можете выбрать ее, и потом внизу нажать Удалить. Но осторожно — выбрать значит нажать мышкой по строчке, которая содержит Windows Fast Mode, и потом нажать кнопку Удалить. Повторюсь, если удалить основную/реальную запись Windows — то эта виндовс больше не загрузится, а значит будут проблемы. Поэтому нажмите точно по той, где упоминается именно название пункта!
Стоп! Еще совет — перед удалением, выберите запись рабочей системы. Например у вас могут быть две записи — Windows 7 и Windows Fast Mode. Выберите Windows 7 и нажмите кнопку Использовать по умолчанию — таким образом вы проверите, что запись вообще может быть использована — тогда запись точно настоящая. После этого уже удаляйте Windows Fast Mode.
Картинка по поводу использования по умолчанию:
 Картинка — только пример! Делайте все осторожно!
Картинка по поводу удаления записи:
 Это только пример! Повторюсь — делайте все осторожно, будьте внимательны!
Я выше написал как удалить. И тут, я искал в интернете инфу, нашел на зарубежном сайте как раз почти тоже самое, что я и написал.. это я к тому, что таким способом и другие удаляют эту запись. Вот собственно инфа (уже была переведена на русский прямо в Хроме):

Откуда появляется этот пункт?
Анализируя интернет, выделил две версии:
- Вирусы. В системе есть вирус либо был, который создал данную запись. Смысл правда непонятен. Возможно рассчитано на то.. ну например вы запустите Windows Fast Mode и тем самым Windows загрузится уже с модифицированным ядром, чтобы вирус нельзя было удалить, ибо он будет вшит в ядро. Но это просто моя фантазия, как вариант. Просто уж слишком странное название, мне первое что пришло в голову — маскировка под системное что-то.
- Сбой. В интернете замечал что юзеры пишут — появляется данная запись после сбоя Windows, после синего экрана, в принципе так может быть. Дело в том, что после сбоя виндовс может выполнить некоторые действия по анализу сбоя, его причинах и попробовать его предотвратить в будущем. В общем точно не знаю, но некоторые точно писали — после синего экрана у них появилась запись Windows Fast Mode.
При мыслях что у вас вирус — проверьте ПК утилитами, я советую две против опасных вирусов — Dr.Web CureIt! и Kaspersky Virus Removal Tool, я вам даю честное слово — это лучшие утилиты против опасных вирусов! А что с неопасными? Да, против рекламных у меня тоже есть две утилиты — AdwCleaner и HitmanPro, и они тоже лучшие в своем роде! А смысл мне обманывать то?))
Вывод
В общем мы выяснили — Windows Fast Mode это запись, которая может появляться в двух случаях: после вируса, либо после серьезного сбоя системы, например синий экран. Удалить запись можно, скорее всего проблем не будет, однако делать все нужно предельно осторожно и внимательно!
Кстати, самое лучшее решение сохранить работоспособность виндовса — сделать образ системы. Подходит тем, у кого есть два жестких диска или более. Или тем, у кого есть внешний диск. Скажу сразу, что все просто — образ системы можно создать используя штатные средства Windows (в интернете куча инструкций, но там все оч просто). По сути — вы копируете системный диск полностью и при проблемах — можете его восстановить также полностью. В общем я советую вам на досуге почитать об этом, ибо оч полезная штука))
Надеюсь информация помогла. Удачи и добра вам!
How to delete large folder extremely fast on Windows 10
Use this method to delete thousands of files and folders in the matter of seconds on Windows 10, not minutes or hours.

On Windows 10, sometimes you need to delete folders that may contain a large number of files, and using File Explorer can take a long time. The reason is that during the delete process, Windows 10 needs to run calculations, analyze, and show updates as files and folders are deleted on the screen, something that usually takes time when deleting a large folder with thousands of files and subfolders.
However, using a few command lines (via Ghacks), you can significantly speed up the process to only a few seconds. The only caveat is that you need to be comfortable using Command Prompt.
In this guide, you’ll learn the fastest way to delete large folders with thousands of files using command lines, and the instructions to add an option on the right-click context menu to automate the process with just one click.
Delete large folder fast using Command Prompt
To delete a large number of files on Windows 10 using the del and rmdir commands, use these steps:
Open Start on Windows 10.
Search for Command Prompt, right-click the top result, and select the Run as administrator option.
Type the following command to navigate to the folder that you want to delete and press Enter:
In the command, make sure to update the path with the path to the folder that you want to delete.
Type the following command to delete all the files in that folder without showing the output and press Enter:
In the above command, we use the /f switch to force the deletion of read-only files. The /q switch enables quiet mode. The /s switch executes the command for all files in any folder inside the folder you’re trying to remove. Using *.* tells the del command to delete every file, and > nul disables the console output improving performance and speed.
Type the following command to go back one level in the folder path and press Enter:
Type the following command to delete the folder and all its subfolders and press Enter:
In the above command, we use the /q switch to enable quiet mode, the /s switch to run the command on all the folders, and FOLDER-NAME is the variable you need to specify to delete the folder you want.
 Del and rmdir commands
Once you complete the steps, all the files and folders in the location will delete quickly from your device.
Delete large folder fast adding context menu option
If the command lines aren’t your thing, you don’t usually delete tons of files, or you’re just looking for a faster way, it’s possible to add a right-click context menu option that will run a batch file for the data you want to delete.
To add a context menu option that will delete files and folder extremely fast on Windows 10, use these steps:
Open Notepad.
Copy and paste the following lines into the Notepad text file:
Click on File.
Select the Save As option.
Save the file as quick_delete.bat, and make absolutely sure it uses the .bat extension.
Move the quick_delete.bat file to the C:\Windows folder. (This step is necessary, because the file need to be on a location that has a path environment variable, but you can always create your own if you’re up to the challenge.)
 Windows folder
Open Start.
Search for regedit and click the top result to open the app.
Browse the following path:
Right-click the Shell (folder) key, and select New and click Key.
 Shell Registry key
Name the key Quick Delete and press Enter.
Right-click the newly created key, select New and click Key.
Name the key command and press Enter.
Double-click the command key default String on the right side.
Change the value of the key with the following line and click the OK button.
 Command to delete folders and files fast
After you complete the steps, you can right-click a folder and select the Quick Delete option from the context menu to remove a large folder super fast.
While executing command you’ll get a security prompt which will prevent you from deleting files by accident, you can always proceed by pressing any key, or use the Ctrl + C keyboard shortcut or click the X button to cancel the operation.
We may earn commission for purchases using our links to help keep offering the free content. Privacy policy info.
All content on this site is provided with no warranties, express or implied. Use any information at your own risk. Always backup of your device and files before making any changes. Privacy policy info.
How to Delete Everything on Windows 7 and Start Over [Work Fast] [Partition Magic]
By Linda | Follow | Last Updated May 21, 2020
Summary :

How to delete everything on Windows 7 and Windows 10? How to factory reset Windows 7 and Windows 10? How to completely wipe a PC? Some of you may search these problems on Google. If you also want the answers to these problems, keep reading to get them.
Quick Navigation :
Preparatory Work for Deleting Everything on Windows 7 and Windows 10
Many users ask how to delete everything on Windows 7 or Windows 10 on forums. They want to delete everything on their computers and start over. In a word, they want to make their computers like new.
They might plan to wipe a computer Windows 7 or Windows 10 if one of the following situations occurs.
- The computer is full of trashes and becomes slow and buggy.
- The computer is full and can’t install updates.
- They just bought a second-computer and then various issues happen to it.
- They decide to sell or donate their computers.
- .
Do you also want to delete everything on your computer Windows 7 or Windows 10? If so, you can read on to know how to delete everything on your computer Windows 7 or Windows 10.
However, before you start to completely wipe a PC, you should back up important files from your computer to external storage device. As for backup software, MiniTool Partition Wizard is recommended for its simplicity and convenience.
Here is the tutorial on how to back up files with MiniTool. (If there is no important file on your computer, you can skip the backup process.)
Step 1: Download MiniTool Partition Wizard and launch it to get its main interface. Then, right-click a partition and choose Copy.
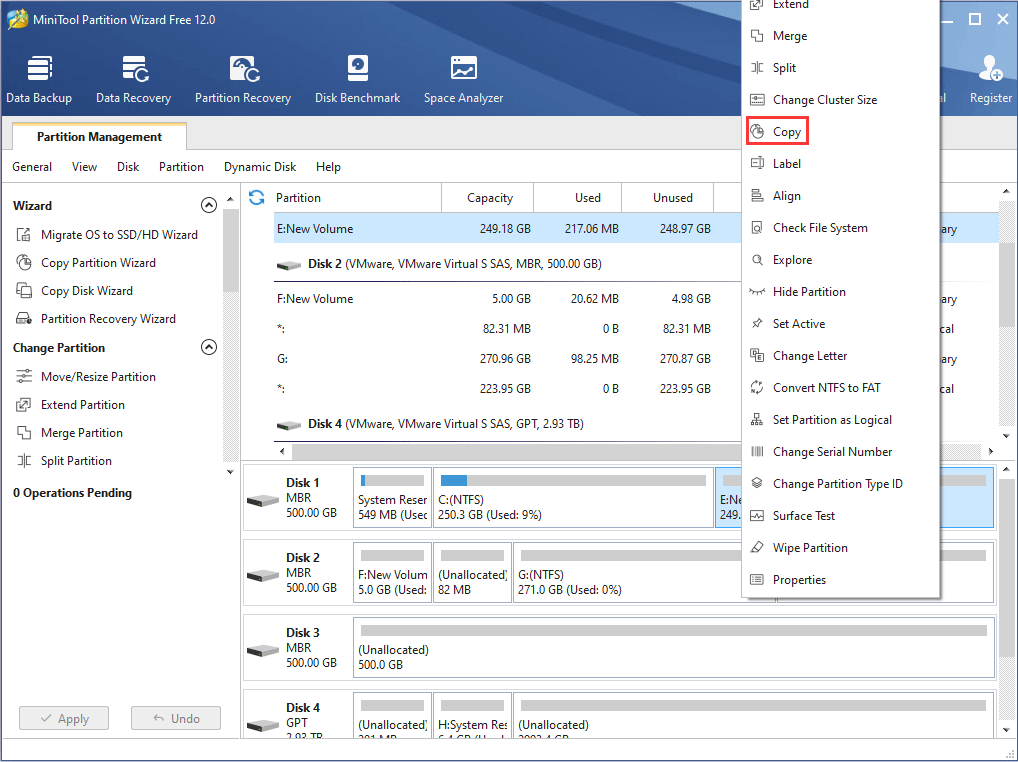
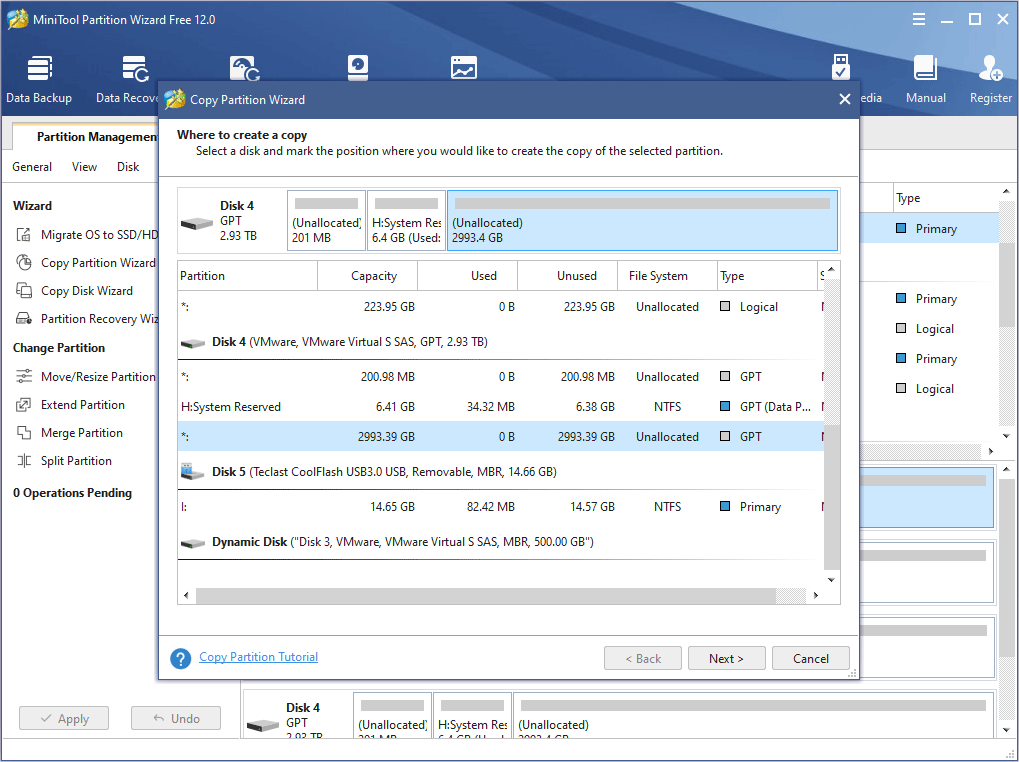
Step 2: Choose a target location where the partition is copied to and click Next button.
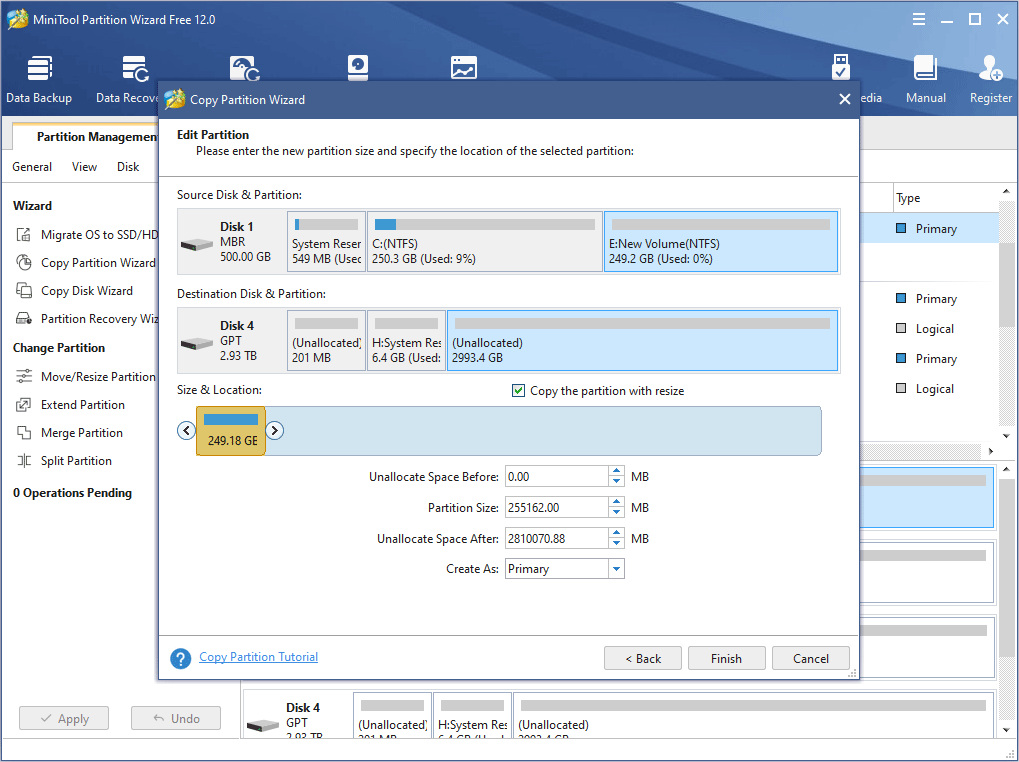
Step 3: Adjust the size and location of the new partition and click Finish.
Step 4: Click Apply button to execute pending operations.

Then, you can delete everything on your computer without worries.
How to Completely Wipe a PC Windows 7 or Windows 10
How to delete everything on your computer Windows 7 or Windows 10? Here are three methods for you.
Method 1. Factory Reset
As we all know, unlike Windows 10, Windows 7 doesn’t have a built-in factory reset option. When you decide to reset your computer to factory state, you have to use an installation media or recovery disk.
But fortunately, for those people who ask how to delete everything on Windows 7 without CD, they can try the following method to reset their Windows 7 computers to factory state.
Here is the tutorial on how to factory reset Windows 7 without CD.
Step 1: Press Start button and choose Control Panel.
Step 2: Choose System and Security.
Step 3: Click Backup and Restore.
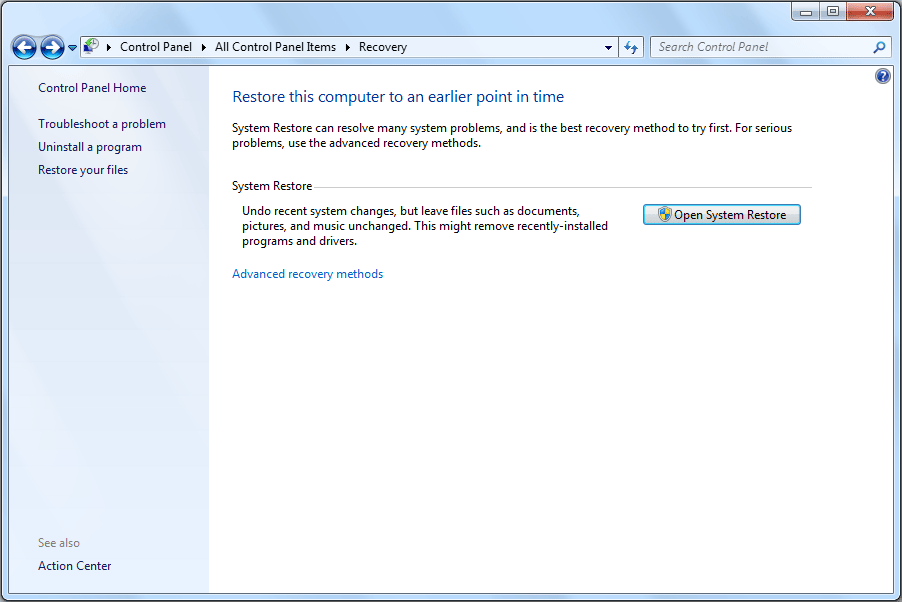
Step 4: Click Recover system settings or your computer.
Step 5: Click Advanced recovery methods.
Step 6: Then, you will be presented with two options: «Use a system image you created earlier to recover your computer» and «Return your computer to factory condition«. Please choose the latter option.
If the computer is bought in a shop, you can use this method to restore it to the original state. If this computer is bought on secondary market, you should use the second or third method to delete everything on the computer in order to ensure computer safety.
If your computer is Windows 10, you can use the built-in reset this PC option to wipe your computer completely. Here is the tutorial on how to how to wipe a computer Windows 10:
- Press «Shift» key while you are clicking Power>Restart button so as to boot into WinRE.
- Navigate to Troubleshoot >Reset this PC. Then, you will see two options: «Keep my files» or «Remove everything«. The former will just reinstall Windows 10, while the latter will reinstall Windows 10 and delete all your personal files.
When you choose Remove everything, you will be asked whether you want to remove everything from all drives. If you want to resell your computer, clicking All drives is recommended.
Besides, if you don’t find the factory option on Windows 7 or Windows 10 computer, you should use the following methods.
Method 2. Wipe a Computer with Commands
The second method is to wipe hard drive with commands. This method works both on Windows 7 and Windows 10, and it can wipe operating system and trash files at the same time. Some people don’t like to use this method because it is more complicated.
Here is a tutorial on how to wipe a computer Windows 7 and Windows 10.
Step 1: Click here to download Windows 7 disk image files.
Step 2: Click here to download Windows7-USB-DVD-Download-Tool-Installer-en-US.exe (a tool used for burning Windows 7 bootable disk).
Step 3: Open the exe file and follow the wizard to set up Windows 7 USB DVD Download Tool.
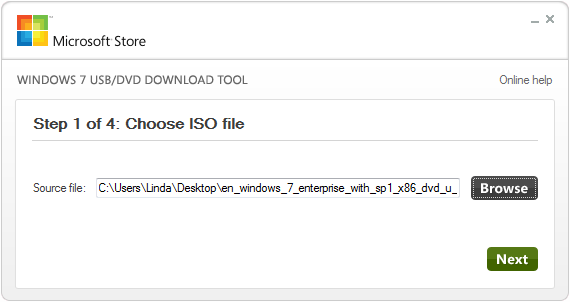
Step 4: Launch Windows 7 USB DVD Download Tool and choose ISO file. Then, click Next button.
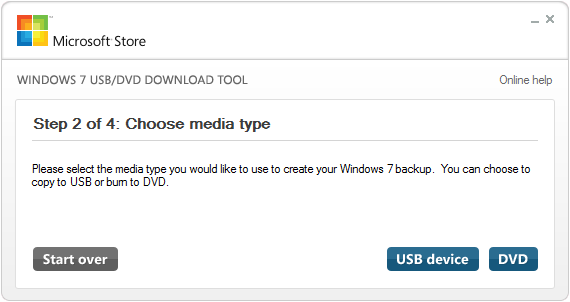
Step 5: Select USB device to burn the ISO file on a USB flash drive or select DVD to burn the ISO file on a DVD disk.
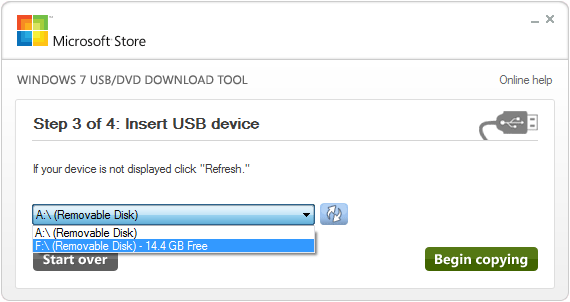
Step 6: Select a removable disk in the drop-down list and click Begin copying.
Step 7: A pop-up window warns that the selected removable disk must be erased. Click Erase USB Device to continue if there is no important file in the removable disk. Otherwise, click Cancel and back up data in advance.
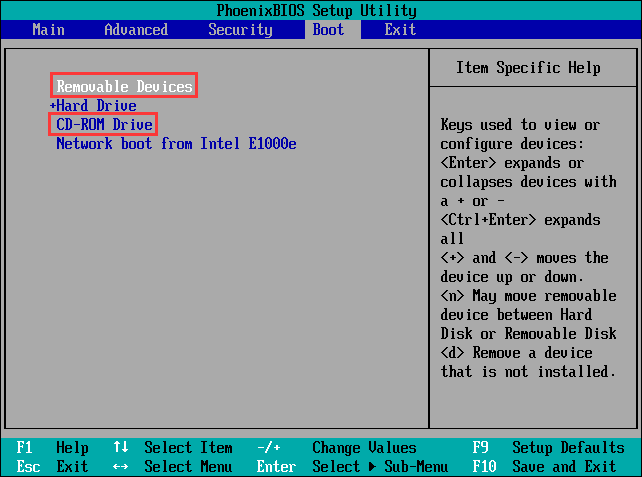
Step 8: After the Windows installation media is completed and connected to your computer, please set in the Firmware to make the computer boot from the Windows installation media.
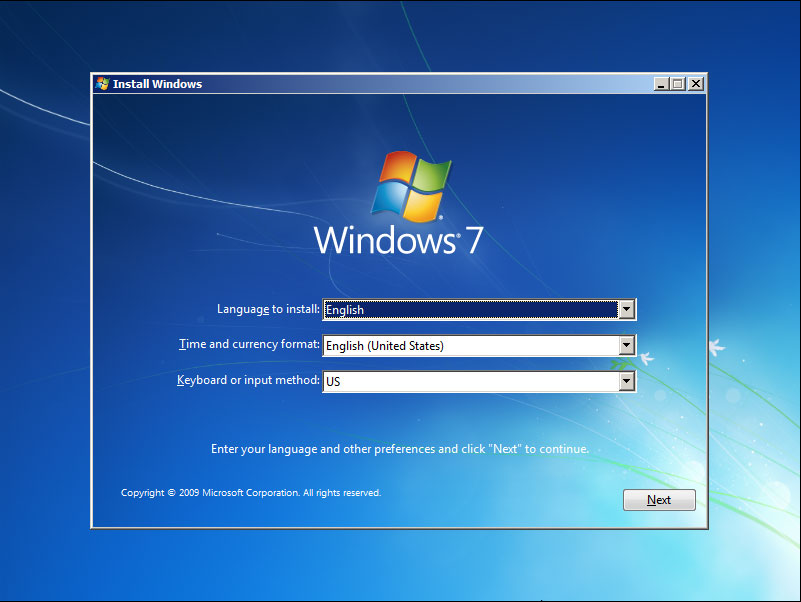
Step 9: Then, you will enter WinPE shown like the following picture. Click Next.
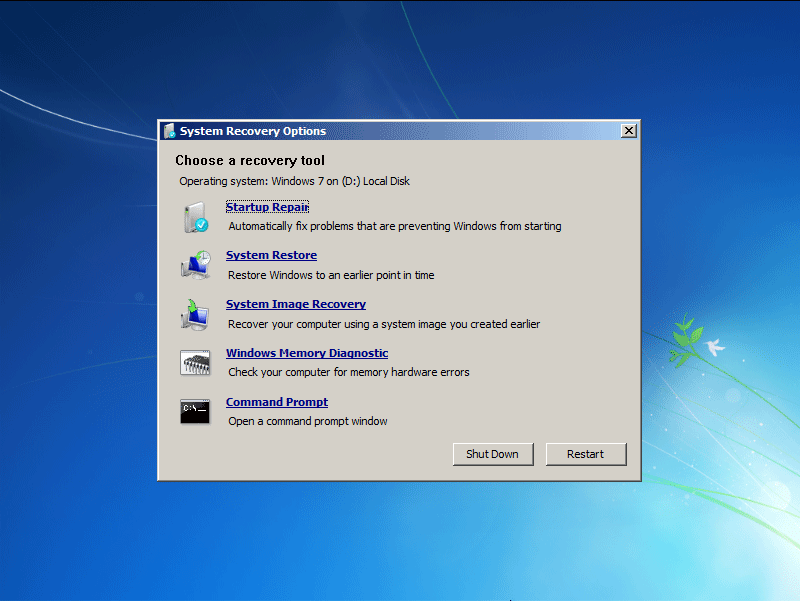
Step 10: Click Repair your computer. Then, click Next and choose Command Prompt.
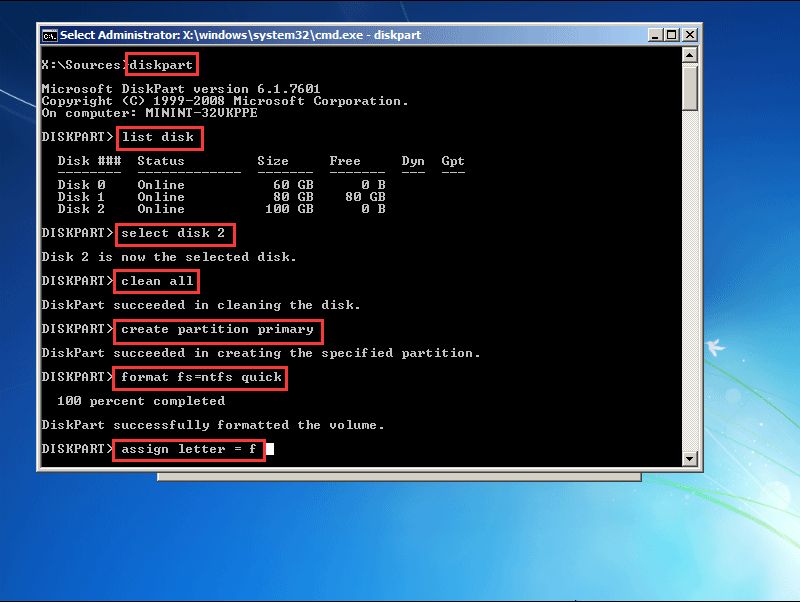
Step 11: Type the following commands one by one to delete all partitions on the disk.
- If there are multiple disks, you should select them and clean them one by one.
- When you format a partition, the file system can be FAT32 or NTFS. But, NTFS file system is recommended when the partition is larger than 32 GB.
- You can create only one partition to install OS. Then, you can manage your disks and partitions after the OS is reinstalled.
Then, you can exit the cmd window and perform OS reinstallation process. But please note that the Windows 7 installation media can only help you install Windows 7 on your computer. If you want to delete everything on Windows 7 and install Windows 10 on your computer, you should make a Windows 10 installation media.
This method can format the computer to destroy trashes files, virus, etc. However, if you want to avoid data disclosure better after you sell or donate your computer, you can use a third-party program to wipe your computer more radically.
Method 3. Wipe a PC with a Third-Party Program
To be honest, the data can be recovered easily if you just delete or format partitions (Click to know how to recover deleted files and recover data from formatted partition). If you plan to sell or donate your computer, you should know how to completely wipe a PC. Thus, MiniTool Partition Wizard is recommended. You can use it to erase your computer easily.
Here is the tutorial on how to delete everything on Windows 7 and Windows 10 with MiniTool Partition Wizard.
Step 1: Buy MiniTool Partition Wizard and setup it to get to its main interface. Then, click Bootable Media after registering your account.
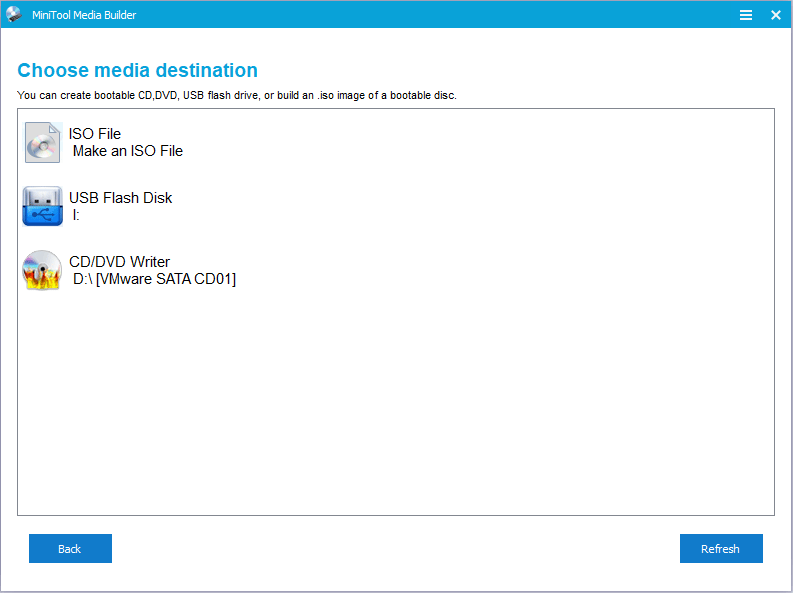
Step 2: Click WinPE-based media with MiniTool plug-in. Then, choose the media destination.
- You can choose a USB flash drive or a CD/DVD as the bootable media and the boot.iso file will be burnt to them directly.
- If you don’t have the above tools, you can choose ISO File. Thus the boot.iso file is generated on your computer. But later, you still need to burn it to a USB flash drive by using another media creation tool.
Step 3: Similarly, set in the Firmware to make the computer boot from the bootable disk.
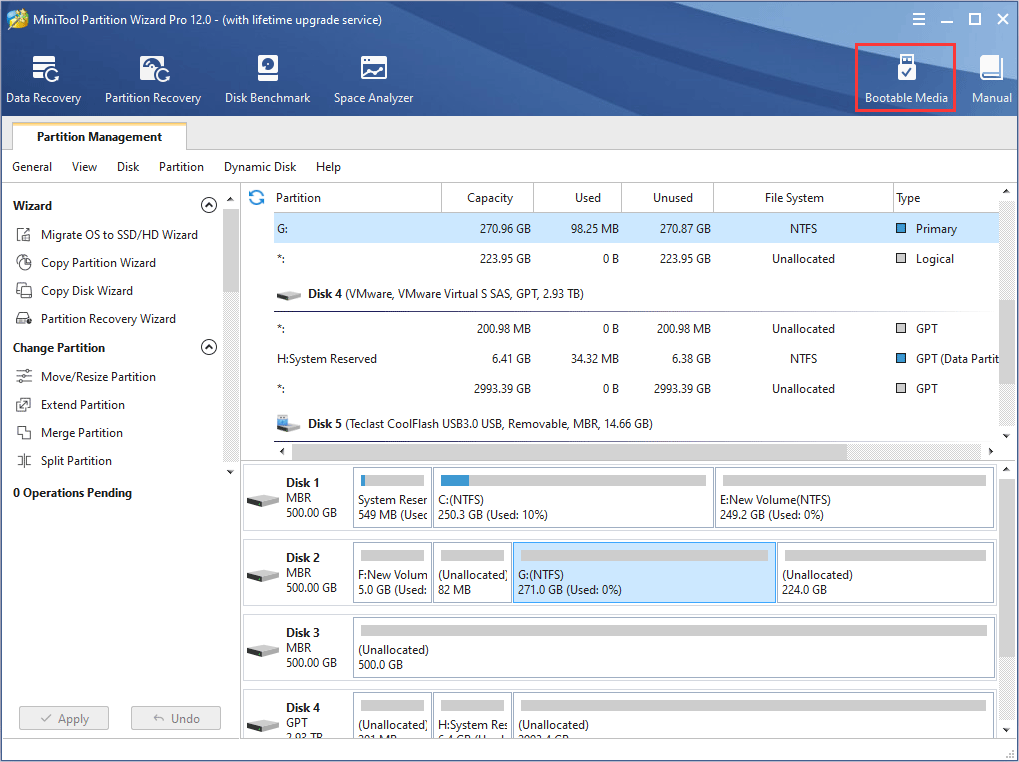
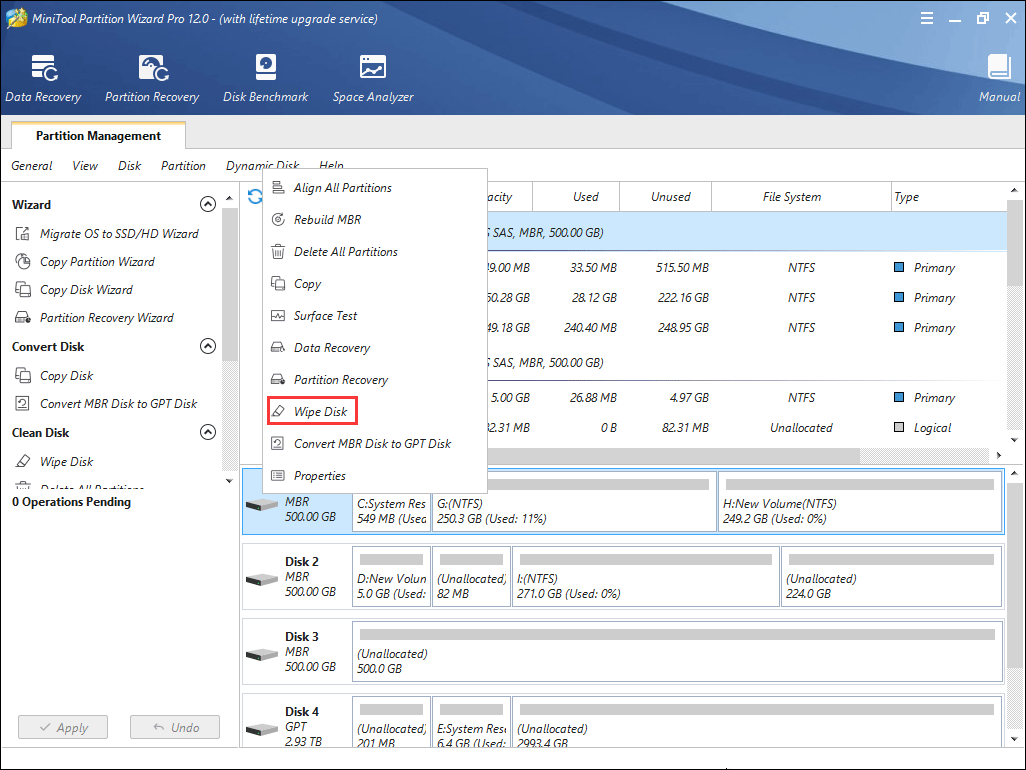
Step 4: Wait a few minutes and click Disk & Partition Management to get to the main interface. Then, right-click a disk and select Wipe Disk.
Step 5: Choose how to wipe a hard drive.
- Fill sectors with Zero and Fill sectors with One: They will write the same code to the disk. Thus the overwriting process will avoid your data being recovered easily by others.
- Fill sectors with Zero &One: It will randomly write zeros and ones to partition, which makes data more unrecoverable.
- DoD 5220.22-M (3 passes): It is recommended if users want to get rid of the data disclosure radically.
- DoD 5220.28-STD (7 passes): It provides higher security level for data because it has more passes than DoD 5220.22-M (3 passes).
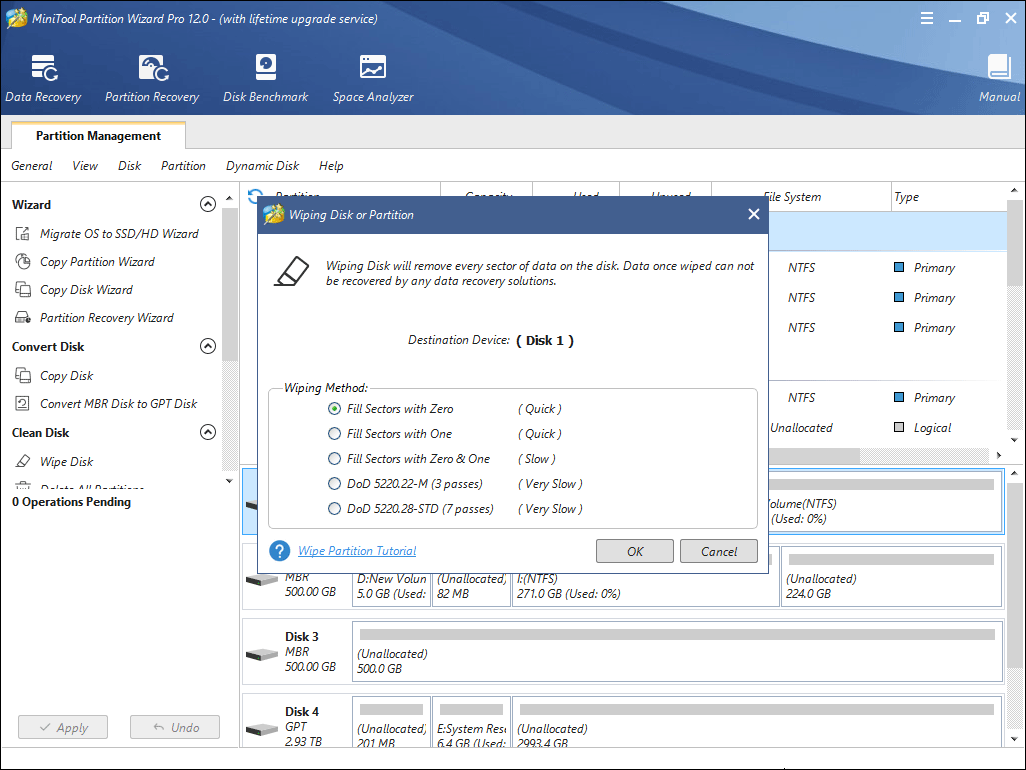
Step 6: Click Apply button to execute the wiping operation.
Then, you could also use MiniTool Partition Wizard to create a new partition if you want to install new OS on the computer. You can refer to the following tutorial.
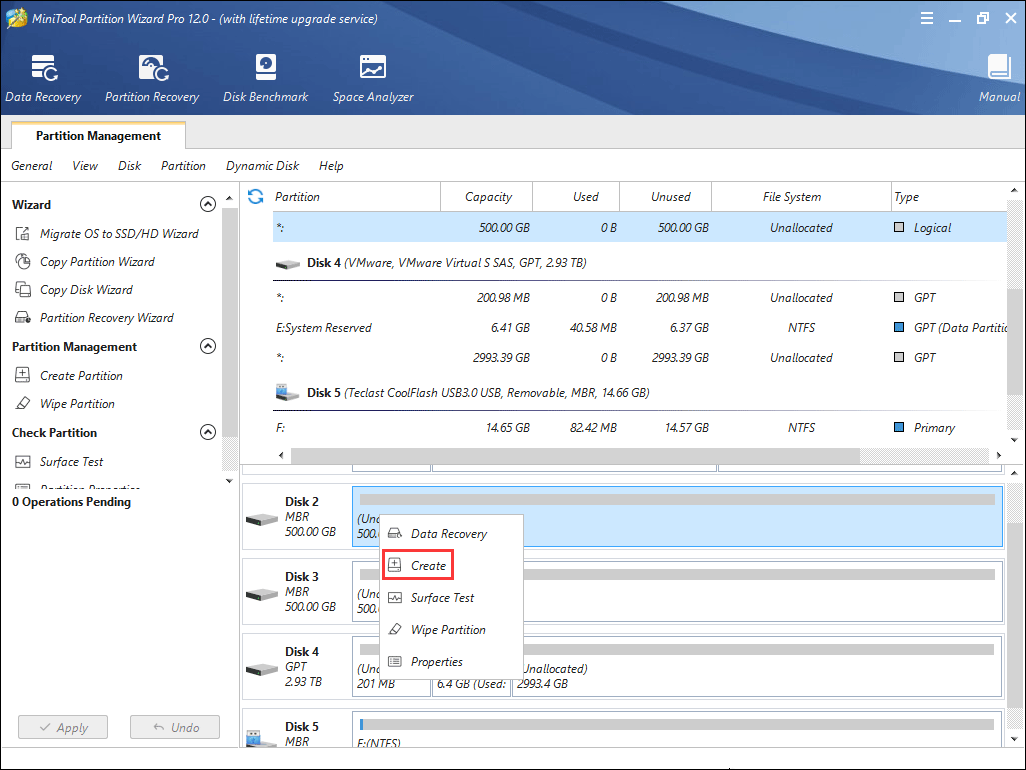
Step 1: Right-click on the gray Unallocated space and choose Create.
Step 2: Set parameters for the new partition. You should choose file system type cautiously, but for other parameters, you can keep their defaults. Then, click OK button.
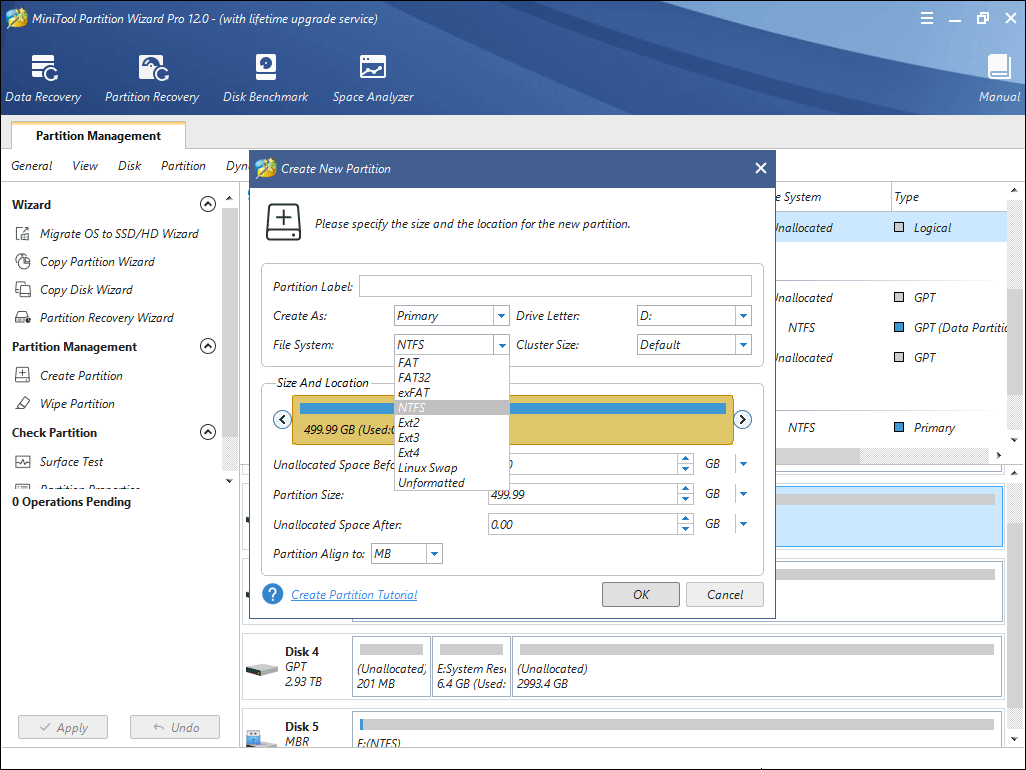
Step 3: Click Apply button to carry out the partition creation command.
Then, you can install a new OS on your computer. You can use Windows installation media to install the operating system. Of course, you can also use MiniTool Partition Wizard to migrate OS to your computer.
In my mind, OS migration is recommended for the following two reasons.
- It is more convenient than clean installation.
- You only need to install a few programs after OS migration. However, after clean installation, you should install all programs that you need.
No matter what method you choose, MiniTool Partition Wizard is a tool that you deserve because it is a powerful program for managing partition. You can also use it to prevent your computer from being full of trashes.
Bottom Line
Is this article helpful to you? We need your feedback. If you are confused about the content in this article or have other related problems, please leave a comment below for discussion or email us at [email protected] for help. We will reply to you as soon as possible.
Of course, if you have any other ideas, you can also leave a comment below for sharing.
How to Delete Everything on Windows 7 FAQ
Step 1: Press Start button and choose Control Panel.
Step 2: Choose System and Security.
Step 3: Click Backup and Restore.
Step 4: Click Recover system settings or your computer.
Step 5: Click Advanced recovery methods.
Step 6: Then, you will be presented with two options: «Use a system image you created earlier to recover your computer» and «Return your computer to factory condition«. Please choose the latter option.
Step 1: Factory reset the PC to delete everything on the computer.
Step 2: Use MiniTool Partition Wizard to wipe the PC completely so that the data can’t be recovered.
Step 3: Reinstall Windows.
ABOUT THE AUTHOR

Position: Columnist
Author Linda has been working as an editor at MiniTool for 1 year. As a fresh man in IT field, she is curious about computer knowledge and learns it crazily. Maybe due to this point, her articles are simple and easy to understand. Even people who do not understand computer can gain something.
By the way, her special focuses are data recovery, partition management, disk clone, and OS migration.


