- Как удалить папку WindowsApps в Windows 10
- Удаление папки WindowsApps на диске D или в Program Files
- How to delete the WindowsApps folder on Windows 10
- WindowsApps folder
- Delete/move apps
- Change WindowsApps folder permission
- Delete the WindowsApps folder
- Leave a Reply Cancel reply
- 7 Tools To Find And Delete Empty Folders in Windows
- Delete Empty Folders Using a Third Party Program
- Delete Empty Folders From the Command Line or Scripts
Как удалить папку WindowsApps в Windows 10
 Папка WindowsApps — стандартная папка Windows 10, в которой хранятся приложения из магазина (UWP приложения). По умолчанию, она присутствует как скрытая папка C:\Program Files\WindowsApps\, но когда вы пользуетесь функциями установки или переноса приложений из магазина на другой диск, аналогичная папка появляется также в корне этого диска — обычно пользователи хотят удалить именно её.
Простое удаление этой папки невозможно, вследствие отсутствия доступа к ней. Однако, если по той или иной причине вам нужно удалить WindowsApps, особенно если речь идет об этой папке на диске D или другом не на системном разделе, вы можете это сделать, настроив права доступа соответствующим образом, об этом — в инструкции.
Удаление папки WindowsApps на диске D или в Program Files
Вне зависимости от того, из какого расположения вам требуется удалить папку WindowsApps, действия будут одинаковыми. Учитывайте, что, удаляя папку вы также удалите и установленные в ней приложения и, если для папки на не системном разделе диска (например, диске D) это относительно безопасно, при удалении WindowsApps из Program Files могут быть проблемы (делайте это только на свой страх и риск) и часть вложенных папок удалены не будут.
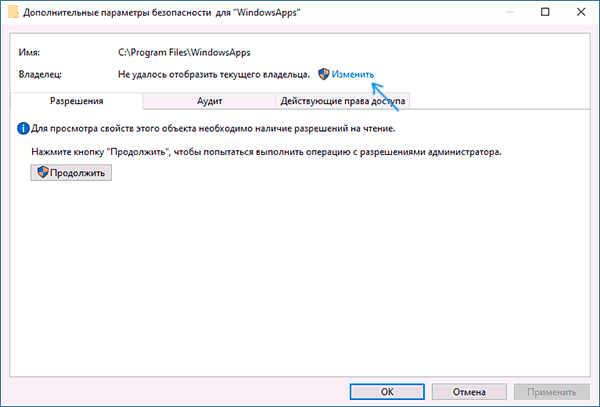
- Нажмите правой кнопкой мыши по папке WindowsApps и откройте её свойства, а затем перейдите на вкладку «Безопасность» и нажмите кнопку «Дополнительно».

- Нажмите «Изменить» в пункте «Владелец».
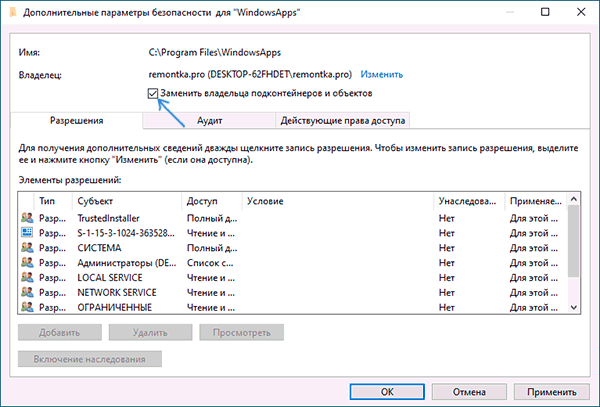
- В поле «Введите имена выбираемых объектов» введите имя вашего пользователя, а затем нажмите кнопку «Проверить имена». Если имя было введено верно, к имени пользователя добавится имя компьютера, как на скриншоте. Для учетной записи Майкрософт можно ввести соответствующий ей E-Mail в качестве имени. Нажмите «Ок».
- Отметьте пункт «Заменить владельца подконтейнеров и объектов» и нажмите «Применить». Дождитесь окончания применения изменений.
- Нажмите «Ок». Вы вернетесь в окно свойств папки. В нем снова нажмите кнопку «Дополнительно» на вкладке «Безопасность».
- Нажмите «Изменить разрешения», а затем — кнопку «Добавить». В поле «Субъект» укажите вашего пользователя, также как вы это делали на 3-м шаге, а затем установите отметку «Полный доступ» и нажмите «Ок».
- Установите отметку «Заменить все записи разрешений дочернего объекта» и нажмите «Ок». Дождитесь завершения применения параметров безопасности. Учитывайте, что при их изменении для системных приложений (если вы удаляете WindowsApps на диске C), могут быть сбои, придется нажать «Продолжить» (права на указанную вложенную папку изменены не будут).


После применения параметров безопасности удалите папку WindowsApps обычным способом. Учитывайте: в случае если какие-то из приложений, находящихся в папке WindowsApps работают в настоящий момент времени, вы можете получить сообщение о том, что удаление невозможно, так как эти папка или файл открыты в другой программе.
В этом случае вы можете начать удалять папки внутри WindowsApps, пока не будет ясно, какая из папок не удаляется (а по её имени можно установить соответствующее приложение).
Если после удаления вы снова будете скачивать приложения из магазина Windows 10, при этом в качестве места сохранения будет использоваться папка на не системном разделе диска, папка WindowsApps будет снова создана автоматически.
А вдруг и это будет интересно:
Почему бы не подписаться?
Рассылка новых, иногда интересных и полезных, материалов сайта remontka.pro. Никакой рекламы и бесплатная компьютерная помощь подписчикам от автора. Другие способы подписки (ВК, Одноклассники, Телеграм, Facebook, Twitter, Youtube, Яндекс.Дзен)
02.08.2019 в 11:23
Это можно сделать быстрее, разблокировав папку с помощью командной строки от имени администратора
08.06.2020 в 01:27
01.12.2020 в 10:50
01.10.2019 в 15:08
Добавлю от себя: если вы сносите не всю папку, а некоторые приложения внутри её — для того чтобы работали адекватно другие приложения из магазина и собственно сам магазин, необходимо после пункта 7 включить наследование. У меня только после этого всё завелось, может кому пригодится
18.12.2019 в 09:07
Доброе утро! Благодарен вашим рекомендациям по удалению папки Windows App с диска D. Пройдя описанный вами путь, только этот метод смог с легкостью удалить эту папку. Добра и процветание вашему сайту. С Уважением Leonid.
18.12.2019 в 14:41
Спасибо за отзыв!
24.12.2019 в 09:24
29.12.2019 в 20:57
Благодарен вашим рекомендациям удалил в Win.10 с диска «С» в Program Files папку без проблем. С наступающим Новым Годом . Здоровья благополучия и процветания вашему сайту!
27.01.2020 в 00:19
У меня на 7ом пункте возникает ошибка:
«Ошибка при применении параметров безопасности к: перечисление каждого файла внутри папки
Не удалось выполнить перечисление объектов в контейнере. Отказано в доступе.»
То есть, у вложенных файлов доступ не изменяется. Но если я с каждым файлом проделываю п. 6, 7, то они удаляются. К сожалению, файлов много, помогите решить ошибку, пожалуйста?
И вопрос на засыпку: почему после возврата пути хранилища системных файлов (обратно на системный диск), папки WindowsApps и WpSystem не удалились? WpSystem можно удалить без проблем, но она и содержимое восстанавливается.
27.01.2020 в 09:57
По первому пункту — сходу не скажу, а эксперимент сейчас у себя провести не могу. А по второму лишь предположение: возможно, какие-то приложения были установлены когда мы хранили их на отдельном разделе и ОС их туда «восстанавливает». Возможное решение — удалить эти приложения (если есть соображения, что именно ставилось в этом время), удалить папки, заново установить приложения с расположением «системный диск». Но это лишь догадка.
27.01.2020 в 13:25
Буду очень благодарен, если поможете решить мою проблему.
Распишу подробнее мою ситуацию.
Изменил путь хранилища системных файлов с системного диска «C» на несистемный «D».
В результате в корне «D» создались 2 папки WindowsApps и WpSystem. Через некоторое время, после обновления Windows 10, в папке WindowsApps появились 3 подпапки Realtek Audio Control, а в WpSystem появилась 1 подпапка с временными данными этого приложения.
Но на диске «C» в папке WindowsApps так же появились аналогичные подпапки, но, видимо, являющиеся ссылками на те же самые, расположенные на диске «D». И в свойствах этого приложения (смотрел по методу https://remontka.pro/delete-apps-windows-10/) указан путь именно на папки-ссылки на диске «C». Ссылки они потому, что при удалении файла из подпапки в WindowsApps на диске «D», такой же файл удаляется из WindowsApps на диске «C».
Как лучше поступить, если я хочу восстановить приложение Realtek Audio Control на диск «C»? Сначала полностью его удалить методом по ссылке выше, а потом заново установить? И каким способом его можно установить, если: Его можно скачать с обновлением Windows 10, но я не могу найти это обновление на офф сайте.
Из магазина Microsoft store, но на моём ПК удалён UWP. Придётся его устанавливать, скачивать приложение и заново удалять UWP?
27.01.2020 в 20:39
Windows 10 живёт своей жизнью, походу. После вчерашних издевательств над Realtek Audio Control и попытками удалить папки WindowsApps и WpSystem с несистемного диска «D», сегодня включаю комп, а там сюрприз:
— Realtek Audio Control каким-то образом переустановился на диск «D», хотя UWP должна быть удалена (но я уже ни в чём не уверен) и путь хранилища системных файлов выбран системный диск «С». И даже возможность переместить это приложение на другой диск нет (кнопка не горит, видно на скрине). Как же всё-таки переместить это приложение на диск С?
— И произошло более интересное — пропали все иконки. На скрине видно, что я выделил 3 папки (названия 2х убрал давно). И скрин проводника так же без иконок. Что делать? Как восстановить?
Может быть из-за того, что я обновил Win 10 до 1909 и сменил оформление на полностью чёрное? Под конец вчерашнего дня ещё почистил с помощью CCleaner и Privazer настройками, которыми чищу раз в месяц и никогда не было проблем.
28.01.2020 в 10:20
Я бы проблему не с Windows связал, а все-таки с очисткой (и возможно ее «несовместимостью» в каком-то нюансе с новой версией).
28.01.2020 в 10:37
Под UWP вы понимаете магазин Windows? Если так, то да, путь для установки UWP-версии приложения Realtek Audio Control вы описали верно.
Есть и еще один вариант: найти файл appx этого приложения где-то на стороннем сайте, тогда без установки магазина можно обойтись будет.
16.03.2020 в 16:38
Установил SDD и вин 10, но на HDD ни как не мог выковырнуть WindowsApps. Всё удалил по инструкции, хотя и мешала эта папка уже больше психологически, СПАСИБО БОЛЬШОЕ !
13.09.2020 в 08:55
НЕ НАДО УДАЛЯТЬ ПАПКУ С PROGRAM FILES!
Получите черный экран при перезагрузке!
Статья опасная.
19.09.2020 в 15:04
Спасибо Вам большое! Проблема была в том, что скачав половину игры из магазина и остановив закачку, скачанные гигабайты так и остались занимать место на диске, и освободить место было нельзя так как нет доступа к папке WindowsApps. После выполнения описанных выше инструкций, зашёл в эту папку и удалил папку с недокачанной игрой (44гб). Теперь место освободилось.
05.01.2021 в 15:06
Как вернуть обратно все, ведь права разрешаем на все папки
How to delete the WindowsApps folder on Windows 10
Jul 29, 2019
Comment
There are many folders on your Windows drive that you cannot access and/or delete. These are normally system folders and deleting them or modifying them could break the OS. Some of these folders can be deleted without damaging the OS but due to their nature, they’re protected. The WindowsApps folder is one such folder.
WindowsApps folder
The WindowsApps folder is where UWP apps are installed. UWP apps can be installed or moved to any drive on your system. What this means is that if you’ve ever installed an app to a non-Windows drive, it will have the WindowsApps folder. As such, if you want to delete the WindowsApps folder from a drive, you have to make sure that there is no UWP app installed to the drive the folder is on.

Delete/move apps
Before we show you how you can delete the WindowsApps folder, you need to first make sure there are no apps installed to the drive it’s on. Checking which apps are installed on a drive is incredibly easy.
Open the Settings app and go to the Apps group of settings. On the Apps & features tab, scroll down to the list of installed apps. Open the Filter by dropdown and select the drive with the WindowsApps folder that you want to delete.

Look through the list and move the apps you want to keep to a different drive. Delete the ones you don’t want to use. The list will be a mix of UWP apps and desktop apps. The desktop apps do not need to be removed. They do not install to the WindowsApps folder.
Change WindowsApps folder permission
You’re going to need admin rights for this. Navigate to the root of the drive with the WindowsApps folder. Right-click it and select Properties from the context menu. Go to the Security tab and click ‘Advanced’.

On the next window that opens, click the Change option next to the Owner.

Another window will open where you can enter a new owner for the folder. In the box at the bottom, enter your admin user name and then click the Check Name button. Once the name is verified, click OK, and then Apply.

Delete the WindowsApps folder
After you’ve changed the permissions, go ahead and select the WindowsApps folder, and the Delete key on your keyboard. You will be prompted to allow the change as an admin user but once you give it admin permission, the folder will be deleted.

If you ever install or move a UWP app to the same drive again, this folder will be recreated. It won’t have any data left over from the previous version that you deleted.
Leave a Reply Cancel reply
This site uses Akismet to reduce spam. Learn how your comment data is processed.
7 Tools To Find And Delete Empty Folders in Windows
Over time your Windows installation gets cluttered up with more and more data. While many of the files are important for the running of the system, some are useless and get left behind by software that has been uninstalled. The files and folders are therefore redundant but still on the system. As more and more is added to the operating system, it begins to slow down which is partly why an old install runs slower than a newer install.
Although folders by themselves don’t really cause any performance issues or take up any space, having thousands of folders spread across your system that don’t contain any files can become a bit of a pain. For the most part, they are of no practical use and just get in the way, especially while using Windows File Explorer. It’s frustrating to drill down through folders to find what’s in them only to discover they are completely empty and are serving no purpose.
Here we list 7 Windows based tools that can find and delete empty folders from your system. While many empty folders are of no use and can be safely deleted, others are required by software or Windows itself. It is never recommended to just mass delete all empty folders from your system drive and some experience is required to determine what is safe to remove and what isn’t. Don’t panic if you’ve made the wrong decision in deleting an important folder because there are free recovery software that you can use to restore back the deleted folder.
Delete Empty Folders Using a Third Party Program
Using a separate tool to delete a number of empty folders is going to be much faster and easier than trying to do it yourself manually. Here are some tools to look at.
1. Remove Empty Directories
Remove Empty Directories is probably the most well known empty folder deleting tool, but like many others, it hasn’t been updated in several years. The last update for this program was 2011. It still works great though, has enough functions for most users and manages to squeeze everything into a portable executable under 200KB in size.
![]()
After selecting and scanning the base folder or drive, the view will be populated with a tree view containing different colored text and icons. The icon list on the right will tell you if the folders are truly empty, contain trash files and are hidden, locked or can’t be read. Names in red are automatically marked for deletion. Right click on a red empty folder and select “Protect once” to ignore it for this session or “Add to ignore list” to permanently ignore the folder in future.
![]()
In the the Settings tab you can choose to delete to the Recycle bin or directly, skip predefined folders (7 are already added), add or remove what are classed as trash files (3 are pre entered), add a right click menu entry to Explorer, and set a few advanced options like recursive depth. Right click and run the program as administrator to enter Admin mode and allow deleting of protected folders.
2. EmptyFolderNuker
EmptyFolderNuker is probably the easiest GUI based empty folder remover here. It’s a bit old dating from 2007, and the official website is no longer there but the tool still works as intended, even in Windows 10. The program is also a single portable executable.
![]()
Browse for the folder or drive you want to check, then press the Find button. Make sure the two boxes are checked to scan the path recursively and treat folders as empty if they contain only empty folders. The Shell Integration box is useful and places a right click “Find empty folders” entry when you right click on a folder. The program will then open with the folder you clicked on as the base path.
![]()
You need to be slightly careful at the results window as all empty folders are pre-checked for deletion. It’s recommended to press Uncheck All and choose the folders selectively or go through the list and make sure to uncheck any folders you want to leave alone. After you press Delete, a UAC prompt will pop up if any folders require administrator privileges to remove.
3. Fast Empty Folder Finder
Like Empty Folder Nuker, this tool is quite old and its official website is no longer around. Fast Empty Folder Finder is a bit newer though and from 2011. The .NET Framework v2 is required so Windows 8 and 10 users will need to have the .NET 3.5 optional feature installed. Besides the .NET requirement, Fast Empty Folder Finder is portable.
![]()
When you press the Scan Locations button to add a folder, several different base folders can be added at once. This is useful and can stop the program scanning thousands of folders you are not interested in. After pressing Scan Now! select all the empty folders you want to remove using left click, Shift+click or Ctrl+click or use the List > Check menu options. Checked files can be deleted permanently or to the Recycle bin for a bit of added safety.
![]()
Although the lower pane Explorer window might be useful to check if a folder is really empty, it is mostly unneeded and can be turned off from the View menu. Empty folder lists can be exported to a text file for later use. One issue is Fast Empty Folder Finder doesn’t delete a folder if it only contains empty folders. If you have a path of foldera\folderb and both folders contain no files, only folderb will be deleted.
4. 4dots Empty Folder Cleaner
Empty Folder Cleaner by 4dots Software has both installer and portable versions available. The only major difference between the two is the installed version has the option to add a right click context menu entry so you can delete empty folders from the folder you right click on.
![]()
After selecting a drive or folder to scan and scanning it, you then have the opportunity to delete completely empty folders or those that contain what are considered “junk” files. By default, junk files are desktop.ini, thumbs.db and .tmp files although you can add to or edit this list in the program’s options. Press either the green or blue buttons to select all empty or junk folders or selectively check the boxes for individual folders.
![]()
You can also add folders to ignore (5 system folders are already included), folders and files to protect from deletion, and keep backups of the deleted folders for later restoration. To enable the backup option go to Tools > Options and select Keep Backups. The program will ask for administrative privileges after you press the delete button if administrator protected folders are listed for deletion.
Other potentially useful empty folder deleting programs we tried include Empty Folders Finder (part of Glary Utilities), JoseDelEmpty, Vanity Remover, Empty Folder Finder and DelEmpty (GUI based).
Note: Some tools were ineffective in finding the real number of empty folders on our system. The tools above found thousands but Advanced SystemCare Free only found 23 empty folders and Puran Delete Empty Folders found just 7. You are welcome to try these programs but we found they were nowhere near thorough enough to be considered truly useful.
Delete Empty Folders From the Command Line or Scripts
Letting a dedicated program find and delete empty folders is the best choice for users of all skill levels. Advanced users might also want some extra options like being able to delete empty folders from the command line or batch scripts. Here are a few ways to do that using third party command line and built in Windows utilities.
5. DelEmpty (by Intelliadmin)
There is another tool called DelEmpty that has a GUI but this one is made solely for the command line. The main arguments to remove folders and subfolders from a given path are:
![]()
The -D argument is required and tells the tool to delete empty folders, the -S will optionally include sub-folders. Two other useful arguments are -Y which requires confirmation to delete each folder and -L lists the folders to be deleted without deleting anything. This is useful if you want to redirect the folder list to a text file. DelEmpty is also able to delete zero byte files by including -F, run the tool without arguments for a list.
6. RmEmpty
For complete ease of use while deleting empty folders from the command line, this old tool from around the year 2000 is about as simple as it gets.
RmEmpty pathtofolder [pathtofolder2]
![]()
Supply at least one folder as an argument and RmEmpty will search the path recursively and delete empty folders. Multiple path arguments can be included so you can delete from several different base folders at once.
7. Windows RoboCopy Command
There are several different ways in which you can delete empty folders using built in Windows commands, most require the use of a For loop. The Robocopy (Robust File Copy) tool is much easier and a simple trick forces it to remove all empty folders in the given path. Robocopy is available as standard in Windows Vista and above.
Robocopy pathtofolder samepathtofolder /S /Move
![]()
Instead of supplying a different source and destination folder you simply use the same for both. The addition of /Move tries to move the files from and to the same location, so Robocopy skips them. The extra /S argument forces Robocopy to also move subfolders but not empty folders. Only the empty folders are processed and deleted while everything else is skipped because it already exists. This leaves all files and non empty folders completely intact.
Note: These tools need to be run in an administrative Command Prompt or the script needs running as administrator for all folders to be processed on the C drive. Otherwise only those empty folders inside the current user’s folder will be deleted and those outside (such as in Program Files) will receive an access denied error message.


