- Recover lost or deleted files
- How to refresh, reset, or restore your PC
- Before you start to refresh or reset your PC
- Refresh, reset, or restore
- To refresh your PC
- To reset your PC
- To restore your PC to an earlier point in time
- How to Delete Recovery Partition in Windows 10/8/7 Safely?
- Is it safe to delete recovery partition?
- Which recovery partition should you delete?
- Remove recovery partition with Diskpart
- Delete recovery partition with AOMEI Partition Assistant
Recover lost or deleted files
Note: If you’ve recently updated Windows 10 and are having problems finding files, see Find lost files after the upgrade to Windows 10.
If you can’t find a file on your computer or you accidently modified or deleted a file, you can restore it from a backup (if you’re using Windows backup) or you can try to restore it from a previous version. Previous versions are copies of files and folders that Windows automatically saves as part of a restore point. Previous versions are sometimes referred to as shadow copies.
To restore a file from a backup, make sure the media or drive that your backup is saved on is available, and then follow these steps:
To restore files from a backup
Open Backup and Restore by selecting the Start button  , selecting Control Panel, selecting System and Maintenance, and then selecting Backup and Restore.
Select Restore my files, and then follow the steps in the wizard.
Restore deleted files and folders or restore a file or folder to a previous state.
To restore a deleted file or folder
Open Computer by selecting the Start button , and then selecting Computer.
Navigate to the folder that used to contain the file or folder, right-click it, and then select Restore previous versions. If the folder was at the top level of a drive, for example C:\, right-click the drive, and then select Restore previous versions.
You’ll see a list of available previous versions of the file or folder. The list will include files saved on a backup (if you are using Windows Backup to back up your files) as well as restore points, if both types are available.
Note: To restore a previous version of a file or folder that’s included in a library, right-click the file or folder in the location where it’s saved, rather than in the library. For example, to restore a previous version of a picture that’s included in the Pictures library but is stored in the My Pictures folder, right-click the My Pictures folder, and then select Restore previous versions.
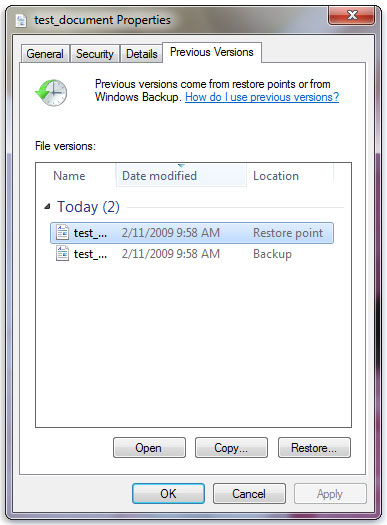
Some previous versions of files
Double-click a previous version of the folder that contains the file or folder you want to restore. (For example, if a file was deleted today, choose a version of the folder from yesterday, which should contain the file.)
Drag the file or folder that you want to restore to another location, such as your desktop or another folder.
The version of the file or folder is saved to the location that you selected.
Tip: If you don’t remember the exact file or folder name or its location, you can search for it by typing part of the name in the search box in the Documents library.
To restore a file or folder to a previous state
Right-click the file or folder, and then select Restore previous versions.
You’ll see a list of available previous versions of the file or folder. The list will include files saved on a backup (if you’re using Windows Backup to back up your files) as well as restore points, if both types are available.
The Previous Versions tab, showing some previous versions of files
Before restoring a previous version of a file or folder, select the previous version, and then click Open to view it to make sure it’s the version you want.
Note: You can’t open or copy previous versions of files that were created by Windows Backup, but you can restore them.
To restore a previous version, select the previous version, and then select Restore.
Warning: The file or folder replaces the current version on your computer, and the replacement can’t be undone.
Note: If the Restore button is unavailable, you can’t restore a previous version of the file or folder to its original location. You might be able to open it or save it to a different location.
How to refresh, reset, or restore your PC
Note: For information about this topic in Windows 10, see Recovery options in Windows 10.
If you’re having problems with your PC, you can:
Refresh your PC to reinstall Windows and keep your personal files and settings. Refresh also keeps the apps that came with your PC and the apps you installed from the Microsoft Store.
Reset your PC to reinstall Windows but delete your files, settings, and apps—except for the apps that came with your PC.
Restore your PC to undo recent system changes you’ve made.
If you’re having trouble starting (booting) your PC, see Windows Startup Settings (including safe mode), and go to the “Get to Windows Startup Settings in the Windows Recovery Environment” section. You can refresh, reset, or restore your PC from the Windows Recovery Environment.
If you want to back up and restore your personal files using File History, see Set up a drive for File History.
Before you start to refresh or reset your PC
In most cases, once you start to refresh or reset your PC, it’ll finish on its own. However, if Windows needs missing files, you’ll be asked to insert recovery media, which is typically on a DVD disc or thumb drive. If that happens, what you’ll need depends on your PC.
If your PC came with Windows 8.1 or Windows RT 8.1, you’ll need the discs or thumb drive that came with your PC. Check the info that came with your PC to see if your PC manufacturer provided these discs or media. In some cases, you might have created them when you first set up your PC.
If you don’t have either of those, you can make them if you have a USB thumb drive of 16 GB or larger. Having a recovery drive can help you troubleshoot and fix problems with your PC, even if it won’t start. For more info, see Create a USB recovery drive.
If you upgraded your PC to Windows 8.1 or Windows RT 8.1 with a DVD, use that disc. If you don’t have Windows 8.1 or Windows RT 8.1 media, contact Microsoft Support.
Refresh, reset, or restore
Select any of the following for more detailed info.
If your PC isn’t performing as well as it once did, and you don’t know why, you can refresh your PC without deleting any of your personal files or changing your settings.
Note: If you upgraded your PC from Windows 8 to Windows 8.1 and your PC has a Windows 8 recovery partition, refreshing your PC will restore Windows 8. You’ll need to upgrade to Windows 8.1 after the refresh has finished.
Warning: Apps you installed from websites and DVDs will be removed. Apps that came with your PC and apps you installed from Microsoft Store will be reinstalled. Windows puts a list of removed apps on your desktop after refreshing your PC.
To refresh your PC
Swipe in from the right edge of the screen, tap Settings, and then tap Change PC settings.
(If you’re using a mouse, point to the upper-right corner of the screen, move the mouse pointer down, click Settings, and then click Change PC settings.)
Tap or click Update and recovery, and then tap or click Recovery.
Under Refresh your PC without affecting your files, tap or click Get started.
Follow the instructions on the screen.
If you want to recycle your PC, give it away, or start over with it, you can reset it completely. This removes everything and reinstalls Windows.
Note: If you upgraded your PC from Windows 8 to Windows 8.1 and your PC has a Windows 8 recovery partition, resetting your PC will restore Windows 8. You’ll need to upgrade to Windows 8.1 after the reset has finished.
Warning: All of your personal files will be deleted and your settings will be reset. All apps that you installed will be removed. Only apps that came with your PC will be reinstalled.
To reset your PC
Swipe in from the right edge of the screen, tap Settings, and then tap Change PC settings.
(If you’re using a mouse, point to the upper-right corner of the screen, move the mouse pointer down, click Settings, and then click Change PC settings.)
Tap or click Update and recovery, and then tap or click Recovery.
Under Remove everything and reinstall Windows, tap or click Get started.
Follow the instructions on the screen.
Note: You’ll be asked to choose whether you want to erase data quickly or thoroughly. If you choose to erase data quickly, some data might be recoverable using special software. If you choose to erase data thoroughly, this will take longer but it makes recovering data less likely.
If you think an app or driver that you recently installed caused problems with your PC, you can restore Windows back to an earlier point in time, called a restore point. System Restore doesn’t change your personal files, but it might remove recently installed apps and drivers.
System Restore isn’t available for Windows RT 8.1.
Windows automatically creates a restore point when you install desktop apps and new Windows updates, if the last restore point is older than 7 days. You can also create a restore point manually at any time.
To restore your PC to an earlier point in time
Swipe in from the right edge of the screen, and then tap Search.
(If you’re using a mouse, point to the upper-right corner of the screen, move the mouse pointer down, and then click Search.)
Enter Control Panel in the search box, and tap or click Control Panel.
Enter Recovery in the Control Panel search box, and then tap or click Recovery.
Tap or click Open System Restore, and then follow the instructions.
If you need additional help refreshing, resetting, or restoring your PC, check out the Repair and Recovery community pages in the Windows forum for solutions that other people have found for problems they’ve experienced.
How to Delete Recovery Partition in Windows 10/8/7 Safely?
Learn how to safely delete recovery partition to reclaim disk space since Windows 7/8/10 has one or more recovery partitions on a disk, which takes much space.

By AOMEI  / Last Updated February 26, 2020
Is it safe to delete recovery partition?
There are basically two kinds of recovery partition, Windows recovery partitions, and computer supplier’s recovery partitions. Windows recovery partition allows you to boot into Windows recovery environment (WinRE) to restore your computer when problems happen, while the recovery partitions created by manufacturers allow you to press a specific key (usually F9 for HP and F12 for Dell) to recover your computer to the factory default settings.
If you see a few gigabytes recovery partition in Disk Management, it is definitely included by computer manufacturers such as Dell, HP, and Lenovo. This recovery partition contains an image of everything pre-installed along with operating system. On some computers, it is labeled as OEM reserved partition. You may also see a recovery partition with several gigabytes space and an OEM partition that is less than 100 MB.
The Windows recovery partition consumes much less storage space. For example, Windows 10 recovery partition only takes about 450MB, and even less in the Windows 8 or 7. Therefore, it is recommended to keep the Windows recovery partition. However, if you really need to get rid of the recovery partition, you can create Windows 10 recovery disk with a USB drive, and then Windows 10 will give you an option to delete the current recovery partition for Windows 10.
Which recovery partition should you delete?
If you have upgraded to Windows 10 from previous Windows system, then the factory default recovery partition will not work normally. In that case, you should delete this recovery partition and reclaim disk space.
You only need one Windows recovery partition to be able to use Windows recovery options to fix your system. When you upgrade your system to the next version, Windows may generate another recovery partition. In that case, you should only keep the current recovery partition and delete the rest.
To locate this Windows recovery partition, you can type “reagentc /info” (without quotes) in an elevated command prompt.
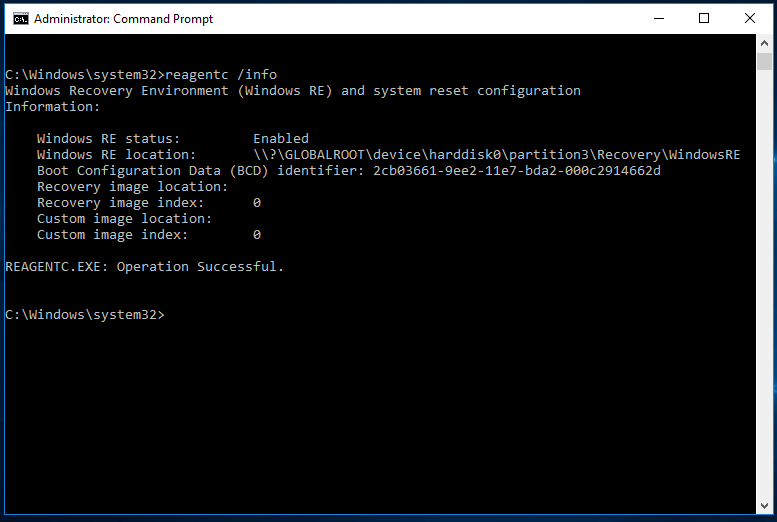
Note: from the screenshot above, this “harddisk0\partition3” does not mean the third partition on Disk 0. You can use type the following commands on another command prompt:
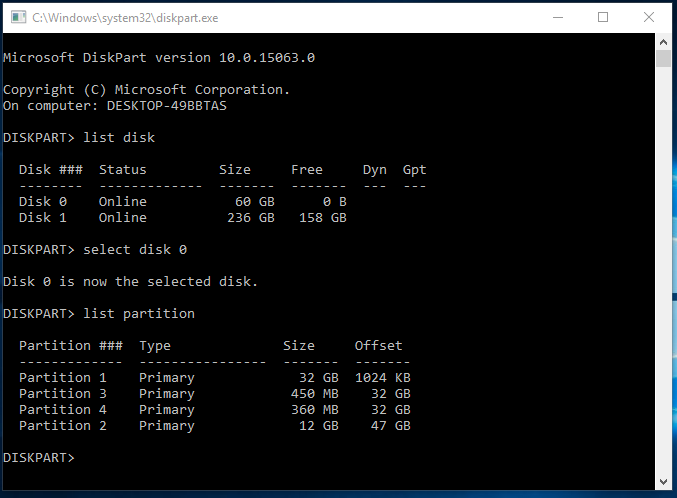
From my end, the second partition is the current Windows recovery partition that you should keep if you want to use the recovery options. Once you have decided which recovery partition to delete, it is easy.
Remove recovery partition with Diskpart
As you know, you are not allowed to delete recovery partition in Windows Disk Management, but you use Diskpart.exe to delete partitions from command prompt. You can use the following steps to remove recovery partition with diskpart:
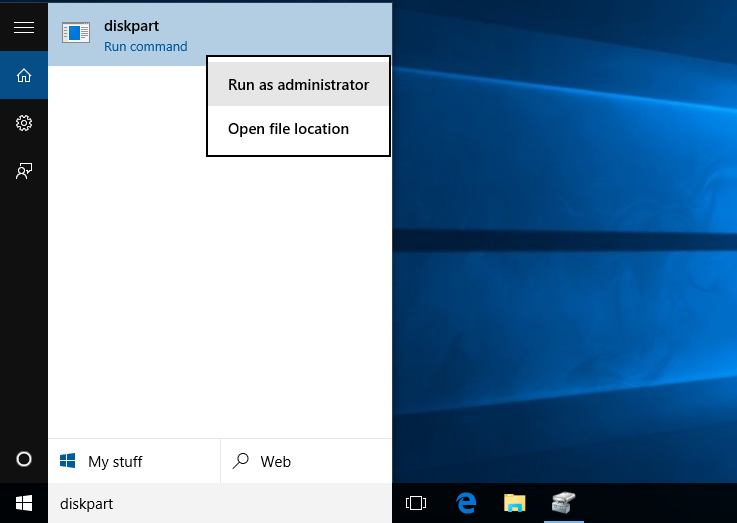
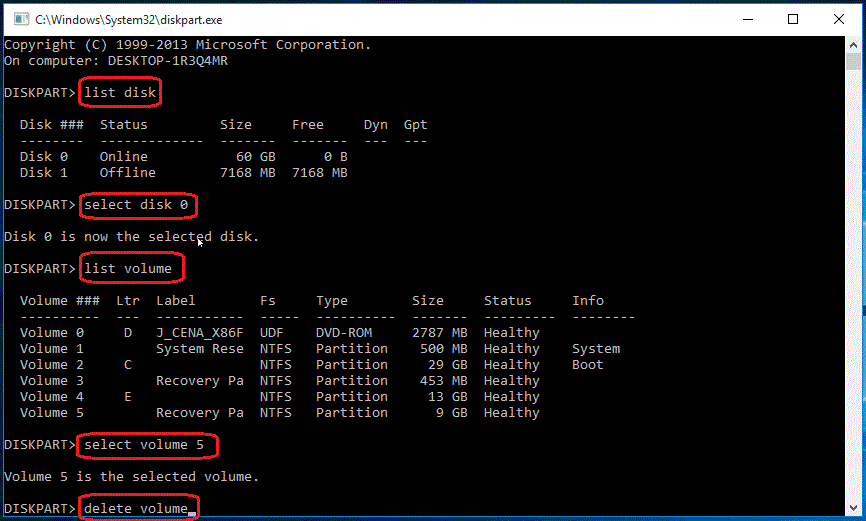
1. Type «diskpart.exe» in the search box, in the listed results, right-click on Diskpart and select Run as administrator.
2. At a Diskpart prompt, type in «list disk» to display all the disks. Each disk on your computer will be listed with a disk number.
3. Specify the disk that contains the recovery partition by typing in «select disk n», in which «n» should be replaced with the disk number listed before.
4. Type in «list volume» to list all the partitions on the selected disk with all the partition labels, so you can determine which one is the recovery partition to be deleted. If you want to see the partition type, use «list partition» command instead.
5. Specify the partition you want to delete using the volume number, like this: «select volume 3».
6. Type in: «delete volume».
Without a clear interface to show you display the details of each partition, there are chances that you may delete inappropriate partitions. What’s worse, this operation cannot be canceled or undo. For those who are not familiar with Diskpart, the best choice to get rid of recovery partition should be using third party partition manager software.
Delete recovery partition with AOMEI Partition Assistant
AOMEI Partition Assistant Standard is a completely free program that allows you to delete recovery partition and reclaim the storage space without a scratch. Let’s see how to delete recovery partition using AOMEI Partition Assistant.
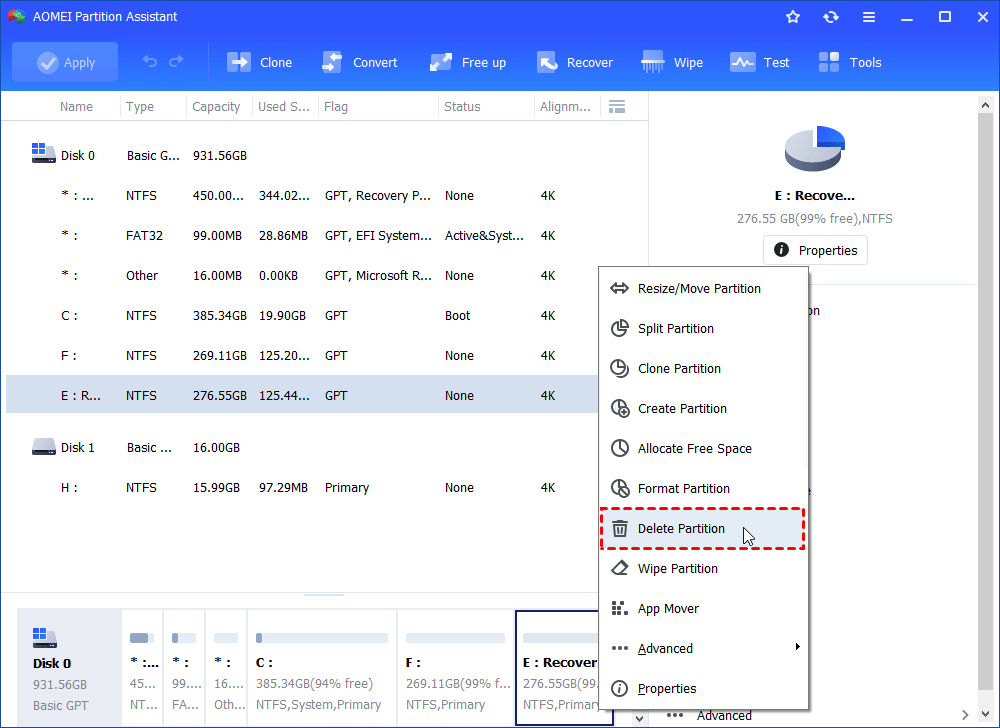
Step 1. Download this freeware. Install and open it. Right click on the recovery partition you want to delete and select «Delete Partition», and then click “OK”.
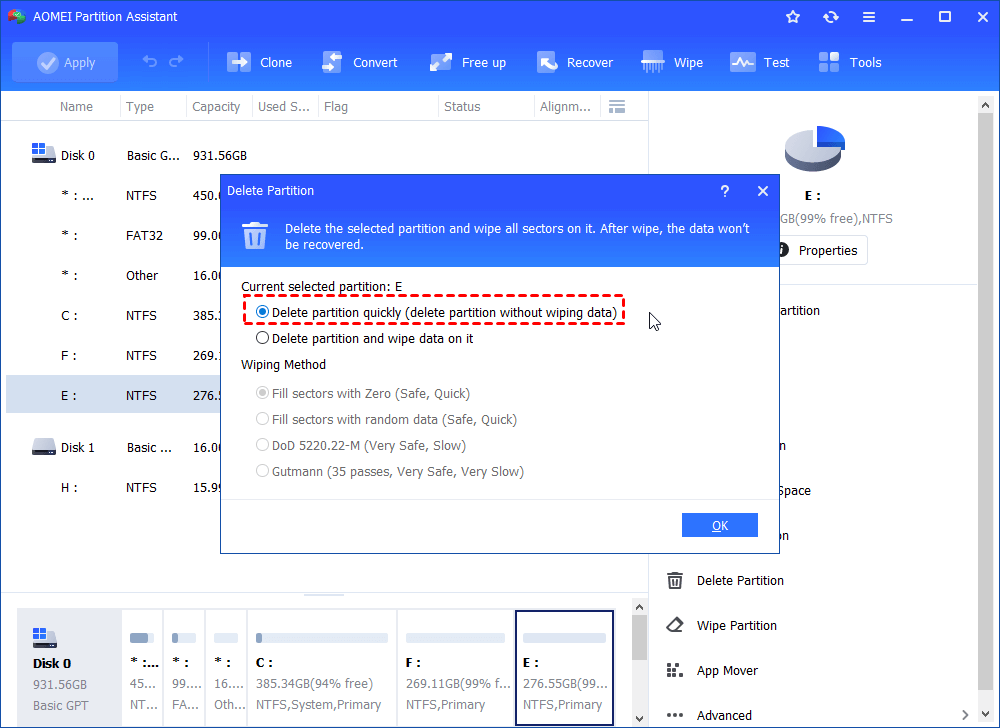
Step 2. Select a method to remove the recovery partition and click “OK”.
Step 3.The recovery partition will be displayed as unallocated space. Make sure that is the partition you want to get rid of, and click «Apply» to make the operation in process.
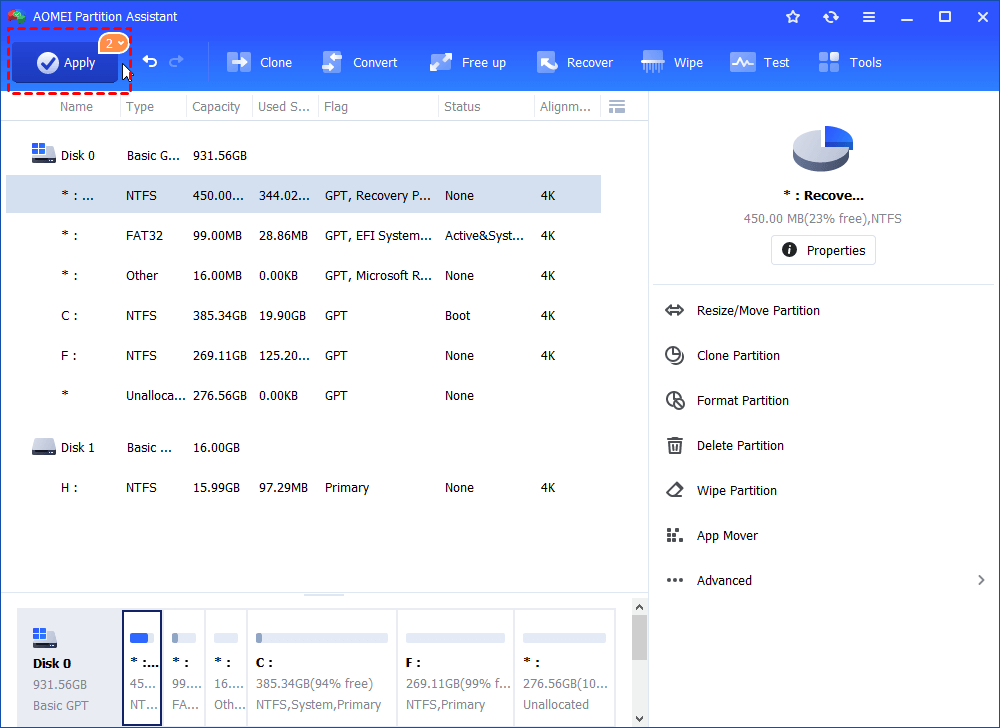
In a few seconds, you will have recovery partition deleted. You can use AOMEI Partition Assistant to add this unallocated space to any partition on this disk by using merge partitions or create a new partition. Besides that, AOMEI Partition Assistant also can be used to clone hard drive, resize partition and so on. If you want to experience more features likeallocating free space, quick partition, you can upgrade to AOMEI Partition Professional.


