- How to Delete File History Backup in Windows 10?(4 Ways included)
- Can I delete file history folder in Windows 10?
- Why delete old file history in Windows 10?
- How to delete Windows 10 file history old versions?
- Method 1: Delete File History backup via Advanced Settings
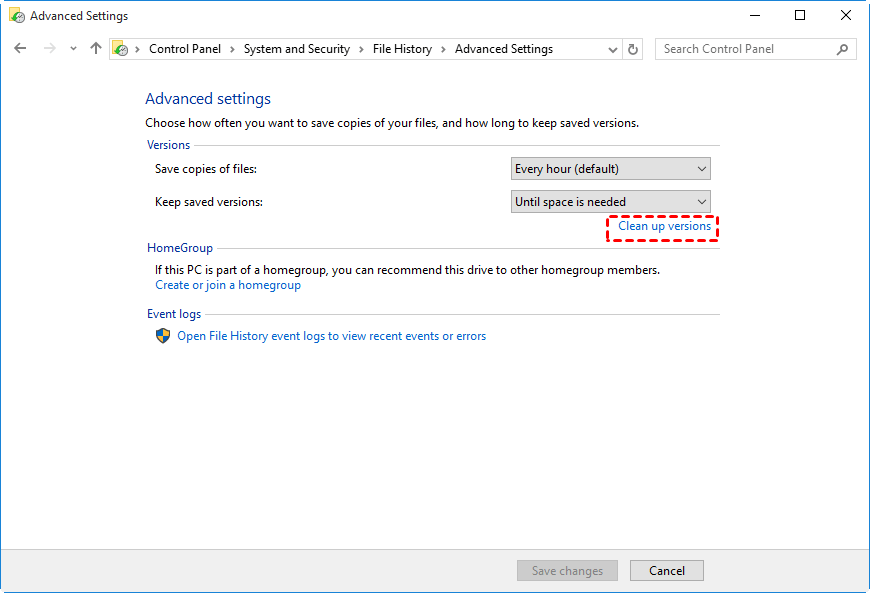
- Method 2: Delete old versions via Clean up version
- Method 3: Completely delete all the backups in the backup disk
- Method 4: Reset File History in Windows 10 using CMD
- Another way to backup files and delete old versions in Windows 10
- Wrapping things up
- How to delete backup files from File History in Windows 10
- Replies (30)
How to Delete File History Backup in Windows 10?(4 Ways included)
Deleting file history backup in Windows 10 with the detailed steps below, or you disk will run out of space. And your computer will run slower and slower owing to low disk space issue.
By Ivy 
Can I delete file history folder in Windows 10?
“My disk is full of backups and I would like to remove all backup files from file history and start afresh. How to do it? Thank you for any answer.”
Why delete old file history in Windows 10?
File History continuously protects your personal files stored in Libraries, Desktop, Favorites, and Contacts folders. And it will keep every change of your personal files. However, over time, your backups will become more and more until your disk is full. More so, it will not delete Windows 10 file history older versions automatically, because the backup file retention period is set as forever by default.
To get rid of backup disk full, you need to remove file history in Windows 10 manually. Keep reading to learn the detailed steps.
How to delete Windows 10 file history old versions?
Method 1: Delete File History backup via Advanced Settings
Step 1. Type file history in the search box and select it from the result list. Then, you will go to File History window.
Step 2. Click Advanced settings at the left side.
Step 3. Click the drop-down menu and select Until the space is needed, then click Save changes to exit this window.
Step 4. Close File History Window.
Method 2: Delete old versions via Clean up version
Step 1. Go to Advanced settings of File History and then click Clean up versions.
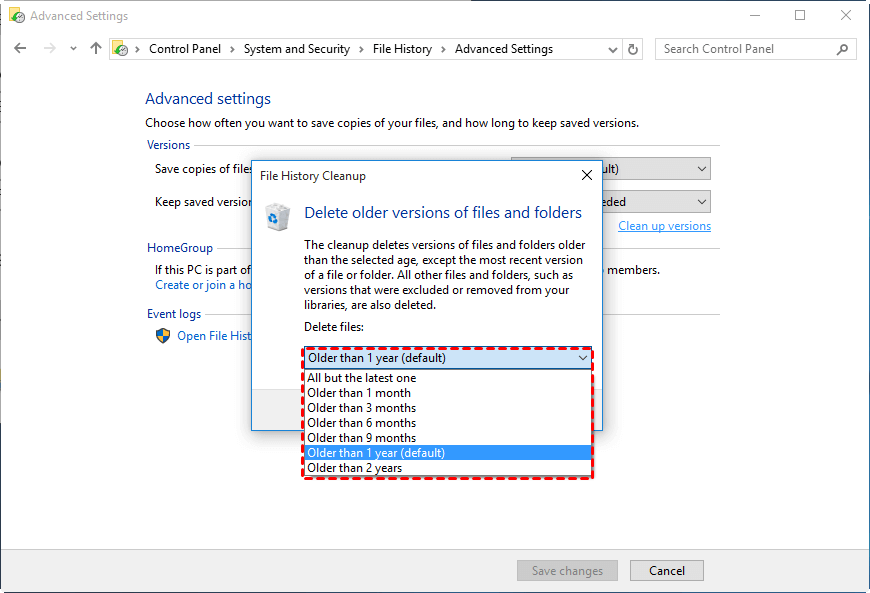
Step 2. Select a period of time under Delete files and click Clean up.
Step 3. Click OK when you receive a prompt the “The cleanup completed successfully”.
Method 3: Completely delete all the backups in the backup disk
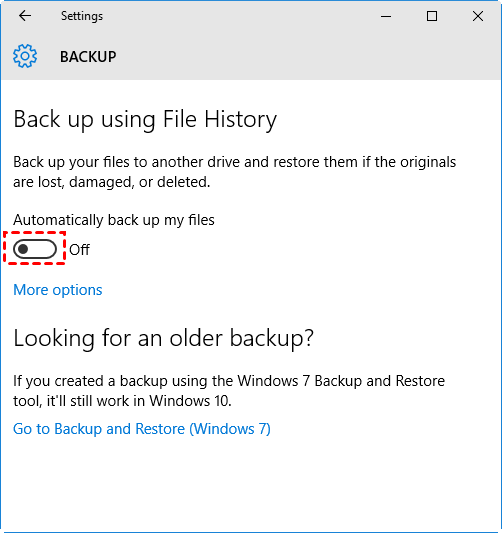
Step 1. Go to Setting > Update & Security > Backup and click the button under Automatically back up my files.
Step 2. Go to the backup drive and delete the folder named as FileBackup.
Note: If this folder is locked and you cannot delete it, you should go to File History again, then turn on the File History backup and click More options, scroll down to the bottom and hit Stop using drive. Then, delete file history folder again.
Method 4: Reset File History in Windows 10 using CMD
Step 1. Open command prompt.
Step 2. Type one of the following commands according to your needs and Hit Enter. Then, I’ll take All but the latest one as an example and show you the right command.
FhManagew.exe -cleanup 0
FhManagew.exe -cleanup 0 -quiet (-quiet refers to delete file history in Windows 10 without interruption.)
Note: Here, we think that every month is thirty days, so you just need to replace 0 with 30, 90, 180, 270, 360, 720.
Another way to backup files and delete old versions in Windows 10
In File History, there is a feature called Keep saved versions, which can help you delete old versions of backups. It all depends on the time period you selected. But some users reports that it does not clear old versions automatically. So, a better file backup software with disk space management feature is needed.
AOMEI Backupper Professional will be your prior choice, because it’s an excellent backup software for any level of user, from beginners to experienced. It has a clear interface and user-friendly design, which make all the steps become very easier. With it, you can backup files at daily, backup files with a certain file extension, backup large files, copy files without Windows, backup files to cloud, delete old backups in Windows 8, etc.
This version is only suitable for 1 PC user, so you need to use AOMEI Backupper Technician if you want to protect and recover unlimited PCs and Servers. And the advanced version has more useful features, such as, AOMEI Image Deploy. With it, you can deploy image to multiple computers over network.
Now, continue to see the detailed steps.
Step 1. Download AOMEI Backupper Professional, install and launch it.
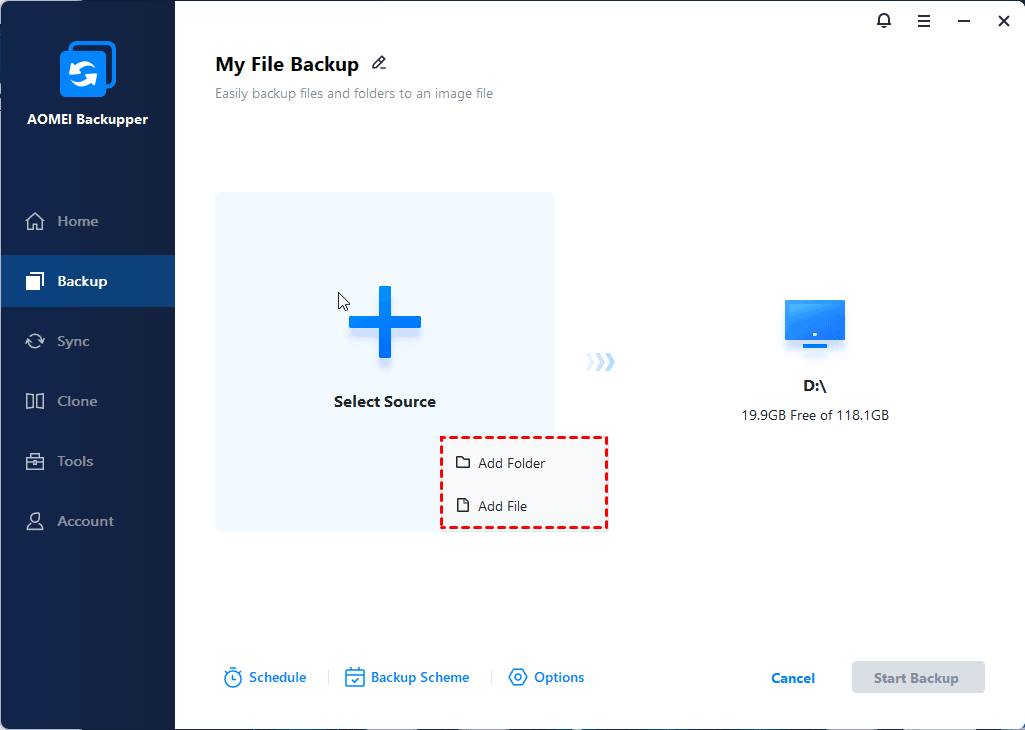
Step 2. Click Backup and File Backup subsequently.
Step 3. Click Add File orAdd Folder to select the data you want to backup, and pitch on a path for it. You can backup files to local hard drive, external hard drive, USB drive, cloud drive, etc.
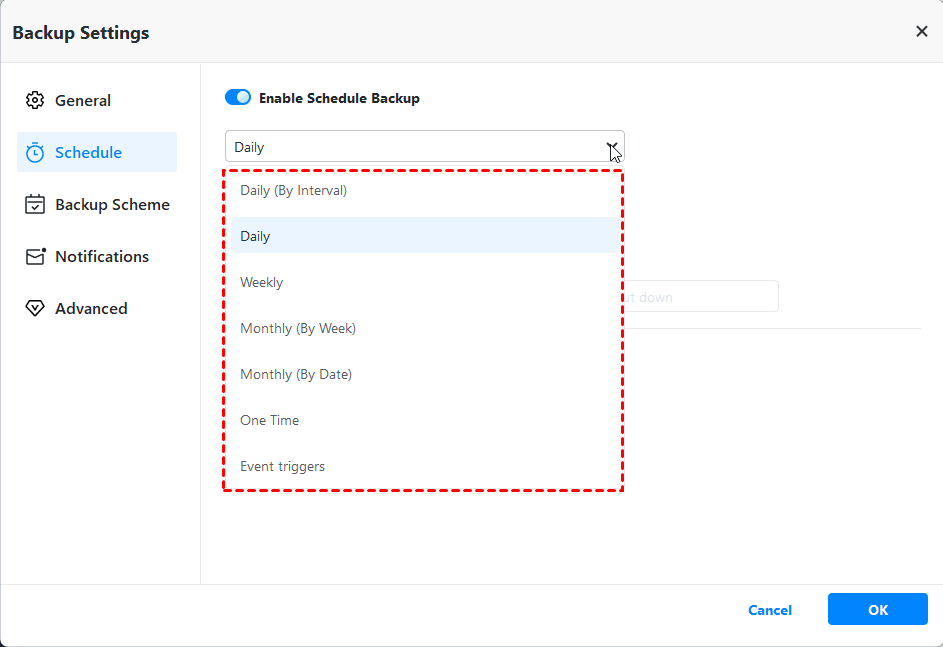
Step 4(Required). Click Schedule to open Schedule Settings, customize settings under the General or Advanced tab.
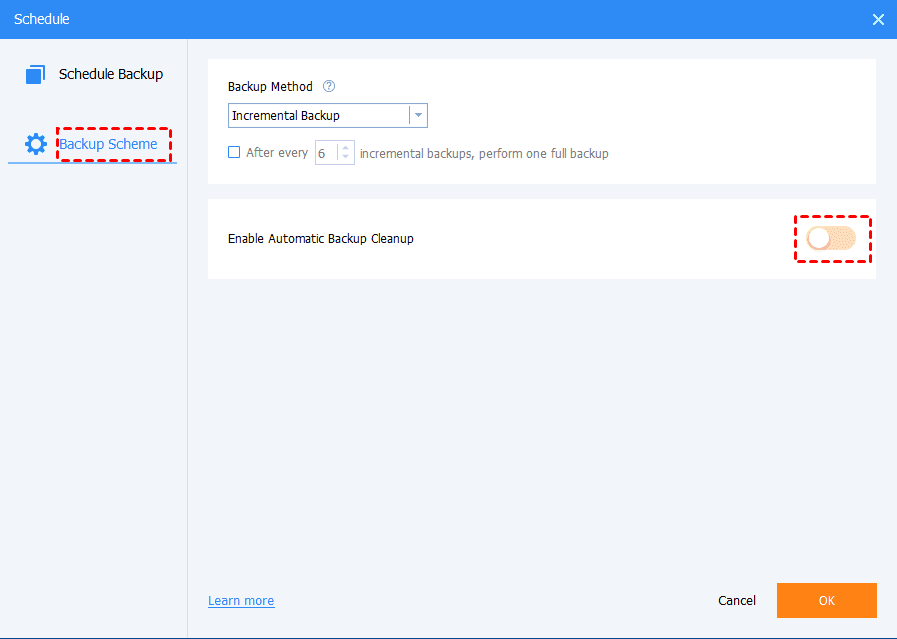
Step 5(Required). Click Scheme option, click the button at the right side of Enable Backup Scheme and select the Scheme you like from the drop-down menu. Then, click OK to exit this window.
Step 6. Confirm all the setting and click Start Backup. After that, your older backup will be deleted automatically when your file backups exceed the versions of backup image files.
Wrapping things up
To clear the older backup versions of File History and free up disk space, you should delete File History in Windows 10. Here are 4 ways for you, you can try them one by one.
Besides File History, you still can use a third-party backup disk space manager AOMEI Backkupper. It can help you backup files and delete old backups without effort. More so, it can help you backup system, disk, partition, restore files from backup, restore system, etc.
How to delete backup files from File History in Windows 10
Replies (30)
* Please try a lower page number.
* Please enter only numbers.
* Please try a lower page number.
* Please enter only numbers.
210 people found this reply helpful
Was this reply helpful?
Sorry this didn’t help.
Great! Thanks for your feedback.
How satisfied are you with this reply?
Thanks for your feedback, it helps us improve the site.
How satisfied are you with this reply?
Thanks for your feedback.
All Windows 10 backup files are stored in a folder called «FileHistory» on a drive that was selected during the backup setup.
1. Lower the backup file retention period to whatever it is set. The default is «Forever». You can also change this setting to «Until space is needed».
2. Turn off the Windows backup all together. Go to Setting > Update & Security > Backup
Turn off the backup.
Now go to the backup drive and delete the «FileHistory» folder.
If the folder is locked and cannot be deleted then turn the backup ON again and click on «more options».
Click on «Stop using drive»
Now try to delete the «FileHistory» folder again.
37 people found this reply helpful
Was this reply helpful?
Sorry this didn’t help.
Great! Thanks for your feedback.
How satisfied are you with this reply?
Thanks for your feedback, it helps us improve the site.
How satisfied are you with this reply?
Thanks for your feedback.
This might help, in addition:
How to Delete Older Versions of Files from File History Backup? » Winhelponline : http://www.winhelponline.com/blog/delete-older-versions-files-file-history/
File History classic UI has an option to purge older copies. Or use FhManageW command-line to clear them quickly.
14 people found this reply helpful
Was this reply helpful?
Sorry this didn’t help.
Great! Thanks for your feedback.
How satisfied are you with this reply?
Thanks for your feedback, it helps us improve the site.
How satisfied are you with this reply?
Thanks for your feedback.
The problem with trying to delete the File History folder is that it contains numerous system/hidden files. Using a Command Prompt (as File Manager would not allow removing these files), I had to go through and delete numerous system/hidden files. You might want to check the question I had posted in Ten Forums «How do I totally reset File History». If the above suggestion works, then that is the easy way of doing it. If not, you need to do a little work. I am still having an issue with trying to run a File History backup using the «Settings > Update & Security > Backup» method. If I do it through «Control Panel > File History», it works fine. I have received a suggestion here which I will give a try.
1 person found this reply helpful
Was this reply helpful?
Sorry this didn’t help.
Great! Thanks for your feedback.
How satisfied are you with this reply?
Thanks for your feedback, it helps us improve the site.
How satisfied are you with this reply?
Thanks for your feedback.
These are inappropriate answers.
In point 1., the question initially raised is how to «remove all backup files from file history and start afresh» (I stress «start afresh»), which is very different from the «reduce the file retention period» of the answer.
In point 2., the method proposed for the «complete removal» does not work, because it does not completely erase the File History configuration, which reemerges like Phoenix reborn when we attempt to get a brand new File History backup. I read somewhere that the above-mentioned configuration is saved in C:\Users\user x\AppData, but I have not been able to find it, let alone delete it.
4 people found this reply helpful
Was this reply helpful?
Sorry this didn’t help.
Great! Thanks for your feedback.
How satisfied are you with this reply?
Thanks for your feedback, it helps us improve the site.
How satisfied are you with this reply?
Thanks for your feedback.
The File History folder is supposed to contain only the user’s working files of the user’s folders , like Documents, Pictures, Music and Videos, which contain almost no system or read only files. Such unerasable system/hidden files abound in folders like «Programs», Programs(x86)», and «AppData», which are useless for the normal user and should not be backed up with File History.
The hint in the Ten Forums post quoted by you seems more to the point when it suggests deleting the File History configuration file stored in C:\Users\user x\AppData\. The problem is: I could not identify the configuration file in the multitude of subfolders and files of AppData.
Was this reply helpful?
Sorry this didn’t help.
Great! Thanks for your feedback.
How satisfied are you with this reply?
Thanks for your feedback, it helps us improve the site.
How satisfied are you with this reply?
Thanks for your feedback.
Copy the following path and paste it in the File Explorer address bar:
The following files would be present in that folder:
Catalog1.edb
Catalog1.jfm
Catalog2.edb
Catalog2.jfm
Config1.xml
Config2.xml
Clear them all, or just rename the «Configuration» folder.
Reconfigure File History.
2 people found this reply helpful
Was this reply helpful?
Sorry this didn’t help.
Great! Thanks for your feedback.
How satisfied are you with this reply?
Thanks for your feedback, it helps us improve the site.
How satisfied are you with this reply?
Thanks for your feedback.
Copy the following path and paste it in the File Explorer address bar:
The following files would be present in that folder:
Catalog1.edb
Catalog1.jfm
Catalog2.edb
Catalog2.jfm
Config1.xml
Config2.xml
Clear them all, or just rename the «Configuration» folder.
Reconfigure File History.
Copy the following path and paste it in the File Explorer address bar:
The following files would be present in that folder:
Catalog1.edb
Catalog1.jfm
Catalog2.edb
Catalog2.jfm
Config1.xml
Config2.xml
Clear them all, or just rename the «Configuration» folder.
Reconfigure File History.
Thank you very much for your helpful information. Placing your line in the address bar of File Explorer did not work, but based on your information I managed to easily find and rename the FileHistory\Configuration folder of my user/administrator area and rename it. Now I am going to test configuring from scratch the File History backups in Windows 10 settings. I have great hopes that now it will work.
There is a related and complementary detail on the efficient use of the Windows 10 File History process which is troubling me: how to have the Administrator’s File History backing up process cover the data folders of all the users of the PC, instead of the default configuration covering just the folders of the user/administrator plus the Public folders (e.g., include also the data folders of wife and children as independent users). I tried to do it by inserting C:\Users\ as the only location to cover, but the whole process got mixed up, with inappropriate ordering and with duplication of backed up folders. I already found that I should deactivate the File History process of the other users, and that might take care of the duplication problem. But the messed up ordering will probably persist. As this is a problem of interest for anyone running a family PC with different users, I am going to start an independent question about it. If you can contribute, please do it there.
By the way, I checked your blog. Thanks.
P.S. I just tested reconfigurating File History after deleting the Configuration folder, but some stupid Microsoft automatism spoiled the result: in Windows 10 Settings, I added one (the one and only) target external drive for the File History backup and, incoveniently enough, the backup process started imediately, even before I had time to stop it in order to go and exclude the folders I do not want backed up. I cancelled the process and introduced the folders to be excluded, but Win 10 had already created in the target drive two folders under FileHistory for the same PC (PC and PC(2)). I know by experience that the result is duplicated folders and messed up directories.
I am going to try other «tricks» to see if I can define the inclusion and exclusion lists before the saving process starts.


