- Как очистить историю на компьютере в Windows
- Как очистить историю браузера на компьютере
- Как почистить историю поиска Windows на компьютере
- История последних файлов в Проводнике
- Очистка данных в CCleaner
- Выводы статьи
- How to manually clear Windows Defender Protection History in Windows 10
- Delete Windows Defender Protection History
- 1] Using Set-MpPreference PowerShell cmdlet
- 2] Delete Windows Defender Service folder from the local drive
- 3] Using Event Viewer
- File History Folder Cleanup: How to Delete File History in Windows 10
- How Can I Delete File History Folder in Windows 10/8.1/8
- Fix 1. Delete Windows 10 File History Old Versions via Cleanup
- Fix 2. Manually Delete File History Folder in Windows 10
- Bonus Tip — Back Up Files with File History Alternative
- ConclusionВ
- File History Frequently Asked Questions
- Is it safe to delete the File History folder?
- Where will File History save files?
- How do I restore File History?
Как очистить историю на компьютере в Windows
При работе в операционной системе Windows, на компьютере сохраняется история действий пользователя в разных ситуациях. В этой информации сохранены различные аспекты деятельности, в том числе, затрагивающие приватность и конфиденциальность владельца ПК.
Принимая во внимание эти обстоятельства, мы разберем вопрос о том, как удалить историю на компьютере, работающего под управлением операционной системы Windows. Что делать, чтобы очистить ОС от ненужной информации.
Под историей пользователи подразумевают различные сохраненные данные: для одних — это история посещенных страниц в интернете, но это не все сведения о действиях пользователя. Нужно не забывать, что система ведет запись различных действий пользователя на компьютере.
На ПК сохраняется довольно много различных данных, например, история поиска на компьютере, информация о недавно открытых файлах, списки просмотренных сайтов в браузере и т. п. Эти сведения сохраняются в разных местах операционной системы Windows.
В некоторых случаях, хранение подобной информации на компьютере нежелательно, если пользователю необходимо оградить от посторонних данные приватного характера или скрыть конфиденциальную информацию.
История действий пользователя на компьютере находится в следующих местах:
- История в браузере — история посещенных веб-страниц, история поисковой системы, логины, пароли, автозаполнения форм и т. д.
- История поиска Windows.
- Информация о дате изменения файлов.
- Данные по дате запуска программ.
- Регистрация событий в Журналах Windows о действиях, ошибках, предупреждениях.
- Привязка задачи к событию в Планировщике заданий.
Принимая во внимание вышеизложенную информацию, у пользователей возникают вопросы о том, как очистить историю на компьютере.
Как очистить историю браузера на компьютере
Большую часть пользователей заботят сохраненные сведения об активности в интернете. Эти данные могут получить посторонние, если у них имеется доступ к устройству. Поэтому актуален вопрос о том, как очистить историю просмотров веб-страниц на компьютере.
В конкретном браузере, в зависимости от интерфейса программы, потребуется выполнить определенные действия, чтобы очистить приложение от требуемых сведений.
В общем случае, доступ к истории браузера появится, если в открытом окне обозревателя интернета нажать одновременно на клавиши «Ctrl» + «Shift» + «Del». В открывшемся окне удалите ненужную информацию.
О том, какие конкретные действия нужно совершить в самых популярных браузерах, прочитайте в подробной статье на моем сайте.
Еще один момент, который интересует пользователей: как удалить историю запросов на компьютере. Для поиска нужной информации в интернете, браузер взаимодействует с поисковой системой. Решить эту задачу можно в настройках поисковой системы Яндекс или из аккаунта Google.
Как почистить историю поиска Windows на компьютере
В операционную систему Windows встроена поисковая служба — Windows Search, с помощью которой можно найти файлы, программы, запустить системные средства или приложения. В поиске Windows сохраняются запросы пользователя, потому что это ускоряет и упрощает доступ к необходимым данным.
Выполните следующие действия:
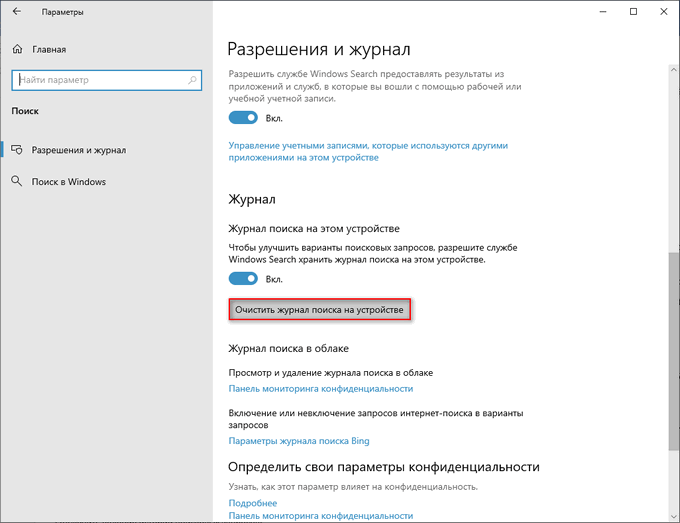
- Нажмите на клавиши «Win» + «I».
- В окне приложения «Параметры» откройте «Поиск».
- Во вкладке «Разрешения и журнал», в разделе «Журнал» нажмите на кнопку «Очистить журнал поиска на устройстве».
В этом разделе имеются дополнительные настройки. Измените их, если в этом есть необходимость.
Вы можете выбрать следующие параметры конфиденциальности, касающиеся поиска:
- Запретить службе Windows Search предоставлять информацию из приложений и служб.
- Отключить «Журнал поиска» на этом устройстве.
- Удалить данные из «Журнала поиска в облаке» (понадобится войти в учетную запись Майкрософт).
- Отключить из интернет-поиска Bing варианты запросов.
Продвинутые пользователи могут воспользоваться другим способом для отключения ведения истории поисковых запросов. Для этого потребуется выполнение команды в командной строке:
История последних файлов в Проводнике
В системном файловом менеджере — Проводнике Windows сохраняется информация об использованных папках и файлах. В ряде случаев, пользователю лучше скрыть подобные сведения.
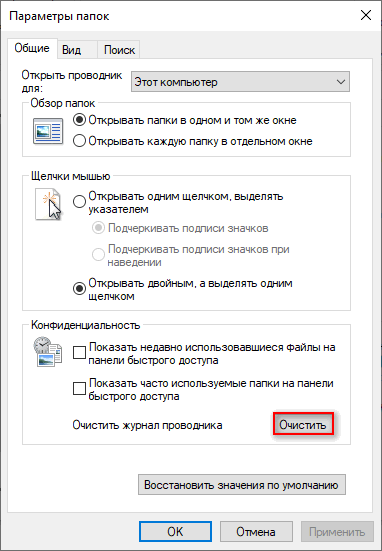
- Откройте Проводник Windows.
- Войдите во вкладку «Вид».
- На панели инструментов нажмите на кнопку «Параметры».
- Из окна «Параметры папок» перейдите во вкладку «Общие».
- В разделе «Конфиденциальность», в опции «Очистить журнал проводника» нажмите на кнопку «Очистить».
Если нужно, выполните дополнительные настройки, влияющие на конфиденциальность:
- В параметре «Конфиденциальность» снимите флажки с пунктов:
- Показать недавно использовавшиеся файлы на панели быстрого доступа.
- Показать часто используемые папки на панели быстрого доступа.
- В опции «Открыть проводник для:» выберите «Этот компьютер».
- Нажмите на кнопку «ОК».
Благодаря этим настройкам, при запуске Проводника будут скрыты часто используемые папки и недавние файлы.
Чтобы отключить сохранение истории списка последних файлов, последовательно выполните две команды из командной строки:
Отключение истории приложений выполняется из консоли при помощи команды:
Очистка данных в CCleaner
Пользователь имеет возможности удалить ненужные данные из операционной системы Windows и установленных приложений с помощью специализированных программ-оптимизаторов для очистки компьютера.
В этой статье мы рассмотрим бесплатную программу CCleaner — наиболее популярный у пользователей инструмент без сложных настроек. Безусловно, есть более продвинутые программы, которыми вы можете воспользоваться для более тщательного удаления следов своей деятельности из истории.
Вам нужно будет сделать следующее:
- Запустите CCleaner на компьютере.
- В главном окне программы откройте раздел «Стандартная очистка».
- Во вкладках «Windows» и «Приложения» по умолчанию уже отмечены многие пункты, касающиеся хранения истории в установленных браузерах, операционной системе и программах.
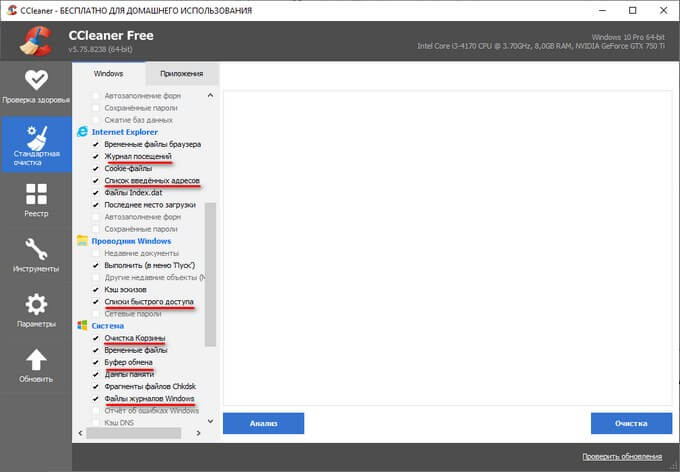
- Нажмите на кнопку «Анализ».
- После завершения сканирования ПК, нажмите на кнопку «Очистка», чтобы удалить ненужные данные.
Выводы статьи
В операционной системе Windows, в интернет-обозревателях, в журналах сохраняются сведения об истории действий пользователя на компьютере. Например, история посещенных сайтов, отображение в Проводнике недавно используемых файлов, сохраненные поисковые запросы.
Из-за соображений конфиденциальности, некоторым пользователям может понадобиться удалить журналы, касающиеся поиска. Сделать это можно из настроек системы, из браузеров или с помощью сторонних программ-чистильщиков.
How to manually clear Windows Defender Protection History in Windows 10
The Protection History page shows detections by Windows Defender and provides detailed and easier to understand information about threats and available actions. Starting with Build 18305, it includes Controlled Folder Access blocks, along with any blocks which were made through the organizational configuration of Attack Surface Reduction Rules. In this post, we will show you how to manually clear protection history in Windows Defender on Windows 10.
If you use the Windows Defender Offline scanning tool, any detections it makes will now also show in this history. Additionally, you will see any pending recommendations (red or yellow states from throughout the app) in the history list.
![]()
Delete Windows Defender Protection History
This specifies the number of days for which items are stored in the scan log folder. After this time, Windows Defender deletes the items. If you specify a null value, Windows Defender will not remove items. If you do not specify a value, Windows Defender will remove items from the default scan log folder, that is, 30 days.
However, if you want to clear the protection history manually, you can do so in any of the three following ways;
- Using Set-MpPreference PowerShell cmdlet
- Delete Windows Defender Service folder from the local drive
- Using Event Viewer
Let’s take a look at the steps involved in relation to each of the listed methods.
1] Using Set-MpPreference PowerShell cmdlet
The Set-MpPreference cmdlet configures preferences for Windows Defender scans and updates. You can modify exclusion file name extensions, paths, or processes, and specify the default action for high, moderate, and low threat levels.
You can specify a different delay period (in days) by running the cmdlet below in PowerShell admin mode (press Win+X and then tap A on the keyboard):
The specified number 1 is the number of days after which the protection history log and items in the log folder will be cleared.
2] Delete Windows Defender Service folder from the local drive
To manually clear the protection history, this method requires you to delete the Service folder under the Windows Defender folder on the local drive.
Here’s how:
- Press Windows key + R to invoke the Run dialog.
- In the Run dialog, copy and paste the path below and hit Enter (if prompted, click Continue).
- Now, right-click the Service folder in that location and select Delete.
You can exit File Explorer.
- Next, open Windows Security >Virus & threat protection >Manage settings.
- Toggle the button to Off then to On again for Real-Time protection and Cloud-delivered protection.
3] Using Event Viewer
To manually clear the Windows Defender protection history using the Event Viewer (eventvwr), do the following:
- Press Windows key + R to invoke the Run dialog.
- In the Run dialog, type eventvwr and hit Enter to open Event Viewer.
- Under the Event Viewer (Local) section on the left-hand side of the pane, expand the Applications and Services logs option.
- Under this, expand the Microsoft option.
- Click on Windows to open the list of all its files on the middle pane.
- On the middle pane, scroll down to find Windows Defender from the list of files.
- Right-click Windows Defender, and click on Open.
- From the two options in the middle pane, right-click on Operational, and click Open to view all the past logs.
- Now, under Windows Defender folder on the left pane, right-click on Operational.
- Click on Clear Log… on the menu.
- Select Clear or Save and Clear based on your requirement to clear the protection history.
And the above listed are the 3 known ways to manually clear Windows Defender protection history in Windows 10.
File History Folder Cleanup: How to Delete File History in Windows 10
File History feature replaces Backup and Restore in previous versions of Windows and currently exists in Windows 8, 8.1, and 10. It is an application that continuously backs up data in your Libraries, on your desktop, in your Favorites folders, and in your Contacts folders. It periodically scans the file system for changes and copies changed files to another location. Every time any of your personal files has changed, its copy will be stored on a dedicated, external storage device selected by you. Over time, File History builds a complete history of changes made to any personal file.
How Can I Delete File History Folder in Windows 10/8.1/8
However, it is a personal choice to delete it. Over time, more and more File History backups are saved, and you find that you are running out of space. In this case, you can use File History Cleanup in Windows 10/8.1/8 at any time to delete File History versions of files and folders older than a selected age, except the most recent version of a file or folder.
| Workable Solutions | Step-by-step Troubleshooting |
|---|---|
| Fix 1. Delete Windows 10 File History Old Versions via Cleanup |
|
| Fix 2. Manually Delete File History Folder in Windows 10 |
|
Fix 1. Delete Windows 10 File History Old Versions via Cleanup
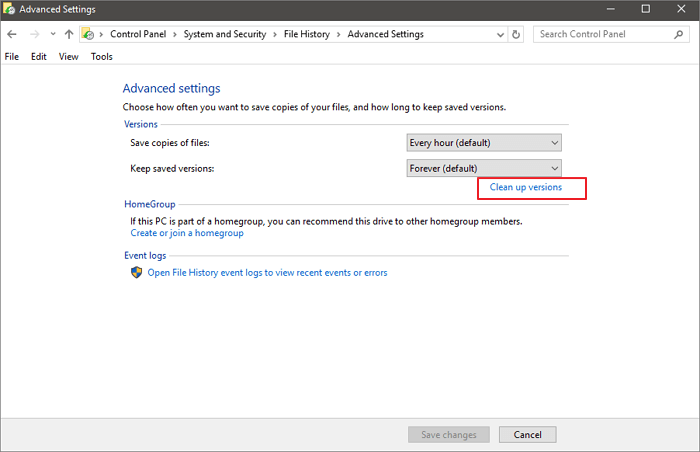
File History itself has the «Clean up versions» option. You can delete old versions of File History backup with this option. Follow these steps below to delete Windows 10 File History’s old version.
Step 1. Hit the Windows key and type: control panel and hit «Enter» or select the result at the top to open «Control Panel». Scroll down and click «File History».

Step 2. Click the «Advanced Settings» link from the list on the left.

Step 3. Under the «Versions» section in Advanced Settings, click the «Clean up versions» option. You can manage how often copies of files are created and the length of time versions are saved.
Step 4. choose how far back you want to delete the versions of saved files. You can select from «older than 2 years» to «older than just 1 month». There is also the option to delete all versions except for the most recent one.
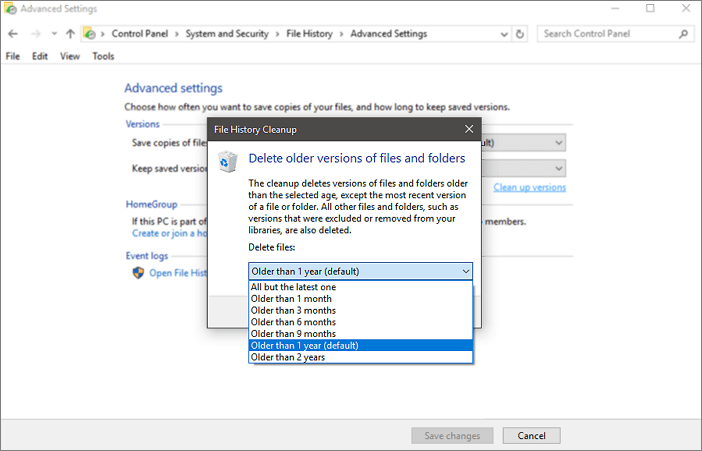
You will get a progress message while the older versions are being deleted. The process is generally quick. But it will vary depending on the amount of data you’re clearing and the speed of the PC.
Fix 2. Manually Delete File History Folder in Windows 10
If you don’t want to back up files in File History, you can stop the File History backup service and delete the folder manually.
Step 1. Go to Setting > Update & Security > Backup and click the button under Automatically back up my files.
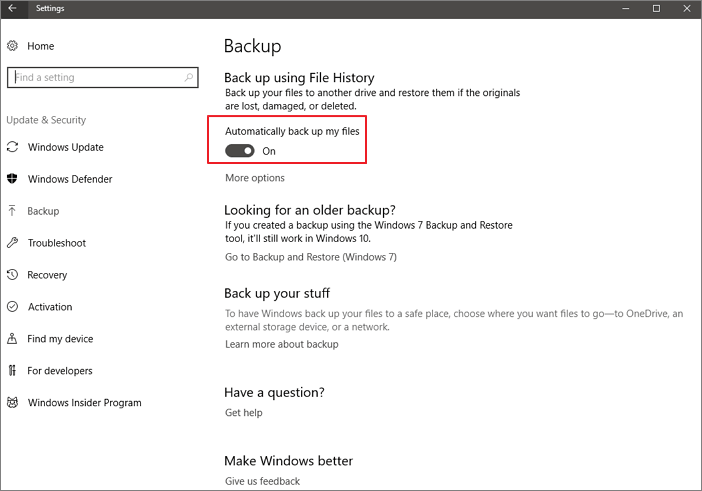
Step 2. Go to the backup drive and delete the folder named FileHistory. All File History backup files are stored in a folder called «FileHistory» on the backup drive you set up. Just delete it.
Bonus Tip — Back Up Files with File History Alternative
File History selects a partition and then performs file history protection. If the function is enabled, the files operated on this partition will be recorded.
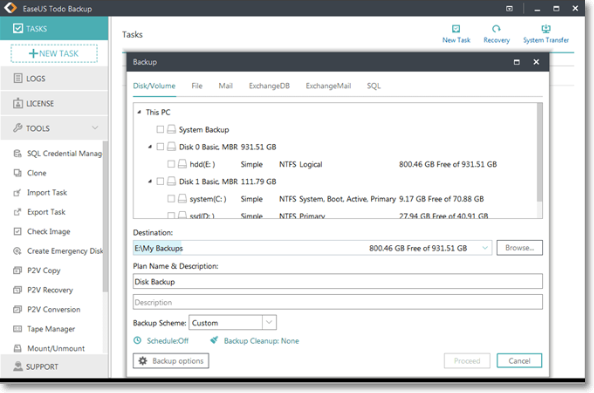
Compared with File History, EaseUS backup and recovery software can choose the desired folder, system or partition, etc. It is more flexible, and the delete strategy is more convenient. You can easily select the backup and click «Deleted». Besides, you are suggested to use EaseUS Todo Backup, which is designed for professional backup and restore. It can automatically delete old backups to free up disk space for new backups.В
- Back up and restore files for personal use.
- Protect your data in simple clicks, restore everything instantly.
- Clone, upgrade or migrate Windows 10 easily.
Support Windows 10/8.1/8/7/Vista/XP
Step 1: Launch EaseUS Todo Backup software and then choose «File Backup», «Disk/partition Backup» or «System Backup» for different backup purpose.
Step 2: Choose the system, disk partition, files or apps that you want to back up. Then select a destination where you want to store the backup file.
Step 3: Click «Proceed» to start the data backup process.
ConclusionВ
You can delete File History if you have tried these steps above. Besides File History, you can use a third-party backup and recovery software — EaseUS Todo Backup. It can help you back up files and delete old backups with ease.В
Support Windows 10/8.1/8/7/Vista/XP
File History Frequently Asked Questions
If you have File History related questions, you can read these questions and answers below to get more information.
Is it safe to delete the File History folder?
Over time, File History builds a complete history of changes made to any personal file. However, it is a personal choice to delete it. Note: It is recommended to take a backup of all the activities since everything will be deleted from the History.
Where will File History save files?
By default, File History will be set to back up important folders to your user account’s home folder. This includes the Desktop, Documents, Downloads, Music, Pictures, Videos folders. It also includes the Roaming folder, where many programs store application data, your OneDrive folder, and other folders.
How do I restore File History?
- Tap or click the Start button.
- Tap or click the Settings button.
- Tap or click the Update & security button.
- Tap or Click Backup, then select Back up using File History.
- Tap or click the More options icon.
- Pull down the page and click Restore files from a current backup.
- Enter the name of the file you’re looking for in the search box, or use the left and right arrows to browse through different versions of your folders and files.
- Select what you want to restore to its original location, and then tap or click the Restore button.


