- Как эффективно удалить MySQL на Mac
- Самый быстрый и простой способ удаления MySQL
- Удаление MySQL вручную
- Окончательный вывод
- How to uninstall MySQL on macOS
- What is MySQL, and why remove it?
- How to uninstall MySQL from Mac manually
- Uninstallation steps for MySQL:
- How to delete MySQL with App Cleaner & Uninstaller
- Here is how to uninstall MySQL with App Cleaner & uninstaller:
- How to completely delete MySQL from Mac
- Before we start
- What is MySQL?
- How to remove MySQL from your Mac manually
- How to completely uninstall MySQL on Mac with a third-party uninstaller
Как эффективно удалить MySQL на Mac

Написано Хлоя Тернер Последнее обновление: July 14, 2021
Специалист по написанию технических текстов, который создает различные типы статей, от обзоров до практических статей для Mac.
Возможно, вы захотите переустановить MySQL на свой Mac или даже получить другую версию, какой бы ни была причина, вам необходимо удалить MySQL. Есть несколько шагов, которые вам нужно предпринять, чтобы удалить MySQL на Mac, и они могут показаться немного пугающими для людей, которые не слишком разбираются в технологиях или имеют большой опыт работы с Mac. Однако, если вы будете следовать этой статье с инструкциями по удалению MySQL на Mac, у вас не должно возникнуть особых проблем при удалении MySQL с вашего Mac.
СОВЕТЫ:
Самый быстрый и простой способ удаления MySQL
Чтобы начать с вашими опциями, лучше всего использовать PowerMyMac чтобы удалить MySQL. Это сделает процесс очень простым с помощью всего лишь нескольких щелчков мыши тут и там. Также приятно отметить, что PowerMyMac — отличный инструмент, который поможет вам поддерживать ваш Mac. PowerMyMac был специально разработан, чтобы ваш Mac работал правильно и безупречно. Теперь к правильно удалить приложения(в данном случае MySQL), выполните следующие действия, чтобы сделать это легко и безболезненно:
Шаг 1: Установка PowerMyMac. Первый и самый важный шаг — это фактическая загрузка и установка PowerMyMac. Просто зайдите на сайт, найдите вариант загрузки и нажмите на него. Загрузка не должна занимать слишком много времени, все зависит от скорости вашего интернета, но когда она будет завершена, щелкните файл PKG и начните процесс установки.
Шаг 2: Открытие PowerMyMac — как только процесс установки будет завершен, вы можете открыть программу, и вы сразу увидите текущее состояние вашего Mac. Хотя вам может и не понадобиться эта информация сейчас, если вы планируете поддерживать и максимально продлевать срок службы вашего Mac, было бы хорошо принять к сведению эти детали.
Шаг 3: Выберите деинсталлятор — на главной странице вы увидите несколько вариантов, которые определенно могут помочь вам поддерживать работоспособность вашего Mac. На данный момент, однако, идеально, если вы сосредоточитесь на Деинсталляторе, поскольку это ваша основная цель.
Шаг 4: Сканирование вашего Mac — PowerMyMac продолжит спрашивать вас, может ли он сканировать ваш Mac, пожалуйста, дайте ему разрешение. Это позволит программе проверять все остальные программы и приложения на вашем Mac. Время сканирования может быть разным, но оно зависит от количества программ, установленных на вашем Mac: чем больше программ, тем больше времени потребуется PowerMyMac для сканирования всех них.
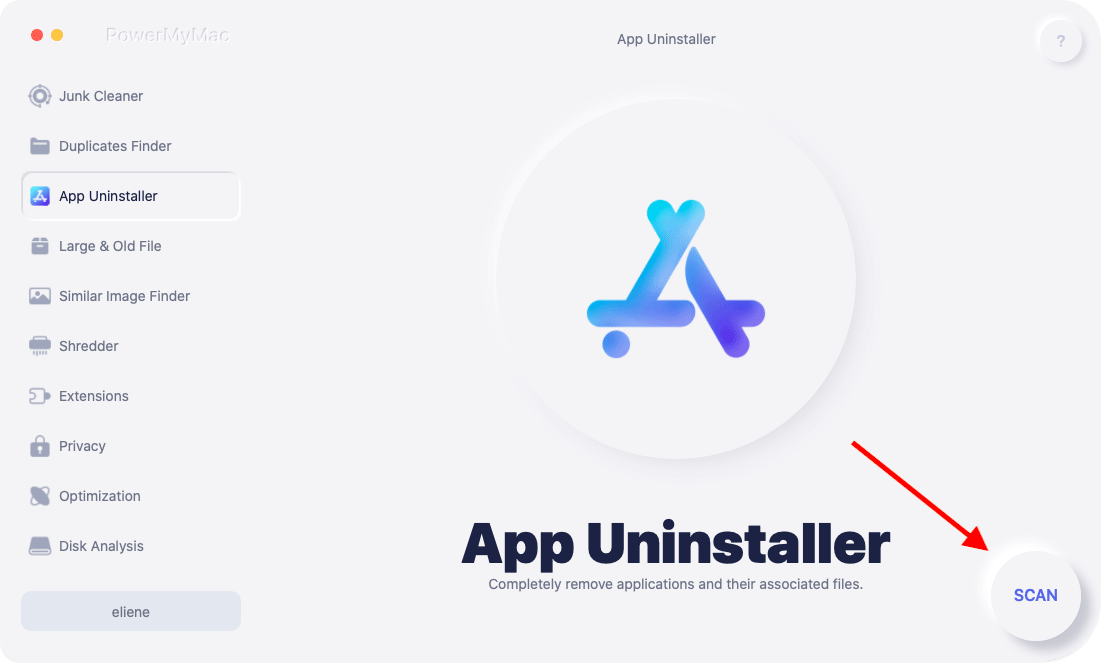
Шаг 5: Найти MySQL — после того, как список будет отображен, выполните поиск MySQL среди результатов.
Шаг 6: Отметьте все элементы — при выборе MySQL вы заметите, что рядом с именем стоит знак плюса, который указывает на то, что с ним связано несколько файлов. Чтобы действительно правильно удалить MySQL, вам нужно убедиться, что все поля отмечены правильно и должны быть выбраны, это будет указывать на то, что вы хотите удалить все, включая эти другие файлы, связанные с MySQL. Вы можете просмотреть каждый из них, но, возможно, лучше всего просто выбрать все и нажать кнопку «Очистить», чтобы начать удаление MySQL. Когда все закончится, MySQL больше не будет на вашем Mac.

PowerMyMac сделал довольно сложный процесс очень простым и эффективным, его могут использовать ветераны и люди, которые не слишком разбираются в использовании Mac.
Удаление MySQL вручную
MySQL немного уникален, чтобы успешно удалить программу, вам нужно будет открыть терминал, чтобы завершить процесс. В отличие от других программ, в которых вы можете просто перетащить программу в корзину и удалить ее, MySQL не работает таким образом. Напомним, что удаление других программ с помощью метода перетаскивания также оставляет на Mac все еще много файлов, которые занимают место, и вы определенно не захотите этого в долгосрочной перспективе.
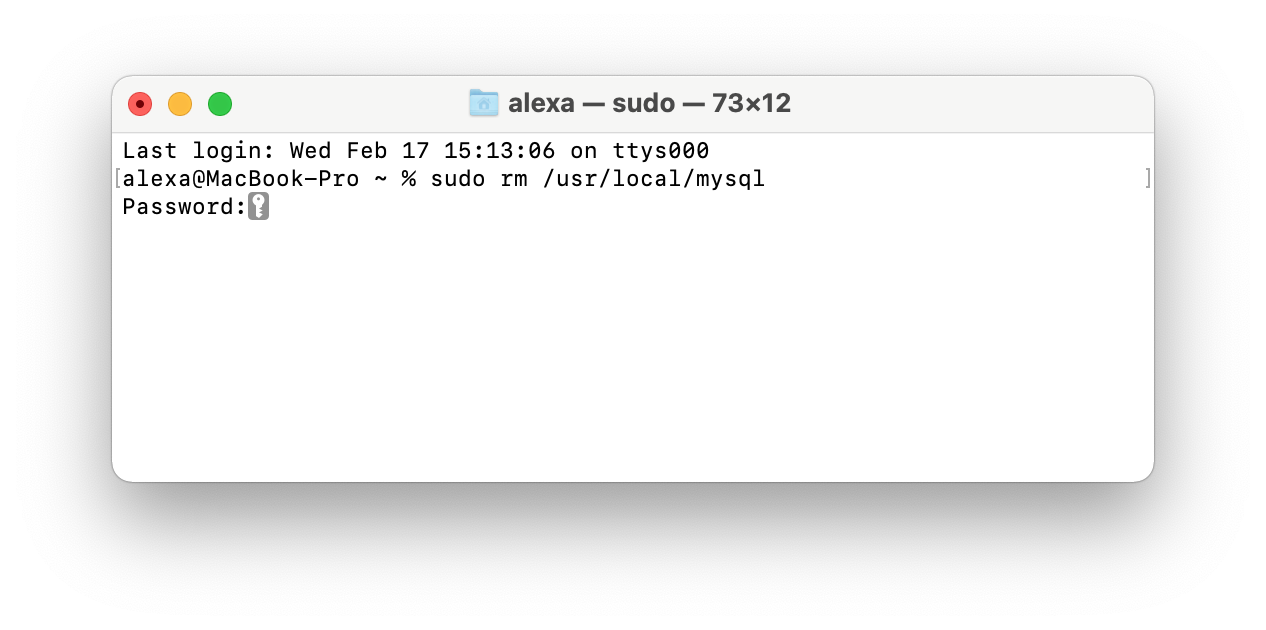
Чтобы удалить MySQL, вам нужно будет открыть терминал, чтобы полностью удалить его с вашего Mac. Выполните следующие шаги, чтобы удалить MySQL вручную:
Шаг 1: открыть терминал
Step 2: Type in the command sudo rm /usr/local/mysql , this may ask for your administrator password
Шаг 3: введите эти команды после предыдущей:
- sudo rm -rf /usr/local/var/mysql
- sudo rm -rf /usr/local/mysql*
- sudo rm -rf /Library/StartupItems/MySQLCOM
- sudo rm -rf /Library/PreferencePanes/My*
Шаг 4: введите последние несколько команд:
- sudo rm -rf /Library/Receipts/mysql*
- sudo rm -rf /Library/Receipts/MySQL*
- sudo rm -rf /private/var/db/receipts/*mysql*
Это должно почти завершить все, что вам нужно сделать в терминале, чтобы удалить MySQL. Для тех, кому неудобно пользоваться терминалом, а это довольно много людей, это может показаться слишком большим и слишком сложным препятствием, но, к сожалению, это один из немногих способов ручного удаления MySQL без использования Деинсталлятор, такой как PowerMyMac.

Окончательный вывод
Теперь, когда у вас есть два метода удаления MySQL, вы можете принять взвешенное решение о том, как вы хотите удалить MySQL на Mac. Ручной метод предлагается тем, кто знаком с терминалом и привык к вводу команд. С помощью PowerMyMacТем не менее, предлагается для всех, поскольку это довольно простой метод в целом. Каким бы ни был ваш выбор, лучше всего взвесить ваши варианты и выяснить, какой из двух лучших говорит с вами как с пользователем Mac. Вы должны чувствовать себя максимально комфортно с решением, которое вы принимаете, в конце концов, это ваш Mac в конце дня.
Прекрасно Спасибо за ваш рейтинг.
Источник
How to uninstall MySQL on macOS
A simple removal of MySQL on Mac from the System Preferences window is not enough for its complete uninstallation. It is crucial to remove MySQL with all of its service files. This article will provide a guide on how to remove MySQL from Mac correctly and entirely.
Important notes and the methodology used in this article
- If you want to uninstall applications from Mac completely, you need to find and remove all of their support files.
- By default, applications store their service file in the Library folder. However, some applications might spread their service files all over your disk.
- We will explain how to find applications’ service files from Mac manually and automatically.
- You should be careful when manually removing applications’ support files from Library. Deleting important macOS service files may damage your system.
- No matter which way you use to uninstall applications from your Mac, you can check your disk for their remaining files with App Cleaner & Uninstaller from Nektony.
What is MySQL, and why remove it?
MySQL for Mac is a software tool used for most popular programming languages, like PHP, Java, Perl, C, C ++, and others. In short, it is a database management system (DBMS), which allows you to connect to the database, run SQL queries and receive a response.
You may face some issues with MySQL. In this case, try to reinstall MySQL. The problem should be solved.
If you don’t use MySQL, then you should better uninstall it from your Mac and don’t allow useless files to take up valuable space on your disk. From this article, you will learn two ways on how to uninstall MySQL from Mac.
How to uninstall MySQL from Mac manually
MySQL is a preference pane that can be found in the System Preferences window. Please, carefully follow each step from the guide below to get rid of all of the support files of MySQL.
Uninstallation steps for MySQL:
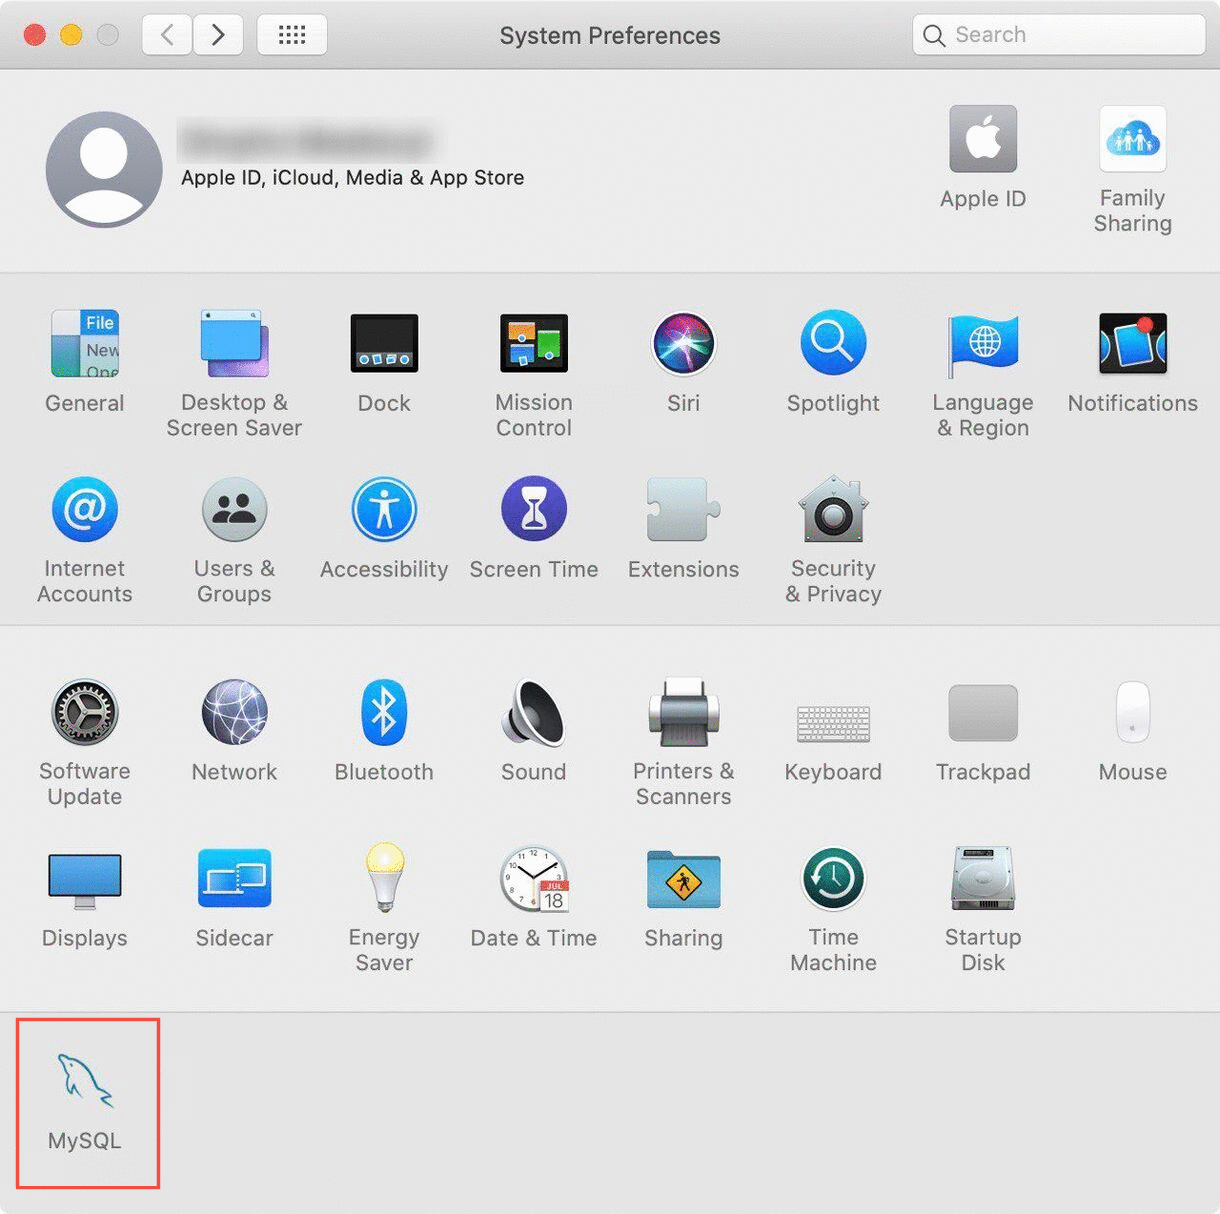
- Open System Preferences. For this, go to the Apple menu and select System Preferences. You can also run it from the Launchpad.
- Find the MySQL icon and click on it.
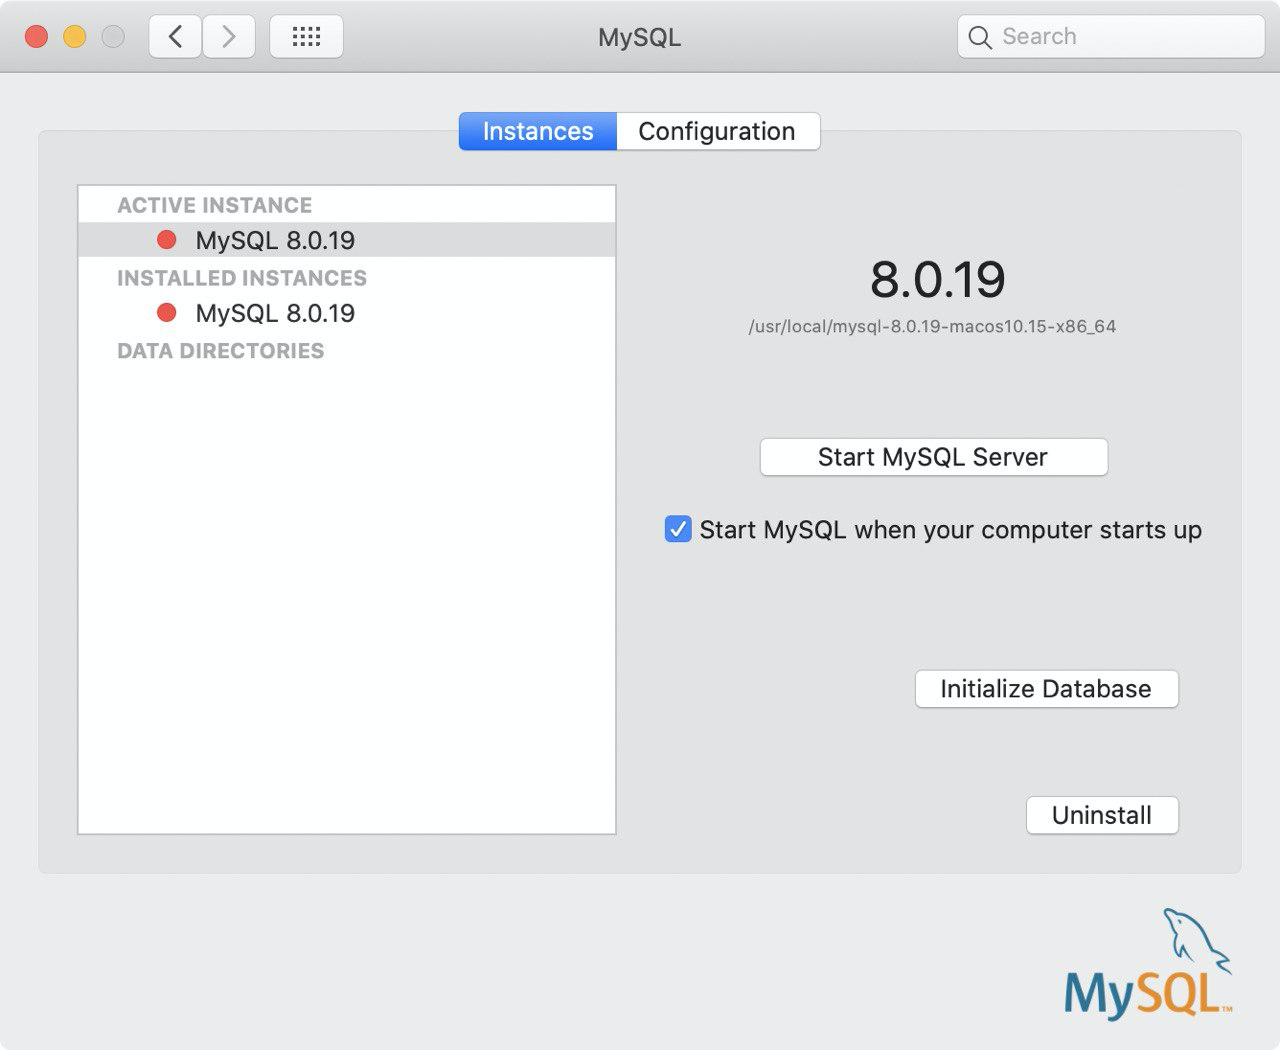
- In the MySQL Instances tab, click the Uninstall button.

Now you need to remove the MySQL database. We will show how to do this using the Terminal command line. - Open the Terminal from the Launchpad.

Back up your data to text files with the following command:
mysqldump
*After each command, you have to press Enter.
ps -ax | grep mysql
Close all the running processes.
sudo rm /usr/local/mysql
If required, enter your user password.
Remove MySQL files. Enter the commands below consistently. After each command you need to press Enter.
- sudo rm -rf /usr/local/var/mysql
- sudo rm -rf /usr/local/mysql*
- sudo rm
/Library/LaunchAgents/homebrew.mxcl.mysql.plist
- rm -rf
/Library/PreferencePanes/My*
- sudo rm -rf /Library/Receipts/mysql*
- sudo rm -rf /Library/Receipts/MySQL*
- sudo rm -rf /private/var/db/receipts/*mysql*
Using the Terminal commands is more for computer geeks, and some users prefer to avoid using it. Luckily, there is another way to uninstall the Mac MySQL server. We will show up how to do this with a few clicks with App Cleaner & Uninstaller’s help.
How to delete MySQL with App Cleaner & Uninstaller
App Cleaner & Uninstaller automatically detects all of the support files that each application creates and stores on Mac. It allows you to remove applications entirely, and you don’t have to search for their support files anymore.
Here is how to uninstall MySQL with App Cleaner & uninstaller:
- Open App Cleaner & uninstaller. It will scan all the apps you have in the Applications folder.
- Find the MySQL in the left section and select it.
- Click the Remove button.
- Confirm the deletion with the appropriate button.
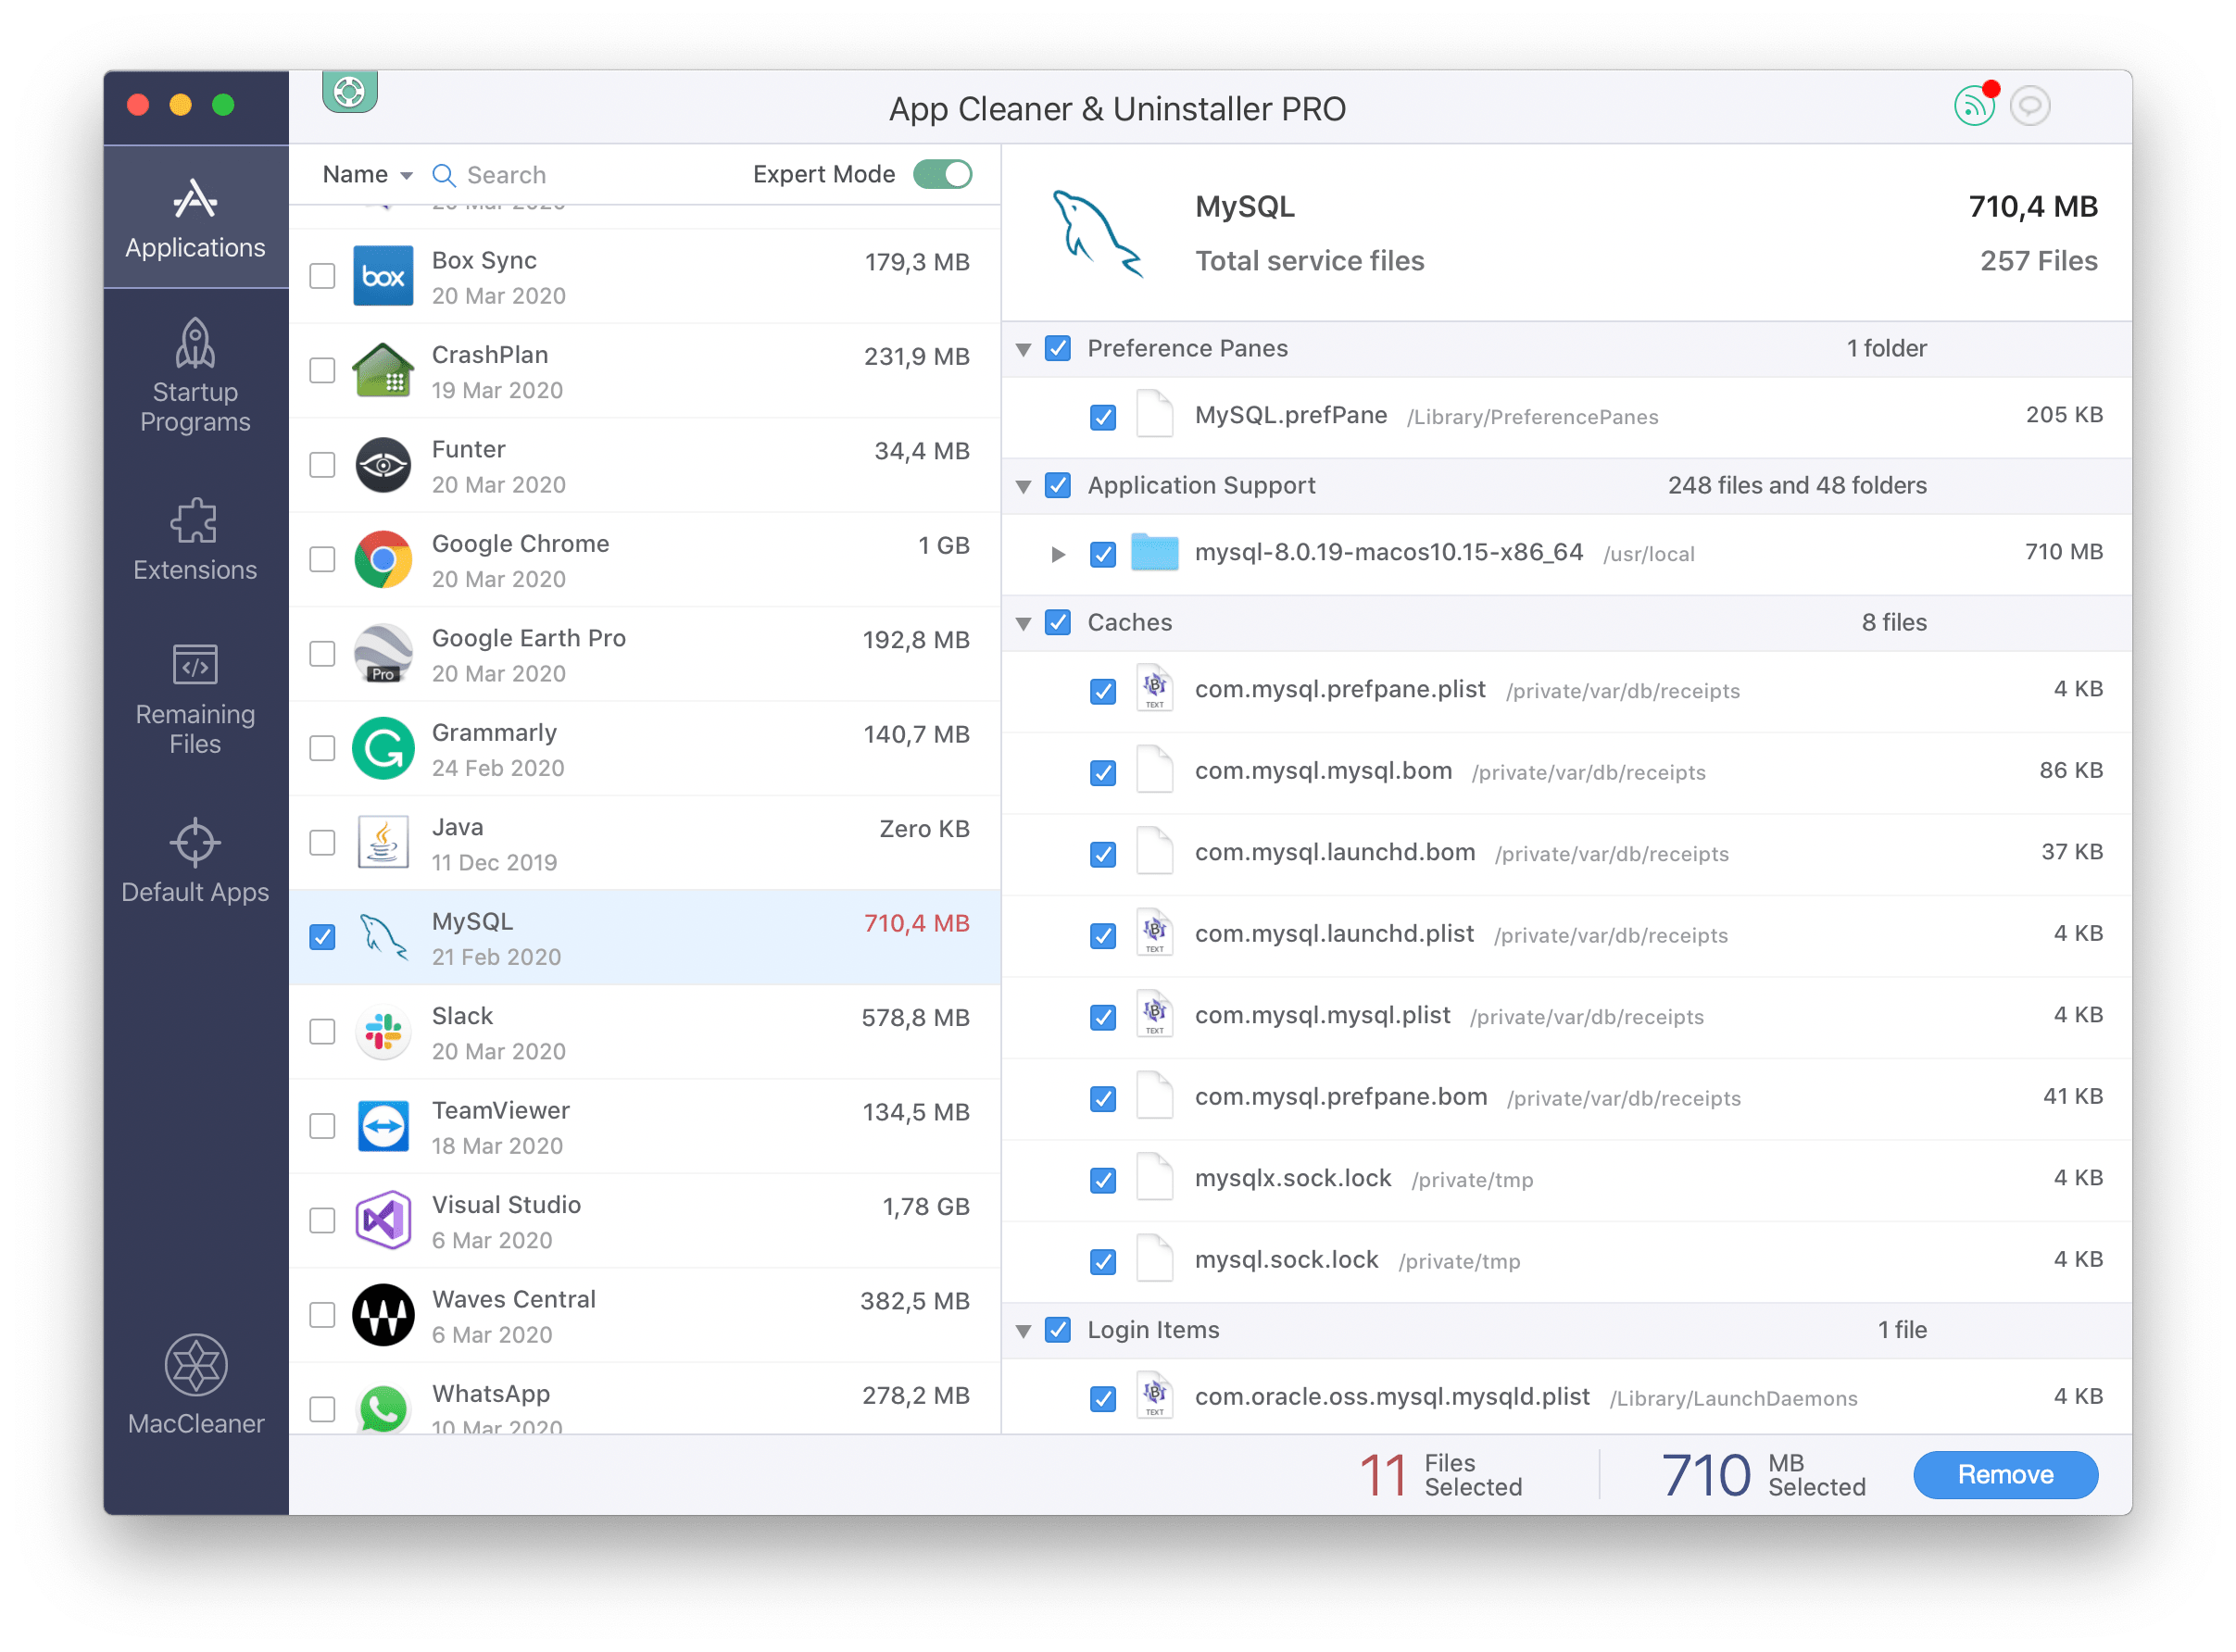
MySQL will be uninstalled from your Mac. By default, all files are removed into the Trash. So don’t forget to empty your bin to get rid of the application completely.
If you have already removed MySQL from the System Preferences window, check your Mac for its remaining files. For this, in App Cleaner & Uninstaller, switch to the Remaining Files section. Here you can select and remove unneeded MySQL’s leftovers. 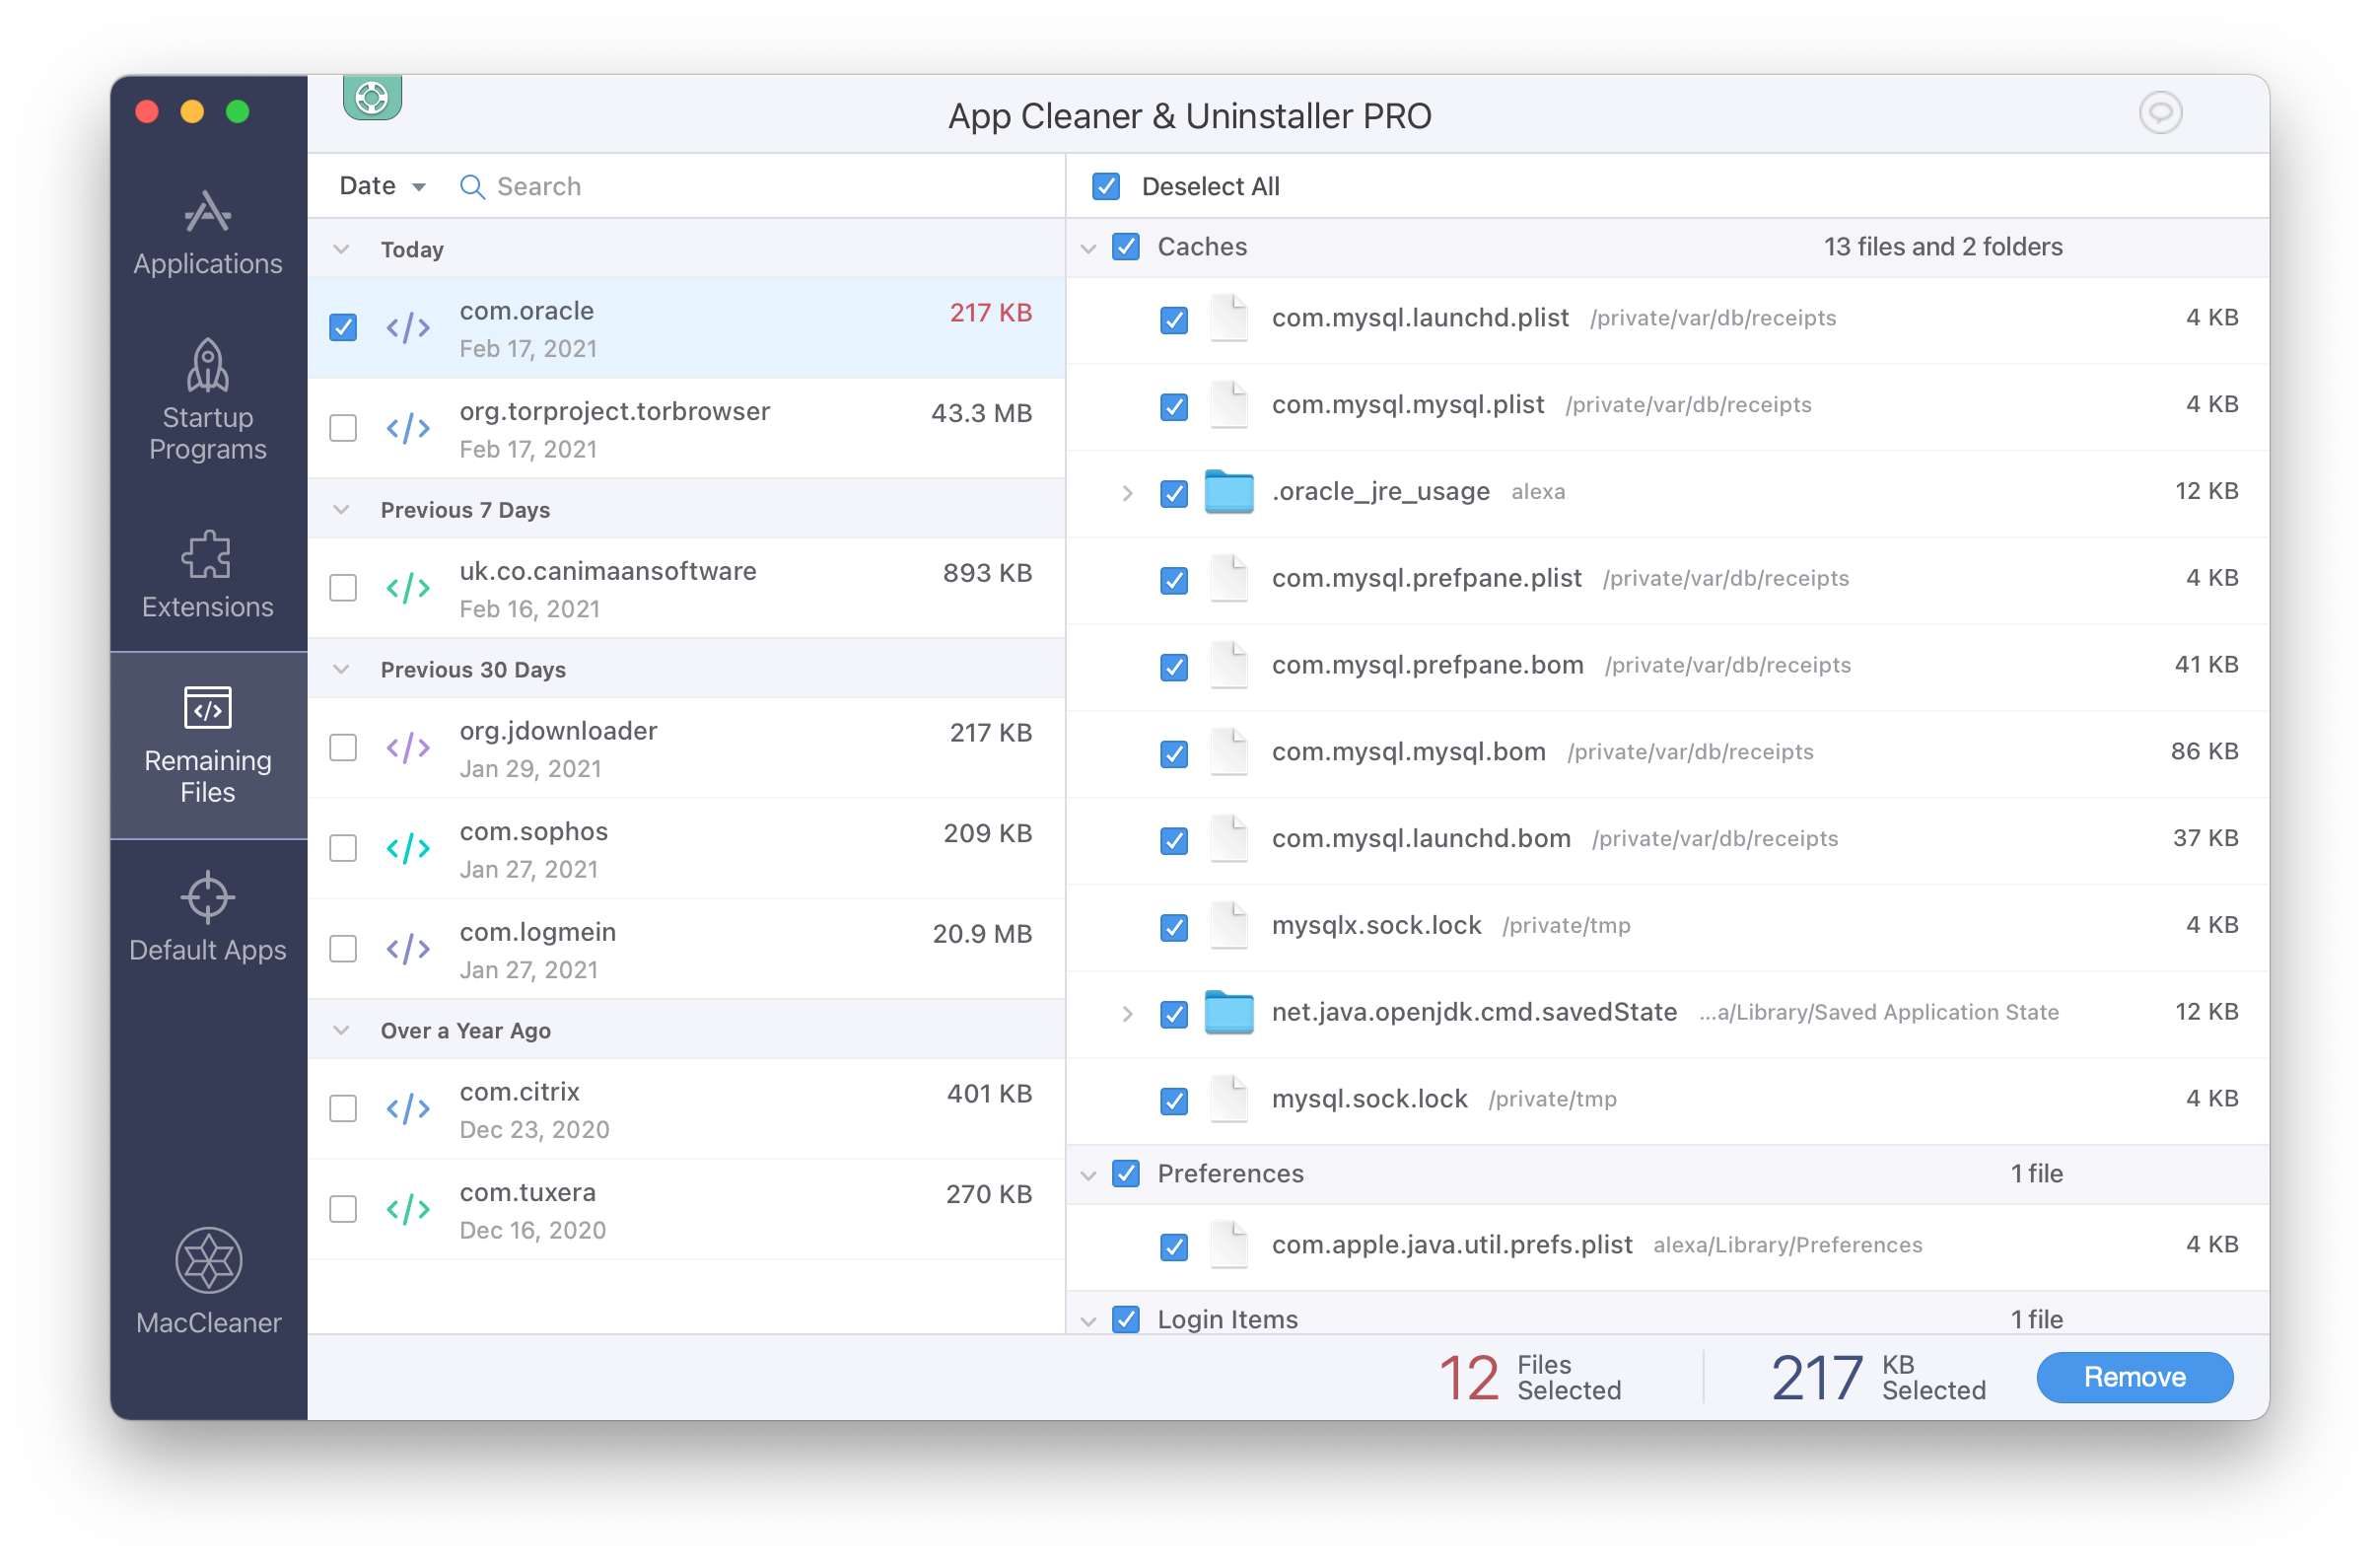
Note, if you want to uninstall any Preference Pane but don’t see this program in the Applications section, switch to the Extensions tab → Preferences Panes. Here you can remove the System Panes of MySQL. 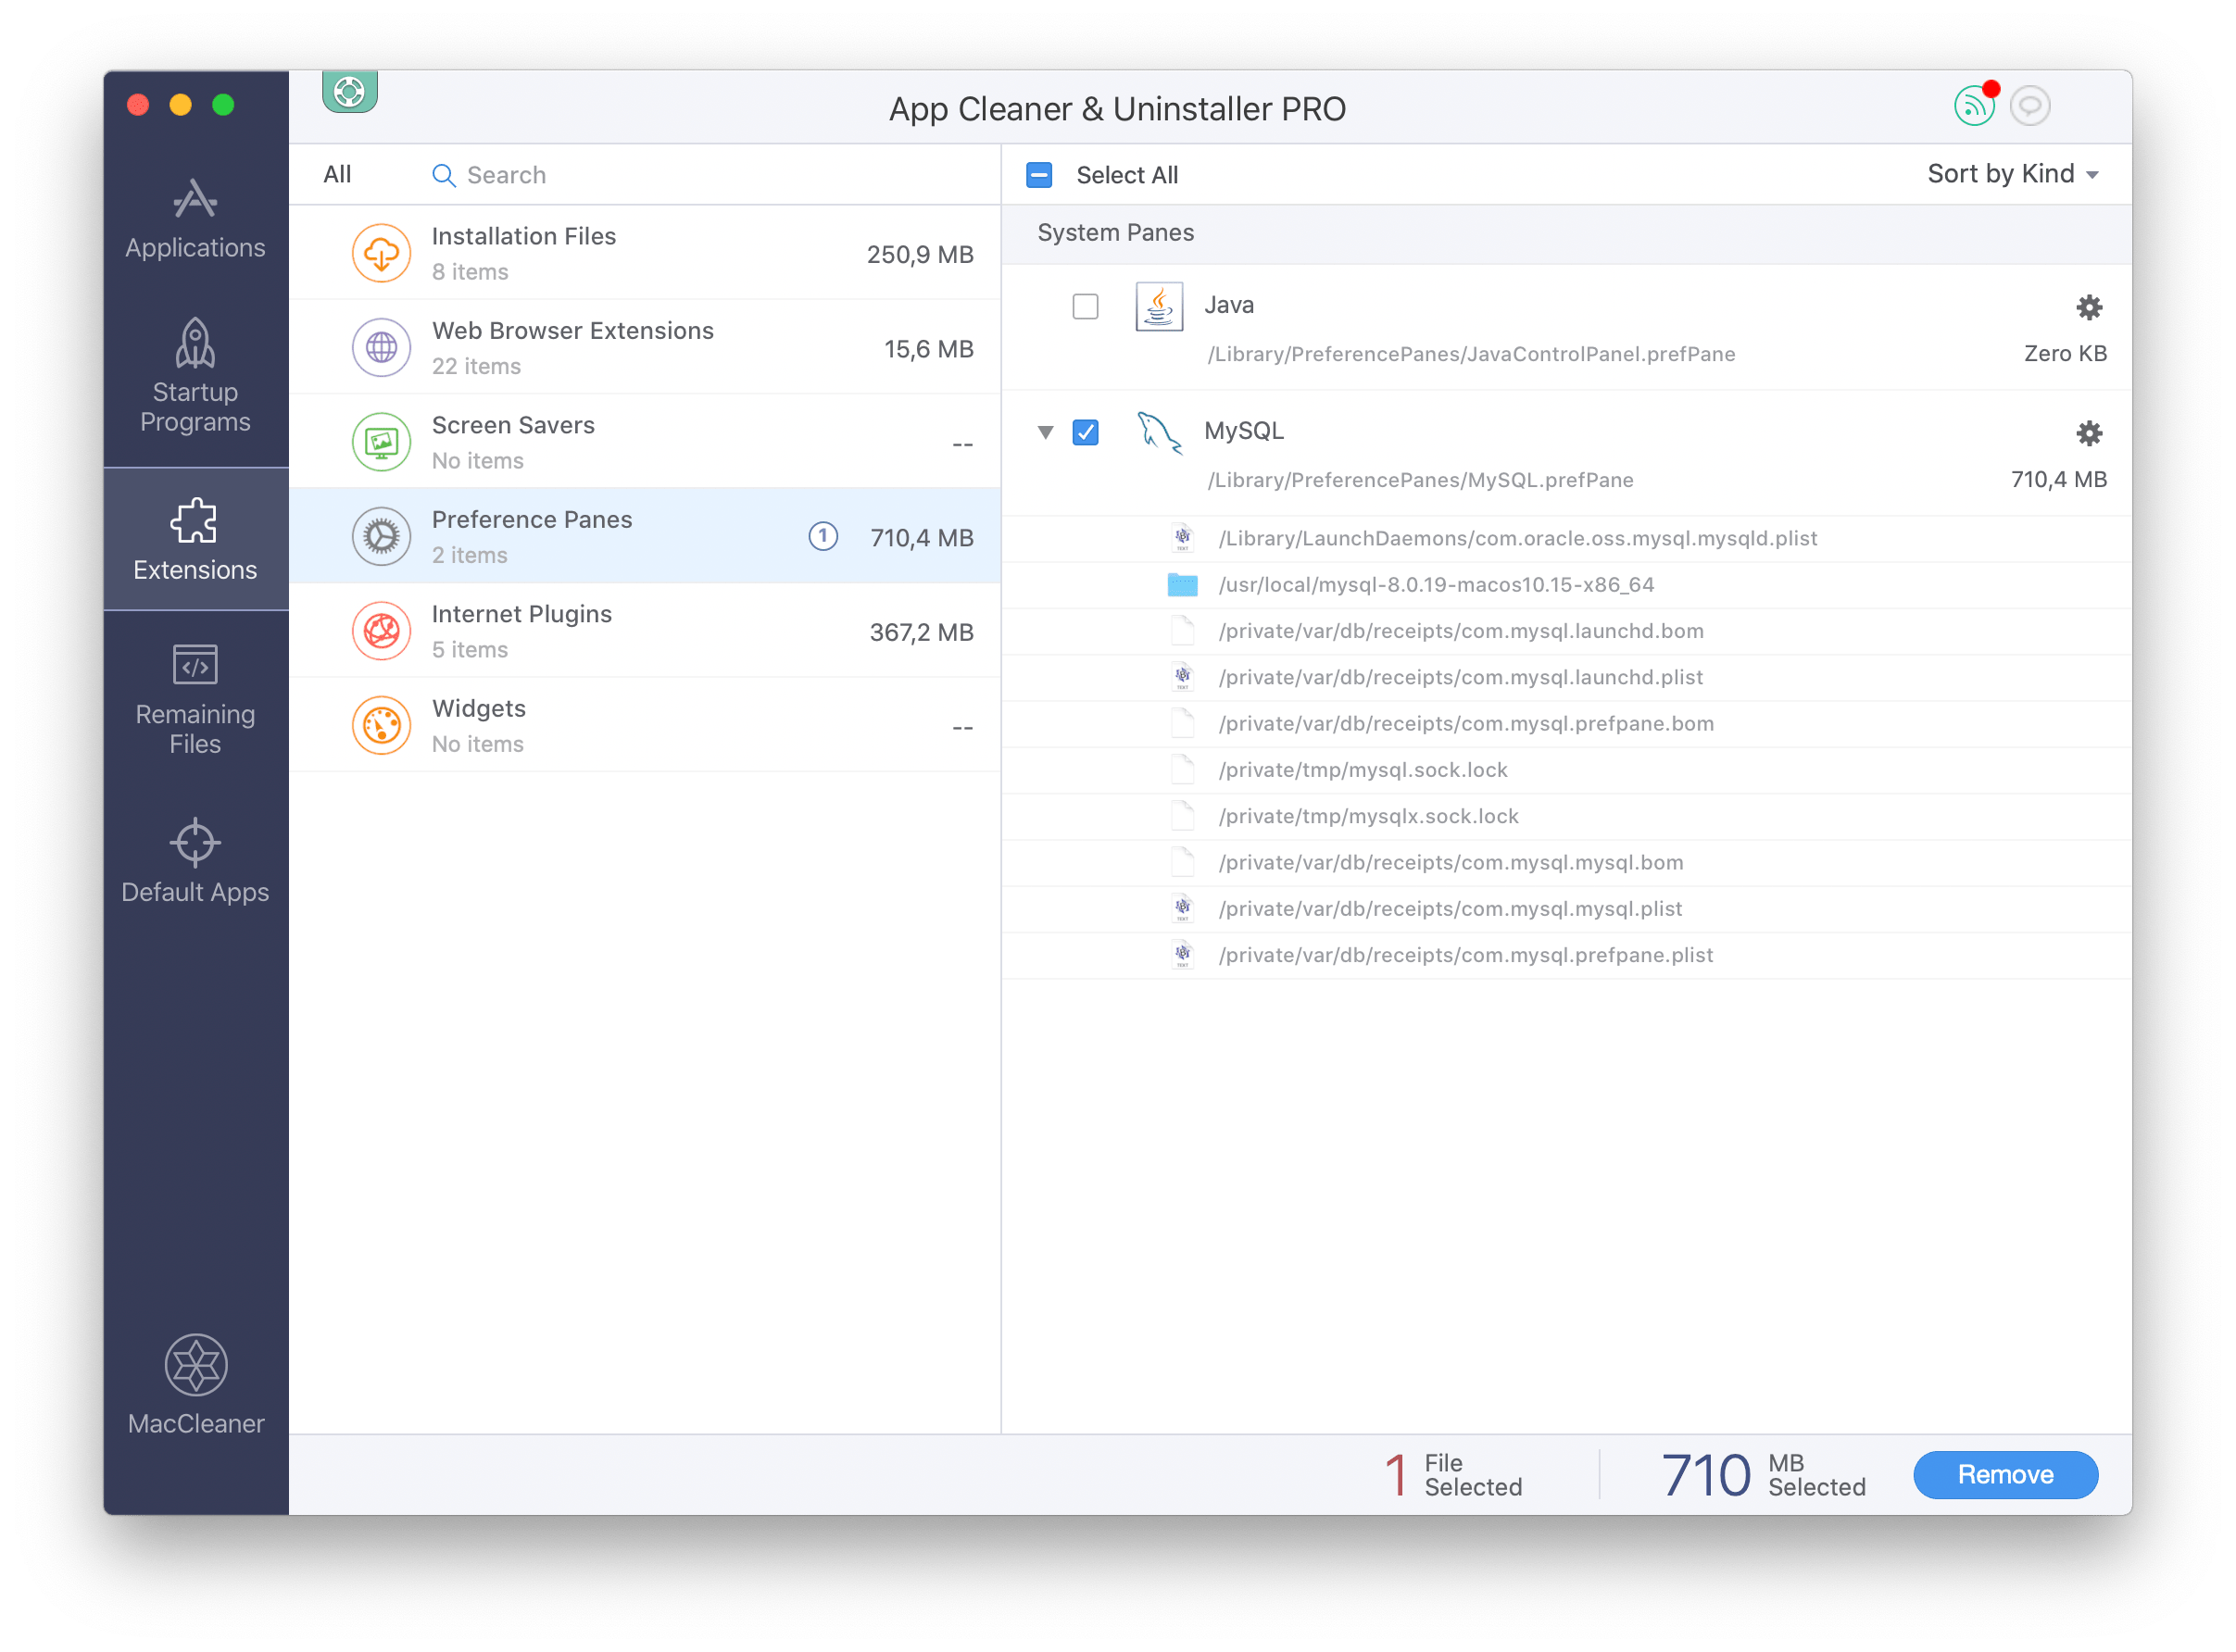
As you can see, Mac’s uninstalling applications and extensions are done easily and safly with App Cleaner & Uninstaller. You can try it absolutely for free.
App Cleaner & Uninstaller
Uninstall any Mac application in 2 minutes.
Источник
How to completely delete MySQL from Mac

Before we start
Having spent some years coding applications for macOS we’ve created a tool that everybody can use. The all-round problem fixer for Mac.

So here’s a tip for you: Download CleanMyMac to quickly solve some of the issues mentioned in this article. But to help you do it all by yourself, we’ve gathered our best ideas and solutions below.
Features described in this article refer to the MacPaw site version of CleanMyMac X.
If you want to uninstall or reinstall MySQL on your Mac, it’s not enough to trash it. To delete it completely, you need to get rid of all its associated files, such as databases and configurations. Today, we’ll show how to do that and uninstall MySQL from your Mac safely.
What is MySQL?
MySQL is a relational database management system (RDBMS) based on structured query language (SQL). Backed by Oracle, a multi-model database management system, this open-source software with a client-server module is an integral part of the most popular software stacks.
Giants like Google, Facebook, Twitter, YouTube, Yahoo!, and Adobe rely on MySQL for data storage purposes. Although it was initially created for limited use, now it’s available for macOS, Windows, Linux, and Ubuntu. As MySQL is a database, it can contain a lot of data, therefore being the largest system on your Mac. So, if you want to delete it, we’ll show you how.
How to remove MySQL from your Mac manually
There are several ways to eliminate MySQL from your computer. Let’s see how you can do that manually. First, go to System Preferences and click MySQL. Press Uninstall to delete the service.
Now that you trashed the app, it’s time to remove all the related files, including databases. To get rid of these files, use Terminal. Follow the steps below:
Deleting MySQL includes removing all its databases. If you have critical data stored in MySQL, make sure to back up your files before you remove the service from your Mac.
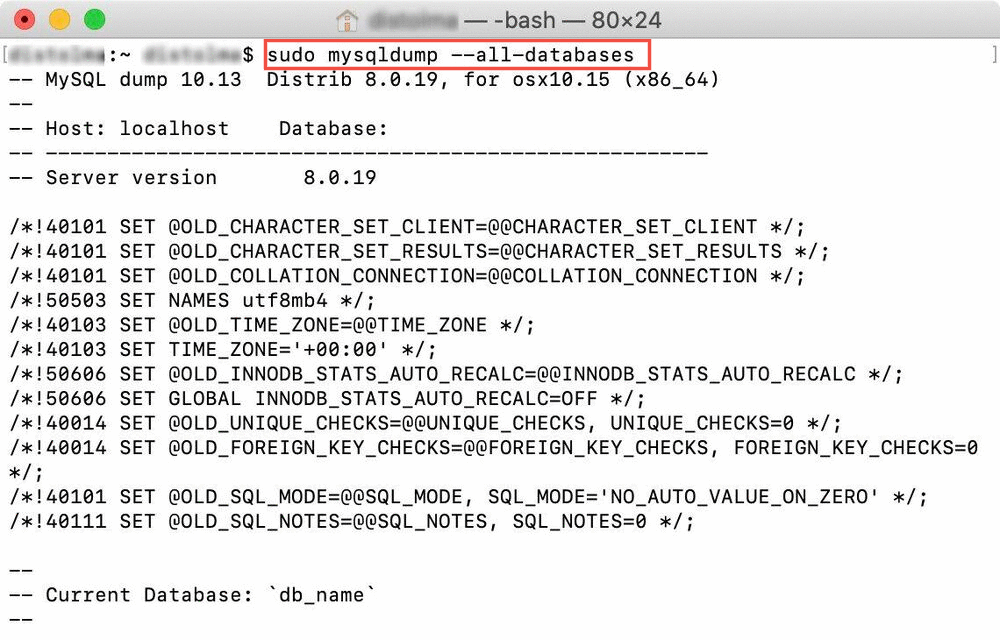
- Open Terminal from the Application folder.
- Enter sudo mysqldump —all-databases command to backup your databases to TXT files.
sudo rm -rf /usr/local/mysql
sudo rm -rf /usr/local/var/mysql
sudo rm -rf /Library/StartupItems/MySQLCOM
sudo rm -rf /Library/PreferencePanes/My*
sudo rm -rf /Library/Receipts/mysql*
sudo rm -rf /private/var/db/receipts/*mysql*
Now, if you check System Preferences, you won’t find MySQL there. Removing MySQL through Terminal may seem like a tiresome task.
Luckily, there is a much easier way to uninstall MySQL. All you need to do is to use a dedicated tool, which will quickly detect and remove both MySQL and its files.
How to completely uninstall MySQL on Mac with a third-party uninstaller
CleanMyMac X is a professional Mac cleaner that shows exactly what you have on your Mac. It’s notarized by Apple, so you can be sure that it won’t conflict with any system settings.
Well-known as a junk-cleaner, CleanMyMac X also includes the Extensions feature.
Here is how to uninstall MySQL with CleanMyMac X:
- Grab you a copy of CleanMyMac X — free trial version is here.
- Launch it and go to the Extensions module in the sidebar.
- Select Preference Panes.
- Check the box next to MySQL.

As simple as that! Now there’s no trace of MySQL left on your computer.
As you can see, removing MySQL with Terminal is a long and tricky process. But there is a more straightforward way by using the Extensions feature of CleanMyMac X.
Источник


