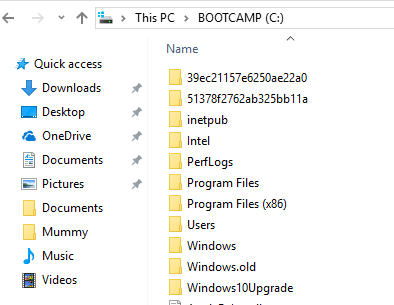
- Удаляем папку Windows.old в Windows 10
- Удаление через «Параметры»
- Очистка системных файлов
- Использование командной строки
- Чистка с помощью CCleaner
- How to delete C:\Windows.Old folder witout using disk cleanup
- How to Delete the Windows.old folder in Windows 7/8/10
- Remove Windows.old Folder
- Windows 7/8/10 Instructions
- Windows Vista Instructions
- How to delete the Windows.old folder on Windows 10
- How to delete the Windows.old folder using Storage sense settings
- How to delete the Windows.old folder using Temporary files settings
- How to delete the Windows.old folder using Disk Cleanup
- Wrapping things up
- More Windows 10 resources
- Halo: MCC’s live service elements make it better, not worse
- Microsoft’s Surface Duo is not ‘failing up’
- Here’s what you can do if Windows 10 update KB5001330 is causing issues
- These are the best PC sticks when you’re on the move
Удаляем папку Windows.old в Windows 10
В папке Windows old хранятся файлы от прежней версии операционной системы. Они нужны для того, чтобы пользователь мог откатиться к предыдущему состоянию системы. Если вы так делать не собираетесь, то удалите папку Windows.old — это освободит на диске 15-20 Гб, а иногда и больше.
Удаление через «Параметры»
В последних сборках Windows 10 доступен следующий способ удаления папки Windows.old:
- Открываем меню «Пуск» и переходим в «Параметры». Можно использовать сочетание WIn+I.
- В разделе «Система» выбираем вкладку «Память устройства».
- Кликаем по ссылке «Освободить место сейчас».
4. В списке отмечаем пункт «Предыдущие установки Windows».
5. Нажимаем «Удалить файлы».
6. Дожидаемся завершения процесса очистки.
Это самый простой метод, который работает на Windows 10, начиная со сборки 1803. На предыдущих версиях мы будем использовать способы, описанные ниже.
Очистка системных файлов
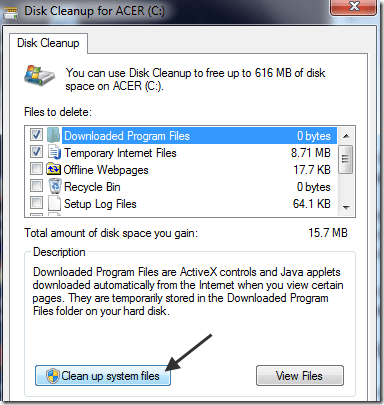
На Windows 7, 8 и 10 для удаления папки Windows.old и других системных файлов есть встроенный инструмент очистки. Чтобы его запустить, нажимаем на сочетание клавиш Win+R и вводим имя программы cleanmgr.
После непродолжительного сканирования появится окно со списком данных, которые можно удалить без вреда для системы. Здесь нам ничего не нужно, поэтому нажимаем на кнопку «Очистить системные файлы».
Запустится ещё одно сканирование, в результате которого будет сформирован список доступных для очистки файлов. Отмечаем пункт «Предыдущие установки Windows» и нажимаем «ОК».
В результате очистки удалится содержимое папки Windows.old. Сам каталог может остаться, но он не занимает место на диске.
Использование командной строки
Командная строка тоже подходит для освобождения места на диске. Находим её с помощью встроенного поиска и запускаем с правами администратора.
Выполняем команду rd /s /q %systemdrive%\windows.old. После непродолжительного ожидания папка с файлами предыдущих установок Windows будет очищена.
Чистка с помощью CCleaner
В составе стандартных инструментов программы CCleaner также есть средства для удаления каталога Windows.old.
- Запускаем бесплатную утилиту CCleaner.
- Открываем вкладку «Очистка».
- В разделе Windows отмечаем пункт «Старая установка Windows».
- Нажимаем на кнопку «Анализ».
- После завершения сканирования нажимаем на кнопку «Очистка».
Все эти способы работают одинаково. Выбор зависит от того, какой версией Windows вы пользуетесь и есть ли у вас установленный CCleaner.
How to delete C:\Windows.Old folder witout using disk cleanup
In the Disk Cleanup dialog box, I don’t see the option to delete Previous Windows Installations. How do I manually delete the C:\Windows.Old folder.
Also, what are the three command lines needed to delete the folder?
The option is shown as Previously Windows Installations.
How to Delete and Remove the Windows.old Folder on Vista or Windows 7
http://www.kodyaz.com/articles/delete-windows-old-removal.aspx
1. Open an Elevated Command Prompt
Start — type in Search box -> CMD find at top — Right Click on — RUN AS ADMIN
2. The Prompt probably looks like C:\Windows\System32>
Type this at the prompt and then hit ENTER
Now the prompt should look like C:\>
3: Type this at the prompt and then hit ENTER
Should look like C:\>DIR Windows.old
It should return
Directory of C:\Windows.old
and show the contents of Windows.old
That is just to make sure the Windows.old folder is under C: (the C Drive) — if not STOP
4. Type this at the prompt and then hit ENTER
Attrib -r -a -s -h C:\Windows.old /S /D
Should look like C:\>Attrib -r -a -s -h C:\Windows.old /S /D
(there are SPACES between Attrib and -r and -a and -s and -h and C:\Windows.old and /S
and /D). The C:\ is the drive Windows.old is located on.
It should return you to the prompt C:\ if it shows and ERROR then STOP — check the command
and if it was typed correctly you are not in the correct spot. You may need to run the TAKEOWN
command :
TAKEOWN /f Windows.old /a /r
and repeat Step 4 — were you using an Elevated Command Prompt? Are you logged to an
ADMIN account?
5. Type this at the prompt and then hit ENTER
RD /s Windows.old
Should look like C:\>RD /s Windows.old
(there are SPACES between RD and /s and Windows.old )
Will return Windows.old, are your sure Y/N type Y
(If you get a message that you do not have Ownership Rights then issue this command
and hit ENTER
TAKEOWN /f Windows.old /a /r
and repeat Step 5 — were you using an Elevated Command Prompt? Are you logged to an
ADMIN account?
6: Type this at the prompt and then hit ENTER
Should look like C:\>DIR Windows.old — and hit ENTER
It should return
Which confirms it is gone.
7. Close the COMMAND window
Hope this helps.
Rob Brown — Microsoft MVP Rob Brown — past Microsoft MVP — Windows Insider MVP 2016 — 2021
Microsoft MVP Windows and Devices for IT 2009 — 2020
116 people found this reply helpful
Was this reply helpful?
Sorry this didn’t help.
Great! Thanks for your feedback.
How satisfied are you with this reply?
Thanks for your feedback, it helps us improve the site.
How to Delete the Windows.old folder in Windows 7/8/10
If it’s eating up a chunk of disk space
If you have tried upgrading your Windows PC and it has failed a couple of times due to various annoying reasons, you’ve probably come to realize that there is a large chunk of disk space being eaten up by a folder called Windows.old.
Windows.old is automatically generated whenever you perform an installation of Windows with a previous version of the OS already installed. It creates this Windows.old folder in the root of the Windows partition and stores the previous operating system files and data.
In case you try to upgrade from Windows Vista to Windows 7 or Windows 7 to Windows 10 and it fails, you can always revert back to Windows Vista or 7 safely. The only issue with this is that every time the install fails, another copy of the previous OS is copied into Windows.old.
So, if your upgrade install failed 2 or 3 times, that Windows.old folder can become very large, very fast! On top of that, the folder is not automatically deleted once you are up and running with the newer version of Windows, so you have to get rid of it yourself.

Note: Removing the Windows.old folder will result in your inability to be able to revert back to the previous OS installed. You will have to stick with the new version of Windows. Also, the Windows.old folder gets created when you install those big bi-annual updates for Windows 10.
Remove Windows.old Folder
So how do you get rid of the folder? Well, you have to use the Disk Cleanup utility! Here’s how to go about it. The first method will describe how to delete the Windows.old folder on Windows 7/8/10. If you are in Windows Vista still, follow the second set of instructions.
Windows 7/8/10 Instructions
If you are in Windows 7/8/10 and want to delete the Windows.old folder, the process is fairly straightforward. First, open Disk Cleanup via the Start Menu (click Start and type in disk cleanup) and when the dialog pops up, choose the drive that has the .old files on it and click OK. This is normally just the C drive. If that’s the only drive on your computer, it won’t even ask you to choose.
The system will perform a scan and another dialog will pop up with the selection. Now click on the button Cleanup system files button at the bottom.
Now choose the drive again that has the .old files on it. The system will perform a second scan of files that need to be cleaned up and will take a bit longer.
Finally, a dialog will pop up with another set of checkboxes. Scroll down until you find one labeled Older versions of Windows or Previous Windows installations and click OK.
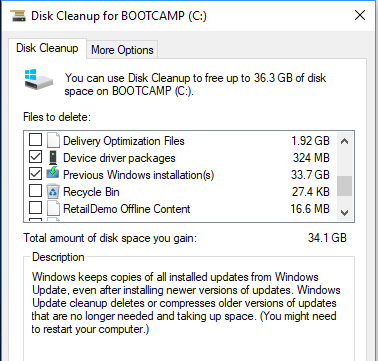
As you can see, it’s normally quite a large amount of data that gets taken up by previous installations of Windows.
Windows Vista Instructions
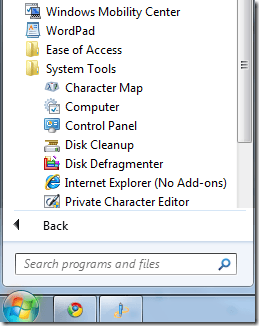
Click on Start, then All Programs, Accessories, System Tools, and then Disk Cleanup. Make sure you right-click on Disk Cleanup and choose Run As Administrator.
In the Disk Cleanup Options dialog, make sure to check the Files from all users on this computer box.
Then in the Disk Cleanup – Drive Selection dialog, click on the hard disk where the the Windows.old folder is and click OK. The system will then scan the drive for unnecessary files.
Click on the Disk Cleanup tab and look for a checkbox that says Previous Windows installations. Check it and click OK. Then click Delete Files when prompted.
That’s it! That should get rid of those space-hogging .old folders forever! If you have any problems getting rid of them, post a comment here and I’ll try to help. Enjoy!
Founder of Help Desk Geek and managing editor. He began blogging in 2007 and quit his job in 2010 to blog full-time. He has over 15 years of industry experience in IT and holds several technical certifications. Read Aseem’s Full Bio
How to delete the Windows.old folder on Windows 10

When you upgrade your computer to a new version of Windows 10, or you install a preview build, the installation process saves a copy of the previous version in the «Windows.old» folder.
This is part of the safety mechanism in case the upgrade process goes wrong. If the installation fails for any reason, the system can use the Windows.old folder to undo the changes. Also, if the upgrade completes successfully, the backup copy of the previous version will be kept to provide the option to rollback in the case the new installation is causing issues.
Although this is a handy feature, if your computer is working correctly after the upgrade, you can safely delete the Windows.old folder to reclaim gigabytes of space.
In this Windows 10 guide, we’ll walk you through the different ways that you can get rid of the Windows.old folder to free up several gigabytes of space to store more important files.
Update November 29, 2018: We’ve updated this article with the latest information for the Windows 10 October 2018 Update.
How to delete the Windows.old folder using Storage sense settings
The easiest method to delete the Windows.old folder from your device is to use the Storage sense with these steps:
- Open Settings.
- Click on System.
- Click on Storage.
Under the «Storage sense» section, click the Change how we free up space automatically option.

Under the «Free up space now» section, check the Delete previous version of Windows option.

Once you’ve completed the steps, the folder with the previous installation of Windows 10 will no longer be available on your device.
How to delete the Windows.old folder using Temporary files settings
Alternatively, using the Settings app, you can delete the Windows.old folder using the Temporary files settings with these steps:
- Open Settings.
- Click on System.
- Click on Storage.
Under the «Storage sense» section, click the Free up space now option.
Check the Previous Windows installation(s) option.
After completing the steps, the folder with the previous installation of Windows 10 will be removed freeing up 14GB to 20GB of storage space on your primary hard drive.
How to delete the Windows.old folder using Disk Cleanup
You can also delete the Windows.old folder using the legacy Disk Cleanup tool with these steps:
- Open File Explorer.
- Click on This PC from the left pane.
Under the «Devices and drives» section, right-click the drive with the Windows 10 installation (usually the C drive) and select the Properties option.
In the «General» tab, click the Disk Cleanup button.

Click the Cleanup system files button.
Check the Previous Windows installation(s) option.
(Optional) Clear the default selected options if you only want to remove the Windows.old folder to free up space.
Important: Starting with the October 2018 Update, Windows 10 is deprecating Disk Cleanup in favor of Storage sense, but it adds an option to delete all the contents from the Downloads folder. If you’re using this option, and you have important files in the Downloads folder, make sure to clear this option.
Once you’ve completed the steps, the Windows.old folder will be removed from your device.
Wrapping things up
While it’s safe to delete the Windows.old folder, if you remove its contents, you will no longer be able to use the recovery options to rollback to the previous version of Windows 10. If you delete the folder, and then you want to rollback, you’ll need to perform a clean installation with the desire version.
More Windows 10 resources
For more helpful articles, coverage, and answers to common questions about Windows 10, visit the following resources:
![]()
Halo: MCC’s live service elements make it better, not worse
Halo: The Master Chief Collection is more popular than ever, but some fans don’t agree with the live service approach 343 Industries has taken with it. Here’s why those elements are, at the end of the day, great for the game and for Halo overall.
![]()
Microsoft’s Surface Duo is not ‘failing up’
Microsoft announced this week that it was expanding Surface Duo availability to nine new commercial markets. While Surface Duo is undoubtedly a work in progress, this is not a sign of a disaster. It’s also doesn’t mean that Surface Duo is selling a ton either. Instead, the reason for the expansion is a lot more straightforward.
![]()
Here’s what you can do if Windows 10 update KB5001330 is causing issues
In this guide, we’ll show you the steps to get rid of the update KB5001330 to fix profile, gaming, and BSoD problems with the Windows 10 October 2020 Update and May 2020 Update.
![]()
These are the best PC sticks when you’re on the move
Instant computer — just add a screen. That’s the general idea behind the ultra-portable PC, but it can be hard to know which one you want. Relax, we have you covered!


