- DeleteFile function (winbase.h)
- Syntax
- Parameters
- Return value
- Remarks
- How to Fix Cannot Delete System Queued Windows Error Reporting Files
- What are System Queued Windows Error Reporting files?
- What’s causing the System Queued Windows Error Reporting files issue?
- How to delete the System Queued Windows Error Reporting files
- Method 1: Run Disk Cleanup with administrative privileges
- Method 2: Deleting the files manually
- Method 3: Resolving the Windows 7 and 8 log bug
- Method 4: Perform a repair install
- How to delete System Error Dump Files completely
- How to delete system error memory dump files in Windows
- How do I delete System Memory dump files in Windows?
- 1. Delete Crash Dumps With Disk Clean-up>
- 2. Delete Crash Dumps With CCleaner
- 3. Delete Crash Dumps Via the Command Prompt
- 4. Turn Off Crash Dumps
DeleteFile function (winbase.h)
Deletes an existing file.
To perform this operation as a transacted operation, use the DeleteFileTransacted function.
Syntax
Parameters
The name of the file to be deleted.
In the ANSI version of this function, the name is limited to MAX_PATH characters. To extend this limit to 32,767 wide characters, call the Unicode version of the function and prepend «\?» to the path. For more information, see Naming a File.
Return value
If the function succeeds, the return value is nonzero.
If the function fails, the return value is zero (0). To get extended error information, call GetLastError.
Remarks
If an application attempts to delete a file that does not exist, the DeleteFile function fails with ERROR_FILE_NOT_FOUND. If the file is a read-only file, the function fails with ERROR_ACCESS_DENIED.
The following list identifies some tips for deleting, removing, or closing files:
- To delete a read-only file, first you must remove the read-only attribute.
- To delete or rename a file, you must have either delete permission on the file, or delete child permission in the parent directory.
- To recursively delete the files in a directory, use the SHFileOperation function.
- To remove an empty directory, use the RemoveDirectory function.
- To close an open file, use the CloseHandle function.
If you set up a directory with all access except delete and delete child, and the access control lists (ACL) of new files are inherited, then you can create a file without being able to delete it. However, then you can create a file, and then get all the access you request on the handle that is returned to you at the time you create the file.
If you request delete permission at the time you create a file, you can delete or rename the file with that handle, but not with any other handle. For more information, see File Security and Access Rights.
The DeleteFile function fails if an application attempts to delete a file that has other handles open for normal I/O or as a memory-mapped file (FILE_SHARE_DELETE must have been specified when other handles were opened).
The DeleteFile function marks a file for deletion on close. Therefore, the file deletion does not occur until the last handle to the file is closed. Subsequent calls to CreateFile to open the file fail with ERROR_ACCESS_DENIED.
Symbolic link behavior—
If the path points to a symbolic link, the symbolic link is deleted, not the target. To delete a target, you must call CreateFile and specify FILE_FLAG_DELETE_ON_CLOSE.
In WindowsВ 8 and Windows ServerВ 2012, this function is supported by the following technologies.
How to Fix Cannot Delete System Queued Windows Error Reporting Files
Some users report that they are unable to delete the System queued Windows Error Reporting File when trying to free up some space using Disk Cleanup. This might not seem like a big deal, but some affected users report that this file is growing in size with each passing week and there’s no apparent way to get rid of it.
 Cannot delete “System queued Windows Error Reporting Files”
This particular issue is often reported on Windows 7, Windows 8 and Windows 10. There are some cases where the System queued Windows Error Reporting File was reported to have over 200 GB in size.
What are System Queued Windows Error Reporting files?
System queued Windows Error Report files are used for error reporting and solution checking in all recent Windows version. While their deletion will not affect the normal functionality of your OS, removing them might prevent built-in troubleshooters and other utilities from applying the correct repair strategy.
What’s causing the System Queued Windows Error Reporting files issue?
After looking at various user reports and trying to replicate the issue, we noticed a few scenarios that were often confirmed to be responsible for the apparition of this issue. Here’s a list with culprits that are most likely causing this odd behavior:
- Disk Cleanup doesn’t have administrative privileges – This is known to happen when the user tries to run disk cleanup without granting admin access to the utility.
- Disk Cleanup utility is glitched – In this particular case, you have the option of navigating to the location of the files and delete them manually.
- Windows 7 and 8 log file compression bug – Windows 7 has a long-standing bug in the Trusted Installer log that can cause your hard drive to fill up for no apparent reason.
How to delete the System Queued Windows Error Reporting files
If you’re struggling to resolve this particular issue, this article will show you a few repair strategies that others have found helpful. Below you have a collection of methods that other users in a similar situation have used to get the issue resolved.
For the best results, start with the first methods and if it’s ineffective, move down to the next ones in order until you encounter a fix that is successful in resolving the issue for your particular scenario. Let’s begin!
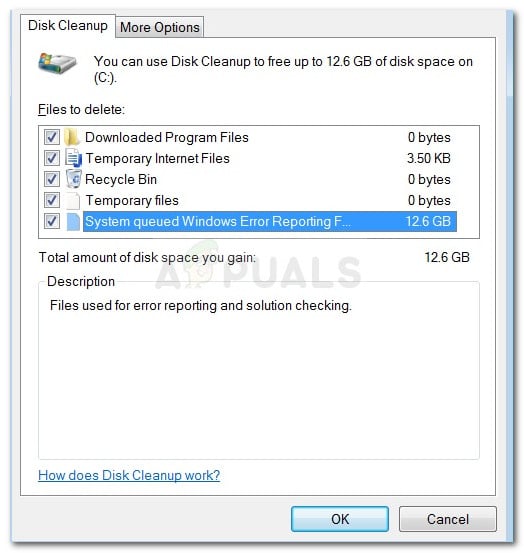
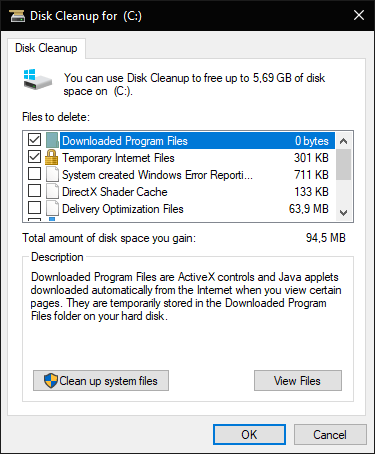
Method 1: Run Disk Cleanup with administrative privileges
In the vast majority of cases, the issue is caused by a privilege issue. A lot of users have reported that the issue was fixed as soon as they opened the Disk Cleanup utility with administrative privileges.
As it turns out, Disk Cleanup will be unable to remove a couple of system files unless the user grants it admin access. Here’s a quick guide on how to do so:
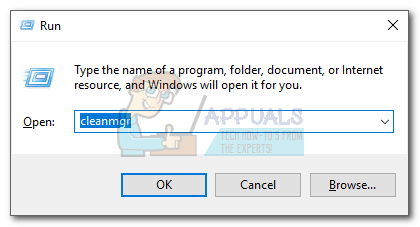
- Press Windows key + R to open up a Run dialog box. Next, type “cleanmgr” and press Ctrl + Shift + Enter to open Disk Cleanup with administrative privileges.
 Run dialog: cleanmgr
 - When prompted by the UAC (User Account Control), choose Yes to accept.
- Now, select the System Queued Windows Error Reporting Files and schedule them for cleanup. You should be able to delete them without issue.
 Run dialog: cleanmgr
If you’re still encountering the same issue, continue down with the next method below.
Method 2: Deleting the files manually
If the first method is not effective, you might have better luck by deleting the System queued Windows Error Reporting files manually. Some users have reported that the System queued Windows Error Reporting Files where gone from Disk Cleanup after they manually browsed and delete them from their locations.
Here’s a quick guide on how to do this:
- Press Windows key + R to open up a Run dialog box. Then, paste “%ALLUSERSPROFILE%\Microsoft\Windows\WER\ReportQueue” and hit Enter to open up the Report Queue folder. Run dialog: %ALLUSERSPROFILE%\Microsoft\Windows\WER\ReportQueue
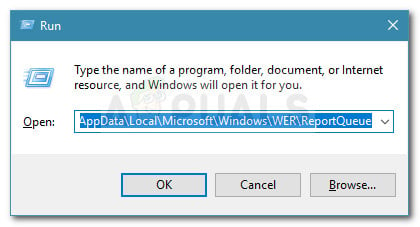 Run dialog: %ALLUSERSPROFILE%\Microsoft\Windows\WER\ReportQueue
Note: If this command is not recognized, try this one instead: “%USERPROFILE%\AppData\Local\Microsoft\Windows\WER\ReportQueue“
If this method wasn’t effective, continue down with the next method below.
Method 3: Resolving the Windows 7 and 8 log bug
If you’re encountering this issue on Windows 7 and Windows 8, you should know that Microsoft has had this bug for a couple of years for now without releasing a hotfix.
Whenever this bug occurs, a series of log files will grow to an enormous size. But what’s even worse is that even if you delete those logs, Windows will kick in and start generating those files again (often times more aggressive than before) until you run out of space.
Luckily, there’s one manual fix that seems to have helped a lot of users to resolve the issue permanently. This method involves stopping the Windows Modules Installer service and renaming all logs to stop Windows from choking on oversized log files. Here’s a quick guide through the whole thing:
- Press Windows key + R to open up a Run dialog box. Then, type “services.msc” and press Enter to open up the Services screen. If prompted by the UAC (User Account Control), choose Yes.
 Run dialog: services.msc
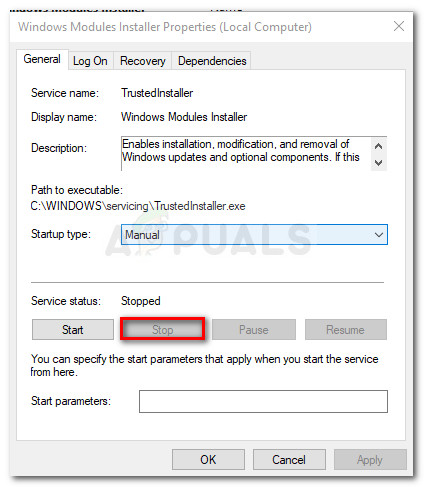 Stop Windows Modules Installer service
Note: If Windows is installed on a different drive, adapt the location accordingly.
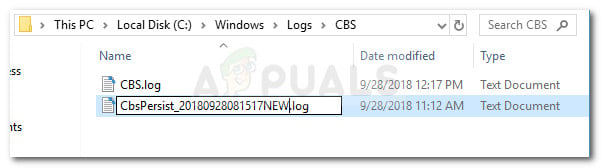 Rename all logs
If this particular method didn’t allow you to resolve the issue, move down to the final method below.
Method 4: Perform a repair install
If none of the methods above have allowed you to get the issue resolved, we’re down to the last resort. Given the fact that all the popular fixes presented above have failed, it’s very likely that the issue is caused by an underlying system file corruption.
There are a few ways to try and fix system file corruption, but we recommend doing a Repair install since it’s faster and will most likely produce the expected results.
A repair install will replace all Windows-related component with fresh copies while allowing you to keep all your personal files including media, documents, and applications. If you decide to do a repair install, follow our step by step guide (here).
How to delete System Error Dump Files completely
No Matter how many times I run dick clean up, I can not delete «System Error Memory Dump Files» or ‘System Error Memory Dump Files Per User’ . I am also having difficulty deleting all of my «Temporary Files». I can never get the number to «zero». I delete them, shut down and start back up and the number hasn’t changed. and in some cases it goes up.
I never had this problem before I upgraded to windows 8.1 a few moths ago. I’m frustrated, so any suggestions would be appreciated.
Original title: System Error Dump Files
![]()
Thank you for posting your query in Microsoft Community.
Several factors are responsible to get the dump and temporary internet files get created:
- Page file must be on OS drive
- Page file base allocation size must be > than installed physical RAM
- Windows Error Reporting (WER) system service should be set to MANUAL
- Set page file to system managed on the OS drive
- Set system crash/recovery options to «kernel Memory Dump»
- User account control must be running.
- Sometimes SSD drives with older firmware do not create DMPS (update firmware)
- Cleaner applications like Ccleaner delete DMP files so dont run them until you are fixed.
Ideally, they can never be zeroed as any erroneous activity, big or small, gets reported and logged. However, if you delete the dump files on regular basis, this keeps your system performance optimized.
If, however, the size of the dump is too large, then you can try the following steps:
a) Go to the location: C:\windows\memory.dmp.
b) Try deleting it (or moving it to another location).
c) Now, run the Disk cleanup and check what it reports.
Hope this information is helpful. Do let us know if you need any further assistance, we’ll be glad to assist you.
How to delete system error memory dump files in Windows

- The Windows system might just be man’s new best friend. On top of its numerous advantages, it also provides a process designed to store your RAM content in case of a system crash and dump it in a data file. This is what system memory dump files are for.
- The crash files are obviously useful and can help devs to further fix and prevent BSOD errors, but they tend to pile up and claim quite a chunk of your storage space so you might want to delete them from time to time. Here are 4 efficient manners to help you do so.
- Want to know more about system files? Do explore our page and take all the information you can handle.
- If you really mean to step up your game, dive into our Windows 10 errors hub and master all the expert fixes in no time.
Memory dump files, otherwise crash dumps, are system files saved during blue screen crashes. When a BSOD error message appears, Windows saves a copy of the system memory.
Those crash dump files can then assist developers to fix BSOD system crashes. Users can send the crash dumps to developers when they file support tickets.
Memory dump files can waste a lot of hard drive space. They can hog gigabytes of hard drive storage. Windows only automatically delete crash dump files when HDD space is limited.
However, users can also erase crash dumps with cleanup utilities.
How do I delete System Memory dump files in Windows?
1. Delete Crash Dumps With Disk Clean-up>
- Users can erase crash dumps with Windows’ very own Disk Clean-up. To do that, launch Run with the Windows key + R keyboard shortcut.
- Enter cleanmgr in Run’s Open text box.
- Press Ctrl + Shift + Enter to open Disk Clean-up as administrator.
- Select the C: drive on the Drive selection window, and click the OK button.
- Select the System error memory dump files check box.
- Then click the OK button.
- Users who can’t find a System error memory dump files option in Disk Clean-up should open that utility via an elevated Command Prompt. Enter
in the Prompt, and press the Return key. That will open Disk Clean-up with more checkbox options.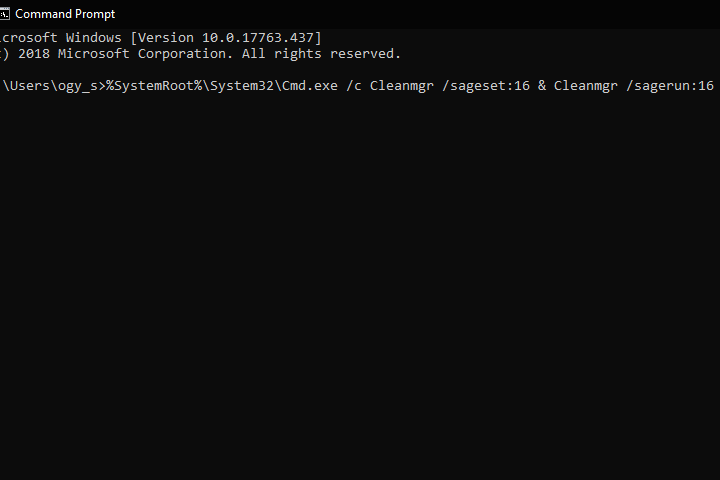
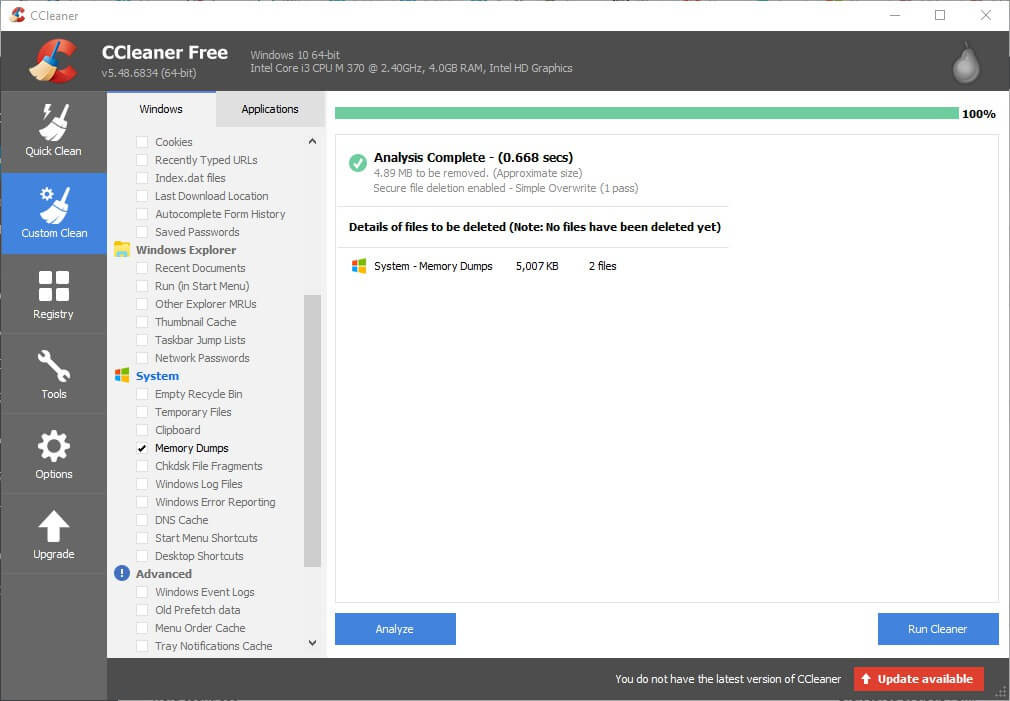
2. Delete Crash Dumps With CCleaner
- Alternatively, users can erase crash dumps with the freeware CCleaner. To do that, click the green Download xtannotation”> button on CCleaner’s webpage.
- Add CCleaner to Windows with its setup wizard.
- Launch the CCleaner utility.
- Select Custom Clean on the left of CCleaner.
- Then select the Memory Dumps check box.
- Press the Analyze button.
- Select the Run Cleaner option to erase the crash dumps.
3. Delete Crash Dumps Via the Command Prompt
- Users can also erase crash dumps with a series of Command Prompt commands. To do so, open the Run accessory.
- Enter cmd in Run, and press the Ctrl + Shift + Enter keys.
- Then enter the following separate commands in the Prompt, and press Enter after entering each one.
fsutil usn deletejournal /d /n c:
del “%temp%*” /s /f /q
del “C:$Recycle.bin*” /s /f /q
del “%systemroot%temp*” /s /f /q
vssadmin delete shadows /for=c: /all /quiet
Dism /Online /Cleanup-Image /StartComponentCleanup /ResetBase
4. Turn Off Crash Dumps
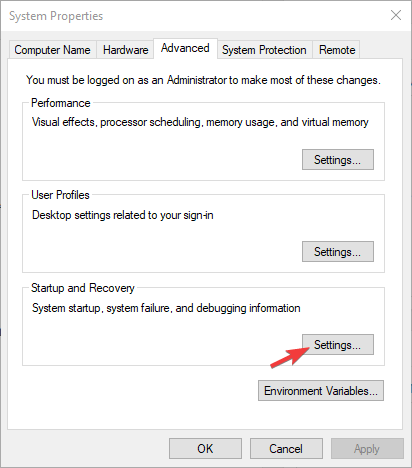
- Users can turn off crash dumps to ensure they don’t hog any more HDD storage space. Enter Control Panel in Run’s Open text box and press Return.
- Then click System to open the Control Panel applet shown directly below.
- Click Advanced system settings on the left of the window to open an Advanced tab.
- Then press the Settings button under Startup and Recovery.
- Select the (none) option on the drop-down menu shown directly below to turn off crash dumps.
- Then click the OK button.
So, there are a few ways users can erase crash dumps in Windows. Deleting the crash dumps might free up quite a bit of hard drive storage space so make sure to do so.
Let us know which was your method of choice in the comments section below.


