- How to Fix Cannot Delete System Queued Windows Error Reporting Files
- What are System Queued Windows Error Reporting files?
- What’s causing the System Queued Windows Error Reporting files issue?
- How to delete the System Queued Windows Error Reporting files
- Method 1: Run Disk Cleanup with administrative privileges
- Method 2: Deleting the files manually
- Method 3: Resolving the Windows 7 and 8 log bug
- Method 4: Perform a repair install
- Служба Windows Error Reporting и очистка каталога WER\ReportQueue в Windows
- Служба Windows Error Reporting
- Очистка папки WER\ReportQueue в Windows
- Отключение Window Error Reporting в Windows Server 2012 R2 / 2008 R2
- Отключение функции сбора и отправки отчетов в Windows 10
- Отключение Windows Error Reporting через групповые политики
How to Fix Cannot Delete System Queued Windows Error Reporting Files
Some users report that they are unable to delete the System queued Windows Error Reporting File when trying to free up some space using Disk Cleanup. This might not seem like a big deal, but some affected users report that this file is growing in size with each passing week and there’s no apparent way to get rid of it.
 Cannot delete “System queued Windows Error Reporting Files”
This particular issue is often reported on Windows 7, Windows 8 and Windows 10. There are some cases where the System queued Windows Error Reporting File was reported to have over 200 GB in size.
What are System Queued Windows Error Reporting files?
System queued Windows Error Report files are used for error reporting and solution checking in all recent Windows version. While their deletion will not affect the normal functionality of your OS, removing them might prevent built-in troubleshooters and other utilities from applying the correct repair strategy.
What’s causing the System Queued Windows Error Reporting files issue?
After looking at various user reports and trying to replicate the issue, we noticed a few scenarios that were often confirmed to be responsible for the apparition of this issue. Here’s a list with culprits that are most likely causing this odd behavior:
- Disk Cleanup doesn’t have administrative privileges – This is known to happen when the user tries to run disk cleanup without granting admin access to the utility.
- Disk Cleanup utility is glitched – In this particular case, you have the option of navigating to the location of the files and delete them manually.
- Windows 7 and 8 log file compression bug – Windows 7 has a long-standing bug in the Trusted Installer log that can cause your hard drive to fill up for no apparent reason.
How to delete the System Queued Windows Error Reporting files
If you’re struggling to resolve this particular issue, this article will show you a few repair strategies that others have found helpful. Below you have a collection of methods that other users in a similar situation have used to get the issue resolved.
For the best results, start with the first methods and if it’s ineffective, move down to the next ones in order until you encounter a fix that is successful in resolving the issue for your particular scenario. Let’s begin!
Method 1: Run Disk Cleanup with administrative privileges
In the vast majority of cases, the issue is caused by a privilege issue. A lot of users have reported that the issue was fixed as soon as they opened the Disk Cleanup utility with administrative privileges.
As it turns out, Disk Cleanup will be unable to remove a couple of system files unless the user grants it admin access. Here’s a quick guide on how to do so:
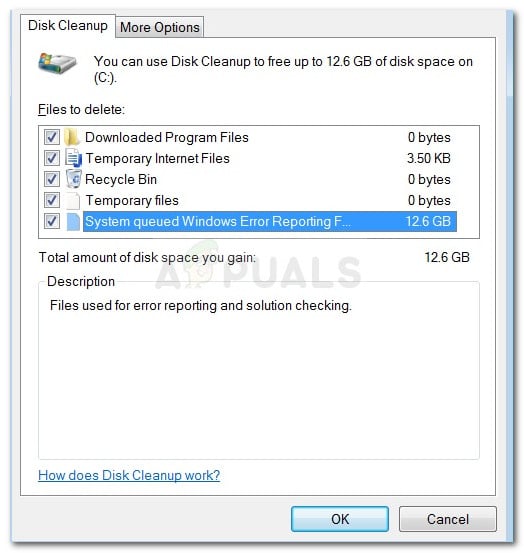
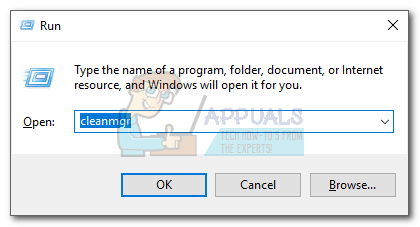
- Press Windows key + R to open up a Run dialog box. Next, type “cleanmgr” and press Ctrl + Shift + Enter to open Disk Cleanup with administrative privileges.
 Run dialog: cleanmgr
 - When prompted by the UAC (User Account Control), choose Yes to accept.
- Now, select the System Queued Windows Error Reporting Files and schedule them for cleanup. You should be able to delete them without issue.
 Run dialog: cleanmgr
If you’re still encountering the same issue, continue down with the next method below.
Method 2: Deleting the files manually
If the first method is not effective, you might have better luck by deleting the System queued Windows Error Reporting files manually. Some users have reported that the System queued Windows Error Reporting Files where gone from Disk Cleanup after they manually browsed and delete them from their locations.
Here’s a quick guide on how to do this:
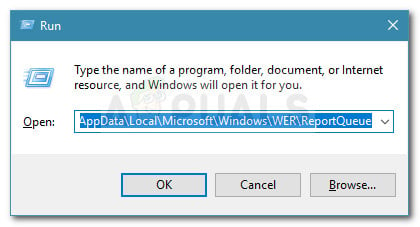
- Press Windows key + R to open up a Run dialog box. Then, paste “%ALLUSERSPROFILE%\Microsoft\Windows\WER\ReportQueue” and hit Enter to open up the Report Queue folder. Run dialog: %ALLUSERSPROFILE%\Microsoft\Windows\WER\ReportQueue
 Run dialog: %ALLUSERSPROFILE%\Microsoft\Windows\WER\ReportQueue
Note: If this command is not recognized, try this one instead: “%USERPROFILE%\AppData\Local\Microsoft\Windows\WER\ReportQueue“
If this method wasn’t effective, continue down with the next method below.
Method 3: Resolving the Windows 7 and 8 log bug
If you’re encountering this issue on Windows 7 and Windows 8, you should know that Microsoft has had this bug for a couple of years for now without releasing a hotfix.
Whenever this bug occurs, a series of log files will grow to an enormous size. But what’s even worse is that even if you delete those logs, Windows will kick in and start generating those files again (often times more aggressive than before) until you run out of space.
Luckily, there’s one manual fix that seems to have helped a lot of users to resolve the issue permanently. This method involves stopping the Windows Modules Installer service and renaming all logs to stop Windows from choking on oversized log files. Here’s a quick guide through the whole thing:
- Press Windows key + R to open up a Run dialog box. Then, type “services.msc” and press Enter to open up the Services screen. If prompted by the UAC (User Account Control), choose Yes.
 Run dialog: services.msc
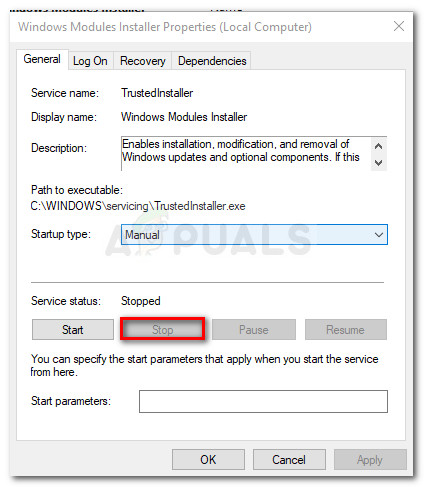 Stop Windows Modules Installer service
Note: If Windows is installed on a different drive, adapt the location accordingly.
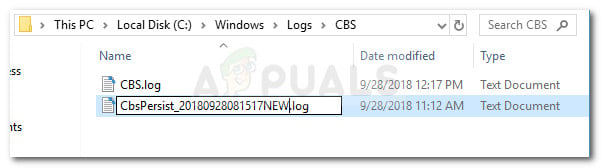 Rename all logs
If this particular method didn’t allow you to resolve the issue, move down to the final method below.
Method 4: Perform a repair install
If none of the methods above have allowed you to get the issue resolved, we’re down to the last resort. Given the fact that all the popular fixes presented above have failed, it’s very likely that the issue is caused by an underlying system file corruption.
There are a few ways to try and fix system file corruption, but we recommend doing a Repair install since it’s faster and will most likely produce the expected results.
A repair install will replace all Windows-related component with fresh copies while allowing you to keep all your personal files including media, documents, and applications. If you decide to do a repair install, follow our step by step guide (here).
Служба Windows Error Reporting и очистка каталога WER\ReportQueue в Windows
Служба WER (Windows Error Reporting) служит для сбора и отправки отладочной информации о падении системных и сторонних приложений в Windows на сервера Microsoft. По задумке Microsoft, эта информация должна анализироваться и при наличии решения, вариант исправления проблемы должен отправляется пользователю через Windows Error Reporting Response. Но по факту мало кто пользуется этим функционалом, хотя Microsoft настойчиво оставляет службу сбора ошибок WER включенной по умолчанию во всех последних версиях Windows. В большинстве случае о службе WER вспоминают, когда каталог C:\ProgramData\Microsoft\Windows\WER\ReportQueue\ начинает занимать на системном диске довольно много места (вплоть до нескольких десятков Гб), даже не смотря на то что на этом каталоге по умолчанию включена NTFS компрессия.
Служба Windows Error Reporting
Служба Windows Error Reporting представляет собой отдельный сервис Windows, который можно легко отключить командой:
net stop WerSvc
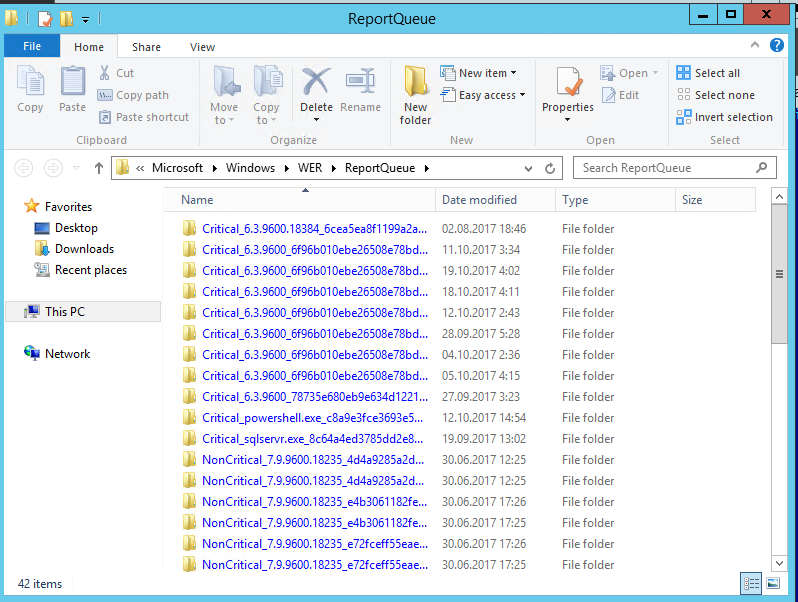
Внутри каталога WER\ReportQueue\ содержится множество каталогов, с именами в формате:
- Critical_6.3.9600.18384_
_00000000_cab_3222bf78 - Critical_powershell.exe_
_cab_271e13c0 - Critical_sqlservr.exe__
_cab_b3a19651 - NonCritical_7.9.9600.18235__
_0bfcb07a - AppCrash_cmd.exe_
_bda769bf_37d3b403
Как вы видите, имя каталога содержит степень критичности события и имя конкретного exe файла, который завершился аварийно. Во всех каталогах обязательно имеется файл Report.wer, который содержит описание ошибок и несколько файлов с дополнительной информацией.
Очистка папки WER\ReportQueue в Windows
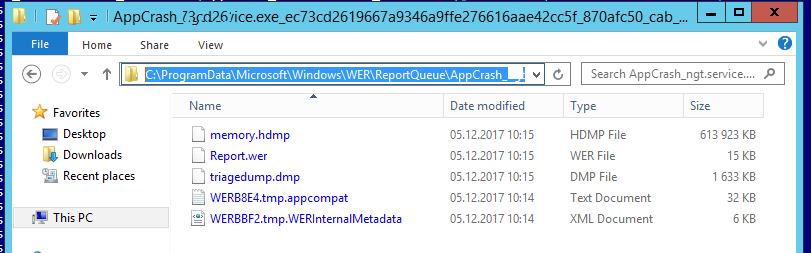
Как правило, размер каждой папки незначителен, но в некоторых случаях для проблемного процесса генерируется дамп памяти, который занимает довольно много места. На скриншоте ниже видно, что размер файла дампа memory.hdmp составляет около 610 Мб. Парочка таким дампов – и на диске исчезло несколько свободных гигибайт.
Чтобы очистить все эти ошибки и журналы штатными средствами, откройте панель управления и перейдите в раздел ControlPanel -> System and Security -> Action Center -> Maintenance -> View reliability history -> View all problem reports и нажмите на кнопку Clear all problem reports.
![]()
Для быстрого освобождения места на диске от файлов отладки, сгенерированных службой WER, содержимое следующих каталогов можно безболезненно удалить и руками.
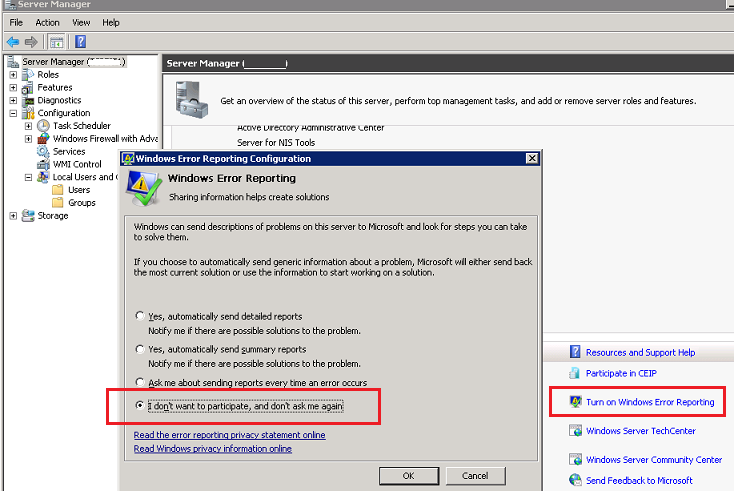
Отключение Window Error Reporting в Windows Server 2012 R2 / 2008 R2
Отключить запись информации об ошибках Windows Error Reporting в серверных редакция Windows можно следующим образом:
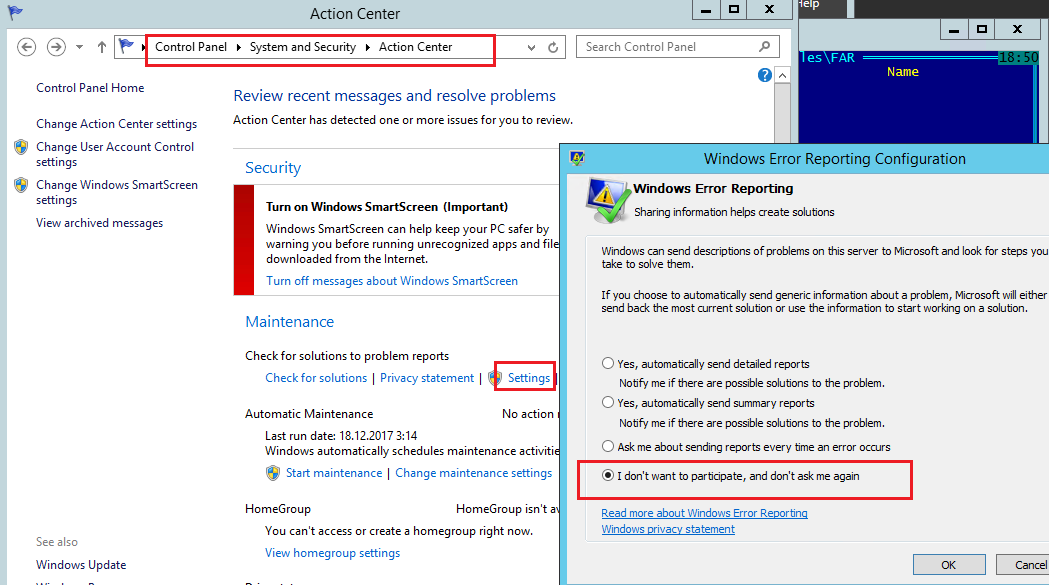
- Windows Server 2012 / R2 – Панель Управления -> System and Security -> Action Center -> раздел Maintenance -> Settings -> выберите опцию I don’t want to participate, and don’t ask me again
- Windows Server 2008 R2 – откройте консоль Server Manager и промотайте список, перейдя в раздел Resources and Support. Нажмите на Turn Off Windows Error Reporting и выберите пункт I don’t want to participate, and don’t ask me again.
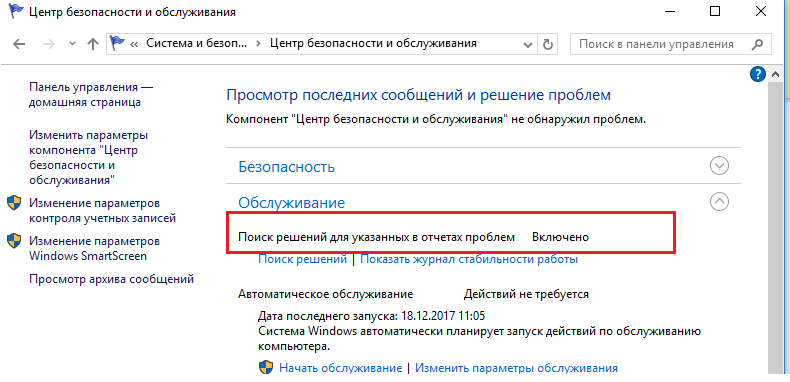
Отключение функции сбора и отправки отчетов в Windows 10
В Windows 10 возможность отключить Error Reporting через GUI отсутствует. Проверить статус компонента можно в панели управления Система и безопасность ->Центр безопасности и обслуживания -> секция Обслуживание. Как вы видите, по умолчанию параметр Поиск решения для указанных в отчетах проблем включен (Control Panel -> System and Security -> Security and Maintenance -> Maintenance -> Check for solutions to problem reports).
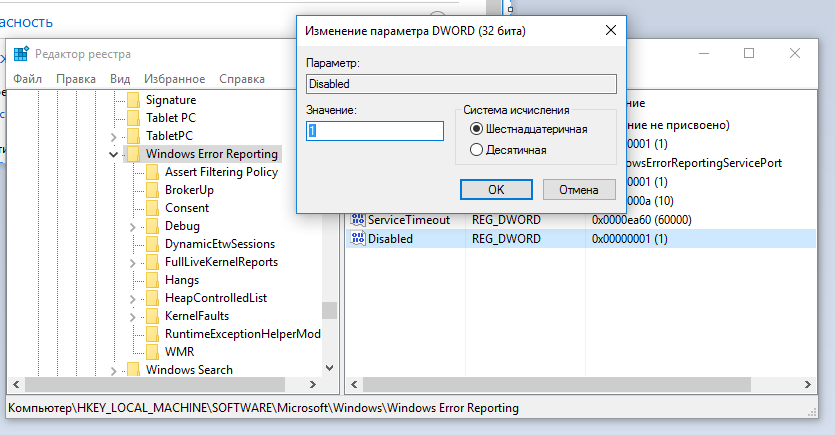
Отключить Windows Error Reporting в Windows 10 можно через реестр. Для этого в ветке HKLM\SOFTWARE\Microsoft\Windows\Windows Error Reporting нужно создать новый параметр типа DWORD (32 бита) с именем Disabled и значением 1.
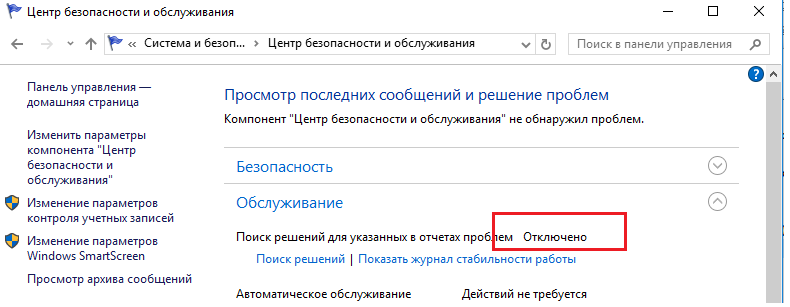
Теперь еще раз проверим статус параметра Поиск решения для указанных в отчетах проблем в панели управления. Его статус должен изменится на Отключено.
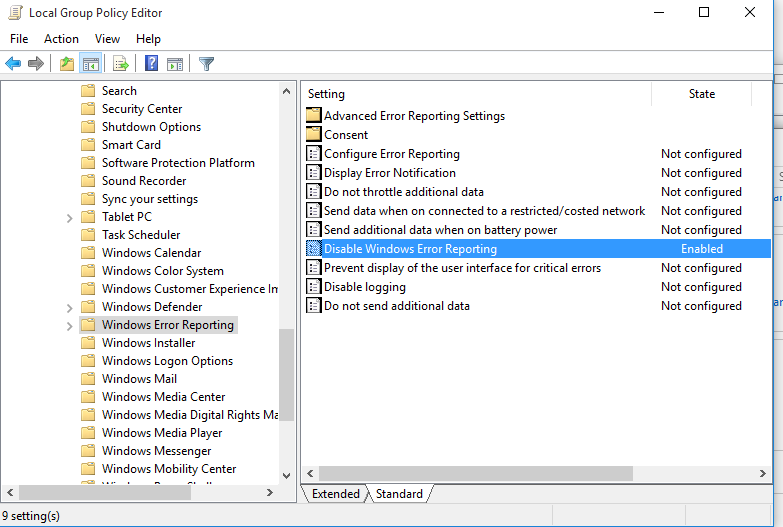
Отключение Windows Error Reporting через групповые политики
Ведение журналов службой Windows Error Reporting можно отключить и через групповую политику. Она находится в разделе Computer Configuration/Administrative Templates/Windows Components/Windows Error Reporting (Компоненты Windows -> Отчеты об ошибках Windows). Для отключения сбора и отправки данных включите политику Disable Windows Error Reporting (Отключить отчеты об ошибках Windows).
В результате сообщения об ошибках приложений в Windows перестанут формироваться и автоматически отправляться в Microsoft.
Служба Windows Error Reporting и очистка каталога WER\ReportQueue в Windows
Служба WER (Windows Error Reporting) служит для сбора и отправки отладочной информации о падении системных и сторонних приложений в Windows на сервера Microsoft. По задумке Microsoft, эта информация должна анализироваться и при наличии решения, вариант исправления проблемы должен отправляется пользователю через Windows Error Reporting Response. Но по факту мало кто пользуется этим функционалом, хотя Microsoft настойчиво оставляет службу сбора ошибок WER включенной по умолчанию во всех последних версиях Windows. В большинстве случае о службе WER вспоминают, когда каталог C:\ProgramData\Microsoft\Windows\WER\ReportQueue\ начинает занимать на системном диске довольно много места (вплоть до нескольких десятков Гб).
Служба Windows Error Reporting
Служба Windows Error Reporting представляет собой отдельный сервис Windows, который можно легко отключить командой:
net stop WerSvc
Внутри каталога WER\ReportQueue\ содержится множество каталогов, с именами в формате:
- Critical_6.3.9600.18384_
_00000000_cab_3222bf78 - Critical_powershell.exe_
_cab_271e13c0 - Critical_sqlservr.exe__
_cab_b3a19651 - NonCritical_7.9.9600.18235__
_0bfcb07a - AppCrash_cmd.exe_
_bda769bf_37d3b403
Как вы видите, имя каталога содержит степень критичности события и имя конкретного exe файла, который завершился аварийно. Во всех каталогах обязательно имеется файл Report.wer, который содержит описание ошибок и несколько файлов с дополнительной информацией.
Очистка папки WER\ReportQueue в Windows
Как правило, размер каждой папки незначителен, но в некоторых случаях для проблемного процесса генерируется дамп памяти, который занимает довольно много места. На скриншоте ниже видно, что размер файла дампа memory.hdmp составляет около 610 Мб. Парочка таким дампов – и на диске исчезло несколько свободных гигибайт.
Чтобы очистить все эти ошибки и журналы штатными средствами, откройте панель управления и перейдите в раздел ControlPanel -> System and Security -> Action Center -> Maintenance -> View reliability history -> View all problem reports и нажмите на кнопку Clear all problem reports.
Для быстрого освобождения места на диске от файлов отладки, сгенерированных службой WER, содержимое следующих каталогов можно безболезненно удалить и руками.
Отключение Window Error Reporting в Windows Server 2012 R2 / 2008 R2
Отключить запись информации об ошибках Windows Error Reporting в серверных редакция Windows можно следующим образом:
- Windows Server 2012 / R2 – Панель Управления -> System and Security -> Action Center -> раздел Maintenance -> Settings -> выберите опцию I don’t want to participate, and don’t ask me again
- Windows Server 2008 R2 – откройте консоль Server Manager и промотайте список, перейдя в раздел Resources and Support. Нажмите на Turn Off Windows Error Reporting и выберите пункт I don’t want to participate, and don’t ask me again.
Отключение функции сбора и отправки отчетов в Windows 10
В Windows 10 возможность отключить Error Reporting через GUI отсутствует. Проверить статус компонента можно в панели управления Система и безопасность ->Центр безопасности и обслуживания -> секция Обслуживание. Как вы видите, по умолчанию параметр Поиск решения для указанных в отчетах проблем включен (Control Panel -> System and Security -> Security and Maintenance -> Maintenance -> Check for solutions to problem reports).
Отключить Windows Error Reporting в Windows 10 можно через реестр. Для этого в ветке HKLM\SOFTWARE\Microsoft\Windows\Windows Error Reporting нужно создать новый параметр типа DWORD (32 бита) с именем Disabled и значением 1.
Теперь еще раз проверим статус параметра Поиск решения для указанных в отчетах проблем в панели управления. Его статус должен изменится на Отключено.
Отключение Windows Error Reporting через групповые политики
Ведение журналов службой Windows Error Reporting можно отключить и через групповую политику. Она находится в разделе Computer Configuration/Administrative Templates/Windows Components/Windows Error Reporting (Компоненты Windows -> Отчеты об ошибках Windows). Для отключения сбора и отправки данных включите политику Disable Windows Error Reporting (Отключить отчеты об ошибках Windows).
В результате сообщения об ошибках приложений в Windows перестанут формироваться и автоматически отправляться в Microsoft.


