- Обновление UEFI/BIOS в Linux
- FAT32 ESP
- Подготовка
- What is Dell System Update (DSU)
- Dell System Update User Guide can be found here
- What is new in this release (Version : 16.02.00)
- Command Difference between Dell Linux Repository and Dell System Update
- Advantage of DSU over Dell Linux Repository
- Supported Operating Systems
- Setup The repository
- Installing DSU
- Red Hat Enterprise Linux Servers
- Updating Firmware and OpenManage Server Administrator (OMSA)
- DSU utility version
- Getting System Inventory
- Category based installation
- Listing supported categories
- Getting specific category updates
- Non-interactive device updates
- Getting the Upgradable updates only
- Getting the Downgradable updates only
- Getting the Equivalent updates only
- Applying the updates specified in the file list
- Install OMSA
- Red Hat Enterprise Linux Servers
- SUSE Linux Enterprise Servers
- Other supporting documents and links
- Support
- File list
- How do I update the BIOS of a Dell laptop?
- 11 Answers 11
- EDIT October 2015
- Ubuntu Wiki
- DellBIOS
- Checking your current BIOS version
- Upgrading the BIOS and hardware firmware for PowerEdge servers
- CentOS
- Dell OpenManage Ubuntu Repository
- Upgrading with a FreeDOS USB drive
- Using WINE to extract the BIOS image for a Dell Inspiron 1525
- Updating the BIOS by booting into firmware directly
- Obtaining and using an image from the WinPhlash utility
- Obtaining the phlash16.exe Utility
Обновление UEFI/BIOS в Linux
Не секрет, что производители материнских плат и ноутбуков не всегда дают возможность пользователям Linux обновить UEFI/BIOS прошивку так же ненавязчиво, как это делают пользователи Windows. Тем не менее для HP EliteBook 840G1, которым я пользуюсь, сделать это немногим сложнее.

Для этого дела понадобятся следующие артефакты:
- FAT32 EFI System Partition (ESP)
- WINE
- Переменный электрический ток
FAT32 ESP
Ноутбуки линейки HP EliteBook содержат 3 режима загрузки. Узнать какой из режимов выбран можно в настройках UEFI/BIOS → System Configuration → Boot Mode . Данный раздел следует читать, если только выбран последний, бескомпромиссный режим UEFI , в остальных случаях можно проскочить.
- Legacy
- UEFI Hybrid with compatibility support module (CSM)
- UEFI Native without CSM
Если вы внимательно читали топик про Linux kernel EFI Boot Stub, то вы наверняка знаете, что и как нужно сделать, для того, чтобы создать дисковый раздел. Можно использовать gdisk , parted или KDE Disk Partition для создания ESP раздела. Вот так выглядит уже готовый раздел.

Рекомендуется ESP раздел монтировать в /boot/efi , а не просто в /boot , для того чтобы можно было хранить образы ядра Linux и файлы загрузчика ОС на штатных линуксовых ФС, вместо того, чтобы все держать в FAT32 EFI System Partition.
Мы уже знаем, что UEFI/BIOS будет искать \EFI\BOOT\bootx64.efi , для чего абсолютный путь к файлу должен быть /boot/efi/EFI/Boot/Bootx64.efi , иначе все пропало и UEFI/BIOS не найдет загрузчик ОС! Обновлению системной прошивки это не помешает, но для чего же тогда нужна прошивка, если нельзя загрузить операционную систему? Очень немаловажно, что по-умолчанию GRUB-2 не копирует необходимый файл и поэтому bootx64.efi надо скопировать вручную.
Подготовка
Берем свежую прошивку с сайта HP, выбираем Linux в выпадающем списке ОС, затем BIOS, скачиваем… и обнаруживаем исполняемый файл для Windows — sp64081.exe . Нет, глаза нас не подвели.
Опытные пользователи бывают готовы к подобным сюрпризам, для чего держат Windows VM либо пользуются не-эмулятором WINE или и то и другое вместе, бо случаи бывают разные. Для распаковки файла возможностей WINE вполне достаточно. Запускаем:
Программа завершает работу с бестактной ошибкой, напоминая лишний раз о том, что нам подсунули не то, что мы ожидали.
Однако, это не должно никого волновать, так как файлы распакованы верно а сверх этого ничего и не требовалось.
Из этого списка нам понадобятся только 3 файла: L71_0137.bin , HpBiosUpdate.efi и HpBiosUpdate.s12 и теперь внимание: скопировать файлы нужно точно в указанные места.
Чтобы попасть в меню настройки UEFI/BIOS надо после включения нажать клавишу Esc или F10 а далее File → Update System BIOS .
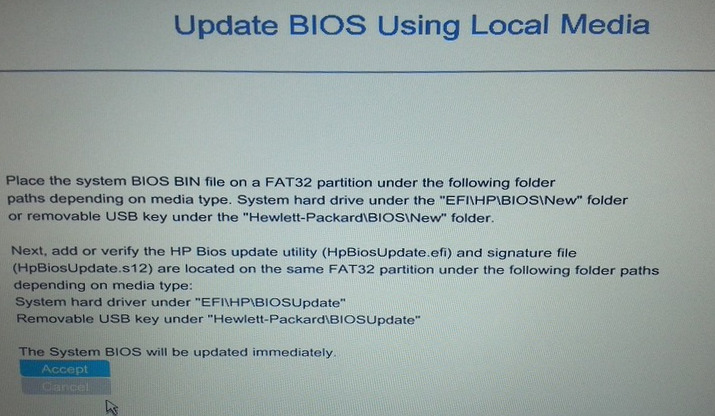
После выбора Accept , процесс обновления стартует без прочих реверансов. Видимо зная цену своим аккумуляторам, производители обновляют прошивку только при включенном электрическом питании компьютера. 2-3 минуты, и процесс благополучно завершен.
UPDATE: По итогам здравых идей в комментариях необходимы некоторые дополнения.
- Можно скопировать те же самые 3 файла на USB флешку, в прописанных путях и используя её обновить прошивку. Разметка файловой системы должна быть FAT32 ESP.
- Можно обновиться из File → Update System BIOS напрямую по интернету, если подключен сетевой кабель. Обновление не будет работать через WiFi соединение.
- Вместо WINE для распаковки архива достаточно использовать 7z e sp64081.exe .
Источник
What is Dell System Update (DSU)
Dell System Update User Guide can be found here
What is new in this release (Version : 16.02.00)
The DSU distributes:.
Command Difference between Dell Linux Repository and Dell System Update
| Dell Linux Repository Commands | Dell System Update Commands |
|---|---|
| Setting Up Repository 1) wget -q -O — http://linux.dell.com/repo/hardware/latest/bootstrap.cgi | bash 2) yum install dell_ft_install 3) yum install $(bootstrap_firmware) | 1) wget -q -O — http://linux.dell.com/repo/hardware/dsu/bootstrap.cgi | bash 2) yum install dell-system-update |
| Inventorying Firmware inventory_firmware | dsu —inventory |
| Updating Firmware update_firmware | dsu |
Advantage of DSU over Dell Linux Repository
| Dell Linux Repository | Dell System Update |
|---|---|
| 1) Selected installation of updates is not possible from CLI | 1) Selected installation of updates are possible from CLI |
| 2) Cluttered console view | 2) Better customer experience with specific readable information on the console | 3) No option to revert to the earlier version | 3) Reverting to earlier version of the update is possible, if repository have earlier version |
| 4) Packages are based on Open Build System | 4) Packages are based on Dell Update Packages (DUPs) |
Supported Operating Systems
- Red Hat Enterprise Linux 6.7 (x86_64)
- Red Hat Enterprise Linux 7.2(x86_64)
- SUSE Linux Enterprise Server 11SP4 (x86_64)
- SUSE Linux Enterprise Server 12SP1 (x86_64)
Note: «rebuilt» versions of the above such as CentOS or ScientificLinux and community distros like Fedora and OpenSUSE are not tested with this repository.
Setup The repository
#wget -q -O — bootstrap.cgi | bash
Installing DSU
Red Hat Enterprise Linux Servers
Updating Firmware and OpenManage Server Administrator (OMSA)
Note:- If OMSA is already installed, it can be updated using dsu tool
DSU utility version
dsu —version or dsu -v
Displaying the DSU utility version.
Getting System Inventory
    To see the System Inventory
Category based installation
Listing supported categories
    Gets the supported category values
Getting specific category updates
    List only those updates belonging to categories
Non-interactive device updates
    DSU supports devices updates in a non-interactive way where all the updatable components will be selected automatically and apply those updates without user intervention.
Getting the Upgradable updates only
dsu —apply-upgrades-only or dsu -u
    To get the list of only upgradable components
Getting the Downgradable updates only
dsu —apply-downgrades-only or dsu -d
    To get the list of only downgradable components
Getting the Equivalent updates only
dsu —apply-equivalent-updates or dsu -e
    To get the list of only equivalent components
Applying the updates specified in the file list
dsu —update-list= or dsu -l
    To apply the updates specified in the file list, if available in configured repository.
Install OMSA
Red Hat Enterprise Linux Servers
#yum install srvadmin-all
SUSE Linux Enterprise Servers
#zypper install srvadmin-all
Other supporting documents and links
To get the complete list of options of DSU, use #dsu —help
Support
A good place for support for this repository is the linux-poweredge mailing list.
File list
Use the following links to browse the contents of the repository
Источник
How do I update the BIOS of a Dell laptop?
I have installed Ubuntu 11.10 on a vista laptop, but Dell is providing the BIOS update in .exe format currently my bios version is A09 but on the driver download site the latest version of bios is A011.
Help me out to update the bios.
My laptop information:
Upon running sudo update_firmware I get the following set of errors:


11 Answers 11
EDIT October 2015
In the post-Win7 era this answer has outlived its usefulness. Look at the other answers first. Read no further unless you have time to burn.
Other answers posted to this question may work with older hardware, but I posted this after my experience of upgrading the BIOS of a Dell Inspiron 7520 (vintage 2012). Checking dates on unofficial Dell support web sites suggests that this may also apply to other Dell models since 2010 or even earlier.
The first step is to get information about your current system. In Ubuntu you can check the BIOS version with the following two commands:
You need information about your computer’s hardware when querying the manufacturer’s website. For Dell this is often printed somewhere on the underside in the form of a Service Tag and an Express Service Code. If this is not easy to read, the information can be obtained in the following way:
1) Install libsmbios:
2) Get the service tab etc. from the system:
This will produce output like this:
with the key information in the BIOS version, the System ID, the Service Tag, and the Express Service Code.
Armed with the above information, go to the Dell web site and download the appropriate driver(s) for your particular computer.
So far so good, but you will notice that the download is a Windows executable. Just as this cannot be run under Ubuntu (or any other Linux), it also will not run under legacy versions of Windows, in particular MS-DOS or any emulation of MS-DOS. This is in spite of anything it may say on the download page about being compatible with earlier versions of Windows; using any legacy DOS-type environment the .exe runs, but exits without doing anything except printing out an annoying message.
So, here comes the fun bit: you need a Windows 7 (or later) environment in order to run the BIOS upgrade. And how do we do that on a single-boot Ubuntu machine (or even a computer running legacy Windows, like XP)?
The key ingredient at this point is a Windows 7 Repair Disk. There are several ways to obtain one, including buying one from sources on the internet, or making friends with someone who has a Windows 7 computer. If you are lucky your computer manufacturer bundled one with your box. I chose to make one on my Ubuntu machine, using a copy of Windows 7 running in VirtualBox, adapting the instructions for making a rescue disk from this web site.
The good news is that it does not seem to matter which version of Windows 7 the Repair Disk is obtained from. Since this is a BIOS upgrade it does not even matter whether you use 32-bit or 64-bit versions if your computer is 64-bit.
Once you have a Windows 7 Repair Disk, the rest is easy. You can make it into a bootable USB if you wish, but if your box has a CD drive this is unnecessary. Here are the steps:
- Put the downloaded BIOS upgrade .exe on an ordinary USB flash drive.
- Reboot you computer from the Windows 7 Repair Disk, hit the Space bar when prompted.
- Navigate to the command prompt. ( Use Recovery Tools->Command Prompt ).
- Find the correct drive letter for your USB (on the command line dir a: then b, c, etc. till you find the right one).
- Navigate to it on the command line (type the drive letter with colon).
- Run the file by typing its name (note tab auto-completion works :)).
- From there, just follow the on-screen instructions, and make sure your computer stays powered-on while the upgrade completes.
Note there are TWO automatic reboots before you get back to your Ubuntu startup screen.
Источник
Ubuntu Wiki
DellBIOS
BIOS update utilities and files are often provided as .exe files. The BIOS updates work by booting the machine into DOS using a USB or floppy (FreeDOS or MS-DOS) and then running an executable to reflash the BIOS.
This guide provides information for Dell users to use such files without using Windows.
Checking your current BIOS version
The current BIOS version can be checked by this command from Ubuntu:
The current BIOS release date can be obtained by invoking:
Upgrading the BIOS and hardware firmware for PowerEdge servers
CentOS
One of the easiest methods requiring no server configuration is to upgrade PowerEdge servers via booting into a CentOS 7.0 x64 live environment (USB is faster but one may want to use CD/DVD due to a limited number of USB ports), load the firmware BIN files onto a FAT32 USB drive, execute the following in a terminal to find the path to the USB drive, and launch the .BIN extension firmware file:
This is how the files were developed assuming one is using Red Hat. As well, while one of the files tested worked by default in Ubuntu (ex. firmware update for Broadcom BCM5720 NetXtreme Gigabit Ethernet Adapter), running the .BIN file for the iDRAC firmware initially complained of missing packages (ex. rpm, stty, gzip, among others) despite gzip being confirmed installed. Installed rpm, executed the .BIN file and this caused the server to start to reboot and then hang, which after a hard shutdown, and booting into the Lifecycle Controller the firmware was not upgraded. However, the same .BIN file worked flawlessly in CentOS.
Dell OpenManage Ubuntu Repository
Upgrading with a FreeDOS USB drive
Follow the directions here to create a FreeDOS USB drive: http://chtaube.eu/computers/freedos/bootable-usb/
After you’ve done that:
1. Eject the USB drive, then re-insert it so you can see the new FreeDOS file system.
2. Copy your BIOS update file to the drive.
3. Reboot, press F12 for the one-time boot menu, and boot from the USB Storage Device.
5. Choose «4 — Load FreeDOS without drivers.»
6. Execute the BIOS update.
Using WINE to extract the BIOS image for a Dell Inspiron 1525
Check your BIOS version number:
Download the BIOS update .exe from Dell’s support site, then run:
Check it outputs a .hdr file:
Then use this file:
One should see a BIOS update screen. Please ensure you do not restart, or lose power during this process. Once it reboots automatically, one may see if it took via:
Updating the BIOS by booting into firmware directly
1. Obtain the appropriate BIOS .EXE file for your computer from http://support.dell.com (search under «drivers & downloads»). Download it to your hard drive. In this example we’ll use the filename I545-A12.EXE but it will be different for you if you have a different Dell model (or a newer BIOS revision).
2. We need to create a 2.88MB «floppy» disk image (1.44MB is too small for the uncompressed BIOS code) and mount it. Note that FreeDOS doesn’t provide an ’empty’ 2.88MB boot disk so we need to delete the «fdos» utility folder to get space. We’ll need to obtain a FreeDOS disk image and mount it:
Note that that last step is crucial to free up sufficient space on the «floppy».
3. Next we need to install dosemu (a DOS emulator) so we can extract the BIOS files from the Dell installer but with unlimited diskspace:
You should get a window pop up that looks like DOS with the C drive active. What you are actually seeing is a dosemu ‘virtual’ drive, who’s actual location on your Ubuntu system is
4. Copy the .exe file to your dosemu «C» drive:
5. Back in the dosemu window, type:
and confirm that the BIOS update’s .EXE file is there.
6. Type the name of the BIOS file (e.g. I545-A12) and hit return to start it up. You should see a ‘ Copyright (c) Foxconn LTD 2001-2007. ‘ message and importantly messages ‘ Decompress the exe file‘ and ‘ Decompress the bin file‘. Unfortunately, you’ll also notice that it ends with an error message and ‘ ALL Files removed!‘ at the bottom. So this is where you need to get quick with your fingers, because we need to get those files before they disappear!
Run the BIOS upgrade file again in the DOS box, and wait until it says ‘ Begin to check the bin file‘. Immediately press Ctrl-C on the keyboard to cancel and exit the program before it fails and erases the files we need. Make sure the files you need are there by typing:
If you don’t see files named something like AFU877.EXE (probably the same for everyone) and 8A1D1P34.BIN (probably different for everyone), you hit Ctrl-C a moment too late. Just re-run the original .EXE file and try to kill it at the right moment. The .BIN file should be around 1-2MB in size, depending on the BIOS.
7. Copy the files to your «floppy» drive image:
8. That’s it for the DOS stuff so you can close the DOS box down. Now to tidy up and prepare to run the update:
9. You now need to add the biosupdate boot image to your grub (system boot) menu. You can do this from the command line like this:
10. Press Ctrl-D to save your changes to that file.
11. Restart your computer. As soon as it starts to boot from the hard drive, hold down the Shift key to make the Grub menu appear.
12. At the Grub menu select the final entry (the one you just added; it should say «Dell BIOS Flash Updater») and press Enter.
13. FreeDOS should now start up. If you get prompts for the date and time just press Enter until you get to the A:> prompt.
14. Start the BIOS update by typing the following (substitute the name of the .EXE and .BIN files you extracted from the Dell download, as appropriate):
15. Follow the prompts, reboot, and confirm that your BIOS was updated.
Obtaining and using an image from the WinPhlash utility
Firstly, you need WINE to obtain the image from the archive:
Then extract and attempt to run the updater, which will fail, but place a file named BIOS.ROM in C:\Windows\Temp\WINPHLASH\. Now download the phlash16.exe utility, which will actually perform the flash using BIOS.ROM.
If this method doesn’t work, you may have downloaded a newer installer. You can then try:
which will extract the ROM file in the same directory:
Assuming the image from biosdisk is called bios.img, next mount the image somewhere and modify it (as root):
Now write the image to a floppy or boot it with GRUB as before, but once you get a command prompt and autoexec.bat has failed, type:
Obtaining the phlash16.exe Utility
One way of getting phlash16.exe has been described previously. The relevant directions from there are reproduced in what follows. 1747A04_DOS.exe has been successfully used before, though other archives from Dell may also work. After downloading the suitable file, use DosBox to extract it:
In the directory where you just downloaded the file:
In the DosBox window, type the name of the executable. It will give an error, but upon closing it, and inspecting your directory, you should see that the archive was extracted and phlash16.exe should now be present.
DellBIOS (последним исправлял пользователь penalvch 2015-02-04 01:52:30)
Источник


