- Activating and Configuring the Target Platform
- Contents
- Create a Multi-Device Application
- Add a Target Platform
- Activate a Target Platform
- To activate a target platform for your project
- Configure a Target Platform
- To configure a target platform for your project
- Linux Application Development
- Contents
- Prerequisites
- Preparing Your Linux Development Environment
- Installing Development Packages
- Preparing Your Linux Machine
- Creating a Connection Profile
- Adding the Installed SDK to RAD Studio
- Running PAServer on Linux machine
- FireMonkey for Linux
- Contents
- What is FMX for Linux?
- Key features:
- How to access FMX for Linux
- FireMonkey GUI Application Prerequisites
- Installing Linux Platform Support
- Installing and running PAServer
- Installing dependencies on your Linux server
- Getting Started
- FMXLinux Configuration
- Building and deploying your first project
- Additional Capabilities
- Web Deployment to Ubuntu Server
- Supported Linux Distributions
- Additional Resources
Activating and Configuring the Target Platform
Before you can start writing the application code for a multi-device application, you need to create and configure your application in the Projects Window. You should have already performed the previous required steps in creating a multi-device application.
Before configuring your multi-device application in the Project Manager:
- If your application targets macOS or iOS, start by installing and running the Platform Assistant server on the Mac, and creating a connection profile that describes how to connect to that instance of the Platform Assistant server.
Then perform the following steps to configure a multi-device application (the steps are described in more detail in this topic):
Contents
Create a Multi-Device Application
Create one of the following project types, which are either potentially multi-device or multi-device by definition:
Nevertheless, to do remote debugging between the host PC (either Win32 or Win64) and a remote Win32 PC, you can use the new debugging scheme, based on the Platform Assistant (required for multi-device application development). If you use the Platform Assistant and a connection profile for any application, including a Win32 application, you can also deploy your application using the Deployment Manager, which requires the Platform Assistant. For more information, see Debugging Multi-Device Applications.
Add a Target Platform
The Target Platforms node in the Projects Window displays the available platforms. However, when you create a project, some supported platforms might not be initially displayed. To create an application that targets a platform that is not currently displayed in the Target Platforms node, add the specific target platform you want, as follows:
1. Right-click the Target Platforms node in the Project Manager:

2. Click Add Platform on the context menu. The Select Platform dialog box appears:

3. Click the down-arrow and select a target platform from the list of supported platforms:

4. Click OK. If you want to add another target platform, repeat the previous steps and add another platform.
Activate a Target Platform
To specify that your application is to be multi-device, you must activate the desired target platform in the Projects Window. The activated target platform is shown in boldface in the Project Manager. The platform you activate determines the compiler and the tooling that your application uses (that is, macOS applications use the BCCOSX.exe and DCCOSX.exe compilers, and use FireMonkey-RTL).
To activate a target platform for your project
Do either of the following:
- Click the platform and the device in the Platform Device Selection Toolbar
- In the Target Platforms node on the Projects Window, double-click the target platform for your application.
- Right-click the Target Platforms node, and select Activate on the context menu:

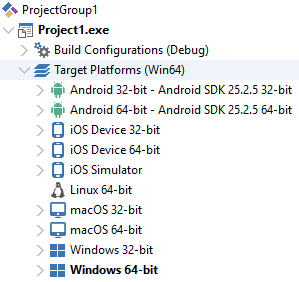
The table below shows the Target Platforms node populated with the available desktop and mobile platforms (Linux requires Enterprise edition). In the Delphi and C++ projects, the Windows 64-bit target platform is activated.
Delphi Desktop Project
C++ Desktop Project

Configure a Target Platform
The final step in setting up your multi-device application in the Project Manager is to assign to the target platform a connection profile and an SDK as needed.
- A connection profile is a set of properties that describe the connection to an instance of the Platform Assistant running on the target machine. This is a requirement for macOS and iOS platforms, as well as for a 64-bit Windows target platform if your development system is 32-bit Windows. Connection profiles are not used in Android applications. For more information, see Connection Profile Manager.
- An SDK (software development kit) is a set of files to build your application. You need an SDK to build C++ and Delphi applications for macOS, iOS or Android.
For macOS and iOS, you can use the SDK Manager to copy the files from a Mac.
For Android, you use the Android SDK that the installer for RAD Studio installs onto your development system.
To configure a target platform for your project
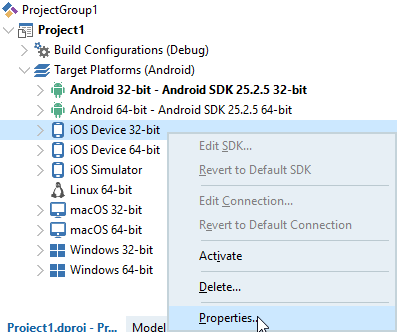
1. In the Project Manager, right-click the target platform that you activated and click Properties in the context menu:
Android (the activated platform)
iOS Device 32-bit (not activated)


3. In the SDK (Software Development Kit) drop-down list, do either of the following:
- To use an existing SDK, select the SDK from the list.
- To add a new SDK, click Add New from the list, and follow either the steps for macOS and iOS or the steps for Android.
4. In the Profile drop-down list, do either of the following:
- To use an existing connection profile, select the profile from the list.
- To create a connection profile, click Add New from the list and follow the steps in Creating and Testing a Connection Profile on the Development PC.
Источник
Linux Application Development
RAD Studio allows you to develop applications for the target Linux platform. Using RAD Studio installed on Windows machine, you can create a 64-bit Linux application and deploy it to the Linux machine. Developing Linux applications is similar to creating Android apps in RAD Studio. However, for Linux, you cannot create the visual VCL and FireMonkey applications. Here is the list of apps that are available for the Linux platform:
- Console Application
- EMS Package (RAD Server)
- DataSnap
- DataSnap WebBroker
- WebBroker
- Dynamic-link Libraries
- DUnitX Project
Contents
Prerequisites
To develop Linux applications, you need to have the RAD Studio installed on the Windows PC as well as a machine with the Linux platform (can be a virtual machine).
Preparing Your Linux Development Environment
To prepare your development system (PC) and Linux machine for application development with RAD Studio:
Installing Development Packages
To install the development packages on Ubuntu:
- Right-click your desktop and select Open Terminal.
- To upgrade the packages you have already installed , type sudo apt update && sudo apt upgrade && sudo apt dist-upgrade in the terminal.
- Type your user password and press Enter
- Wait until prompted to agree to the package upgrade operation. Type Y and press Enter
- Wait until the package upgrade operation is complete. It may take a few minutes to complete.
- To add the development packages, type sudo apt install joe wget p7zip-full curl openssh-server build-essential zlib1g-dev libcurl4-gnutls-dev libncurses5 in the terminal.
- Type your user password and press Enter
- Wait until prompted to agree to the package installation operation. Type Y and press Enter
- Wait until the pacjage installation operation is complete. It may take a few minutes to complete.
To install the development packages on Red Hat:
- Right-click your desktop and select Open Terminal.
- Type yum groupinstall ‘Development Tools’ in the terminal.
- Press Enter and wait until the package installation operation is complete. It may take a few minutes to complete.
Preparing Your Linux Machine
To create Linux applications, you need to add a virtual machine PAServer:
1. Find the LinuxPAServer21.0.tar.gz file in the following location: C:\Program Files (x86)\Embarcadero\Studio\21.0\PAServer\LinuxPAServer21.0.tar.gz 2. Unpack the LinuxPAServer21.0.tar.gz file.
To use the System.zLib unit on Red Hat:
1. Install the zLib-devel library to your RHEL machine with the following command: sudo yum install zlib-devel 2. Update the local SDK cache.
To use the System.zLib unit on Ubuntu:
1. Install the zLib-devel library to your Ubuntu machine with the following command: sudo apt-get install zlib1g-dev 2. Update the local SDK cache.
Creating a Connection Profile
- Right-click the folder where you have unpacked the LinuxPAServer21.0.tar.gz file, and then click Open in Terminal.
- Enter ./paserver in terminal. Then, press Enter.
- On the Tools > Options > Environment Options > Connection Profile Manager page, click the Add button. The Create a Connection Profile wizard opens.
- On the Profile information page, enter the following:
- In the Profile name field, enter the needed name.
- In the Platform field, click the 64-bit Linux platform.
- Click Next.
- On the Remote machine information page, enter the following:
- In the Remote machine field, enter the IP address or Machine name.
- Click Test Connection to check if the values are valid.
- Click Finish.
Adding the Installed SDK to RAD Studio
- On the Tools > Options > Environment Options > SDK Manager page, click the Add button.
- In the Add a New SDK dialog, enter the following:
- In the Select a platform field, click 64-bit Linux.
- In the Select a profile to connect, select a created profile from the drop-down list.
- In the Select an SDK version field, the name of the SDK that you just installed will automatically appear. If you have not installed SDK previously, you can do it on this step. If you have already installed SDK, move on to the next step.
Running PAServer on Linux machine
To run the PAServer on your Linux machine:
- Open the terminal, and then run PAServer in the terminal.
Источник
FireMonkey for Linux
Contents
What is FMX for Linux?
FireMonkey for Linux, also known as FMXLinux, is an add-on component provided to Delphi and RAD Studio Enterprise and Architect edition customers via an exclusive OEM agreement with FMXLinux. FMXLinux provides capabilities for building GUI applications for Linux, extending RAD Studio’s (Delphi Edition) FireMonkey cross-platform framework.
Starting with 10.3.1, the FireMonkey for Linux (FMX) client add-on is available for Delphi and RAD Studio Enterprise customers that are current on Update Subscription via the RAD Studio GetIt Package Manager in the IDE.
Key features:
- FireMonkey for Linux provides the ability to create GUI applications for Linux, extending Delphi’s FireMonkey cross-platform framework.
- FMXLinux expands Delphi’s support from server applications to FMX client applications for popular Linux distributions.
- Includes several ready-to-use user interface styles.
- Many of the FMX components, such as grids, widgets, etc. work seamlessly on Linux clients.
- Leverage RAD Studio’s innovative features, such as Live Bindings, and much more, in your Linux client applications.
- Leverage WebKitGTK support to run an FMXLinux application as an HTML5 web application in the browser.
How to access FMX for Linux
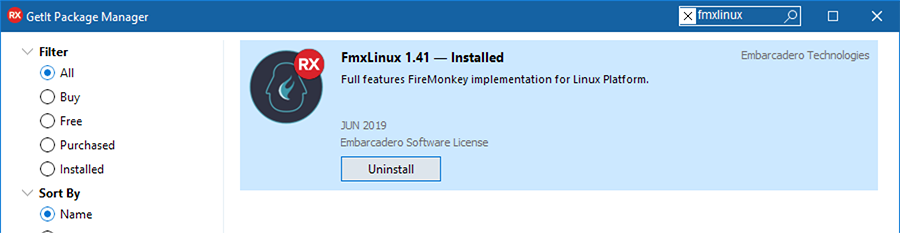
To download and install FMXLinux, open Delphi, go to Tools > GetIt Package Manager , and search for fmxlinux. At the end of the process, you need to restart the IDE, as requested by the GetIt package manager.
FireMonkey GUI Application Prerequisites
Installing Linux Platform Support
Before installing FMXLinux, you need to have Linux platform support for Delphi installed. Go to Tools > Manage Platforms to verify that Delphi Linux 64-bit is installed.

Installing and running PAServer
After installing Linux platform support, you need to install the Platform Assistant on Linux to build and deploy Linux applications. PAServer enables you to use the Deployment Manager, import the Linux SDK, and perform remote debugging on a Linux system. After installing PAServer for Linux, you will need to run PAServer before you can start building FMX Linux GUI applications.
Installing dependencies on your Linux server
To use graphical features in your server application, you will need to install some dependencies. You don’t need to install the whole X11 system on your server.
To install dependencies on Ubuntu/Debian, type this into the terminal:
Getting Started
FMXLinux Configuration
When installing FMXLinux via GetIt, the system registers a DLL Expert (which adds the “Add Linux Platform”) menu indicated below and also adds the catalog repository library folder to the Library Path for the Linux platform. You can verify this in Tools > Options > Language > Delphi Options > Library and choose Linux 64-bit from the Selected Platform combo box at the top:
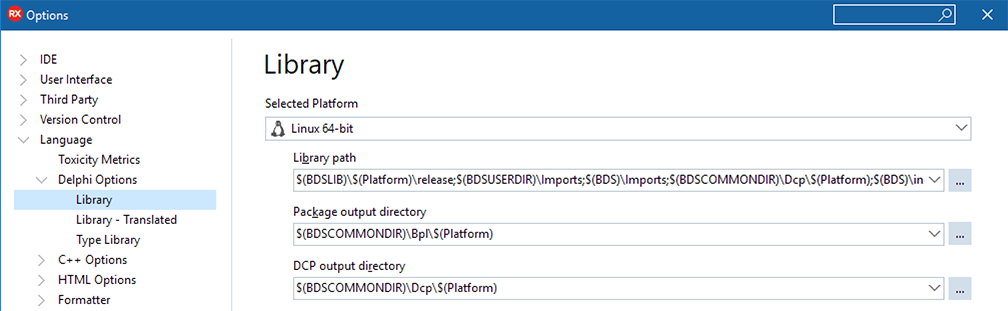
Click the ellipsis  to expand the list of paths and eventually fine tune them.
Building and deploying your first project
After installing the prerequisites listed above and FMXLinux via the GetIt Package Manager, go to File > Open Project to open an existing FireMonkey Project or File > New > Multi-Device Application to create a new FireMonkey project.
Next, right-click on the project in the Project Group to Add Linux platform.
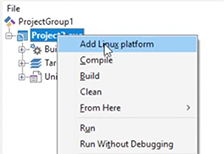
Once you’ve added the Linux platform to your project, you will be able to switch to Linux 64-bit and deploy your FMX GUI applications to Linux. Ensure that PAServer is running on your target Linux machine. Click Run to deploy your Linux GUI application.

This happens because your library paths are not properly configured and instead of building against the proper DCU file, the compiler looks for the original version of the source code file, which is not compatible (FMXLinux patches that file).
Additional Capabilities
Web Deployment to Ubuntu Server
You can use the GTK-Broadway backend to run an FMXLinux application as an HTML5 web application in the browser:
- Install Required Libs: sudo apt install xorg libgl1-mesa-dev libosmesa-dev libgtk-3-bin
- Start broadway server: broadwayd
- Run application from IDE
- Load :8080 in the browser
Supported Linux Distributions
Delphi Linux supports RedHat Enterprise and Ubuntu distributions, see the list of Supported Target Platforms for more information.
Additional Resources
There are a number of videos that you can view for help with getting started building FMX Linux applications:
Источник


