- Как в Delphi использовать компонент TNotificationCenter?
- Использование компонента
- Демонстрационный пример
- delphi 10.2 уведомления в windows 10 как?
- 1 ответ 1
- Using Notifications
- Contents
- Notifications Support per Platform
- Windows Notifications
- macOS Notifications
- iOS Notifications
- Notification Permissions
- Notification Alert
- Creating Notifications
- Firing Notifications
- Immediate Notifications
- Scheduled Notifications
- Firing Notifications in a Particular Date and Time
- Firing Notifications After a Period of Time
- Repeating Notifications
- Notification Sound
- Enabling Notification Sounds
- Customizing Notification Sounds
- Notification Actions
- Adding Notification Actions
- Notification Actions (macOS and iOS)
- Sending Notifications to the Notification Center
- ScheduleNotification
- PresentNotification
Как в Delphi использовать компонент TNotificationCenter?
Компонент TNotificationCenter появился в Delphi 10 Seattle. Этот компонент предоставляет доступ к центру уведомлений в Windows, Android, OS X и iOS. Следует отметить, что TNotificationCenter для Windows может использоваться только в Windows 8 и выше.
| Основная информация по компоненту | ||
| Вкладка палитры компонентов | System | |
| Исходник официального примера и документация | DocWiki | |
Этот демонстрационный пример показывает использование компонента TNotificationCenter в Windows.
На главной форме приложения расположены следующие компоненты:
- NotificationCenter1: компонент TNotificationCenter;
- btnShow: TButton – вызывает показ первого уведомления;
- btnCancel: TButton – отменяет показ первого уведомления;
- btnCancelAll: TButton – отменяет показ всех уведомлений;
- btnShowAnother: TButton – вызывает показ второго уведомления;
- btnCancelAnother: TButton – отменяет показ второго уведомления;
- mmLog: TMemo – лог для показа работы событий компонента TNotificationCenter.
Внешний вид демонстрационного приложения представлен на рисунке ниже:

Использование компонента
RAD Studio предоставляет компонент TNotificationCenter для управления уведомлениями на нескольких устройствах.
Центр уведомлений (TNotificationCenter), позволяет отправлять сообщения из запущенных приложений. Приложения могут использовать уведомления, чтобы проинформировать пользователя о чем-либо.
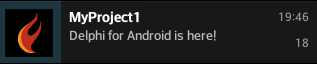
Компонент TNotification – это сообщение, которое приложение отправляет в центр уведомлений для отображения в области уведомлений в соответствии с платформой. Так, например, иконка центра уведомлений в Windows 10 располагается в нижнем правом углу экрана, там же и будут появляться Ваши уведомления.
В Windows для компонента TNotification вы можете использовать следующие свойства:
- TNotification.Name – уникальный идентификатор уведомления;
- TNotification.AlertBody – сообщение, которое будет показано пользователю;
- TNotification.Title – заголовок сообщения;
Для уведомлений в других операционных системах возможно использование ещё нескольких свойств в зависимости от того в какой ОС вы работаете. Например, вы можете назначить определенный звук на показ уведомления, запланировать перезапуск и т.д.
Демонстрационный пример
В приложении демонстрируется создание нового уведомления, его показ пользователю и скрытие из центра уведомлений. Прежде всего, т.к. центр уведомлений Windows доступен только с версии Windows 8 необходимо проверить на какой платформе запускается приложение и, при необходимости выдать пользователю сообщение о том, что TNotificationCenter не будет работать на его платформе. В примере это делается следующим образом:
delphi 10.2 уведомления в windows 10 как?
На официальном сайте delphi http://docwiki.embarcadero.com/CodeExamples/Tokyo/en/VCL.Windows_10_Notifications_Sample я вижу пример по работе уведомлений. Все работает. НО это довольно простой пример. На сколько я знаю API windows позволяет гораздо больше возможностей: с картинкой, с кнопками, отложенные, и тд тп. вот тут показано: https://blogs.msdn.microsoft.com/tiles_and_toasts/2015/07/08/toast-notification-and-action-center-overview-for-windows-10/
Подскажите как это все делать?
1 ответ 1
Вобщем разобрался с уведомлениями, оказалось, что встроенная библиотека в делфи Tnotification — позволяет только попробовать уведомления на простом примере, в остальном пришлось разбираться с помощью документации microsoft. Но я все равно еще не до конца разобрался — как получать реакцию на события. Как делать сложные уведомления (с картинками и кнопками) я разобрался.
Мне показалось, что компонент, который в делфи, довольно сильно усложняет понимание как работает уведомление. На самом деле, фактически уведомление windows 10 — это XML документ
Вот базовый шаблон:
Как я добился, я сначала хотел найти, так сказать чистый код, чисто на winapi, чтобы просто формировать свой документ и передавать напрямую, но мне не удалось заставить работать этот код:
Тогда я скопировал исходные коды компонента в папку проекта и стал исправлять нужные мне функции, т.к. если я изменял компонент в папке исходников — изменения не работали.
Как я поступил: я сам формирую нужный мне XML и передаю его в компонент уведомления, для этого я изменил функцию в компоненте, чтобы она принимала мой код
Ну и в класс уведомления, я добавил поле с шаблоном
Ну и теперь моя функция вызова уведомления выглядит так:
С реакцией на нажатие я пытаюсь разобраться в этом вопросе Реакция на actions уведомлений windows 10 на delphi, ищу решение. Как найду обязательно расскажу
Using Notifications
Notifications are messages that the applications send to communicate information or alert about something.
Note: This topic is about local notifications, which are the notifications that the device applications send; for remote notification see Push Notifications.
RAD Studio provides the TNotificationCenter component to manage multi-device notifications. The notification center, allows you to send messages from a running applications. Applications can use the notifications to inform the user about something.
The TNotification component is the message that the application sends to the notification center to be displayed in the designated notification area according to the platform.
You can create notifications for Windows using VCL, or for your Multi-Device applications using FireMonkey.
Contents
Notifications Support per Platform
| Item | Windows | macOS | iOS | Android |
|---|---|---|---|---|
| Platform Support |  |
Windows 10 and Windows 8
If no title, app name is used as title.
App name used as title.
If no title, app name is used as title.
Sets the badge number.
Sound always enabled.
Windows Notifications
Toast notifications are compatible with the following versions of Windows:
- Windows 8: Windows 8 displays the notifications for a short period of time, after this, the user does not have any further access to the notifications.
- Windows 10: Windows 10 displays the notifications for a short period of time, after this, the notifications are available in the Action Center.
To access the Action Center to view the notifications, click the Action Center icon available on the taskbar. The icon changes depending on whether there are notifications pending or not:
| Notifications Pending | No Notifications Pending |
|---|---|
 |  |
macOS Notifications
macOS supports notifications since version 10.8. For further information about macOS, see Using the macOS Notification Center.
iOS Notifications
Notification Permissions
To use notifications on iOS, add notification permissions to your application:
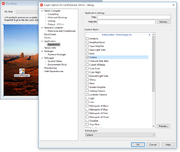
- Select Project > Options >Version Info .
- Select the appropriate iOS target platform.
- In the key-value list box, set the value of FMLocalNotificationPermission to True .
Notification Alert
iOS allows the user to set whether the notifications of an app is displayed as a banner or as an alert. Banners are displayed in the screen for a short period of time, while Alerts remain in the screen until the user interacts with the Alert.
To display the notifications as an alert, the end user has to go to the Notifications Settings of the application in the iOS device, and change the Alert Style when Unlocked settings to Alerts.
Creating Notifications
The TNotification class is used to create notification messages. You need the TNotificationCenter component to manage one or several TNotification instances.
After you have a TNotificationCenter component on your form, you can declare a TNotification variable, and call the CreateNotification method to create the notification.
After creating the notification, we recommend that you set at least the following fields:
- Name: with the unique name to identify your notification.
- AlertBody: with the text of the notification. The AlertBody filed is mandatory in iOS
You can manage other settings for your notifications:
- Title: with the title of the notification. iOS is not compatible with the Title field; iOS always displays the app name as title.
- Number: use this field to update the notification number in Android or the application badge number in iOS.
- ApplicationIconBadgeNumber: use this property to update the application badge number in iOS.
| iOS Badge Number | Android Notification Number |
|---|---|
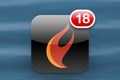 |  |
Firing Notifications
FireDate is used to set the date and time when the notification is going to be fired.
As regarding the time to fire the notification, you can create two types of notifications.
Immediate Notifications
By default, FireDate is set to Now, so if you do not change the value of FireDate, the notification is fired immediately.
Scheduled Notifications
Notifications can be scheduled to be fired at any time. Set FireDate to the date and time when you want to fire the notification.
Firing Notifications in a Particular Date and Time
You can set that a notification must be fired in a particular date and time. For example, to set a notification to be fired on the 16th of December of 2015 at 5:30 P.M., you could set FireDate like this:
When scheduling notifications to a particular date and time, you must bear in mind that if the FireDate you set has already passed, the notification is fired immediately.
Firing Notifications After a Period of Time
You can set that a notification must be fired after a period time. For example, to fire the notification in 1 minute and 30 seconds, you can do the following:
If a notification is scheduled, and you create another notification with the same name (whether scheduled or not), any previous notification that was scheduled with that same name is overwritten.
Repeating Notifications
You can use RepeatInterval to schedule notifications to repeat after a period of time. You can use one of the interval types that TRepeatInterval defines: None , Second , Minute , Hour , Day , Week , Weekday , Month , Quarter , Year , or Era .
Warning: When you schedule a notification to repeat after a period of time using RepeatInterval , the notification continues repeating even after the application closes; ensure you deal properly with cancelling the notifications.
For example, to set a notification to repeat every hour, you could do the following:
Notification Sound
Enabling Notification Sounds
You can enable or disable the sound using EnableSound. By default EnableSound is set to True .
- In the case of macOS and iOS, even when the sound is enabled, if the application is in the foreground, the notification sound does not play; macOS and iOS plays the notification sound when the application is in the background or closed.
- In the case of Windows, the notification sound always plays; even if you disable the sound with EnableSound .
Customizing Notification Sounds
You can customize the sound of your notifications setting SoundName to the sound for your notification.
To add a custom notification sound follow these steps:
- Drag and drop the sound file to the name of your project in the Projects Window, and confirm you want to add the file.
- Go to Project >Deployment and set the correct remote paths of the file for the different platforms.
- iOS: .\
- Indicate the custom sound name, set SoundName according to the platform.
Ensure you add the appropriate unit to your project:
Delphi: Add System.IOUtils in the uses clause.
C++: Add System.IOUtils.hpp in the header file .h of your project.
If the device is unable to find the custom sound that you set in your project, iOS plays the default sound, but the Android does not play any sound.
Notification Actions
Clicking the notifications in macOS, iOS, or Android, brings the application that sent the notification to the front, whether this application is running in the background or closed completely.
There is no particular behaviour when the user clicks the notification in Windows.
Adding Notification Actions
You can execute actions when the user clicks a notification. The event OnReceiveLocalNotification is fired when the user clicks a notification. Write an event handler to define an action.
The event handler for the OnReceiveLocalNotification even receives the TNotitication that the user clicked in the ANotification parameter; use the ANotification parameter to get further details about the notification the user clicked.
To show a message according to the notification the user clicked:
Notification Actions (macOS and iOS)
You can add an action button to an alert so the user can open the application clicking the button. For this feature to work, the user needs to set the style of notifications settings of the project to Alerts, for further information see how to set Notification Alerts in macOS and Notifications Alerts in iOS.
To add an action button, set the HasAction field to True . Use the AlertAction field to indicate the text of the button.
Sending Notifications to the Notification Center
After you finish configuring all the settings for your notification, you must send your notification to the notification center to process it.
You can send notifications to the notification center using one of the following two methods.
ScheduleNotification
ScheduleNotification sends a scheduled notification to the notification center. If FireDate is Now, or if FireDate has a past TDateTime, then the notification is presented immediately; otherwise the notification is scheduled as indicated.
Warning: Windows does not support ScheduleNotification .
PresentNotification
PresentNotification presents the notification immediately regardless of the value of FireDate.


