- FireMonkey for Linux
- Contents
- What is FMX for Linux?
- Key features:
- How to access FMX for Linux
- FireMonkey GUI Application Prerequisites
- Installing Linux Platform Support
- Installing and running PAServer
- Installing dependencies on your Linux server
- Getting Started
- FMXLinux Configuration
- Building and deploying your first project
- Additional Capabilities
- Web Deployment to Ubuntu Server
- Supported Linux Distributions
- Additional Resources
- Linux Application Development
- Contents
- Prerequisites
- Preparing Your Linux Development Environment
- Installing Development Packages
- Preparing Your Linux Machine
- Creating a Connection Profile
- Adding the Installed SDK to RAD Studio
- Running PAServer on Linux machine
- Delphi Compiles Code to Linux 64-bit Server
- Delphi for Linux Comes Back
- Console Application or DLL
- Only 64-bit
- No Windows-related Units
- Write One Code, Compile to Multiple Platforms
- How to SetUp PAServer?
- Приложения Delphi в Linux и доступ к базам данным MongoDB
FireMonkey for Linux
Contents
What is FMX for Linux?
FireMonkey for Linux, also known as FMXLinux, is an add-on component provided to Delphi and RAD Studio Enterprise and Architect edition customers via an exclusive OEM agreement with FMXLinux. FMXLinux provides capabilities for building GUI applications for Linux, extending RAD Studio’s (Delphi Edition) FireMonkey cross-platform framework.
Starting with 10.3.1, the FireMonkey for Linux (FMX) client add-on is available for Delphi and RAD Studio Enterprise customers that are current on Update Subscription via the RAD Studio GetIt Package Manager in the IDE.
Key features:
- FireMonkey for Linux provides the ability to create GUI applications for Linux, extending Delphi’s FireMonkey cross-platform framework.
- FMXLinux expands Delphi’s support from server applications to FMX client applications for popular Linux distributions.
- Includes several ready-to-use user interface styles.
- Many of the FMX components, such as grids, widgets, etc. work seamlessly on Linux clients.
- Leverage RAD Studio’s innovative features, such as Live Bindings, and much more, in your Linux client applications.
- Leverage WebKitGTK support to run an FMXLinux application as an HTML5 web application in the browser.
How to access FMX for Linux
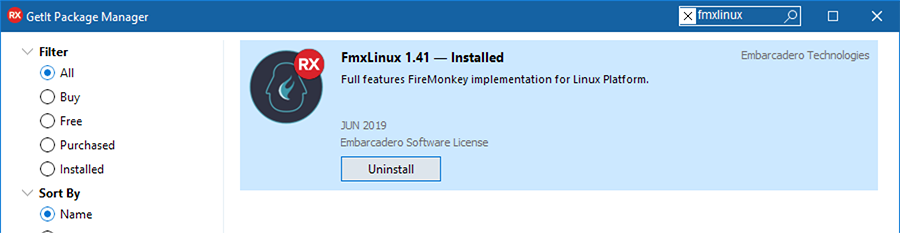
To download and install FMXLinux, open Delphi, go to Tools > GetIt Package Manager , and search for fmxlinux. At the end of the process, you need to restart the IDE, as requested by the GetIt package manager.
FireMonkey GUI Application Prerequisites
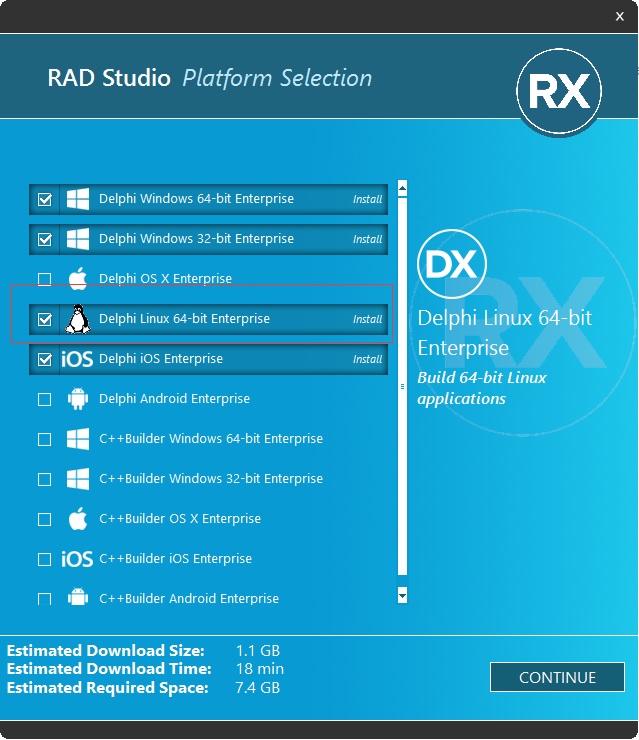
Installing Linux Platform Support
Before installing FMXLinux, you need to have Linux platform support for Delphi installed. Go to Tools > Manage Platforms to verify that Delphi Linux 64-bit is installed.

Installing and running PAServer
After installing Linux platform support, you need to install the Platform Assistant on Linux to build and deploy Linux applications. PAServer enables you to use the Deployment Manager, import the Linux SDK, and perform remote debugging on a Linux system. After installing PAServer for Linux, you will need to run PAServer before you can start building FMX Linux GUI applications.
Installing dependencies on your Linux server
To use graphical features in your server application, you will need to install some dependencies. You don’t need to install the whole X11 system on your server.
To install dependencies on Ubuntu/Debian, type this into the terminal:
Getting Started
FMXLinux Configuration
When installing FMXLinux via GetIt, the system registers a DLL Expert (which adds the “Add Linux Platform”) menu indicated below and also adds the catalog repository library folder to the Library Path for the Linux platform. You can verify this in Tools > Options > Language > Delphi Options > Library and choose Linux 64-bit from the Selected Platform combo box at the top:
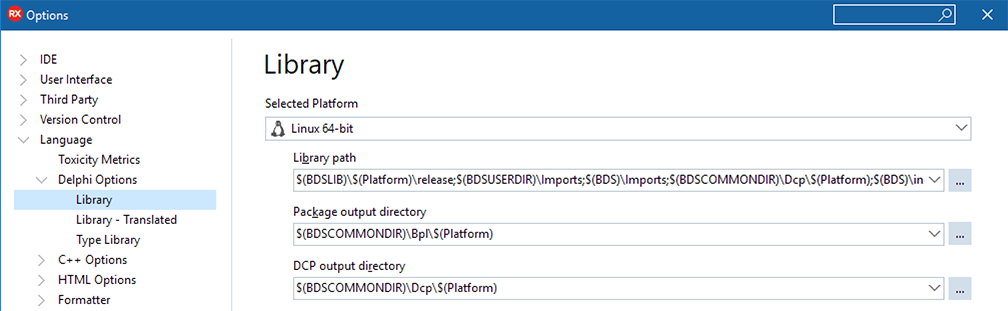
Click the ellipsis  to expand the list of paths and eventually fine tune them.
Building and deploying your first project
After installing the prerequisites listed above and FMXLinux via the GetIt Package Manager, go to File > Open Project to open an existing FireMonkey Project or File > New > Multi-Device Application to create a new FireMonkey project.
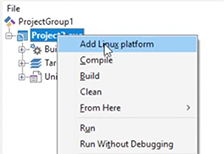
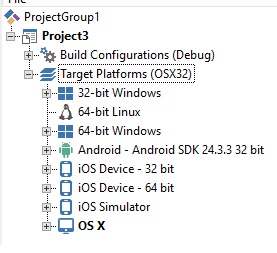
Next, right-click on the project in the Project Group to Add Linux platform.
Once you’ve added the Linux platform to your project, you will be able to switch to Linux 64-bit and deploy your FMX GUI applications to Linux. Ensure that PAServer is running on your target Linux machine. Click Run to deploy your Linux GUI application.

This happens because your library paths are not properly configured and instead of building against the proper DCU file, the compiler looks for the original version of the source code file, which is not compatible (FMXLinux patches that file).
Additional Capabilities
Web Deployment to Ubuntu Server
You can use the GTK-Broadway backend to run an FMXLinux application as an HTML5 web application in the browser:
- Install Required Libs: sudo apt install xorg libgl1-mesa-dev libosmesa-dev libgtk-3-bin
- Start broadway server: broadwayd
- Run application from IDE
- Load :8080 in the browser
Supported Linux Distributions
Delphi Linux supports RedHat Enterprise and Ubuntu distributions, see the list of Supported Target Platforms for more information.
Additional Resources
There are a number of videos that you can view for help with getting started building FMX Linux applications:
Источник
Linux Application Development
RAD Studio allows you to develop applications for the target Linux platform. Using RAD Studio installed on Windows machine, you can create a 64-bit Linux application and deploy it to the Linux machine. Developing Linux applications is similar to creating Android apps in RAD Studio. However, for Linux, you cannot create the visual VCL and FireMonkey applications. Here is the list of apps that are available for the Linux platform:
- Console Application
- EMS Package (RAD Server)
- DataSnap
- DataSnap WebBroker
- WebBroker
- Dynamic-link Libraries
- DUnitX Project
Contents
Prerequisites
To develop Linux applications, you need to have the RAD Studio installed on the Windows PC as well as a machine with the Linux platform (can be a virtual machine).
Preparing Your Linux Development Environment
To prepare your development system (PC) and Linux machine for application development with RAD Studio:
Installing Development Packages
To install the development packages on Ubuntu:
- Right-click your desktop and select Open Terminal.
- To upgrade the packages you have already installed , type sudo apt update && sudo apt upgrade && sudo apt dist-upgrade in the terminal.
- Type your user password and press Enter
- Wait until prompted to agree to the package upgrade operation. Type Y and press Enter
- Wait until the package upgrade operation is complete. It may take a few minutes to complete.
- To add the development packages, type sudo apt install joe wget p7zip-full curl openssh-server build-essential zlib1g-dev libcurl4-gnutls-dev libncurses5 in the terminal.
- Type your user password and press Enter
- Wait until prompted to agree to the package installation operation. Type Y and press Enter
- Wait until the pacjage installation operation is complete. It may take a few minutes to complete.
To install the development packages on Red Hat:
- Right-click your desktop and select Open Terminal.
- Type yum groupinstall ‘Development Tools’ in the terminal.
- Press Enter and wait until the package installation operation is complete. It may take a few minutes to complete.
Preparing Your Linux Machine
To create Linux applications, you need to add a virtual machine PAServer:
1. Find the LinuxPAServer21.0.tar.gz file in the following location: C:\Program Files (x86)\Embarcadero\Studio\21.0\PAServer\LinuxPAServer21.0.tar.gz 2. Unpack the LinuxPAServer21.0.tar.gz file.
To use the System.zLib unit on Red Hat:
1. Install the zLib-devel library to your RHEL machine with the following command: sudo yum install zlib-devel 2. Update the local SDK cache.
To use the System.zLib unit on Ubuntu:
1. Install the zLib-devel library to your Ubuntu machine with the following command: sudo apt-get install zlib1g-dev 2. Update the local SDK cache.
Creating a Connection Profile
- Right-click the folder where you have unpacked the LinuxPAServer21.0.tar.gz file, and then click Open in Terminal.
- Enter ./paserver in terminal. Then, press Enter.
- On the Tools > Options > Environment Options > Connection Profile Manager page, click the Add button. The Create a Connection Profile wizard opens.
- On the Profile information page, enter the following:
- In the Profile name field, enter the needed name.
- In the Platform field, click the 64-bit Linux platform.
- Click Next.
- On the Remote machine information page, enter the following:
- In the Remote machine field, enter the IP address or Machine name.
- Click Test Connection to check if the values are valid.
- Click Finish.
Adding the Installed SDK to RAD Studio
- On the Tools > Options > Environment Options > SDK Manager page, click the Add button.
- In the Add a New SDK dialog, enter the following:
- In the Select a platform field, click 64-bit Linux.
- In the Select a profile to connect, select a created profile from the drop-down list.
- In the Select an SDK version field, the name of the SDK that you just installed will automatically appear. If you have not installed SDK previously, you can do it on this step. If you have already installed SDK, move on to the next step.
Running PAServer on Linux machine
To run the PAServer on your Linux machine:
- Open the terminal, and then run PAServer in the terminal.
Источник
Delphi Compiles Code to Linux 64-bit Server
If you are on the EMB subscription, you should recently get invitiation email to try the preview build – Delphi 10.2 Tokyo, which now supports 64-bit Linux server native code.
It is still at beta-preview, so it is estimated to come out officially sometime this year e.g. April.
Delphi now supports several major platforms, including 64-bit Linux Server (It used to be called – Kylix, but this feature was dropped).
Delphi for Linux Comes Back
Currently, it is just the Delphi language. So it means that you can’t use C++ Builder for Linux code. However, with Delphi for Linux, there comes with some limitations:
Console Application or DLL
Support for Linux native code compilation limits to console applications and DLLs.
Only 64-bit
It does not support 32-bit Linux, but this is not a big problem because Linux 64-bit is preferred and most popular nowadays.
No Windows-related Units
It makes senses that Linux does not know what is “windows.pas” unit. So if you have windows-related code e.g. COM, it won’t compile when targetd Linux.
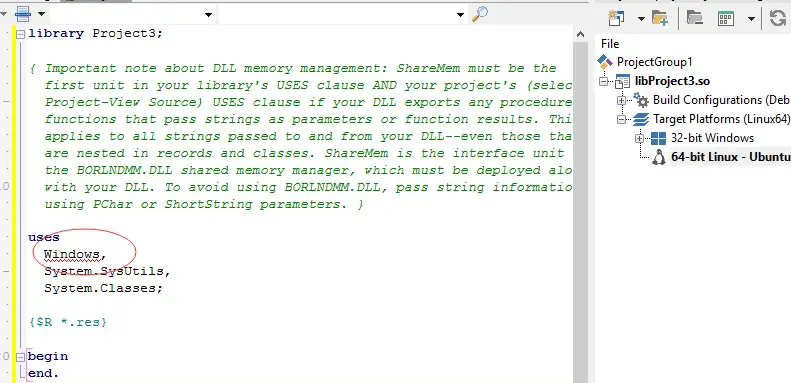
Also, it does not support GUI stuffs, so no Forms.pas unit etc. It is a set back compared to Kylix long time ago.
Write One Code, Compile to Multiple Platforms
The beauty of Delphi RAD (Rapid Application Development) IDE, is that you can write one code, and compile it to multiple platforms
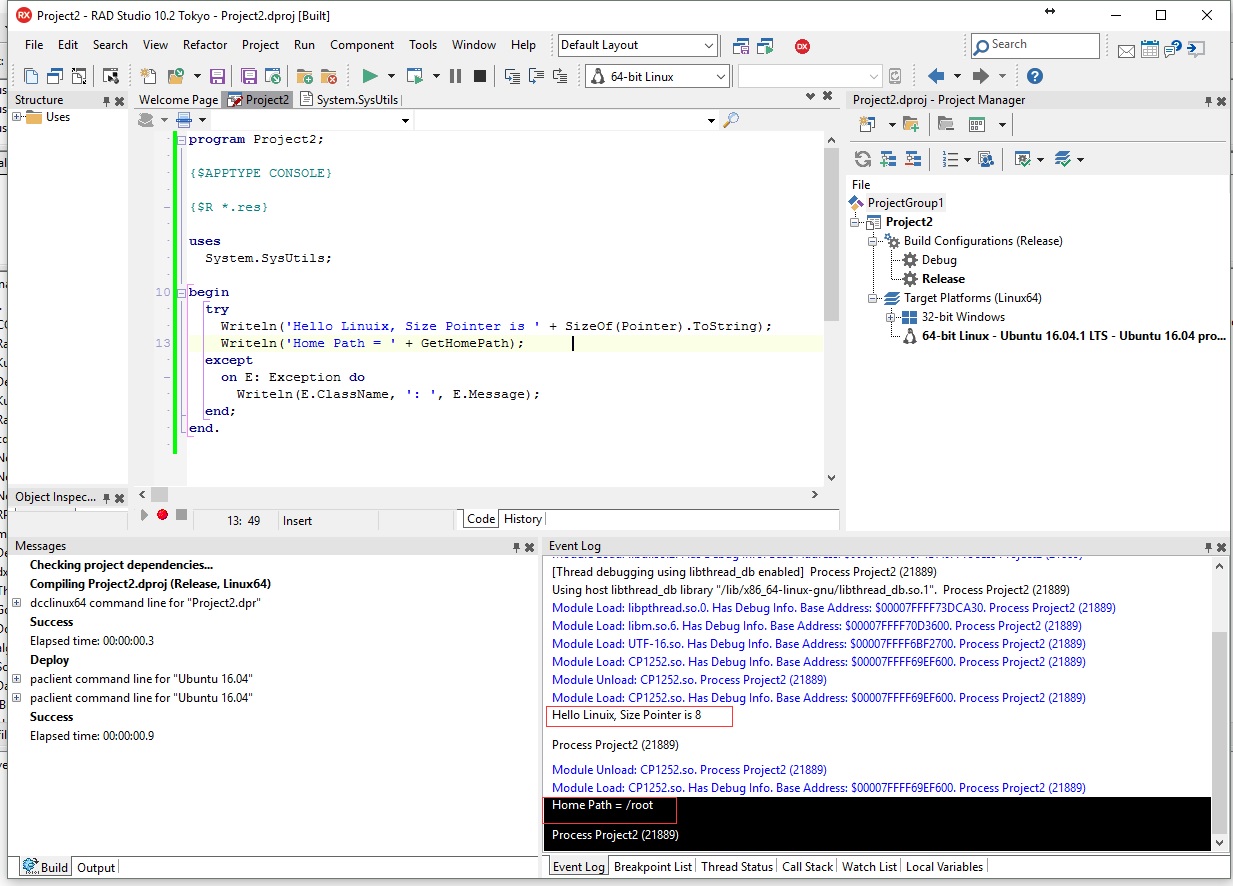
e.g. You can write code on windows and compile to native Linux code directly!

How to SetUp PAServer?
The PAServer is a console application that you need to copy to your Linux server. It is located at Delphi installation folder \PAServer\LinuxPAServer19.0.tar. It is a tar file and you need to extract the contents.
Источник
Приложения Delphi в Linux и доступ к базам данным MongoDB
С выходом RAD Studio 10.2, включающей компилятор Delphi for Linux, появилась возможность создания на Delphi серверных нативных приложений для работы в среде Linux. Многие коммерческие и промышленные системы все чаще используют в качестве серверов вычислительные системы под управлением различных версий и редакций Linux — популярной, производительной и значительно более экономичной операционной системы широко распространенной на множестве облачных платформ и практически в любых центрах обработки данных.
Многие Web-сайты и многозвенные приложения работают на Linux-серверах и обеспечивают одновременный доступ множества пользователей к хранимой на сервере или в распределенных системах информации, которая, в подавляющем числе случаев, хранится под управлением какой-то СУБД.
Библиотеки и компоненты Delphi для работы с базами данных позволяют быстро и в визуальном режиме создавать множество вариантов самостоятельных приложений, WEB- и REST-сервисов, встраиваемых модулей для промышленных WEB-серверов и серверов приложений, в том числе, Datasnap или RAD Server, активно работающие с любыми из обширного списка поддерживаемых СУБД.
За последние годы документо-ориентированная NoSQL СУБД MongoDB добилась огромной популярности и получила широкое распространение именно на серверах под управлением Linux. В силу особенностей Linux здесь MongoDB работает производительнее, лучше настраивается и масштабируется.
На обзорных вебинарах и семинаре по RAD Studio 10.2 я уже показывал примеры реализации серверных приложений Linux, работающих с данными из MySQL. В самом простом случае нужно всего лишь добавить компонент TFDConnection, настроить его для связи с сервером БД, указав соответствующие параметры-свойства, а затем с помощью TFDQuery ввести нужный запрос и выполнить его. Остается только выдать\напечатать данные, полученные после выполнения запроса в нужной форме. Невероятно, но самым сложным является настройка драйверов доступа к СУБД, в данном случае MySQL.
Теперь я бы хотел рассказать, как реализовать простейшую программу для Linux-сервера, обрабатывающую данные из MongoDB. Несмотря на очевидную простоту реализации, стоит обратить внимание на характерные особенности работы с MongoDB.
Для этого примера я буду использовать установленный на моей VirtualBox VM с Ubuntu Server 16.04 отдельный сервер MongoDB v3.4. Как установить и настроить сервер MongoDB в Ubuntu Linux подробно описано в статье Установка InterBase и MongoDB в Linux (Ubuntu server) в этом блоге. Запуск демона MongoDB выполняется командой
Welcome to Ubuntu 16.04.2 LTS (GNU/Linux 4.4.0-78-generic x86_64) * Documentation: https://help.ubuntu.com * Management: https://landscape.canonical.com * Support: https://ubuntu.com/advantage Могут быть обновлены 0 пакетов. 0 обновлений касаются безопасности системы. asovtsov@ubuntu16srv:
$ sudo service mongod start [sudo] пароль для asovtsov: asovtsov@ubuntu16srv:
Кстати, для удобства переноса модулей в Ubuntu я пользуюсь утилитой WinSCP и PuTTY-терминалом для SSH-соединения с Linux.
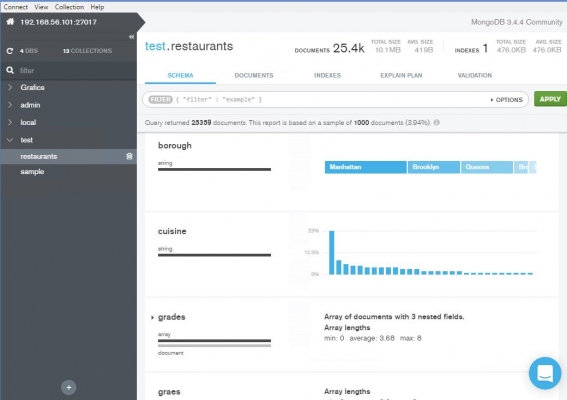
В этом примере мы будем работать с базой данных из примеров работы с MongoDB в FireDAC , которые поставляются вместе с RAD Studio или Delphi 10.2. Это база данных (database) ‘test’ и коллекция ‘restaurants’, которая содержит более 25000 записей о Нью-Йоркских ресторанах, с привязкой по районам. Если ваш MongoDB на Linux еще не содержит такой базы данных, ее можно создать и заполнить прямо из Windows — открыть пример «C:\Users\Public\Documents\Embarcadero\Studio\19.0\Samples\Object Pascal\Database\FireDAC\Samples\DBMS Specific\MongoDB\Restaurants\Mongo_Restaurants.dproj», собрать и запустить его. Первая кнопка ‘LoadData’ создаст и заполнит нужную БД.
Для примера ограничимся только двумя запросами, зато интересными:
- ‘Count of restaurants grouped by borough’ — подсчет количества ресторанов в каждом районе
- ‘Count of Brazilian restaurants in Queens grouped by zip-code’ — Подсчет количества ресторанов с бразильской кухней в районе Queens, с группировкой по почтовому индексу
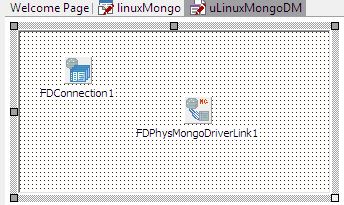
Главный модуль приложения выглядит так:
program linuxMongo; <$APPTYPE CONSOLE> <$R *.res>uses System.SysUtils, uLinuxMongoDM in ‘uLinuxMongoDM.pas’
Вся магия работы с данными заключена в вызове процедуры AggregateData(); которая описана в стандартном TDatamodule в модуле uLinuxMongoDM.
Датамодуль устроен тоже достаточно просто, однако есть специфика работы с MongoDB.
unit uLinuxMongoDM; interface uses System.SysUtils, System.Classes, FireDAC.Stan.Intf, FireDAC.Stan.Option, FireDAC.Stan.Param, FireDAC.Stan.Error, FireDAC.DatS, FireDAC.Phys.Intf, FireDAC.DApt.Intf, Data.DB, FireDAC.Comp.DataSet, FireDAC.Comp.Client, FireDAC.UI.Intf, FireDAC.Stan.Def, FireDAC.Stan.Pool, FireDAC.Stan.Async, FireDAC.Phys, FireDAC.Phys.MongoDB, FireDAC.Phys.MongoDBDef, System.Rtti, System.JSON.Types, System.JSON.Readers, System.JSON.BSON, System.JSON.Builders, FireDAC.Phys.MongoDBWrapper, FireDAC.ConsoleUI.Wait; const DBsrvAddr = ‘192.168.56.101’; type Tfdm = class(TDataModule) FDConnection1: TFDConnection; FDPhysMongoDriverLink1: TFDPhysMongoDriverLink; procedure DataModuleCreate(Sender: TObject); private < Private declarations >FEnv: TMongoEnv; FCon: TMongoConnection; procedure DumpCursor(ACrs: IMongoCursor; caption: string); public < Public declarations >procedure DataGetAggregates(); end; var fdm: Tfdm; procedure AggregateData(); implementation <%CLASSGROUP 'System.Classes.TPersistent'> <$R *.dfm>uses System.Diagnostics, FireDAC.Stan.Util; procedure AggregateData(); var DataModule1: Tfdm; begin DataModule1 := Tfdm.Create(nil); DataModule1.DataGetAggregates; DataModule1.Free; end; procedure Tfdm.DataGetAggregates; var oCrs: IMongoCursor; begin oCrs := FCon[‘test’][‘restaurants’].Aggregate().Group.Add(‘_id’, ‘$borough’) .BeginObject(‘count’).Add(‘$sum’, 1).EndObject.&End; DumpCursor(oCrs, ‘Count of restaurants grouped by borough’); oCrs := FCon[‘test’][‘restaurants’].Aggregate().Match.Add(‘borough’, ‘Queens’) .Add(‘cuisine’, ‘Brazilian’).&End.Group.Add(‘_id’, ‘$address.zipcode’) .BeginObject(‘count’).Add(‘$sum’, 1).EndObject.&End; DumpCursor(oCrs,’Count of Brazilian restaurants in Queens grouped by zip-code’); end; procedure Tfdm.DataModuleCreate(Sender: TObject); begin with FDConnection1.Params do begin Clear; Add(‘DriverID=Mongo’); Add(‘Server=’+DBsrvAddr); end; FDConnection1.Connected := True; FCon := TMongoConnection(FDConnection1.CliObj); FEnv := FCon.Env; end; procedure Tfdm.DumpCursor(ACrs: IMongoCursor; caption: string); begin Writeln(»); Writeln(caption); while ACrs.Next do Writeln(ACrs.Doc.AsJSON); end; end.
Вызываемая процедура AggregateData() управляет созданием и уничтожением объекта датамодуля. Обработчик его события OnCreate обеспечивает задание актуальных параметров соединения с сервером MongoDB, создает и инициализирует необходимые объекты (соединение и контекст) для работы с запросами и курсорами Mongodb. Сами запросы задаются и выполняются в процедуре Tfdm.DataGetAggregates, а процедура Tfdm.DumpCursor(ACrs: IMongoCursor; caption: string) обеспечивает выдачу заголовка запроса и полученных в результате его исполнения данных.
За исключением операторов консольной выдачи, исходный текст этого модуля не содержит изменений по сравнению с аналогичным для платформы Windows — фактически, это один и тот же код.
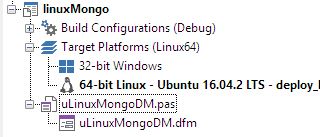
Укажем Linux64, как целевую платформу, и можно компилировать.
Чтобы Delphi автоматически переносил и запускал скомпилированный двоичный модуль, нужно в окне терминала Linux запустить PAServer, необходимый, кроме того, для выполнения отладки программ на Linux.
/PAServer-19.0/paserver Platform Assistant Server Version 10.0.1.23 Copyright (c) 2009-2017 Embarcadero Technologies, Inc. Connection Profile password : Starting Platform Assistant Server on port 64211 Type ? for available commands >
Если теперь собрать приложение и запустить его в Linux, то получим ошибку! Необходимо установить и настроить клиентские драйвера и библиотеки MongoDB.
В этом месте я совершил небольшую ошибку. Чтобы не повторять ее, рекомендую следовать указаниям документации: http://docwiki.embarcadero.com/RADStudio/Tokyo/en/Connect_to_MongoDB_Database_(FireDAC), раздел Client Software.
Дело в том, что работа FireDAC пока настроена на работу с драйвером mongoc от MongoDB версии 3.0. В состав дистрибутива Ubuntu 16.04 этот драйвер уже был включен. Моя ошибка заключалась в том, что я скачал, собрал и установил более современную версию драйвера 1.6.3. Переход на эту версию драйвера будет сделан в ближайшем обновлении (см. опубликованный RoadMap по RAD Studio). Пришлось «откатываться» на требуемый вариант.
Следуйте указанным в документации инструкциям и выполните в окне терминала Linux:
sudo apt-get install libmongoc-1.0-0 sudo ln -s /usr/lib/x86_64-linux-gnu/libmongoc-1.0.so.0.0 /usr/lib/x86_64-linux-gnu/libmongoc-1.0.so sudo ln -s /usr/lib/x86_64-linux-gnu/libbson-1.0.so.0.0 /usr/lib/x86_64-linux-gnu/libbson-1.0.so
Вот теперь можно запускать проект на выполнение!
Источник


