- FireMonkey for Linux
- Contents
- What is FMX for Linux?
- Key features:
- How to access FMX for Linux
- FireMonkey GUI Application Prerequisites
- Installing Linux Platform Support
- Installing and running PAServer
- Installing dependencies on your Linux server
- Getting Started
- FMXLinux Configuration
- Building and deploying your first project
- Additional Capabilities
- Web Deployment to Ubuntu Server
- Supported Linux Distributions
- Additional Resources
FireMonkey for Linux
Contents
What is FMX for Linux?
FireMonkey for Linux, also known as FMXLinux, is an add-on component provided to Delphi and RAD Studio Enterprise and Architect edition customers via an exclusive OEM agreement with FMXLinux. FMXLinux provides capabilities for building GUI applications for Linux, extending RAD Studio’s (Delphi Edition) FireMonkey cross-platform framework.
Starting with 10.3.1, the FireMonkey for Linux (FMX) client add-on is available for Delphi and RAD Studio Enterprise customers that are current on Update Subscription via the RAD Studio GetIt Package Manager in the IDE.
Key features:
- FireMonkey for Linux provides the ability to create GUI applications for Linux, extending Delphi’s FireMonkey cross-platform framework.
- FMXLinux expands Delphi’s support from server applications to FMX client applications for popular Linux distributions.
- Includes several ready-to-use user interface styles.
- Many of the FMX components, such as grids, widgets, etc. work seamlessly on Linux clients.
- Leverage RAD Studio’s innovative features, such as Live Bindings, and much more, in your Linux client applications.
- Leverage WebKitGTK support to run an FMXLinux application as an HTML5 web application in the browser.
How to access FMX for Linux
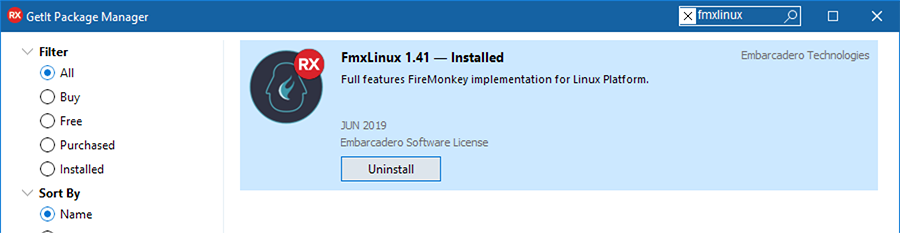
To download and install FMXLinux, open Delphi, go to Tools > GetIt Package Manager , and search for fmxlinux. At the end of the process, you need to restart the IDE, as requested by the GetIt package manager.
FireMonkey GUI Application Prerequisites
Installing Linux Platform Support
Before installing FMXLinux, you need to have Linux platform support for Delphi installed. Go to Tools > Manage Platforms to verify that Delphi Linux 64-bit is installed.

Installing and running PAServer
After installing Linux platform support, you need to install the Platform Assistant on Linux to build and deploy Linux applications. PAServer enables you to use the Deployment Manager, import the Linux SDK, and perform remote debugging on a Linux system. After installing PAServer for Linux, you will need to run PAServer before you can start building FMX Linux GUI applications.
Installing dependencies on your Linux server
To use graphical features in your server application, you will need to install some dependencies. You don’t need to install the whole X11 system on your server.
To install dependencies on Ubuntu/Debian, type this into the terminal:
Getting Started
FMXLinux Configuration
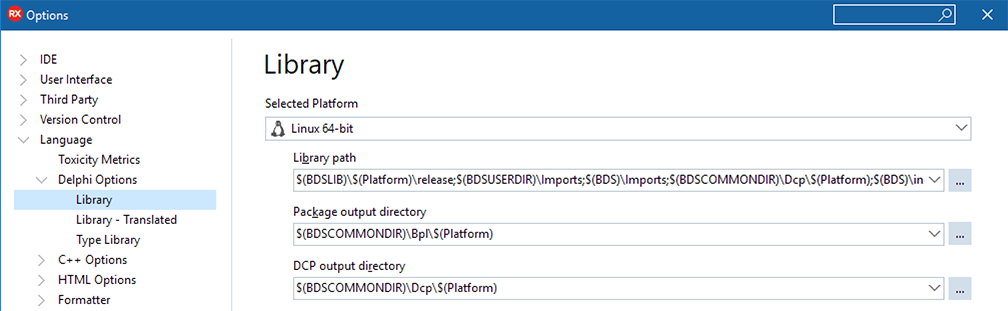
When installing FMXLinux via GetIt, the system registers a DLL Expert (which adds the “Add Linux Platform”) menu indicated below and also adds the catalog repository library folder to the Library Path for the Linux platform. You can verify this in Tools > Options > Language > Delphi Options > Library and choose Linux 64-bit from the Selected Platform combo box at the top:
Click the ellipsis  to expand the list of paths and eventually fine tune them.
Building and deploying your first project
After installing the prerequisites listed above and FMXLinux via the GetIt Package Manager, go to File > Open Project to open an existing FireMonkey Project or File > New > Multi-Device Application to create a new FireMonkey project.
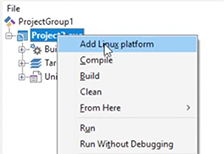
Next, right-click on the project in the Project Group to Add Linux platform.
Once you’ve added the Linux platform to your project, you will be able to switch to Linux 64-bit and deploy your FMX GUI applications to Linux. Ensure that PAServer is running on your target Linux machine. Click Run to deploy your Linux GUI application.

This happens because your library paths are not properly configured and instead of building against the proper DCU file, the compiler looks for the original version of the source code file, which is not compatible (FMXLinux patches that file).
Additional Capabilities
Web Deployment to Ubuntu Server
You can use the GTK-Broadway backend to run an FMXLinux application as an HTML5 web application in the browser:
- Install Required Libs: sudo apt install xorg libgl1-mesa-dev libosmesa-dev libgtk-3-bin
- Start broadway server: broadwayd
- Run application from IDE
- Load :8080 in the browser
Supported Linux Distributions
Delphi Linux supports RedHat Enterprise and Ubuntu distributions, see the list of Supported Target Platforms for more information.
Additional Resources
There are a number of videos that you can view for help with getting started building FMX Linux applications:
Источник
by Craig Chapman · Published 2016-12-29 · Updated 2019-08-03


Image courtesy of Jim McKeeth.
One of the more exciting features of the pending 10.2 release of Delphi and RAD Studio, is support for targeting Linux. In this post, I’m going to step you through setting up your development environment to deploy applications to either RedHat Enterprise or Ubuntu 16.04.
This post is going to become quite lengthy, and there may be parts not relevant to you. For example, if you already have a running RedHat server, you likely don’t need me to explain how to install one. Similarly, you may already be familiar with some virtualization software and don’t need instructions on installing Oracle’s VirtualBox, I’ll break this post into sections so that you can skip to the parts that matter most to you.
- Selecting a Linux distribution.
- You will need
- Installing Oracle’s VirtualBox
- Creating a Virtual Machine for development.
- Installing RedHat
- Installing Ubuntu
- Deploying the PAServer (required)
- Deploying an application.
- The scratch-directory.
There are a lot of sections to cover here!
As this post is long with several instructions, I’ll go relatively light on detail here and provide the installation options and configuration which works for me. If you have suggestions, or encounter problems following these instructions, or better yet, solutions to problems, please register and comment against this blog post so that others can benefit from your experience.
Lets get started.
Selecting a Linux distribution.
Your first decision is going to be which distribution (or ‘flavor’) of Linux you’d like to use for your application deployment. The Delphi / RAD Studio beta offers two options which will be officially supported, RedHat Enterprise and Ubuntu 16.04. (*note other flavors of Linux may work equally well, but due to there being wide variation among the available Linux based operating systems, official support is limited to these two popular distributions).
So what’s the difference between the two distributions? I don’t plan to go into lengthy detail on this subject, you can research each platform for yourself to decide which you’d prefer to use, but I’ll give you some basic pointers to get started.
A long time ago, as Linux operating systems were becoming popular, two leading distributions began to emerge from the fog of options. These were Debian and RedHat. Debian was founded by Ian Murdock under a manifesto which detailed it’s open source and open standards nature, and under the GNU Public License with intentions to encourage contributions, towards the development of the operating system, from it’s user community.
In contrast the Red Hat company released their “RedHat Commercial Linux”, which was later renamed as “RedHat Enterprise Linux (RHEL)”, with a more commercial model but along-side free to use, cost free editions named Fedora or Centos. Their model seemed aimed at merging the benefits of both commercial and open source development, while promoting the relevance of Linux to Enterprise customers. Red Hat therefore offer commercial enterprise support for RHEL, while honoring the open source nature of Linux with Fedora and/or Centos. If you select RedHat as your target, you can get started for free with their Developer Subscription, but will need to pay for a commercial license before deploying your application within your Enterprise. Of course, you could try using one of their cost free options of Fedora or Centos, which ought to be largely compatible, but these aren’t officially supported either by RedHat software nor by Embarcadero.
Ubuntu is a fork of the Debian operating system which is developed and maintained by the UK company Canonical Ltd, originally founded and funded by Mark Shuttleworth, an entrepreneur from South Africa. Canonical also offer commercial support for enterprise users, however, due to the manifesto first laid out for the Debian system by Ian Murdock, there is no commercial version of the operating system it’s self. Home users and community members get the same version of the operating system that commercial customers do, but with community based support rather than commercial support. If you select Ubuntu as the target for your application, you can develop and even deploy your application without paying for the operating system, but if you do, you’ll be at the mercy of community support having foregone the option of commercial support.
You will need
- RedHat or Ubuntu.
Unless you have an existing server, you’ll need an ISO image (disk image) of either RedHat or Ubuntu ready to be installed onto a virtual machine.
For RedHat, I’ll be using a developer edition, which may be downloaded here (requires cost-free subscription): https://developers.redhat.com/blog/2016/03/31/no-cost-rhel-developer-subscription-now-available/
For Ubuntu, I’ll be using the server edition (LTS) which may be downloaded here: https://www.ubuntu.com/download/server - Virtualization Software.
I’ll be using Oracles VirtualBox which may be downloaded here: https://www.virtualbox.org/wiki/Downloads
Download both VirtualBox for your windows host, as well as the extension pack. - WinSCP (SFTP)
We’ll need a way to transport the PAServer portion of the RAD IDE onto the linux machine. For this I plan to use WinSCP which uses SSH to transfer files to our linux server. Both versions of linux support an SSH server which makes this convenient. You can download WinSCP here: https://winscp.net/eng/download.php19.0 \PAServer”
Note: if you’re using a newer version of RAD, simply adjust the version number in the path according to what you have installed.
The PAServer application for linux is contained in an archive file named “LinuxPAServer 19.0 .tar” but it’s little use to us sitting in this tar file on our windows machine. We need a way to move it over to the Linux target machine. This is where WinSCP comes in:
WinSCP is an application which can connect to any Linux computer which is running an SSH daemon (that’s SSH server to windows folks), and can then transfer files to and from that computer. You should have downloaded WinSCP back in the “You will need” section of this post, so go ahead and double click on the installer and lets install WinSCP…


Select “Typical Installation (recommended)” and click “Next”

Select the “Commander” interface, this is a preference you may alter if you wish, but my instructions will be for the commander interface.
Click “Next”


Remove the check box before “Open Getting started page” unless you actually would like to go read the manual 🙂
Click “Finish”
WinSCP will now open and present you with a login screen which looks something like this..

Enter the IP address of your Linux server into the “Host name:” box, but omit the “User name” and “Password” boxes. These boxes are useful if you wish to save the machine IP and credentials for easier login next time, but for the sake of these instructions we’re only going to connect to our Linux server once from WinSCP…

If presented with this warning, click “Yes”. This is importing the security certificate which is used to encrypt the connection between WinSCP and the server.

Enter a username to connect to your linux server with (the one you setup during installation if you followed my guide).
Click “OK”

Enter the appropriate password and click “OK”
If all goes according to plan, you should see WinSCP logged into your server, something like this…

On the left of the WinSCP window you will see a directory browser looking at some location on your computers local disk, and on the right you’ll see a directory browser looking at the home directory for your user on your Linux server. You can navigate these browsers and drag and drop files from either side to the other to have them uploaded or downloaded as necessary.
Lets use this to upload the PAServer application.
On the left side of WinSCP, browse to the location of the PAServer install file:
“C:\Program Files (x86)\Embarcadero\Studio\ 19.0 \PAServer”

Now simply drag the “LinuxPAServer19.0.tar” file from the left to the right side of WinSCP…


And as you can see, the PAServer install file has been copied up to your server.
If you’re not still logged into a terminal session on your server (from having followed my guide for installation), go and log into your server now using the same user that you used to connect from WinSCP, and enter the instruction
You should see the PAServer install file listed…

The .tar file listed is an archive file, (think .zip file but without compression if that helps), we need to unpack it.
Type the instruction..

You’ll see a list of the files that were decompressed, and if you type the “ls” instruction again you’ll see…

It may be difficult to see in the screen shot due to the aweful default color scheme, but along side the “LinuxPAServer19.0.tar” file a new directory has been created “PAServer19.0”
We’re going to change into that directory with the change directory (cd) instruction and then issue the “ls” instruction again…

At this point, if you’re running a RedHat server there are a couple of additional instructions you’ll need to run before we can start the PAServer running. You need to open a hole in the network firewall through which the PAServer can communicate with the RAD IDE.
Skip these instructions if you’re running Ubuntu (by default the ubuntu filewall is disabled)

Ubuntu users that skipped the previous instructions, rejoin us here.
Now it’s time to run the PAServer, enter the following instruction.

You’ll be asked to provide a profile password, this password is optional, and so for these instructions I’m going to suggest you simply press [ENTER] / [RETURN] to leave it blank. If you do enter a password here, you’ll need it later when configuring the RAD IDE to communicate with the PAServer.

The PAServer is now running and is ready for the IDE to communicate with it.
In order to communicate with the PAServer, your IDE will need the IP Address of the Linux server, which by now you already have, but for good measure type the “i” instruction into the PAServer command prompt..

Tip: Remembering that you can use the “i” instruction within PAServer can be useful if you later reconnect the server to your network or reboot, and find that the IP address has been updated by your DHCP setup.
Deploying an application.
Lets put together a simple “Hello World” application so we can deploy it to our Linux server and see it working.
Within RAD, go to “File / New / Other”

Select the “Delphi Projects” branch on the left, and “Console Application” on the right, then click “OK” 
Beneath the green commented “TODO” line of the template application, add the following two lines of code.
Your program should look like this…

Under the Project Manager (top right) right click on “Target Platforms (Win32)” and select “Add Platform”

Select “64-bit Linux” from the drop down box and click “OK”
(Make sure the check box “Make the selected platform active” is checked)

Press the “Run with debugging” button (or press F9 on your keyboard).

You’ll be presented with the following dialog…

Give your deployment profile a name, I’ve named mine “deploy_linux”, and press “Next”

Enter the IP address of your linux server, and click the “Test Connection” button.

If you see this dialog indicating that the connection succeeded, congratulations! If you do not, you’re going to have to retrace your steps to figure out what you did wrong, your IDE is unable to talk to the PAServer on your Linux server.
Click “Ok” and then click “Finish”, you should see a dialog like this one..

Make sure everything looks correct here. In particular, the “Select an SDK Version” drop down box should reflect the flavor of Linux you are targeting. Then click “OK”

After the appropriate SDK has been imported, you should be presented with a dialog similar to the one above. On my system, because I’ve deployed to Linux previously, there is a lot less output than I would expect on yours. Once done, click “Close”
At this point, your IDE should switch into debug mode and the following console output should appear at the bottom of the IDE event log…
(If this does not happen right away, give it a moment.)

Congratulations, you just deployed a Delphi application to a Linux server!
( You can hit “stop debugging” in the IDE now, it’s not going to do anything else 🙂
The scratch-directory.
At this point you’ve seen an application deployed to your linux server, but the console output was redirected through the PAServer back to your IDE. What if you’d like to see the application running on the linux server it’s self?
Well, log into your server and navigate back to the PAServer directory (you’re already there if you’ve followed this guide sequentially, just press “q” followed by [ENTER]/[RETURN] to quit the PAServer), and issue the “ls” instruction once more…

Again, it’s difficult to see because of the color scheme, but a new directory has been created named “scratch-dir”, repeatedly issuing “cd” and “ls” commands, you can navigate down into the scratch-dir and it’s sub-directories until you eventually locate the executable file for your project. In the screenshot named “Project1” as yours ought to be. Note it does not have a ‘.EXE’ extension as this is specific to MS Windows…

Now you can issue an instruction to run this project on the server…

And there it is, your Hello World Application running right there on your Linux server!
Go forth and make Linux applications with Delphi.
Источник


