- Где Default Desktop Pictures находятся в Mac OS X
- Поиск местоположения файла изображения по умолчанию в Mac OS
- Create a disk image using Disk Utility on Mac
- Create a blank disk image for storage
- Create a disk image from a disk or connected device
- Create a disk image from a folder or connected device
- Create a secure disk image
- Customise the desktop picture on your Mac
Где Default Desktop Pictures находятся в Mac OS X
Apple имеет давние записи о прекрасных замечательных картинах рабочего стола на мобильных платформах Mac и iOS, поэтому неудивительно, что некоторые пользователи могут захотеть узнать, где эти обои для рабочего стола по умолчанию хранятся в Mac OS.
Чтобы быть ясным, мы говорим об изображениях рабочего стола по умолчанию, которые поставляются с MacOS и Mac OS X и доступны для всех пользователей с помощью предпочтений Desktop, а не 43 скрытых обоев, которые мы обнаружили в Mac OS X, которые являются частью хранителей экрана , а не любые другие снимки, спрятанные в Mac OS.
Поиск местоположения файла изображения по умолчанию в Mac OS
- Перейдите в любую точку Finder и откройте новое окно в файловой системе
- Нажмите Ctrl + Shift + G, чтобы открыть опцию Go To Folder и введите следующий путь:
/ Библиотека / Обои для рабочего стола
Вы можете просматривать папку рабочего стола так же, как любой другой каталог в файловой системе, просто не удаляйте ничего здесь, потому что он станет недоступным для всех пользователей.

Обратите внимание, что нет никаких оснований добавлять обои в этот каталог, потому что картинки для рабочего стола могут быть изменены из любого места на Mac, но может быть полезно получить доступ к этим файлам напрямую для ваших собственных целей, например, изменить их размер в соответствии с конкретным дисплеем или устройством , обрезая их, чтобы они соответствовали экрану iPhone, или даже превратили изображение в черно-белое или немного изменили цвета.
Если вы хотите выполнить настройку, просто скопируйте изображение из этого каталога в другое место.
Другой подход, чтобы выявить, где хранятся не только изображения рабочего стола по умолчанию, но и все, что активно установлено, — это показать точный путь к текущим установленным обоям с помощью команды по умолчанию, которая накладывает путь к обоям на самом рабочем столе, что может могут быть полезны для быстрого отслеживания местоположения изображения, но в противном случае это не особенно заметно. И, конечно, если вы установили обои из Safari, но с тех пор не смогли отследить файл или изображение, вы можете найти этот файл с помощью этого трюка.
Источник
Create a disk image using Disk Utility on Mac
You can use Disk Utility to create a disk image, which is a file that contains other files and folders.
Note: You can burn information to a CD or DVD using the Burn command in the Finder. See Burn CDs and DVDs.
Create a blank disk image for storage
You can create an empty disk image, add data to it, then use it to create disks, CDs, or DVDs.
In the Disk Utility app  on your Mac, choose File > New Image > Blank Image.
Enter a filename for the disk image, add tags if necessary, then choose where to save it.
This is the name that appears in the Finder, where you save the disk image file before opening it.
In the Name field, enter the name for the disk image.
This is the name that appears on your desktop and in the Finder sidebar, after you open the disk image.
In the Size field, enter a size for the disk image.
Click the Format pop-up menu, then choose the format for the disk:
If the disk image will be used with a Mac that has a solid state drive (SSD) and uses macOS 10.13 or later, choose APFS or APFS (Case-sensitive).
If the disk image will be used with a Mac with macOS 10.12 or earlier, choose Mac OS Extended (Journaled) or Mac OS Extended (Case-sensitive, Journaled).
If the disk image will be used with a Mac or Windows computer and is 32 GB or less, choose MS-DOS (FAT); if it’s over 32 GB, choose ExFAT.
To encrypt the disk image, click the Encryption pop-up menu, then choose an encryption option.
Click the Partitions pop-up menu, then choose a partition layout.
Click the Image Format pop-up menu, then choose an option:
Sparse bundle disk image: Same as a sparse disk image (below), but the directory data for the image is stored differently. Uses the .sparsebundle file extension.
Sparse disk image: Creates an expandable file that shrinks and grows as needed. No additional space is used. Uses the .sparseimage file extension.
Read/write disk image: Allows you to add files to the disk image after it’s created. Uses the .dmg file extension.
DVD/CD master: Changes the size of the image to 177 MB (CD 8 cm). Uses the .cdr file extension.
Click Save, then click Done.
Disk Utility creates the disk image file where you saved it in the Finder and mounts its disk icon on your desktop and in the Finder sidebar.
In the Finder, copy your files to the mounted disk image, then eject it.
For more information about disk image types, see the manual (man) page for hdiutil.
Create a disk image from a disk or connected device
You can create a disk image that includes the data and free space on a physical disk or connected device, such as a USB device. For example, if a USB device or volume is 80 GB with 10 GB of data, the disk image will be 80 GB in size and include data and free space. You can then restore that disk image to another volume.
In the Disk Utility app on your Mac, select a disk, volume, or connected device in the sidebar.
Choose File > New Image, then choose “Image from [device name].”
Enter a filename for the disk image, add tags if necessary, then choose where to save it.
This is the name that appears in the Finder, where you save the disk image file before opening it.
Click the Format pop-up menu, then choose an option:
Read-only: The disk image can’t be written to, and is quicker to create and open.
Compressed: Compresses data, so the disk image is smaller than the original data. The disk image is read-only.
Read/write: Allows you to add files to the disk image after it’s created.
DVD/CD master: Can be used with third-party apps. It includes a copy of all sectors of the disk image, whether they’re used or not. When you use a master disk image to create other DVDs or CDs, all data is copied exactly.
To encrypt the disk image, click the Encryption pop-up menu, then choose an encryption option.
Click Save, then click Done.
Disk Utility creates the disk image file where you saved it in the Finder and mounts its disk icon on your desktop and in the Finder sidebar.
Important: Don’t create a disk image of a disk that you believe to be failing or that contains corrupted information. The disk image may not serve as a reliable backup.
For technical information about creating a restore disk image, see the Apple Software Restore (ASR) manual (man) page.
Create a disk image from a folder or connected device
You can create a disk image that contains the contents of a folder or connected device, such as a USB device. This method doesn’t copy a device’s free space to the disk image. For example, if a USB device or volume is 80 GB with 10 GB of data, the disk image will be 10 GB in size and include only data, not free space. You can then restore that disk image to another volume.
In the Disk Utility app on your Mac, choose File > New Image, then choose Image from Folder.
Select the folder or connected device in the dialog that appears, then click Open.
Enter a filename for the disk image, add tags if necessary, then choose where to save it.
This is the name that appears in the Finder, where you save the disk image file before opening it.
To encrypt the disk image, click the Encryption pop-up menu, then choose an encryption option.
Click the Image Format pop-up menu, then choose an option:
Read-only: The disk image can’t be written to, and is quicker to create and open.
Compressed: Compresses data, so the disk image is smaller than the original data. The disk image is read-only.
Read/write: Allows you to add files to the disk image after it’s created.
DVD/CD master: Can be used with third-party apps. It includes a copy of all sectors of the disk image, whether they’re used or not. When you use a master disk image to create other DVDs or CDs, all data is copied exactly.
Hybrid image (HFS+/ISO/UDF): This disk image is a combination of disk image formats and can be used with different file system standards, such as HFS, ISO, and UDF.
Click Save, then click Done.
Disk Utility creates the disk image file where you saved it in the Finder and mounts its disk icon on your desktop and in the Finder sidebar.
For technical information about creating a restore disk image, see the Apple Software Restore (ASR) manual (man) page.
Create a secure disk image
If you have confidential documents that you don’t want others to see without your permission, you can put them in an encrypted disk image.
Note: If you want to protect the contents of the system disk, turn on FileVault using the FileVault pane of Security & Privacy Preferences.
In the Disk Utility app on your Mac, choose File > New Image > Blank Image.
Enter a filename for the disk image, add tags if necessary, then choose where to save it.
This is the name that appears in the Finder, where you save the disk image file before opening it.
In the Name field, enter the name for the disk image.
This is the name that appears on your desktop and in the Finder sidebar, after you open the disk image.
In the Size field, enter a size for the disk image.
Click the Format pop-up menu, then choose a format:
If you’re using the encrypted disk image with a Mac computer using macOS 10.13 or later, choose APFS or APFS (Case-sensitive).
If you’re using the encrypted disk image with a Mac computer using macOS 10.12 or earlier, choose Mac OS Extended (Journaled) or Mac OS Extended (Case-sensitive, Journaled).
Click the Encryption pop-up menu, then choose an encryption option.
Enter and re-enter a password to unlock the disk image, then click Choose.
WARNING: If you forget this password, you won’t be able to open the disk image and view any of the files.
Use the default settings for the rest of the options:
Click the Partitions pop-up menu, then choose Single partition — GUID Partition Map.
Click the Image Format pop-up menu, then choose “read/write” disk image.
Click Save, then click Done.
Disk Utility creates the disk image file where you saved it in the Finder and mounts its disk icon on your desktop and in the Finder sidebar.
In the Finder  , copy the documents you want to protect to the disk image.
If you want to erase the original documents so they can’t be recovered, drag them to the Trash, then choose Finder > Empty Trash.
When you’re finished using the documents on the secure disk image, be sure to eject the disk image. As long as it’s available on your desktop, anyone with access to your computer can use the documents on it.
To access the data in a disk image, double-click it. It appears on your desktop, and you can add, remove, and edit files on it just as you would with a disk.
Источник
Customise the desktop picture on your Mac
You can choose the picture that’s displayed on your desktop. Your Mac comes with dozens of desktop pictures to choose from, or you can use your own pictures or choose a solid colour.
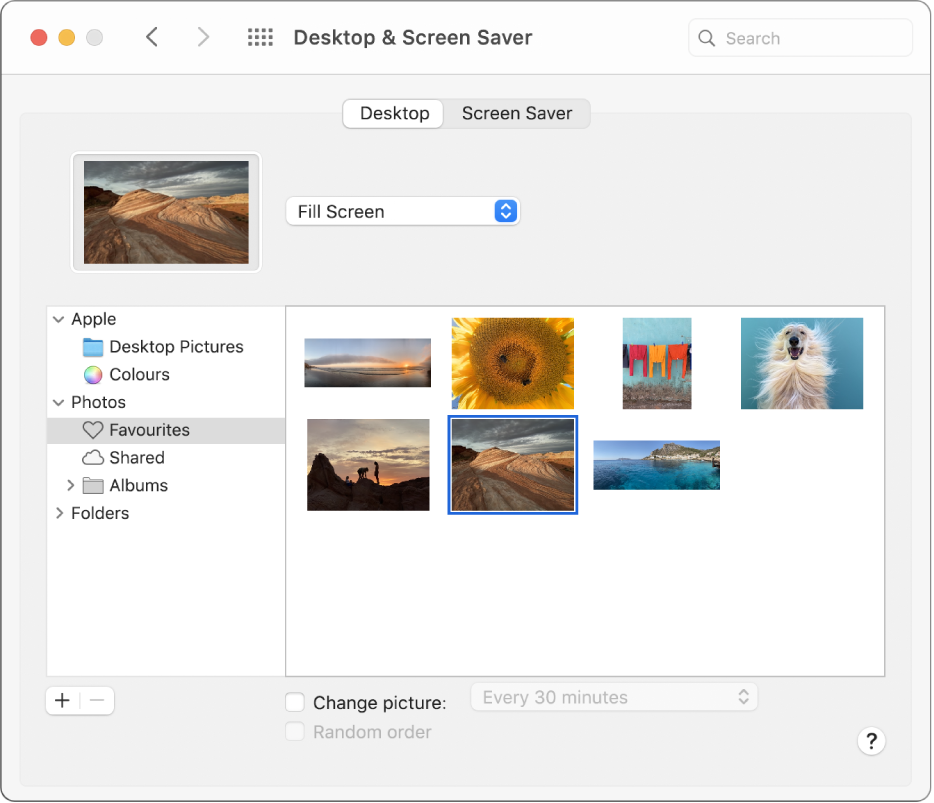
Tip: You can drag an image from your desktop or a folder onto the thumbnail at the top of the pane to use the image as your desktop picture.
On your Mac, choose Apple menu

> System Preferences, click Desktop & Screen Saver, then click Desktop.
On the left, find a picture or colour:
Pictures and colours that come with your Mac: Click the arrow  next to Apple, then select a folder, such as Desktop Pictures or Colours, to see thumbnails of available pictures or colours.
Dynamic desktop pictures can automatically change throughout the course of the day based on your current location. If Location Services is turned off in Privacy preferences, the picture changes based on the time zone specified in Date & Time preferences.
Some dynamic desktop pictures may also provide still images so the desktop picture doesn’t distract from the light or dark appearance. For example, if you chose the dark appearance during macOS setup, the desktop picture is set to a dark still image. To use or stop using a still image (if available), click the pop-up menu, then choose an option.
Your pictures: Click the arrow next to Photos (or iPhoto if available). If your pictures are in the Pictures or another folder, click the arrow next to Folders, then select a folder.
To add a folder, click the Add button  , navigate to and select the folder, then click Choose.
If you don’t see anything when you select the folder that contains your pictures, they might not have the right file format — JPEG, PICT, TIFF, PNG or HEIC. To change a picture’s format, open it in the Preview app, then save it in the new format. If pictures look fuzzy, try using larger ones, such as 1024×768 pixels.
On the right, click the picture you want to use.
The desktop immediately changes, so you can see how the picture looks. When you use one of your own pictures, you can choose to have it fill the screen, be centred or otherwise arranged. It’s easy to click around and try different pictures and arrangements until you find the one you like best.
To use all the pictures in a folder, select the “Change picture” tick box, then choose how often you want the picture to change — for example, every hour. The pictures are shown in the order they appear in the folder, or you can choose to show them in a random order.
To quickly use a picture you have in the Photos app, select the picture in Photos, click the Share button  in the Photos toolbar, then choose Set Desktop Picture.
You can use a picture you see on the web as your desktop picture. Control-click the image in the browser window, then select Use Image as Desktop Picture.
Источник


