- Manage Windows 10 Start and taskbar layout
- Start options
- Taskbar options
- Taskbar configuration applied to clean install of Windows 10
- Taskbar configuration applied to Windows 10 upgrades
- Start layout configuration errors
- Desktops v2.0
- Introduction
- Using Desktops
- Screenshot
- How to Find Windows 10 Computer Specifications & Systems Requirements
- Table of Contents
- System requirements for installing Windows 10
- Keeping Windows 10 up-to-date
- More information on hard drive space requirements to install or update Windows 10
- Feature-specific requirements for Windows 10
Manage Windows 10 Start and taskbar layout
Applies to
- WindowsВ 10, Windows Server 2016 with Desktop Experience, Windows Server 2019 with Desktop Experience
Organizations might want to deploy a customized Start and taskbar configuration to devices running WindowsВ 10 Pro, Enterprise, or Education. A standard, customized Start layout can be useful on devices that are common to multiple users and devices that are locked down for specialized purposes. Configuring the taskbar allows the organization to pin useful apps for their employees and to remove apps that are pinned by default.
Taskbar configuration is available starting in Windows 10, version 1607.
Start and taskbar configuration can be applied to devices running Windows 10 Pro, version 1703.
For information on using the layout modification XML to configure Start with roaming user profiles, see Deploy Roaming User Profiles.
Using CopyProfile for Start menu customization in Windows 10 isn’t supported. For more information Customize the Default User Profile by Using CopyProfile
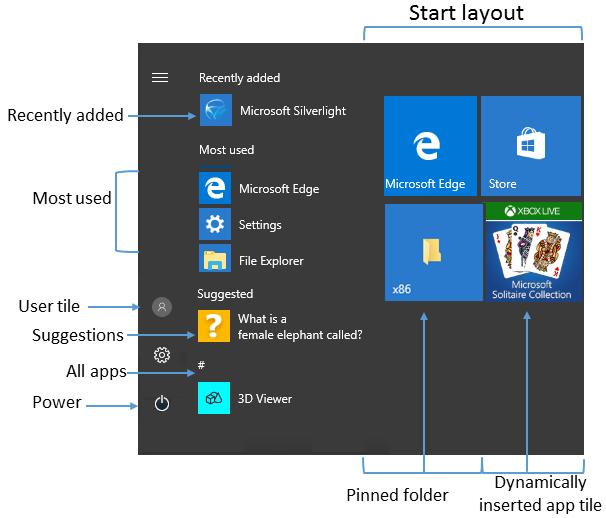
Start options
Some areas of Start can be managed using Group Policy. The layout of Start tiles can be managed using either Group Policy or Mobile Device Management (MDM) policy.
The MDM policy settings in the table can also be configured in a provisioning package using Policies > Start. See the reference for Start settings in Windows Configuration Designer.
The following table lists the different parts of Start and any applicable policy settings or Settings options. Group Policy settings are in the User Configuration\Administrative Templates\Start Menu and Taskbar path except where a different path is listed in the table.
| Start | Policy | Local setting |
|---|---|---|
| User tile | MDM: Start/HideUserTile Start/HideSwitchAccount Start/HideSignOut Start/HideLock Start/HideChangeAccountSettings Group Policy: Remove Logoff on the Start menu | none |
| Most used | MDM: Start/HideFrequentlyUsedApps Group Policy: Remove frequent programs from the Start menu | Settings > Personalization > Start > Show most used apps |
| Suggestions -and- Dynamically inserted app tile | MDM: Allow Windows Consumer Features Group Policy: Computer Configuration\Administrative Templates\Windows Components\Cloud Content\Turn off Microsoft consumer experiences Note: This policy also enables or disables notifications for a user’s Microsoft account and app tiles from Microsoft dynamically inserted in the default Start menu. | Settings > Personalization > Start > Occasionally show suggestions in Start |
| Recently added | MDM: Start/HideRecentlyAddedApps Group Policy: Computer configuration\Administrative Template\Start Menu and Taskbar\Remove «Recently Added» list from Start Menu (for Windows 10, version 1803) | Settings > Personalization > Start > Show recently added apps |
| Pinned folders | MDM: AllowPinnedFolder | Settings > Personalization > Start > Choose which folders appear on Start |
| Power | MDM: Start/HidePowerButton Start/HideHibernate Start/HideRestart Start/HideShutDown Start/HideSleep Group Policy: Remove and prevent access to the Shut Down, Restart, Sleep, and Hibernate commands | none |
| Start layout | MDM: Start layout ImportEdgeAssets Group Policy: Prevent users from customizing their Start screen Note: When a full Start screen layout is imported with Group Policy or MDM, the users cannot pin, unpin, or uninstall apps from the Start screen. Users can view and open all apps in the All Apps view, but they cannot pin any apps to the Start screen. When a partial Start screen layout is imported, users cannot change the tile groups applied by the partial layout, but can modify other tile groups and create their own. Start layout policy can be used to pin apps to the taskbar based on an XML File that you provide. Users will be able to change the order of pinned apps, unpin apps, and pin additional apps to the taskbar. | none |
| Jump lists | MDM: Start/HideRecentJumplists Group Policy: Do not keep history of recently opened documents | Settings > Personalization > Start > Show recently opened items in Jump Lists on Start or the taskbar |
| Start size | MDM: Force Start size Group Policy: Force Start to be either full screen size or menu size | Settings > Personalization > Start > Use Start full screen |
| App list | MDM: Start/HideAppList | Settings > Personalization > Start > Show app list in Start menu |
| All Settings | Group Policy: Prevent changes to Taskbar and Start Menu Settings | none |
| Taskbar | MDM: Start/NoPinningToTaskbar | none |
In local Settings > Personalization > Start, there is an option to Show more tiles. The default tile layout for Start tiles is 3 columns of medium sized tiles. Show more tiles enables 4 columns. To configure the 4-column layout when you customize and export a Start layout, turn on the Show more tiles setting and then arrange your tiles.
Taskbar options
Starting in Windows 10, version 1607, you can pin additional apps to the taskbar and remove default pinned apps from the taskbar. You can specify different taskbar configurations based on device locale or region.
There are three categories of apps that might be pinned to a taskbar:
Apps pinned by the user
Default Windows apps, pinned during operating system installation (Microsoft Edge, File Explorer, Store)
Apps pinned by the enterprise, such as in an unattended Windows setup
We recommend using the layoutmodification.xml method to configure taskbar options, rather than the earlier method of using TaskbarLinks in an unattended Windows setup file.
The following example shows how apps will be pinned — Windows default apps to the left (blue circle), apps pinned by the user in the center (orange triangle), and apps that you pin using XML to the right (green square).

In operating systems configured to use a right-to-left language, the taskbar order will be reversed.
Whether you apply the taskbar configuration to a clean install or an update, users will still be able to:
- Pin additional apps
- Change the order of pinned apps
- Unpin any app
In Windows 10, version 1703, you can apply an MDM policy, Start/NoPinningToTaskbar , to prevents users from pinning and unpinning apps on the taskbar.
Taskbar configuration applied to clean install of Windows 10
In a clean install, if you apply a taskbar layout, only the apps that you specify and default apps that you do not remove will be pinned to the taskbar. Users can pin additional apps to the taskbar after the layout is applied.
Taskbar configuration applied to Windows 10 upgrades
When a device is upgraded to Windows 10, apps will be pinned to the taskbar already. Some apps may have been pinned to the taskbar by a user, and others may have been pinned to the taskbar through a customized base image or by using Windows Unattend setup.
The new taskbar layout for upgrades to Windows 10, version 1607 or later, will apply the following behavior:
- If the user pinned the app to the taskbar, those pinned apps remain and new apps will be added to the right.
- If the user didn’t pin the app (it was pinned during installation or by policy) and the app is not in updated layout file, the app will be unpinned.
- If the user didn’t pin the app and the app is in the updated layout file, the app will be pinned to the right.
- New apps specified in updated layout file are pinned to right of user’s pinned apps.
Start layout configuration errors
If your Start layout customization is not applied as expected, open Event Viewer and navigate to Applications and Services Log > Microsoft > Windows > ShellCommon-StartLayoutPopulation > Operational, and check for one of the following events:
- Event 22 is logged when the xml is malformed, meaning the specified file simply isn’t valid xml. This can occur if the file has extra spaces or unexpected characters, or if the file is not saved in the UTF8 format.
- Event 64 is logged when the xml is valid, but has unexpected values. This can happen when the desired configuration is not understood, elements are not in the required order, or source is not found, such as a missing or misspelled .lnk.
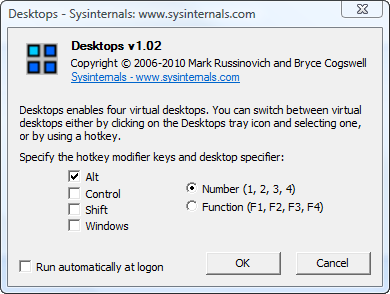
Desktops v2.0
By Mark Russinovich
Published: October 17, 2012
 Download Desktops (61 KB)
Run now from Sysinternals Live.
Introduction
Desktops allows you to organize your applications on up to four virtual desktops. Read email on one, browse the web on the second, and do work in your productivity software on the third, without the clutter of the windows you’re not using. After you configure hotkeys for switching desktops, you can create and switch desktops either by clicking on the tray icon to open a desktop preview and switching window, or by using the hotkeys.
Using Desktops
Unlike other virtual desktop utilities that implement their desktops by showing the windows that are active on a desktop and hiding the rest, Sysinternals Desktops uses a Windows desktop object for each desktop. Application windows are bound to a desktop object when they are created, so Windows maintains the connection between windows and desktops and knows which ones to show when you switch a desktop. That making Sysinternals Desktops very lightweight and free from bugs that the other approach is prone to where their view of active windows becomes inconsistent with the visible windows.
Desktops reliance on Windows desktop objects means that it cannot provide some of the functionality of other virtual desktop utilities, however. For example, Windows doesn’t provide a way to move a window from one desktop object to another, and because a separate Explorer process must run on each desktop to provide a taskbar and start menu, most tray applications are only visible on the first desktop. Further, there is no way to delete a desktop object, so Desktops does not provide a way to close a desktop, because that would result in orphaned windows and processes. The recommended way to exit Desktops is therefore to logoff.
Screenshot
Configuration Dialog
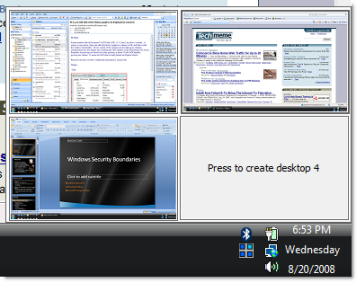
Tray Desktop Switch Window
Download Desktops (61 KB)
Run now from Sysinternals Live.
Runs on:
- Client: Windows Vista and higher.
- Server: Windows Server 2008 and higher.
—>
How to Find Windows 10 Computer Specifications & Systems Requirements
Here’s an overview of how to find computer specification requirements, versions, and languages available for Windows 10.
Table of Contents
System requirements for installing Windows 10
These are the basic requirements for installing Windows 10 on a PC. If your device does not meet these requirements, you may not have the great experience intended with Windows 10 and might want to consider purchasing a new PC.
Hard drive size:
32GB or larger hard disk
Note: See below under “More information on hard drive space to install or update Windows 10” for more details.
Compatible with DirectX 9 or later with WDDM 1.0 driver
Internet connectivity is necessary to perform updates and to download and take advantage of some features. Windows 10 Pro in S mode, Windows 10 Pro Education in S mode, Windows 10 Education in S mode, and Windows 10 Enterprise in S mode require an internet connection during the initial device setup (Out of Box Experience or OOBE), as well as either a Microsoft account (MSA) or Azure Activity Directory (AAD) account. Switching a device out of Windows 10 in S mode also requires internet connectivity. Learn more about S mode here.
There may be additional requirements over time for updates, as well as requirements to turn on specific features within the OS.
Keeping Windows 10 up-to-date
Windows 10 is designed to deliver updates for the supported lifetime of the device. Two types of updates may be provided: quality updates and feature updates. Quality updates include both security and non-security updates and are typically targeted to be released once a month. Feature updates also include security and non-security fixes as well as new features to Windows 10 and are typically provided twice a year. Ensuring that your device receives these updates and is kept up-to-date is important for your device security. Windows 10 periodically checks for updates so you don’t have to. When an update is available—and sufficient free disk space is available on your device—it will be automatically installed. So that Windows 10 continues to stay updated, it’s important to ensure your device has sufficient free space. See additional applicable details in the following notes.
Important notes about updates:
- A device might not be able to receive updates if the device hardware is incompatible, if it lacks current drivers or sufficient available hard drive space, or if it’s otherwise outside of the Original Equipment Manufacturer’s (“OEM”) support period. Visit the Windows Lifecycle Fact Sheet or the Lifecycle FAQ for Windows products to learn more about the servicing timeline for each feature update.
- Some of the disk space needed for installing updates is only temporarily required. Typically, ten days after installing an update, a disk cleanup will be automatically performed to delete copies of the older, unneeded Windows files and free up space again.
- Not all features in an update will work on all devices.
- An internet connection is required to perform updates and Internet access (ISP) fees might apply.
- If you need assistance installing an update, Windows 10 Update Assistant may be able to help.
More information on hard drive space requirements to install or update Windows 10
The size of the Windows operating system that comes with your device and the amount of space needed to download and install Windows updates, are highly variable as they depend on a variety of factors. Visit here to learn why. The factors that impact the amount of free hard drive space needed to take an update include: the versions of Windows previously installed on the machine, the amount of disk space available to reuse from Windows files, such as the virtual memory pagefile or hibernation file, which applications are installed on your device and how those applications store data. Starting with the May 2019 Update, the system requirements for hard drive size for clean installs of Windows 10 as well as new PCs changed to a minimum of 32GB. The 32GB or larger drive requirement is set to leave space for users to install apps and to keep data on the device. Installing Windows or updating from a previous version of Windows on devices with less than 32GB storage will continue to work if the device has enough free space available. When updating, Windows will attempt to automatically free up enough hard drive space and guide you through freeing up even more if the automatic cleanup is not sufficient. You can also take steps to free up space on your own. For more information, see Free up space to install the latest Windows 10 update or visit the related FAQ.
Feature-specific requirements for Windows 10
In addition to the requirements above that are needed to run Windows, some features have additional requirements. In some cases, features included with updated versions of Windows 10 will be best experienced with newer processors. For specific hardware support please refer to your Original Equipment Manufacturer (OEM). Below are some additional details regarding requirements for key features:
- BitLocker Drive Encryption (available with Windows 10 Pro or Windows 10 Enterprise only) requires a Trusted Platform Module (TPM) 1.2 or higher and Trusted Computing Group (TCG)-compliant BIOS or UEFI. BitLocker can be used on devices without TPM, but you will need to save a startup key on a removable device such as a USB flash drive. TPM 2.0 and InstantGo support is required when you want to automatically encrypt the local drive when joining a device to Azure Active Directory (AAD). Check with your PC manufacturer to confirm if your device supports the correct TPM version and InstantGo for the scenario you want to enable.
- BitLocker To Go requires a USB flash drive (available in Windows 10 Pro and Windows 10 Enterprise only).
- Client Hyper-V requires a 64-bit system with second level address translation (SLAT) capabilities and additional 2 GB of RAM (available in Windows 10 Pro and Windows 10 Enterprise only).
- Cortana is only currently available on Windows 10 for the United States, United Kingdom, China, France, Italy, Germany, Brazil, Mexico, Japan, Canada, Spain, Australia and India.
- Microsoft account is required for some features.
- Miracast requires a display adapter which supports Windows Display Driver Model (WDDM) 1.3, and a Wi-Fi adapter that supports Wi-Fi Direct.
- Movies & TV application is not available in all regions. For the most up-to-date list of regions, please go to the Movies & TV information page.
- Secure boot requires firmware that supports UEFI v2.3.1 Errata B and has the Microsoft Windows Certification Authority in the UEFI signature database.
- Skype is available only in select countries and regions. Calling to select countries and regions only. Excludes special, premium and non-geographic numbers. For details, visit the Office FAQ page.
- Snap: The number of applications that can be snapped will depend upon the minimum resolution for the application with a limit of two applications in Tablet mode and four applications in Desktop mode.
- Speech recognition will vary by device microphone. For a better speech experience, you will need a:
- High fidelity microphone array
- Hardware driver with microphone array geometry exposed
- Tablet mode is available on tablets and 2-in-1s with GPIO indicators or those that have a laptop and slate indicator will be able to be configured to enter «tablet mode» automatically.
- Touch: To use touch, you need a tablet or a monitor that supports multi-touch.
- Two-factor authentication requires the use of a PIN, Biometric (finger print reader or illuminated infrared camera), or a phone with Wi-Fi or Bluetooth capabilities.
- Windows Hello requires a camera configured for near infrared (IR) imaging or fingerprint reader for biometric authentication. Devices without biometric sensors can use Windows Hello with a PIN or a portable Microsoft compatible security key.
- Xbox application requires an Xbox Live account, which is not available in all regions. For the most up-to-date list of regions, please go to Xbox Live Countries and Regions website.
- Wi-Fi Direct Printing requires a Wi-Fi adapter that supports Wi-Fi Direct and a device that supports Wi-Fi Direct Printing.


