- kali ошибка «не удается смонтировать установочный компакт-диск»
- Не удается установить Kali Linux с USB, не удается найти дисковод компакт-дисков
- 4 ответов
- Не устанавливается Kali Linux
- Решение
- Can’t install Kali Linux from USB, fails to find CD-ROM drive
- 6 Answers 6
- Fix the installation errors in Kali Linux 2020.1 offline installer
- Problem 1: Your installation CD-ROM couldn’t be mounted.
- Solutions
- Solution 1:
- Solution 2:
- Problem 2: Some of your hardware needs non-free firmware files to operate.
- Problem 3: No GUI after successful installation of Kali 2020.1
- Problem Description
- Reason of Problem
- Workaround
kali ошибка «не удается смонтировать установочный компакт-диск»
Я знаю, что моя проблема не оригинальна, но удовлетворяющего решения на просторах сети я так и не смог найти. Я новичок в данной теме и, почитав форумы, свое знакомство с линуксом я решил начать с Kali 2016.2. С компа на Windows 10 64 бит я с помощью Universal USB Installer создал загрузочную флешку (флешка 4gb nfts). Live версия отлично работала и запускалась, но вот когда я решил установить oc, то после выбора страны языка и раскладки я получил вот такую ошибку: «не удается смонтировать установочный компакт-диск». Можно было повторить процесс или вернуться в меню. Пробовал высовывать и вставлять обратно флешку а затем повторять процесс, но это результата не дало. Я пытался прописать параметры для установки, чтобы установщик определил мою флешку как cd-rom, но не вышло. Махинации с командной строкой и командами, которые я нашел в интернете результата тоже не дали. Также пробовал перезаписывать, форматируя флешку в fat 32, пробовал перезаписывать с помощью Ultraiso и при буте у меня появилась вот такая надпись: » Failed to load Idlinux.c32. Boot failed: please change disks and press a key to continue» Dvd-roma в компьютере нет. Как я и сказал, решения в интернете я так и не нашел. Буду благодарен, если вы мне поможете, подробнее расписав, как мне решить эту проблему.
Попробуйте записать образ с помощью rufus. PS Kali — не самый удачный дистр для начинающих. Посмотрите в сторону Ubuntu.

Уже советованный руфус умеет писать в «сыром» режиме (режим dd, гугли ‘man dd’). Еще можешь попробовать:
Спасибо, руфус помог, при установке когда установщик попросил источник для драйверов, я вытащил и вставил флешку м установка продолжилась. Вот только появилась новая проблема. После установки я не могу войти в учетную запись. Root:root и root:toor не работает,не работает и :root,toor при установке мне пароль изменять не предлагали, что делать?

Установщик надо полагать заимствован из Debian и должен запрашивать пароль суперпользователя вот так. Либо предлагается вариант отключить вход суперпользователя, создать обычного, назначить ему пароль, который будет использоваться для sudo — команды, наделяющей запускаемое приложение правами суперпользователя. Может, пароля и нет вовсе?
я вытащил и вставил флешку м установка продолжилась
Возможно флешка или юсб чудные, бывает.
ри установке мне пароль изменять не предлагали
Вот примерная инструкция, вот картинка с запросом пароля при установке. Такого не было? Пустой пароль не подходит? (графика может чуть-чуть измениться, но сам установщик тот же)
Загрузиться с установочной флешки в live режим (пароль если будет нужен тут root:toor). После загрузки примонтировать корневой раздел установленной на жесткий диск кали, чрутьнуться туда и задать пароль руту:
mount /dev/sdX /mnt — тут sdX корневой раздел с кали, например sdb2
chroot /mnt — изменяется корневой католог
passwd root — установка пароль руту, при вводе не отображается, печатается на «ощупь».
Источник
Не удается установить Kali Linux с USB, не удается найти дисковод компакт-дисков
Я успешно сделал живой USB Кали Linux.
когда я загружаюсь с USB, он дает возможность установить. Я нажал на эту опцию. В какой-то момент он обнаруживал и монтировал компакт-диски. Поскольку у меня нет CD-привода или любого ROM-привода на моем ноутбуке, это дает ошибку
не удается установить и обнаружить диски CD-ROM.
Я попробовал вариант «жить что-то», который принимает меня непосредственно к Кали Linux и он успешно загружается, но я не могу установить это навсегда. Я хочу установить его, чтобы мне не пришлось тратить время на подключение и отключение USB.
Как пройти обнаружение CD-ROM и сделать установку закончить правильно?
4 ответов
вы можете устранить ошибку, повторяя шаги:
открыть командную строку ( ALT + F2 ).
создайте каталог cdrom непосредственно в корне файловой системы:
Примечание : если у вас возникли проблемы с созданием каталога / cdrom, отключите проигрыватель компакт-дисков в BIOS или отсоедините кабель
смонтировать USB, как будто это это компакт-диска:
горе -т для vfat устройства /dev/sdb1 /компакт-диск
где sdb1-ваше USB-устройство.
вы можете продолжить установку сейчас
после выполнения mount -t vfat /dev/sdb1 /cdrom , cd в директорию /cdrom и делаем ls чтобы увидеть, если файлы есть. Затем нажмите ALT — F1 чтобы вернуться назад, продолжите и выберите «detect CDROM»
когда окно показывает, что CDROM не может быть установлен,
отключите ваш USB от системы и повторно вставьте его
дождитесь mount / detection (USB LED glow)
вы могли бы сделать то, что я сделал. Нажать клавишу «Escape», тип устанавливать, нажмите Enter, заезженная пластинка привод.
Если вы используете Rufus (v 2.x) чтобы записать ISO на USB-накопитель, убедитесь, что опция «DD Image «in»создать загрузочный диск с помощью«. Не уверен, что Unetbootin предлагает тот же вариант. Если образ копируется таким способом, то вам не нужно вручную монтировать его в терминал.
с Руфусом (v 3.x), вы не можете явно выбрать режим DD. Если ISO является гибридным или имеет режим DD, Rufus предложит вам выбрать режим ISO или DD после нажатия кнопки Пуск кнопка.
проверил сам вопрос прямо сейчас: это способ более простой в использовании «графической установки». Кажется, растут дополнительные услуги, связанные с hw, и это работает просто отлично! Также — если вы используете 2 флешки — подключите с диска вы собираетесь установить его до, загрузите его в GUI-и затем подключите целевой диск.
Я пробовал все ответы здесь и больше результатов google, но никто не работал. Я в конце концов понял, проблема в том, что формат файла не vfat, а iso9660.
когда вы получаете CDROM не найдена ошибка выполните следующие действия:
ввести оболочку ( CTRL + Alt + F2 )
Примечание: Кали сказал мне нажать ( Alt + F2 ), но это не работает
получить список устройств с blkid:
Примечание: я сократил свой список до соответствующей строки. Также вы можете увидеть тип хранения iso9660, а не vfat
смонтируйте диск Kali командой mount:
проверьте содержимое /cdrom так, как ожидалось:
вернуться к установщику ( CTRL + Alt + F5 )
Примечание: Кали сказал мне нажать ( Alt + F1 ), но это не сработало. Я пытался F1 до F5 пока я не нашел правильную комбинацию
из меню скажите ему смонтировать CDROM, если его попросят выбрать /dev / sdc1 и / cdrom. Я знаю, что мы уже смонтировали привод, но по какой-то причине этот шаг не работали, но работал нормально после выполнения предыдущих шагов.
установка будет продолжена в обычном режиме.
Источник
Не устанавливается Kali Linux
 Удаление GNU\Linux из автозагрузки Kali Linux x64
Здравствуйте. Установил криво Kali Linux на диск С. Потом удалил все его файлы. Но в автозагрузке.
2 ОС Kali Linux
Доброго времени суток! Записал образ через RUFUS. Раздел как MBR и GPT пробовал. Не.
Kali linux
Какие принципиальные отличия между дефолт линукс и кали?
Kali Linux
После установки не происходит загрузки привычного окна «введите логин», да собственно так и.
Решение
Сразу извиняюсь за такой ответ, обычно я не позволяю себе отвечать на незаданные вопросы, и всё же:
Вопрос который вам следовало задать это — «как поменять утерянный пароль к рут аккаунту». Ибо пароль рута не является защитой от рута, т.к. вы управляете машиной физически(следовательно являетесь корневым пользователем), значит пароль от вашей учётной записи не является преградой для вас, а так же для всех кто имеет физический доступ к компьютеру не защищённому LUKS. В следующий раз,старайтесь решать проблемы выбирая наиболее простой способ, а не наоборот. + Защищать систему от несанкционированного доступа надо при помощи LUKS, не забывая при этом отключить single boot mode.
Отвечая на ваш оригинальный вопрос:
Для записи загрузочного образа кали из винды используйте balendaEtcher
Для записи загрузочного образа винды из кали используйте WoeUSB
Для записи загрузочного образа кали из любой линукс системы используйте только:
Источник
Can’t install Kali Linux from USB, fails to find CD-ROM drive
I successfully made a live USB of the Kali Linux.
When I boot from the USB it gives an option to install. I clicked on that option. At one point it was detecting and mounting CD-ROM drives. As I have no CD-drive or any ROM-drive on my laptop, it gives an error
Can’t mount and detect CD-ROM drives.
I tried the «live something» option that takes me directly to Kali Linux and it loads successfully but I can’t install it permanently. I want to install it so I won’t have to waste my time plugging and unplugging the USB.
How to get past the CD-ROM detection and make the installation finish correctly?
6 Answers 6
You could resolve the error by repeating the steps :
Run the installer.
Open a shell ( ALT + F2 ).
Create the directory cdrom directly on the root of the file system:
Note : If you got problems making the directory /cdrom, disable the CD-rom player in BIOS or disconnect the cable
Mount the USB as if it is a CD-ROM:
Where sdb1 is your USB device.
You could carry on installation now
After executing mount -t vfat /dev/sdb1 /cdrom , cd into the /cdrom directory and do an ls to see if the files are there. Then press ALT — F1 to go back, continue and re-select «detect CDROM»
when the Window shows CDROM couldn’t be mounted ,
Unplug your USB from system and re insert it
wait for mount/ detection (usb LED glow)
You could do what I did. Hit escape, type install, hit enter, skip CD drive.

If you use Rufus (v 2.x) to burn the ISO to USB drive, make sure the option is «DD Image» in «Create a bootable disk using«. Not sure if Unetbootin offers the same option. If image is copied using this method, you don’t need to go to terminal and manually mount it.
With Rufus (v 3.x), you can not explicitly choose DD mode. IF the ISO is hybrid or has DD mode, Rufus will prompt you to choose ISO or DD mode AFTER clicking start button.

I tried all the answers here and more google results, but none worked. I eventually figured it out, the issue is the file format is not vfat, but iso9660.
When you get the CDROM not found error follow these steps:
Enter a shell ( CTRL + Alt + F2 )
Note: Kali told me to press ( Alt + F2 ), but this didn’t work
Get a list of devices with blkid:
Note: I have shortened my list to the relevant row. Also you can see the storage type is iso9660, not vfat
Mount the Kali CD with the mount command:
Check the contents of /cdrom are as expected:
Switch back to the installer ( CTRL + Alt + F5 )
Note: Kali told me to press ( Alt + F1 ), but this didn’t work. I tried F1 through to F5 until I found the correct combination
From the menu tell it to mount the CDROM, if asked choose /dev/sdc1 and /cdrom. I know we have already mounted the drive, but for some reason this step didn’t work previously, but worked fine after following the previous steps.
Источник
Fix the installation errors in Kali Linux 2020.1 offline installer
Since the Kali Linux 2020.1 is released on 28 th January 2020, so I thought to give it a try and install it on my HP Pavilion 15 laptop. I went over to https://www.kali.org/downloads page and downloaded the Kali Linux 64-Bit (Installer) which is about 2GB. I used Rufus on Windows to write the bootable ISO images onto my USB drive.
When I booted up and started the installation of Kali, I came across various errors, which took quite a lot of time to fix all the errors and get the new Kali 2020.1 version up and running on my laptop. I am sharing all the possible errors and how to fix them so that it can help others.
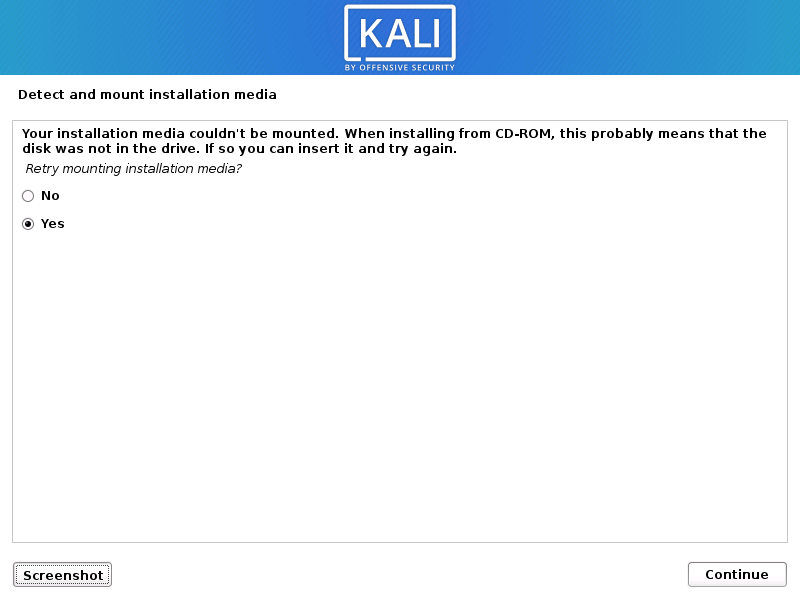
Problem 1: Your installation CD-ROM couldn’t be mounted.
Solutions
You have two options to fix this error.
Solution 1:
- On “Retry mounting the CD-ROM?” option, select the No and click Continue.

- You will see an installation step failed page but that is okay, just click on Continue.
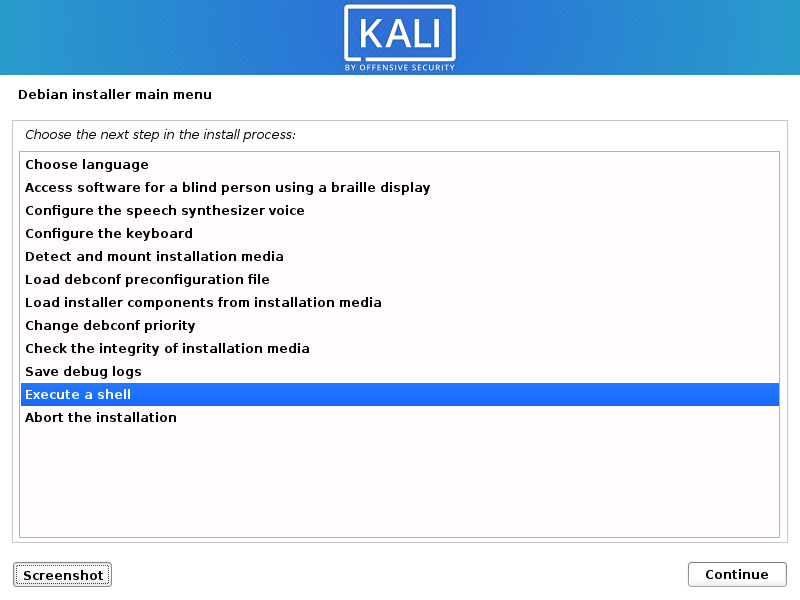
- Now you will see an installer menu with various options. Navigate and select “Execute a shell” option and click on Continue twice.
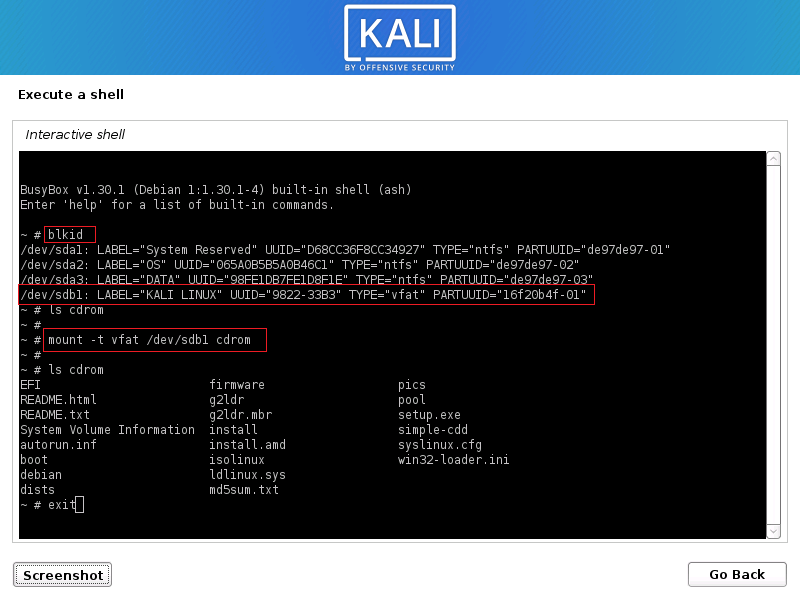
- You will get a terminal window where you can execute commands. From here, we will manually mount our bootable USB to cdrom directory so the installer can continue.
- First, to determine the block ID of USB drive, use the “blkid” command without quotes.Usually it is the last option in the list. Take a note of the device name i.e. /dev/sdb1 and file system type i.e. vfat. You will need these two things to manually mount the USB.
- Now type “ls cdrom” command without quotes. If you do not get anything, you can skip the next command but if you get an error like “No such file or directory”, continue to next command.
- Type “mkdir cdrom” command
- Type “mount -t vfat /dev/sdb1 cdrom” command. Make sure you adjust the device name noted in first step
- If above command is successful, you can verify the contents of cdrom directory using “ls cdrom” command.
- Now type exit and hit enter. (see the following image for all the commands)
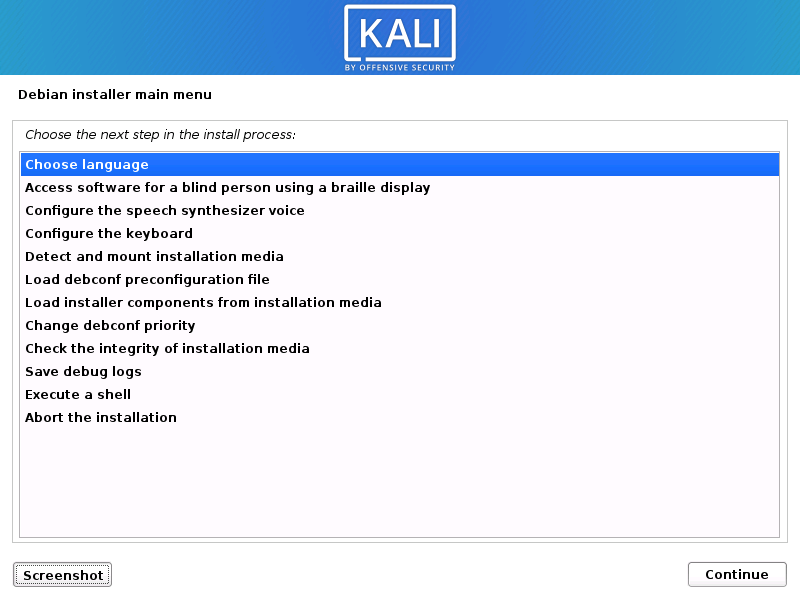
- You will get back to the list of installer menu with various options. You need to start over; Just highlight the first option i.e. Choose Language and click Continue.
- Hopefully, your system will now detect and mount the CDROM since you manually mounted it this time.
If above steps do not work for you, you can follow the next solution.
Solution 2:
For this, you will need to re-format your USB device. You can download and use rufus to write the bootable kali iso image onto your USB drive.
-
- Launch rufus.
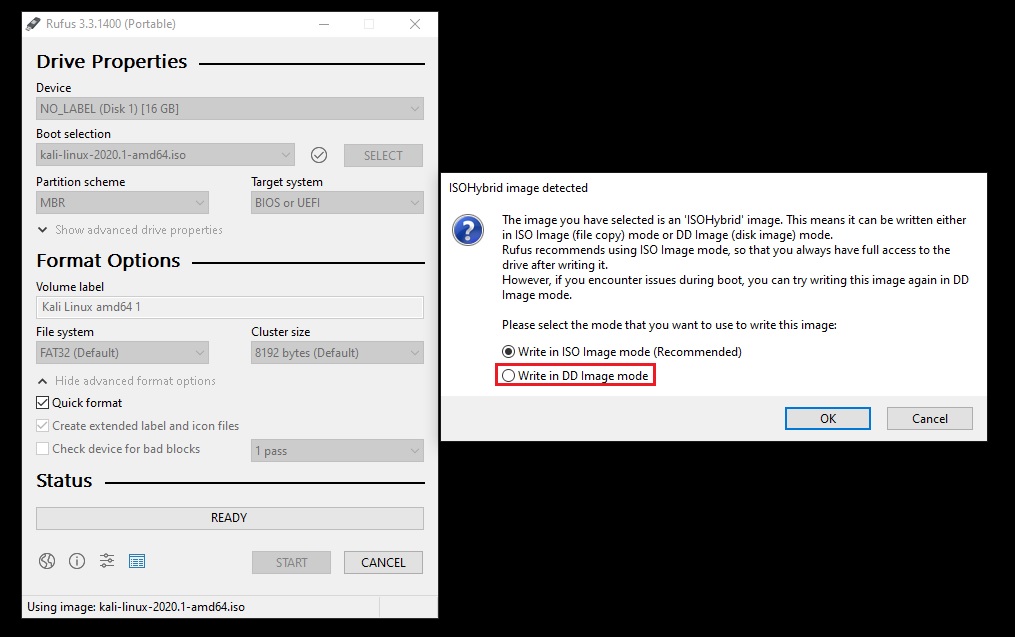
- Rufus will auto detect your USB drive, just make sure right device is selected, then select the kali iso image and click on Start button.
- As soon as you hit the Start button, rufus will detect that the selected ISO image is ISOHybrid type and gives you two ways of writing this image to USB.
- Just select the second option i.e. Write in DD image mode and click OK.
- No matter what software you use for writing the kali iso to USB, you need to do it via DD mode. Once your USB is ready, plug it in and start the installation.
- Now you will not get CD-ROM detect and mount error.
Tip: The problem with DD image mode is that you can no longer make any changes to your USB device i.e. you will not be able to add or delete any file to/from your USB device (until you re-format it). To be able to use the USB again you will have to clean it and remove the kali linux image from it.
Problem 2: Some of your hardware needs non-free firmware files to operate.
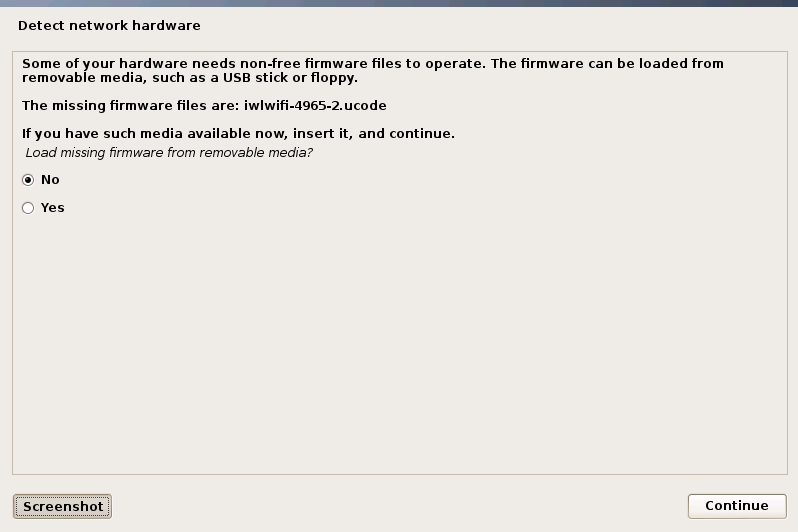
To fix this error you will need a PC with an active internet connection. Just take a note of the missing firmware file names. In my case, it is “rtlwifi/rtl8723befw.bin”.
Now follow these steps:
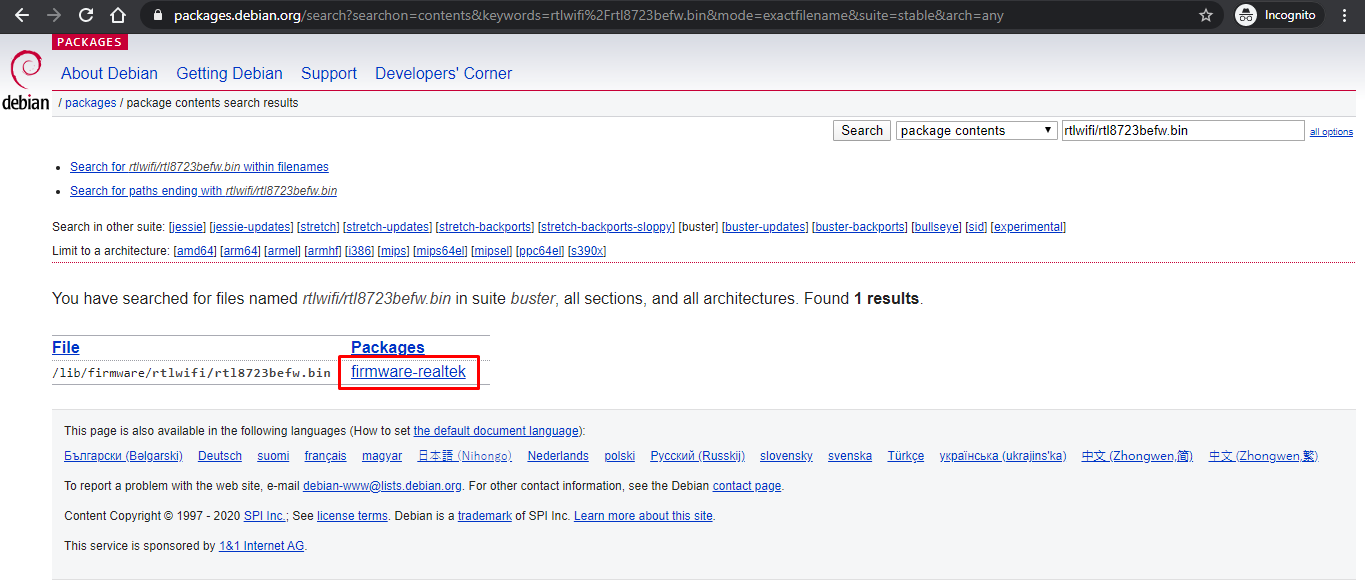
- Launch any web browser and open https://www.debian.org/distrib/packages#search_contents URL.
- Under keywords text box type the firmware file name noted initially, and then select “packages that contain files named like this” under display and then click on the Search button.
- If your firmware matches the search criteria, you will get a list of files. Click on the link under Packages and you will be redirected to package contents page.
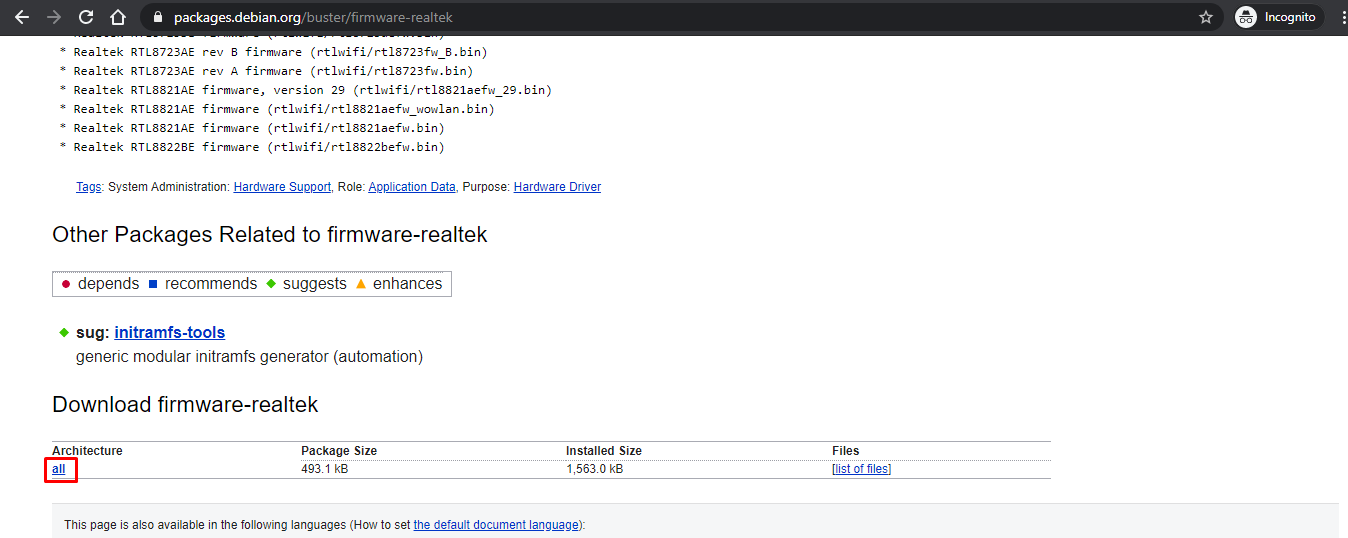
- Now, scroll down until you see download firmware section, just click on the all link under Architecture column.
- You will now see a list of servers in various geographical regions. Click on the link of sever which is nearest to you and a .deb package will be downloaded.
- You will need to repeat the steps 2 – 5 for each missing firmware file.
- Now connect the bootable USB containing kali image to your computer. Make sure your USB device is not written using DD mode. If it is in DD mode, you won’t be able to copy files across. You will need to re-format it in ISO mode.
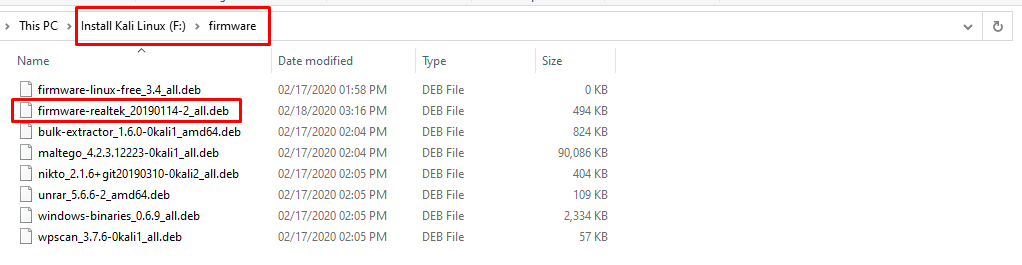
- Browse to USB device via File Explorer and navigate to F:\pool\non-free\ (USB device is mounted under F: drive, you need to adjust it accordingly)
- You will see some subdirectories in there. You need to go inside each subdirectory, copy all the files and paste them right inside F:\firmware\. If there are already some files with same name, just click replace.
- After copying all the files from F:\pool\non-free subdirectories, you also need to copy the firmware files that you downloaded earlier into same F:\firmware folder. Please see the following image for reference.
- That is it. Now plug-in your USB and start the kali installation again.
- Hopefully, you will no longer get any missing non-free firmware error. If you do get the error, just repeat the steps 2 – 5 to download the missing firmware files.

Problem 3: No GUI after successful installation of Kali 2020.1
Problem Description
After installation is successful, GRUB is installed to MBR, but when I rebooted the system there was no grub splash screen; just a text based booting menu. After kali is booted up, there was no GUI; but only a text based login option.
Reason of Problem
By spending some time on googling it, I found that there is bug in 2020.1 installer ISO and about 140+ packages are missing in offline installer. Also, there are a few packages that are missing in APT package manager. To install Kali Linux with default options (XFCE DE), installer needs Internet connection to download missing packages from Kali repository. If you try to install Kali linux offline, you will end up with text mode install.
Workaround
To remediate the situation, we can connect the kali linux to internet, convert our installation to GUI mode, and install any missing firmware and packages.
You will need an Android phone with good internet connection, USB cable that can connect your phone to PC where you just installed the kali linux. The idea is to use USB tethering option to share mobile’s internet connection on PC. Just to mention that I don’t really use an iPhone. So, I don’t know if there is any option to use USB tethering in iPhone as well. If there is, you can surely use iPhone too.
Tip: If your mobile internet is not too fast, first connect your mobile to a WiFi network which is fast enough and then follow these steps.
Since you don’t have any GUI in kali linux yet, so you will have to do everything in text mode.
-
- Login to kali linux in text mode
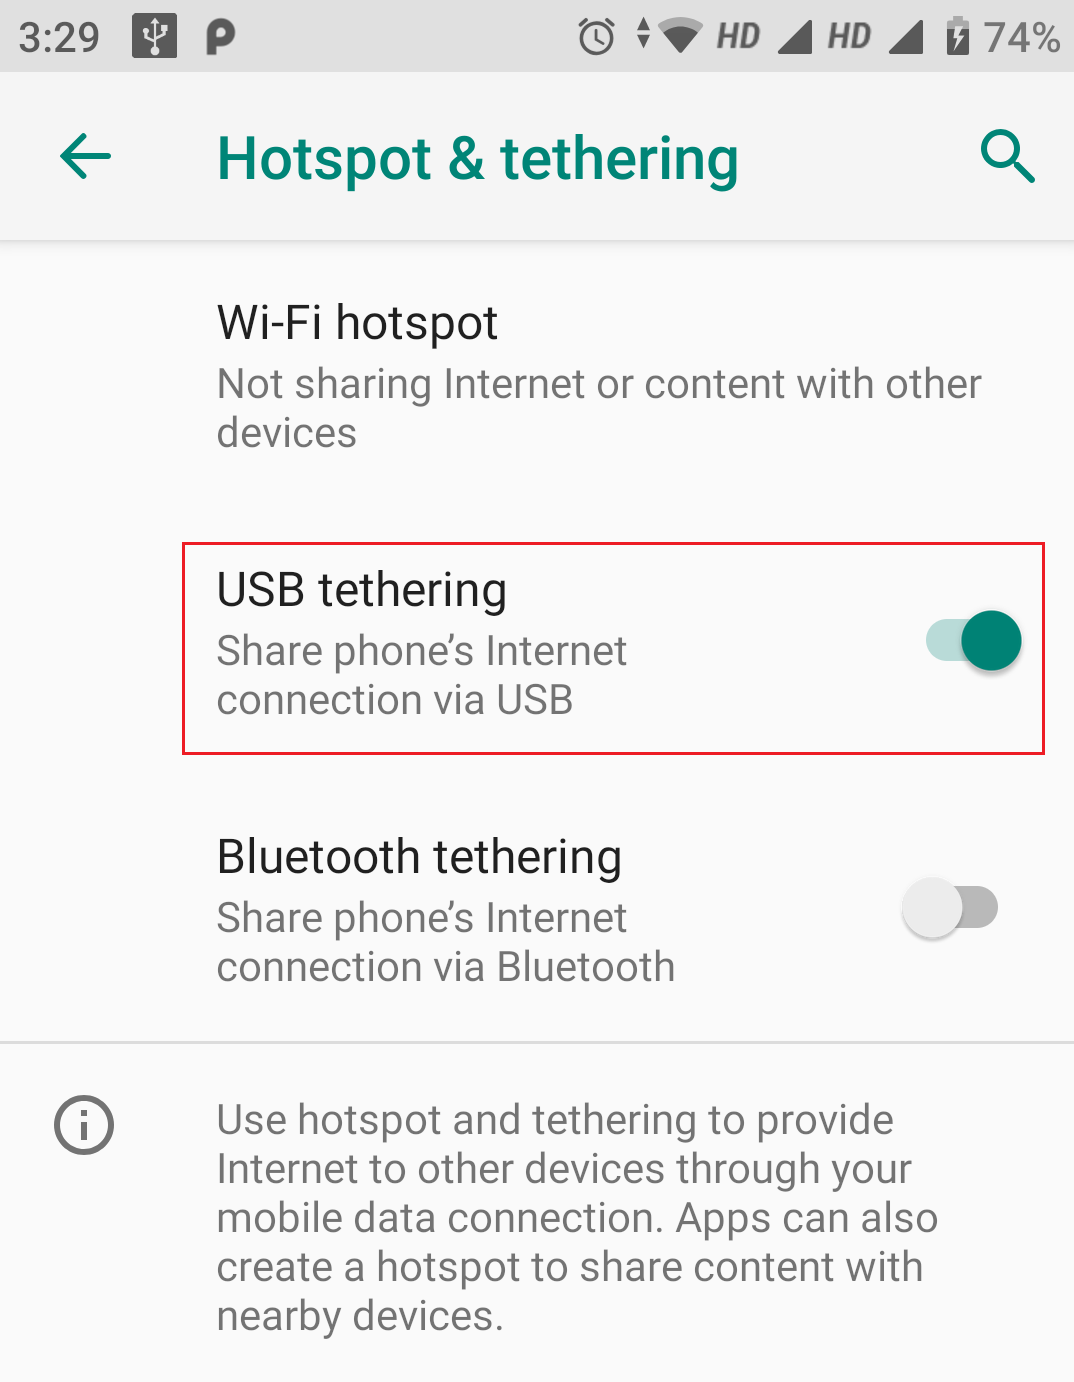
- Connect the USB cable to your PC and phone.
- Go to settings in your phone and enable USB tethering
- Now wait a few seconds and use the following commands in right order. We will make sure that kali linux can connect to internet using USB.
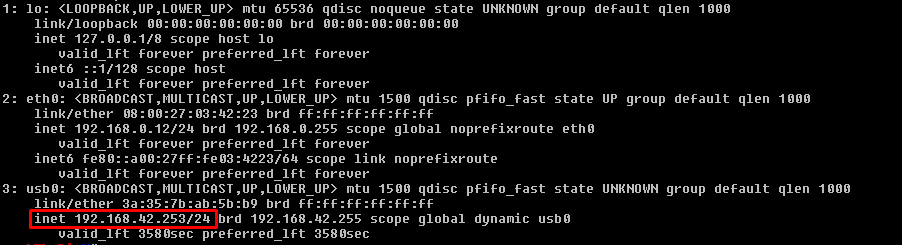
- Type “ip a” command without quotes and hit enter.This command will list all the network adapters and their IP configurations. The last device i.e. usb0 will probably be the USB network adapter created by USB tethering. If you see it, you are good to go to next step.
- Now type “sudo dhclient” command without quotes and hit enter.
- The command could take a few seconds. When completed, use “ip a” command again to verify that usb0 adapter has successfully received the IP configuration.
- If you see the IP address assigned (as highlighted in picture above), you are connected to internet.
- Now that you are connected to internet, make sure that the sources.list is updated with following information:
- If it is not, use following command to add kali-rolling repositories to sources.list:
- Use “cat /etc/apt/sources.list” command to view the file and comment out if there is any other line except above two
- Now type “sudo apt update ” command and wait for it to complete.
- Make sure your platform microcode is updated. Use following command just in case:
- Now type “sudo apt install kali-desktop-xfce -y ”. This could take a while depending upon the speed of your internet connection. Wait for it complete and then restart. This command will convert your text mode installation of kali linux into default XFCE based desktop environment.
- After reboot, you will be able to login using GUI mode but you will still notice that there is no GNOME tweaks tool, no applications menu, no Places menu. To re-activate all these, follow the next step.
- Type “sudo apt install gnome-core kali-defaults kali-root-login desktop-base -y ” command and hit enter. Wait for it to finish and then reboot.
- Now you can see the Applications menu, Places menu, and GNOME tweaks tool is also installed so that you can customize the GNOME interface.

After following this guide, you will be able to get latest version of kali linux up and running. Let me know if you still face any error that is not mentioned in this guide and I will try to get back to you with a solution as soon as possible.
Источник


