- How to determine the IP address of a computer or website
- Nslookup
- Installing BIND on Microsoft Windows
- How to find my IP address
- Determining the IP in Microsoft Windows
- Graphical representation of network settings
- See the IP in Linux and Unix, BSD 4.2+, and Apple OS X
- View the IP address on a Mac
- Android smartphone or tablet
- Apple iPhone and iPad
- Windows — VBScript — Determine IP address of computer on network
- 3 Answers 3
- 8 ways to find your IP address in Windows (all versions)
- 1. How to find your IP address from the Command Prompt (all versions of Windows)
- 2. How to find your IP address in the Settings app (Windows 10 only)
- 3. How to find your IP Address in the Control Panel (all versions of Windows)
- 4. How to find your IP address in System Information (all versions of Windows)
- 5. How to find the IP address in PowerShell (all versions of Windows)
- 6. How to find your IP address in Task Manager (Windows 10 and Windows 8.1 only)
- 7. How to find your computer’s IP address using the Network Map (Windows 7 only)
- 8. How to find your IP address in the PC Settings app (Windows 8.1 only)
- Conclusion
How to determine the IP address of a computer or website
This page discusses the best ways to find the IP address of an external computer or website. If you want to find the IP address of the computer, see: How to find my IP address.

If you know the domain name or network name of a website or networked computer, and you want to find its IP address, you need to perform a DNS lookup. There are a few ways to do this, which we cover below.
The ping command sends an ICMP packet to a networked computer. If you try to ping a hostname, the ping program performs a DNS request to discover the host’s IP address. The IP address is displayed in the command output.
On all modern operating systems, you can open a command line interface and run the command:
Where hostname is the name of the computer. For instance, let’s say you want to find the IP address of computerhope.com. If you are using Microsoft Windows, open the command prompt and run:
You will see something like this:
The pings were sent to 104.20.56.118, which is an IP address of computerhope.com.
However, this information is not complete — it shows one IP address for the host, but there may be others. Also, ping doesn’t always succeed. Many websites and computers will completely ignore a ping request.
To perform a direct DNS query, and receive more complete information, use one of the other three methods.
Nslookup
The nslookup command gets DNS information about a host, including its IP addresses. For example, from the Windows command prompt, run:
Nslookup performs the DNS lookup, but unlike ping, it does not send any data to the host. There are two IPv4 addresses, 104.20.50.118 and 104.20.56.118, listed at the bottom. Both are valid IP addresses for that hostname, used in round-robin distribution.
The response is non-authoritative, which means you’re getting the information from a domain name server not owned by the host.
The nslookup command works on most operating systems, including Microsoft Windows. However, it is an older program, and is no longer actively developed. It is deprecated by the organization that developed it, the Internet Systems Consortium. Instead, they recommend using the newer tools dig and host, discussed below.
Dig, the «domain information groper,» performs a DNS lookup if you give it a hostname:
Dig comes pre-installed on macOS X and Linux operating systems. On Microsoft Windows, you can download it for free, as part of the ISC’s BIND utilities.
Installing BIND on Microsoft Windows
- In a web browser, go to https://www.isc.org/downloads.
- Scroll to the «BIND» drop-down menu, and expand it.
- Look for the «Current-Stable» version. Click the Download button for that version.
- In the dialog that appears, click the button corresponding to your type of computer. For instance, for 64-bit computers running Windows, click the button for win 64-bit.
- Extract the zip archive.
- In the extracted folder, right-click BINDInstall.exe, and choose Run as administrator. At the UAC prompt, choose Yes.
- In the installer options, make sure Tools Only is checked.
- Choose a Target directory for the installation, and click Install. If you receive a message about «Visual C++ Redistributable — Modify Setup,» click Close, then Yes.
The BIND utilities are now installed, including dig.
As a last step, add the BIND binary directory to your PATH environment variable, so you can run dig from any directory. Modify your system’s PATH environment variable to include the path to the BIND binaries. If you installed to C:\Program Files\ISC BIND 9\, add C:\Program Files\ISC BIND 9\bin\ to your PATH. Don’t forget the bin at the end of the path name.
The host command is part of ISC BIND. It’s similar to dig, but it displays simpler information.
Host comes pre-installed on macOS X and Linux. On Windows, you can install as part of the BIND utilities, as described above.
How to find my IP address
Knowing your IP address can be helpful for troubleshooting many network problems and well and Internet connection issues. However, there are two different types of IP address: local and external. The information contained in this page shows you how to determining your local IP address. If you want to know your external or public IP address (the one the Internet sees), use our custom system information tool.
Determining the IP in Microsoft Windows
- Open the command line.
- From the prompt, type ipconfig and press Enter .
- You should see information similar to what is shown below. Look for the number sequence next to IPv4 Address.
If you have more than one network adapter (e.g., a wireless adapter and a network interface card), you’ll see each of them listed when using this command.
If your computer uses an IPv6 address, you may see both an IPv6 and IPv4 address.
Graphical representation of network settings
Microsoft Windows 10 users can view their computer network settings through Windows network properties by following the steps below.
- In the search box, type network status and press Enter .
- In the Network status window, click the View your network properties option.
- In the View your network properties window, you can see the network information.
Microsoft Windows 7 users can view their network details through Windows by following the steps below.
- Click Start or press the Windows key .
- In the search box, type network and sharing and press Enter .
- In the Network and Sharing Center window, next to Connections:, click your connection type. For example, on a wired connection, you’d click Local Area Connection.
- In the Status window, click the Details button.
- In the Network Connection Details window, you can see all your network information.
Microsoft Windows XP users may get a GUI representation of their network by right-clicking the network icon in their windows notification area and selecting Status. In the Local Area Connection Status window, click the Support tab.
Microsoft Windows 98 users may also get a GUI representation of their network settings by clicking Start, Run, and typing ipconfig in the run line. Unfortunately, all later versions of Windows no longer have this feature.
See the IP in Linux and Unix, BSD 4.2+, and Apple OS X
For Linux or Unix users, to view their IP address or network information, users must have administrator or root privileges.
- Open the Linux or Unix shell if you are utilizing a GUI interface for your Linux or Unix machine.
- From the prompt, type «ifconfig eth0» (without the quotes) and press Enter . Once done, a list of network information similar to what is shown below should appear.
As seen from the example above, you can see the network settings for all their network devices when running the «ifconfig» command. First, in the example above, we have the network settings for the «lo» (local loopback). Next is the actual network settings of your network adapter.
View the IP address on a Mac

Viewing an IP address on an Apple Mac computer can be done by following the steps below.
- From the desktop, click the Apple menu icon in the upper-left corner of the screen.
- In the drop-down menu that appears, select System Preferences.
- On the left side, find and click Network.
- On the left side of the screen, click the Internet connection device you’re utilizing (usually denoted by a green dot next to it).
- Your IP address is under IPv4 Addresses.
You can see the IP address of other network controllers by selecting them from the Network section described above.
Android smartphone or tablet
As there are many different brands of Android smartphones and tablets, the instructions for your device may differ. However, the process is usually similar for most devices. This set of instructions was created using a Google Pixel.
- Go into your apps list and tap the Settings
 icon.
icon. - Scroll to the bottom and select About phone (or something similar on a tablet).
 icon.
icon.
- On the About phone screen (or something similar on a tablet), scroll to the IP address section near the bottom.

You likely see four different IP addresses. The reason is that there is an internal and external IP address for your Wi-Fi network and mobile data connections.
Apple iPhone and iPad
- On the home screen, tap the icon.
- Ensure your Wi-Fi is turned on and that the correct network is selected.
 icon.
icon.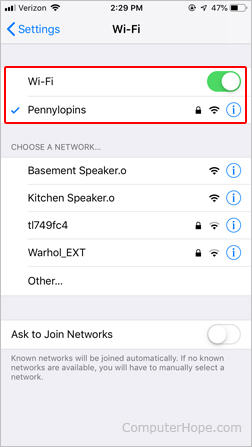
- Click the button next to your Wi-Fi connection.
- Your IP address is shown on the next screen.
Windows — VBScript — Determine IP address of computer on network
I have written some VBScripts to automate tasks that I perform on computers over the network. These work great for most tasks however within our network we have problems with the IP address in DNS being correct all the time. This mainly occurs with laptops where we have different IP ranges for machines on the wireless and wired network.
For example a machine may boot up wired in the morning and get an IP address: 10.10.10.1
When it switches to wireless it will obtain an address in a different subnet: 10.11.10.1
When you try to connect to that machine it still returns the old IP address (10.10.10.1) even though the computer now has a new one.
I have found that I can still connect to that computer’s C$ share via \computer name\c$ even though the machine does not ping. Obviously there is some other kind of address resolution going on, my question is how do I harness this to allow my VBScripts connect to WMI?
3 Answers 3
If DNS doesn’t have the correct address, then perhaps it is likely being resolved with NetBios. What you would have to do is resolve the computer name with either a WINS Server or through Broadcasts to the network. Depending on your network environment you would use one or both of those options.
Microsoft has a tool called NBLookup which should be able to lookup the name from WINS at the very least.
You can call NBLookup and parse the results. I don’t recall another method for NetBios resolution natively within VBScript, but I haven’t looked awfully hard recently.
Your problem is name resolution. Windows uses 2 types of name resolution: DNS and NetBIOS.
DNS will resolve a name like .comcast.net or www.google.com NetBIOS resolves names that are 15 characters or less, like your computer name likely is.
When your computer looks for a name it doesn’t know how to turn into an IP address, it goes to a DNS server and/or uses NetBIOS name resolution. Once it’s looked up a name, it saves it in a cache for some period of time (usually about an hour) before looking it up again.
You can look at the list of names your computer has cached for each type of name resolution using the command-line this way:
DNS
ipconfig -displaydns
NetBIOS
nbtstat -c
Each of those commands also alllows you clear that cache as well, which will force your system to rediscover what IP address the name points to. Here are those commands:
DNS
ipconfig -flushdns
NetBIOS
nbtstat -R
Between those commands, you should be able to determine which type of name resolution is the culprit and resolve it by flushing that cache.
8 ways to find your IP address in Windows (all versions)
The IP address or Internet Protocol address is a numerical label that is used in networks to identify and locate network devices, from computers to smartphones, to printers and other devices. The IP address can be a useful piece of information, especially when you want to set up your home router or when you want to connect to other devices on a network. But how do you check a PC’s IP address in Windows? In this tutorial, we will show you eight methods that work in Windows 10, Windows 7 and Windows 8.1:
NOTE: The information shared in this tutorial applies to all modern Windows operating systems: Windows 10, Windows 8.1 and Windows 7. To make things simpler, we use screenshots taken mostly in Windows 10. If you want to learn more technical details about IP addresses and their role in networking, we recommend you to read these articles:
1. How to find your IP address from the Command Prompt (all versions of Windows)
Open the Command Prompt , type the command ipconfig and press Enter. This command lists all the network adapters (both Ethernet and wireless) found on your Windows computer, and it shows details about each of them.
For each network adapter, you get to see both the IPv4 address and the IPv6 Address.
To learn more about the parameters accepted by the ipconfig command and what each of them does, run the command ipconfig /?.
And, if you are interested in finding more information about other networking commands that you can run using the Command Prompt, check this tutorial: Command Prompt – Advanced networking commands .
2. How to find your IP address in the Settings app (Windows 10 only)
If you are using Windows 10, open the Settings app . There, go to Network & Internet. You are shown a list of networking related settings and categories. If you are connected to a wireless network, in the column on the left, choose Wi-Fi and then, on the right, click or tap on the name of the network that you are connected to.
You are shown a long list of properties. Scroll down until you find the fields for the IPv6 and IPv4 addresses, highlighted below.
If you are connected using a network cable, in the column on the left choose Ethernet and then click or tap on the network name, on the right side of the screen.
Scroll down the list of network properties until you find the entries for the IPv6 and IPv4 addresses, highlighted below.
Now you can close the Settings app.
3. How to find your IP Address in the Control Panel (all versions of Windows)
Another geeky method that does not involve using a command is to use the Network and Sharing Center. To access it, open the Control Panel and go to “Network and Internet -> Network and Sharing Center.” If you want to learn more about it, read this guide: Simple questions: What is the Network and Sharing Center in Windows? . Next, click or tap the “Change adapter settings” link on the left.
The Network Connections window is opened, listing the network adapters installed on your computer, including virtual ones, used by VPN services or virtualization apps. Double click (or double tap) the network adapter for which you want to see the IP address.
This action opens the Status window of that adapter. Click or tap the Details button to see a series of details about that network adapter, including its IPv4 and IPv6 addresses.
Scroll through the list of details until you find the IPv4 and IPv6 address fields, highlighted below.
When done, Close the windows you just opened.
4. How to find your IP address in System Information (all versions of Windows)
Another method that works in all versions of Windows is to use the System Information desktop app. You can open it by using search and typing “System Information“ in the appropriate search field and clicking on the search result with the same name. Learn more about this tool and how to open it, from this guide: System Information – How to learn your PC’s complete configuration .
In the System Information desktop app, on the column on the left, expand Components followed by Networks and then Adapter. On the right side of the app window, you can see detailed information about each network adapter that is found on your computer. Scroll down the list until you find the network card that you are interested in. There you see a field named IP Address, giving you all the information you need.
Close the System Information app when done.
5. How to find the IP address in PowerShell (all versions of Windows)
PowerShell is a tool similar to the Command Prompt, but it is even more powerful and allows you to work with more elements that make up Windows. PowerShell has two commands which you can use to find the IPv4 and IPv6 address of a network adapter. The first one is gip. Type it in PowerShell and then press Enter. The command triggers the display of several details about each network adapter, including their IP addresses.
Another command which returns the same results is Get-NetIPConfiguration. Type it, press Enter and then look for the information that you want.
Close PowerShell when done.
6. How to find your IP address in Task Manager (Windows 10 and Windows 8.1 only)
If you use Windows 10 or Windows 8.1, start the Task Manager . If it starts in the compact view that only displays open apps, click or tap “More details.” Next, select the Performance tab and look for your network card. If you are connected to a wireless network, click or tap Wi-Fi. On the right side, you can see the IPv6 and IPv4 addresses.
If you are connected to a wired network, choose Ethernet on the left side of the Performance tab. On the right side look for the IPv6 and IPv4 addresses.
Close Task Manager when done.
7. How to find your computer’s IP address using the Network Map (Windows 7 only)
Windows 7 has a unique feature that is not available in Windows 8.1 or Windows 10. It is called the Network Map, and it shares a visual map of your network. If you want to find more about it, we recommend that you read this article: The Network Map – Access your network computers in a fun way . First, open the Network and Sharing Center. On the top right of the window, there is a link called “See full map.” Click on it.
This opens the Network Map. If you hover with the mouse over your computer, networking related information will be displayed, including the IPv4 and IPv6 address.
Write it down and close the Network Map.
8. How to find your IP address in the PC Settings app (Windows 8.1 only)
If you are using Windows 8.1, open the PC Settings app . There, choose Network and then go to Connections. Here you can see the network adapter that you are using the name of the network that you are connected to. Click or tap on the network name, under Ethernet (if you are on a wired connection) or Wi-Fi (if you are using a wireless network).
You are shown the properties of your connection, including the IP address.
Close PC Settings when done.
Conclusion
Finding the IP address of your Windows computer provides information that can be useful in many networking situations. If you know of other ways to find the IP address in Windows, or if you have questions regarding this subject, do not hesitate to leave a comment below.


