- DHCP Servers
- Configure the DHCP Server on Cumulus Linux Switches
- Configure the IPv4 DHCP Server
- Configure the IPv6 DHCP Server
- Assign Port-Based IP Addresses
- Troubleshooting
- isc-dhcp-server ipv6
- netprobe
- Configuring a static IPv6 address
- INIT file – /etc/init.d/isc-dhcp-server6
- Defaults file – /etc/default/isc-dhcp-server6
- Config file – /etc/dhcp/dhcpd6.conf
- The DHCP6 leases file
- Starting the Service and verifying it
- Auto-starting the service at boot
- IPv6 DHCP (DHCPv6) Server & Client Explained
- IPv6 Foundation Part 6: IPv6 DHCP (DHCPv6)
- All about DHCPv6 and Dynamic Address Assignment
- How DHCPv6 works
- DHCPv6 Example #1: How to configure a Cisco DHCPv6 Server & Client
- How to Configure a Cisco DHCPv6 Server
- How to Configure a Cisco DHCPv6 Client
- How to troubleshoot a Cisco DHCPv6 Server
- DHCPv6 Example #2: How to configure a Linux DHCPv6 Server using ISC dhcpd
- How to Configure a UNIX/Linux DHCPv6 Server
- How to Configure a Debian GNU/Linux DHCPv6 Client
- How to Configure IPv6 SLAAC on UNIX/Linux
- Recommended Resources for additional reading
- Book recommendations on IPv6
DHCP Servers
A DHCP Server automatically provides and assigns IP addresses and other network parameters to client devices. It relies on the Dynamic Host Configuration Protocol to respond to broadcast requests from clients.
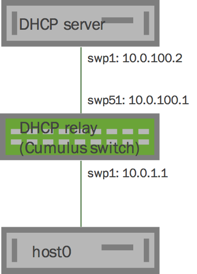
This topic describes how to configure a DHCP server for IPv4 and IPv6. Configurations on the hosts, DHCP relay and DHCP server are provided using the following topology. The DHCP server is a switch running Cumulus Linux; however, the DHCP server can also be located on a dedicated server in your environment.
The dhcpd and dhcrelay services are disabled by default. After you finish configuring the DHCP relays and servers, you need to start those services. If you intend to run these services within a VRF, including the management VRF, follow these steps.
For information about DHCP relays, refer to DHCP Relays.
Configure the DHCP Server on Cumulus Linux Switches
To configure the DHCP server on a Cumulus Linux switch for IPv4 and IPv6, you need to edit the /etc/dhcp/dhcp.conf and /etc/dhcp/dhcpd6.conf configuration files. Sample configurations are provided as a starting point.
You must include two pools in the DHCP configuration files:
- Pool 1 is the subnet that includes the IP addresses of the interfaces on the DHCP server
- Pool 2 is the subnet that includes the IP addresses being assigned
Configure the IPv4 DHCP Server
In a text editor, edit the /etc/dhcp/dhcpd.conf file. Use following configuration as an example:
Edit the /etc/default/isc-dhcp-server configuration file so that the DHCP server launches when the system boots. Here is an example configuration:
Enable and start the dhcpd service:
Configure the IPv6 DHCP Server
In a text editor, edit the /etc/dhcp/dhcpd6.conf file. Use following configuration as an example:
Edit the /etc/default/isc-dhcp-server6 file so that the DHCP server launches when the system boots. Here is an example configuration:
Enable and start the dhcpd6 service:
Assign Port-Based IP Addresses
You can assign an IP address and other DHCP options based on physical location or port regardless of MAC address to clients that are attached directly to the Cumulus Linux switch through a switch port. This is helpful when swapping out switches and servers; you can avoid the inconvenience of collecting the MAC address and sending it to the network administrator to modify the DHCP server configuration.
Edit the /etc/dhcp/dhcpd.conf file and add the interface name ifname to assign an IP address through DHCP. The following provides an example:
Troubleshooting
The DHCP server determines if a DHCP request is a relay or a non-relay DHCP request. You can run the following command to see the DHCP request:
Источник
isc-dhcp-server ipv6
Почему isc dhcp не отдает ipv6 адреса?
Раньше был dnsmasq и с ним все было нормально, но встала необходимость поставить bind ну и соответственно рядом isc dhcp.
Думалось что проблем не будет. Но. С ipv4 все в порядке. С ipv6 — никак. Или там разница большая и нужен еще один клиент?
В логах пусто. Даже запросов нет. Процесс есть. В netstat есть.


isc dhcpd в связке с dns-сервером так и не научили нормально работать с dualstack-сетями. Можно забить, и настроить SLAAC.
А так, на первый взгляд не могу понять, что с ним не так. Попробуй добавить authoritative;
Кто сказал radvd ?
но встала необходимость поставить bind ну и соответственно рядом isc dhcp.
Соответственно чему? Простите какая связь?
А какой еще dhcp умеет апдейтить bind?
Он просто не отвечает вообще.
В networkmanagere передергиваю соединение — v4 есть. И в логах сервера есть запрос. v6 -нет. И в логах тишина.
А адрес на клиенте есть? может у тебя lease еще не истек, вот он и не просит новый адрес.
Нет конечно. dhclient его не получает изначально.
А в целом по link-local адресам трафик ходит? Может что-то другое пакеты не пускает?
Да, еще. iptables оба пустые.
Ничего не должно.
ps. Извиняюсь. А как посмотреть?
Не уверен, как посмотреть.
Кроме iptables блокировать могут всякие штуки типа apparmor и selinux. Еще в современных ядрах кроме iptables другие фильтры есть, у них могут быть свои правила, настраиваемые через какой-нибудь firewalld.
Но с dnsmasq то все работает. Может там механизм какой другой.
Типа over v4, или типа того.
Я имею ввиду что dnsmasq отдает v6 после запроса v4.
А что за система? Формат вывода ifconfig как-то радикально отличается он моего, и того, что гуглится на картинках. Можно посмотреть вывод ip addr show eth0?
В принципе та же убунта.
Очень загадачно. Единственное, что мне удалось нагуглить, что в 2017 году в дебиане был сломанный пакет isc-dhcpd, который по какой-то причине не выдавал ipv6-адреса. Проблему решали пресборкой из оригинальных исходных кодов, после этого все начинало работать с тем же конфигом. Исправили это в апстриме дебиана или нет не ясно. Попробуй и ты собрать самостоятельно, это единственное, что мне приходит в голову.
Попробую.
Пошел на isc.
Судя по всему мне нужно вот это
enable support for DHCPv4-over-DHCPv6 (default is
no)

Чтоб в isc-dhcpd была поддержка ipv6 достаточно добавить —enable-dhcpv6 к опциям configure
Я вообще держу 2 dhcpd — один хитро патченный для ipv4 и оригинальный для ipv6 ( мне в одной сети одному устройству нужен dhcp6)
Запускаются параллельно с разными конфигами.
Оказалось что все с ним нормально.
dhclient -6 -d enp5s0
отрабатывает. Адрес получает. Проблема видимо в networkmanager.
Источник
netprobe
My network is running IPv6 with SLAAC and the JunOS version on my firewall does not support RDNSS, so I needed a full-featured DHCP server to hand out DNS information.
I already have a Raspberry Pi running isc-dhcp-server for my IPv4 network so I thought it would be simple to add IPv6 support. Unfortunately it was not – the ISC DHCP server does not support dual-stack natively so you need to run two independent services in parallel.
The official documentation for this is very limited and outdated, so it took a lot of blogs and forum posts to get it working, so perhaps this post will help others in their quest for DHCPv6 support 🙂
I am assuming that you have already installed and configured the DHCP server for IPv4. If not, you can do so by entering the following command.
After installation, you can start the service manually, or reboot.
This post focuses on the DHCPv6 part. For the actual configuration for standard DHCP, there are plenty of good guides available online.
Configuring a static IPv6 address
In case you haven’t done so, be sure to configure your device with a static IPv6 address.
Restart the network interface or reboot the device to apply it.
INIT file – /etc/init.d/isc-dhcp-server6
First step is to copy the working init script, which is used by the v4 server, to a new file.
This will create a new file isc-dhcp-server6 – use nano or vi to edit it.
Some of the values in the ### INIT INFO ### section need to modified to represent the new dhcpv6 service. I’ve also modified the value for the default config file, DHCPD_DEFAULT, to be /etc/default/isc-dhcp-server6 – more on that file later.
The script below shows only the first part of the script so don’t copy-paste.
Defaults file – /etc/default/isc-dhcp-server6
This file stores the values used by the INIT script, so it’s absolutely essential that they are correct, or the service will refuse to start or will not work as expected.
Again, you can copy the existing file and modify those parameters.
The configuration file for this example has four different values.
- DHCPD_CONF – this value identifies the configuration file which will hold our DHCPv6 attributes.
- DHCPD_PID – when the service is started, the process ID for the service will be written to this file
- OPTIONS – here we need to specify the server to run in v6 mode by using the -6 knob
- INTERFACES – the interface(s) on which the DHCP server will be listening, in my case eth0
Config file – /etc/dhcp/dhcpd6.conf
This file, just like in the IPv4 version, contains the global DHCP options and the subnet statements, reservations, etc. I am using it in conjunction with SLAAC, so DHCPv6 is only used to hand out the DNS info.
Note – For IPv6 subnets, you need to use the subnet6 statement.
The DHCP6 leases file
It’s possible the service will not start because this file does not exist:
Just create an empty file and it should be OK.
Starting the Service and verifying it
If the configuration files are correct, we can now manually start the service.
If you are getting an error, you will usually find a clue in the /var/log/syslog files…
Verify that the second service is now running:
To validate the process ID as written at service start time.
To verify that the service is listening on UDP port 547:
If you have your DHCP relays set up correctly, you can also verify communication with tcpdump. Here we can see a client is requesting information from DHCP.
Auto-starting the service at boot
To add the new service to the initialization scripts, enter the following command.
After a reboot, you should again have two running instances of the dhcpd service – one with the -6 option.
If everything went well, your clients should now be picking up the DNS servers (or other DHCPv6 information) from your new DHCPv6 server.
If this guide does not work for you, please let me know in the comments!
Источник
IPv6 DHCP (DHCPv6) Server & Client Explained
| Course Index |
|---|
| Part 1 – Introduction: What is IPv6 |
| Part 2 – IPv6 Addressing & Subnetting |
| Part 3 – IPv6 Headers & Header Extensions |
| Part 4 – ICMPv6 & IPv6 Neighborships |
| Part 5 – IPv6 Configuration, EUI-64, SLAAC & Dual Stack |
| Part 6 – IPv6 DHCP (DHCPv6) |
| Part 7 – IPv6 on Windows |
| Part 8 – IPv6 on Linux |
| Part 9 – IPv6 on Mac |
| Part 10 – IPv6 DNS, Monitoring & Address Management |
| Part 11 – IPv6 Routing |
| Part 12 – IPv6 Security & Tunneling |
| Part 13 – IPv6 Internet Connection & Address Planning |
IPv6 Foundation Part 6: IPv6 DHCP (DHCPv6)
All about DHCPv6 and Dynamic Address Assignment
The Dynamic Host Configuration Protocol (DHCP) in Version 6 was created to support automatic IPv6 addressing using DHCP, like it was common with IPv4. Back in the day in the IPv4 World, we did not have automatic configuration of addresses like we do with SLAAC now.
You have learned before, that there also was no possibility to tell a client the router’s IP address (default gateway) nor the address of the DNS servers.
All this can be done using our built-in ICMPv6 toolkit, which I find absolutely great. For some implementations and some networks it might make sense to implement another solution: DHCPv6
DHCPv6 is the stateful alternative to SLAAC. Remember, the S in SLAAC comes from stateless. Stateless means, the state is not recorded, so the address generated by a client is not essentially known to the infrastructure and is not essentially the same every time. In large deployments, engineers might want to do stateful address assignment and keep record which client received which IPv6 address at which time. This can also help fulfill strict security requirements in larger companies.
To the rescue comes DHCPv6!
DHCPv6 has been defined in many RFCs, the most recent one being RFC8415. It can provide SLAAC hosts with additional information which is not commonly provided by SLAAC, such as DNS servers.
Yes, I told you before, DNS can be supplied inside a Router Advertisement message (RA). There is RFC6106 for announcing DNS servers with RA, but this was mostly not implemented by the networking vendors and thus could not be used in production very well. RFC6106 was since obsoleted by a new RFC8106.
DHCPv6 also supports IPv6 Prefix Delegation which is common with DSL routers and some Internet service providers, to receive not only the public IP address (upstream prefix), but also a globally routed prefix for use in the local network (downstream prefix) from the provider.
How DHCPv6 works
On a high-level overview, DHCPv6 uses UDP Port 546 for the client and UDP Port 547 for the server and follows these simple steps:
- the DHCP Unique Identifier (DUID) is sent by the client to request an address
- the DHCPv6 server checks the DUID with the DHCPv6 database for reservation or pool
- the IPv6 address is announced by DHCP server to the client
The detailed technical steps are:
- the DHCP client sends a solicit from its Link-Local address to multicast group ff02::1:2 (all DHCP servers)
- the DHCP server replies with an advertise message from its Link-Local address to the Link-Local address of the client (remember, both have to be link-local as the client has no other address yet!)
- the DHCP client replies with a request message from its Link-Local address to multicast group ff02::1:2 (all DHCP servers)
- the DHCP server ends the communication with the assignment of an address and replying from its Link-Local address to the Link-Local address of the client
DHCPv6 Example #1: How to configure a Cisco DHCPv6 Server & Client
Let’s do a lab together as an example how DHCPv6 works.
You can copy and paste the sample configuration to real hardware or virtual machines. Or, if you prefer, you can just read and not try out for yourself.
How to Configure a Cisco DHCPv6 Server
How to Configure a Cisco DHCPv6 Client
How to troubleshoot a Cisco DHCPv6 Server
Here are some example troubleshooting commands you can use on Cisco gear in regards to the DHCPv6 service:
Show Cisco DHCPv6 Address Pools
Show Cisco DHCPv6 Server Bindings (Allocations)
Show Cisco DHCPv6 Client Status (Interfaces)
DHCPv6 Example #2: How to configure a Linux DHCPv6 Server using ISC dhcpd
One of the most common DHCPv6 implementations is still the ISC dhcpd server that runs on UNIX and Linux and supports IPv6 since version 4. You can try these example configurations on a virtual machine our your own host.
How to Configure a UNIX/Linux DHCPv6 Server
Server ISC dhcpd6:
First edit the configuration file in /etc/dhcp/dhcpd6.conf:
# Range for clients requesting a temporary address
range6 2001:db8:0:1::/64 temporary;
# Additional options
option dhcp6.name-servers fec0:0:0:1::1;
option dhcp6.domain-search “domain.example”;
# Prefix range for delegation to sub-routers
prefix6 2001:db8:0:100:: 2001:db8:0:f00:: /56;
# Example for a fixed host address
host specialclient <
host-identifier option dhcp6.client-id 00:01:00:01:4a:
1f:ba:e3:60:b9:1f:01:23:45;
And then restart the dhcpd6 daemon using the init system of your Linux distribution.
How to Configure a Debian GNU/Linux DHCPv6 Client
Your configuration is in the file /etc/network/interfaces:
Now restart your networking stack and check out your brand new IPv6 connectivity!
How to Configure IPv6 SLAAC on UNIX/Linux
For Stateless Address Autoconfiguration (SLAAC) you just need to put this one line into your networking configuration at /etc/network/interfaces:
Same here – please restart your networking stack now and enjoy your brand new IPv6!
Recommended Resources for additional reading
Apart from the links throughout this course I recommend the following resources for additional information:
- The Internet Society (ISOC) IPv6 Portal
- Test your IPv6 connectivity on test-ipv6.com
- The official IANA list of assigned IPv6 address space is very interesting
- The Google IPv6 deployment statistics
- The RIPE NCC IPv6 working group and mailing list
Book recommendations on IPv6
I can recommend the following 3 books (Amazon referral links) which I enjoyed reading:
This concludes IPv6 Foundation Part 6: IPv6 DHCP (DHCPv6) of the original IPv6 Foundation Master Class.
Источник


