Creating a custom input dialog
In the last couple of articles, we’ve looked at using the built-in dialogs of WPF, but creating your own is almost just as easy. In fact, you really just need to create a Window, place the required controls in it and then show it.
However, there are a few things that you should remember when creating dialogs, to ensure that your application acts like other Windows applications. In this article, we’ll create a very simple dialog to ask the user a question and then return the answer, while discussing the various good practices that you should follow.
Designing the dialog
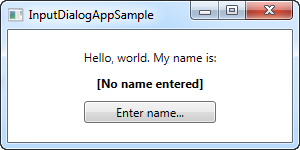
For this particular dialog, I just wanted a Label telling the user which information we need from him/her, a TextBox for entering the answer, and then the usual Ok and Cancel buttons. I decided to add an icon to the dialog as well, for good looks. Here’s the end result:

And here’s the code for the dialog:
The code is pretty simple, but here are the things that you should pay special attention to:
In the XAML part, I’ve used a Grid for layout of the controls — nothing fancy here. I’ve removed the Width and Height properties of the Window and instead set it to automatically resize to match the content — this makes sense in a dialog, so you don’t have to fine tune the size to make everything look alright. Instead, use margins and minimum sizes to ensure that things look the way you want them to, while still allowing the user to resize the dialog.
Another property which I’ve changed on the Window is the WindowStartupLocation property. For a dialog like this, and probably for most other non-main windows, you should change this value to CenterScreen or CenterOwner, to change the default behavior where your window will appear in a position decided by Windows, unless you manually specify Top and Left properties for it.
Also pay special attention to the two properties I’ve used on the dialog buttons: IsCancel and IsDefault. IsCancel tells WPF that if the user clicks this button, the DialogResult of the Window should be set to false which will also close the window. This also ensures that the user can press the Esc key on their keyboard to close the window, something that should always be possible in a Windows dialog.
The IsDefault property gives focus to the Ok button and also ensures that if the user presses the Enter key on their keyboard, this button is activated. An event handler is needed to set the DialogResult for this though, as described later.
Code-behind
In Code-behind, I changed the constructor to take two parameters, with one being optional. This allows us to place the question and the default answer, if provided, into the designated UI controls.
The Ok button has an event handler which ensures that the special DialogResult property of the Window is set to true when clicked, to signal to the initiator of the dialog that the user accepted the entered value. We don’t have one for the Cancel button, because WPF handles this for us when we set the IsCancel property to true, as described above.
To give focus to the TextBox upon showing the dialog, I’ve subscribed to the ContentRendered event, where I select all the text in the control and then give focus. If I just wanted to give focus, I could have use the FocusManager.FocusedElement attached property on the Window, but in this case, I also want to select the text, to allow the user to instantly overwrite the answer provided by default (if any).
A last detail is the Answer property which I’ve implemented. It simply gives access to the entered value of the TextBox control, but it’s good practice to provide a property with the return value(s) of the dialog, instead of directly accessing controls from outside the window. This also allows you to influence the return value before returning it, if needed.
Using the dialog
With all the above in place, we’re now ready to actually use our dialog. It’s a very simple task, so I’ve created a small application for testing it. Here’s the code:
There’s nothing special to it — just a couple of TextBlock controls and a Button for invoking the dialog. In the Click event handler, we instantiate the InputDialogSample window, providing a question and a default answer, and then we use the ShowDialog() method to show it — you should always use ShowDialog() method and not just Show() for a modal dialog like this.
If the result of the dialog is true, meaning that the user has activated the Ok button either by clicking it or pressing Enter, the result is assigned to the name Label. That’s all there is to it!
Диалоговые окна
Часто при отображении окна как модального пользователю предлагается сделать какой-нибудь выбор. Код, отображающий окно, дожидается получения результата этого выбора и затем выполняет на его основании соответствующее действие. Такое проектное решение называется моделью диалогового окна, а само отображаемое модальное окно — диалоговым окном.
Этот шаблон проектирования легко корректировать за счет создания в диалоговом окне общедоступного свойства. Такое свойство может устанавливаться, когда пользователь сделал выбор в диалоговом окне. Далее диалоговое окно может закрываться, а отображавший его код — проверять установленное для свойства значение и на его основе определять, какое действие должно быть выполнено следующим. (Имейте в виду, что даже когда окно закрывается, объект окна и информация обо всех его элементах управления все равно существует до тех пор, пока ссылающаяся на него переменная не покинет область действия.)
К счастью, такая инфраструктура уже отчасти жестко закодирована в классе Window. У каждого окна имеется уже готовое свойство DialogResult, которое может принимать значение true, false или null. Обычно значение true означает, что пользователь выбрал продолжение операции (например, щелкнул на кнопке ОК), а значение false — что он отменил операцию.
Лучше всего, когда результаты диалогового окна возвращаются в вызывающий код в виде значения, возвращаемого методом ShowDialog(). Это позволяет создавать, отображать и анализировать результаты диалогового окна с помощью простого кода:
Использование свойства DialogResult не исключает возможности добавления в окно специальных свойств. Например, исключительно целесообразно использовать свойство DialogResult для информирования вызывающего кода о том, разрешено или отменено было действие, и для предоставления других важных деталей через специальные свойства. В случае обнаружения в свойстве DialogResult значения true вызывающий код далее может проверять эти другие свойства для извлечения необходимой ему информации.
Также существует один сокращенный путь. Вместо того чтобы устанавливать свойство DialogResult вручную после выполнения пользователем щелчка на кнопке, можно назначить кнопку принятия (установкой для свойства IsDefault значения true). Тогда щелчок на этой кнопке будет автоматически приводить к установке свойства DialogResult в true. Подобным образом также можно предусмотреть кнопку отмены (за счет установки значения true для свойства IsCancel), в результате чего щелчок на ней будет автоматически приводить к установке свойства DialogResult в Cancel.
Модель диалогового окна в WPF отличается от той, что предлагается в Windows Forms. Там кнопки не предоставляют свойства DialogResult, из-за чего создавать можно только кнопки по умолчанию и кнопки отмены. Свойство DialogResult может принимать только значения true, false и null (последнее устанавливается для него изначально). Вдобавок щелчок на кнопке не приводит к автоматическому закрытию окна — код, выполняющий эту операцию, необходимо писать отдельно.
Общие диалоговые окна
Операционная система Windows включает много встроенных диалоговых окон, доступ к которым можно получать через API-интерфейс Windows. Для некоторых из них WPF предоставляет классы-оболочки.
Существует веская причина того, что WPF не включает упаковщики для абсолютно всех API-интерфейсов Windows. Одной из задач WPF является отделение от Windows API для получения возможности использования в других средах (например, в браузере) или переноса на другие платформы. Также многие из встроенных диалоговых окон уже начинают устаревать и потому не должны применяться в современных приложениях. Вдобавок в версии Windows 7 предпочтение уже отдается использованию не диалоговых окон, а основанных на задачах панелей и навигации.
Наиболее приметным из этих классов является класс System.Windows.MessageBox, который предоставляет статический метод Show(). Этот код можно использовать для отображения стандартных окон сообщений Windows. Ниже показана наиболее распространенная перегруженная версия этого метода:
Перечисление MessageBoxButton позволяет выбирать кнопки, которые должны отображаться в окне сообщений. К числу доступных вариантов относятся OK, OKCancel, YesNo и YesNoCancel. (Менее удобный для пользователя вариант AbortRetrylgnore не поддерживается.) Перечисление MessageBoxImage позволяет выбирать пиктограмму для окна сообщения (Information, Exclamation, Error, Hand, Question, Stop и т.д.).
Для класса MessageBox в WPF предусмотрена специальная поддержка функций печати, подразумевающих использование класса PrintDialog, а также классов OpenFileDialog и SaveFileDialog в пространстве имен Microsoft.Win32.
Классы OpenFileDialog и SaveFileDialog получают дополнительные функциональные средства (часть из которых наследуются от класса FileDialog). Оба из них поддерживают строку фильтра, которая устанавливает разрешенные расширения файлов. Класс OpenFileDialog также предлагает свойства, которые позволяют проверять выбор пользователя (CheckFileExists) и предоставлять ему возможность выбирать сразу несколько файлов (Multiselect). Ниже показан пример кода, который отображает диалоговое окно OpenFileDialog и выбранные файлы в окне списка после закрытия этого диалогового окна:
Элементов, позволяющих выбирать цвета, указывать шрифт и просматривать папки, здесь нет (хотя при использовании классов System.Windows.Forms из .NET 2.0 они доступны).
В предыдущих версиях WPF классы диалоговых окон всегда отображали диалоговые окна в старом стиле Windows ХР. В WPF 4 они были обновлены и оснащены поддержкой Windows Vista и Windows 7. Это означает то, что при запуске приложения под управлением более новой версии Windows диалоговые окна будут автоматически отображаться в современном стиле.
General dialog window for WPF and Prism
I’ve been through too much pain trying to switch between managing VM state for various views in the shell window, together with VM state for numerous edit dialogues, modal or non-modal, and state for the windows themselves.
Now I wish to redo with one shell window, and hoping for only one dialogue window, then my windows and Vms have far less coupling, and I can borrow the shell’s VM management patterns into the dialogue’s management.
I see quite a lot of guidance for directly managing popups and less generalised non-modals, but is there any established pattern or guidance for using only one dialogue to host various VMs? Even better, is there any such functionality available in Prism already?
I want to really to stick the DRY principle, and inheritance in both views and VMs is adding complexities I can’t afford on a supposed to be quick first iteration prototype.
2 Answers 2
This is actually quite simple, but has some complexities. First off, you will want to create a custom dialog service. This service can be as simple or as complicated as you like. The main thing this service will do is show a dialog that is treated as it’s own shell. Meaning that the dialog will be the same, but the contents within the dialog will be different based on the information you pass to it when you call it. SO this means a custom dialog with it’s own regions. To handle using different views in the dialog shell, I would utilize the navigation service.
Your dialog might look something like this:
You can modify this approach to fit your needs exactly, but you get the idea.
EDIT: I also want to mention that you can even get crazy with this by allowing your dialog to have it’s own separate navigation within it and unique to each instance that is shown. I have a Pluralsight course that shows how to do this if you are interested. https://www.pluralsight.com/courses/prism-showing-multiple-shells
Well I don’t know about any out of the box solution, but creating such a reusable dialog implementation is not that hard. Actually, I implemented something like this a few years ago. Well it was in another job, so I don’t have access to the code anymore. Additionally, I cannot remember all the details, but I can try to give you the basic idea of such an implementation.
You can create a DialogVm , which is providing the generic dialog functionality.
First of all, what is needed for a dialog in presentation layer? Usually, three buttons, like.
- Apply, Cancel and Close (Modification dialog)
- Ok and Cancel or Yes and No (Question dialog)
- Ok (in case of a message box)
So as you can see, you need three commands ( ICommand doc). Actually, I’ve created a DelegateCommand implementation (based on this). ICommand.CanExecute determines, whether a bound button is disabled or enabled. If a command is null, the button should be hidden.
(If you’re using the right layout control, the positions of the buttons are adjusted properly, if a button is not shown.)
To provide support for more than the four scenarios above, I added a CommandTitle property to DelegateCommand , so that the content of the button is coming from there.
Next thing you’ll need a Title property for the title of the dialog. So add this to the DialogVm .
If you want to be able to close the dialog (only necessary, if it’s a child of Window ) by executing a command, you can follow this approach. Of course I’ve used the version, which I’ve described there. But the others are also looking promising.
The last open point is a property, which represents the different dialog contents. If I recall it correctly, I’ve used a small set of view models and corresponding DataTemplates (and of course a TemplateSelector , which is providing the right template based on the VM type). Of course you will also need a ContentPresenter control in your dialog, which is showing the DataTemplate provided by the TemplateSelector .
This is the only downsite, it’s only a good approach, if you have only a few different dialog types (e.g. Question box, Message box. )
The usage is pretty easy. Simply, initialize a DialogVm instance with the desired ICommand logic, the DialogContentVm (however you want to call it), pass it to the DialogWindow (perhaps, you want to use sth. different e.g. a flyout) and present it to the user.
Well I hope it helps. If you need more info or any help, pls let me know.


