- Dialux evo mac os
- Re: Dialux For Mac?
- Re: Dialux For Mac?
- Download DIALux and product catalogues
- DIALux evo 10 The worldwide standard in lighting design software
- DIALux product catalogues
- What’s new in DIALux evo 10
- DIALux evo 10.0
- “Солнышко для Планктонушка” – основы светототехнического моделирования в DIALux
Dialux evo mac os
Post by ben.hollingsworth84 » Thu Sep 03, 2015 3:50 pm
Firstly are there any plans in the short term to release a Dialux 4 and or Evo for Mac systems?
Secondly if not, would anybody be so kind to give me a few pointers on using Parallels and what format I should be getting a copy of windows operating system (USB, DVD etc).
Thanks in advance!
Re: Dialux For Mac?
Post by kvkozierowski » Fri Sep 04, 2015 6:39 am
There are no short or medium term plans to release a DIALux version (evo or 4) for Mac systems.
As we do not support Macs we do not have Mac systems here to test DIALux on these systems, so the following is just theory and/or feedback from other users.
DIAlux 4 should work in Mesa-Mode in a virtual maschine running Windows.
evo needs a native Windows installation because (most) virtualization solutions do not support OpenGL 3.0.
In the future evo might run with VMware Fusion 8 (OpenGL 3.3) but there is an issue in the current evo version: viewtopic.php?f=2&t=81817
When the issue is solved we do not know how evo will perform in this environment (hardware/software rendering, . ).
Re: Dialux For Mac?
Post by joshallen » Tue Sep 08, 2015 6:14 pm
I have been using VMWare Fusion to run Windows software on my Mac since 2008 (Autocad, Revit, etc.). Evo 5.x still has an issue with VMWare Fusion 8. Once corrected, it will be quite useful to me, as well. Until then, I’ve had success running Dialux 4 or Evo 3.3 on VMWare Fusion. I’m not a fan of Parallels, but that’s just me.
Источник
Download
DIALux and product catalogues

DIALux evo 10
The worldwide standard in lighting design software
Design, calculate and visualize light for single rooms, whole buildings, streets, outdoor areas, emergency lighting and daylighting.
DIALux is free and open.
Latest Version
5.10.0.56764 (2021-09-28)
Hardware requirements
CPU with SSE2-support 4 GB RAM (min. 2 GB), OpenGL 3.2 graphics card
(1 GB RAM), Windows 8.1/10 (32/64 bit), resolution min. 1024 × 768 px
Language support
Čeština, Dansk, Deutsch, Eesti, English (UK/US), Español, Français, Italiano, Magyar, Nederlands, Norsk, Polski, Português, Română, Slovenščina, Suomi, Svenska, Türkçe, Ελληνικά, русский, 한국어, 简体中文, 繁體中文, 日本語.
DIALux 4 (outdated)
You can download DIALux 4.13.0.2 here, if you still need it. We do not maintain this version any further. We strongly recommend to use DIALux evo.
DIALux product catalogues
We cooperate with all leading brands in the lighting industry. Download their catalogues to use the products in DIALux.
You can support DIALux by using products and data from DIALux members. Learn more here.
The asteric (*) indicates a premium members.
Источник
What’s new in DIALux evo 10
Finally – DIALux evo 10 offers you the long-awaited planning of emergency lighting. We show you new functions and what we have changed and improved in the previous ones.
DIALux evo 10.0
Version: 5.10.0.56764
Released: 2021-09-28
Emergency lighting
New calculation objects
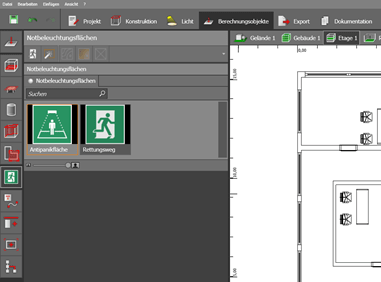
- New calculation objects for emergency lighting have been added in the Calculation objects mode
- Escape routes according to EN 1838 2019-11. Escape routes can cross each other and are thus combined to form complex escape routes. Each section can be assigned its own width
- Anti-panic surfaces in accordance with EN 1838 2019-11. There is only one anti-panic surface per room/area with freely definable edge zone
Emergency luminaires
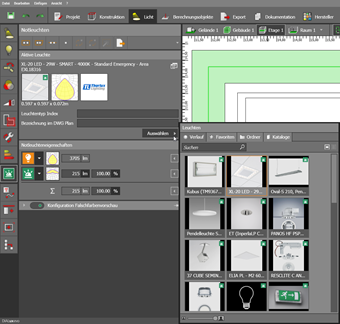
A new tool for emergency luminaires has been added. It includes field lines and single arrangements, as well as special settings for emergency luminaires.

Emergency luminaire properties
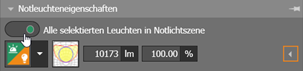
Any luminaire can be used for emergency lighting. The manufacturer can define light-emitting surfaces that are specifically intended for emergency lighting. This information is used by evo. Otherwise, the user must make the settings. Luminous flux or emergency lighting factor can be set, and the two values are converted into each other. For each light-emitting surface, it can be specified whether it is to be used only for emergency lighting, only for normal lighting or for both cases.
Positioning emergency luminaires manually
Each luminaire placed in the Emergency Luminaires tool is automatically added to the emergency lighting scene. The lighting scene is created automatically. The luminaires are automatically grouped according to type and photometric properties. The user can also create his own groups. Mixed groups are not possible. A click on the emergency lighting group selects the luminaires of this group in the CAD. Luminaires that are assigned to the emergency lighting scene are marked with a small symbol in the CAD.
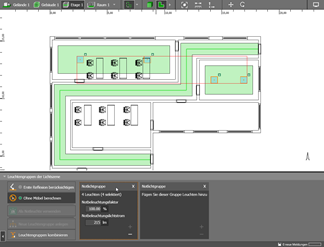
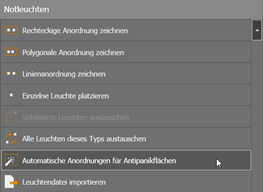
Place luminaires automatically for anti-panic areas
With this function, luminaires can be placed automatically for an existing anti-panic area. Sufficient luminaires are placed to achieve the required illuminance and uniformity.
Use existing luminaires in the emergency lighting
For operation with emergency power units, luminaires that were actually planned for general lighting can also be used for emergency lighting. In order to use a luminaire as an emergency luminaire, it is selected and
- the button Use as emergency luminaire is pressed
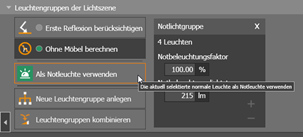
- the slider in the luminaire properties is used
- or the luminaire simply assigned to an emergency luminaire group
Results preview
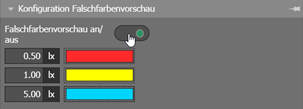
- The result preview shows a real-time visualisation of the expected results. Prerequisites for this are emergency lighting objects, an escape route or an anti-panic area, as well as at least one selected luminaire in the emergency lighting scene. The result preview is activated with the False colour preview on/off switch in the False colour preview configuration tool
- DIALux evo displays the expected results as false colours for the selected luminaire and up to 10 other visible luminaires or light emission surfaces of the emergency lighting scene
- You can define your own colours and values in the false colour preview tool
Calculation settings
Two options are available for the calculation:
- Take first reflection into account. For indirect distribution luminaires, the standard provides that the first reflection can be taken into account. If this option is not selected, no reflection is taken into account for emergency lighting
- Calculation without furniture. Furniture is explicitly excluded from the calculation
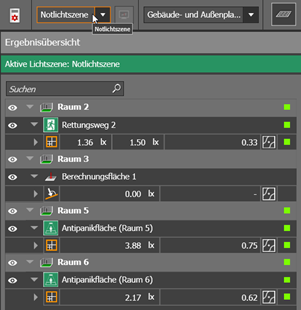
Calculation results
- The result monitor also shows the calculation results of the emergency lighting areas. The emergency lighting scene is highlighted in colour
- So that problematic minimum points can be found quickly, a button has been added that cyclically switches through the points with the smallest illuminance value
Expenditure
For the documentation of the planning, the following results and information are available after the calculation:
- The luminaire list with the emergency luminaires used
- A luminaire location plan showing the emergency luminaires placed
- The individual calculation results of the placed calculation objects
- The spatial summary with the results of the calculation objects
New layouts
For the preliminary remarks page, there is another layout alternative that allows the text to run across the entire width. This results in documentation with fewer pages.
Источник
“Солнышко для Планктонушка” – основы светототехнического моделирования в DIALux
Здравствуй Хабр, сегодня уже пятница а значит я могу сдуть пыль со своей старой традиции публиковать по пятницам, что-нибудь «о вкусной и здоровой пище» полезное и интересное из мира науки и техники.
Близится новый год и мне хотелось бы всем подарить этот мини туториал по Dialux (бесплатной программе для светотехнического 2D и 3D моделирования).
Посмотрев эту короткую статью и покрутив в руках проект прилагаемый к ней вы получите самые начальные представления о светотехническом моделировании. Дерзайте светотехнические расчеты это совсем не страшно.
Сегодня мы будем обеспечивать комфортные нормативные условия труженикам дисплея и бумаги.
За подробностями под кат.
(Внимание! Под катом трафик)
П.с на всякий случай я не ангажирован разработчиками, просто как правило делюсь тем, что сам попутно осваиваю.

Для начала, что такое Dialux и почему он бесплатен.
Dialux это бесплатная программа для трехмерного моделирования и светотехнических расчетов, разработанная немцами в институте чего-то и чего-то. Бесплатная, потому что за программу платят производители светильников (в этом есть свои плюсы и минусы)
Более подробно вам расскажет ресурс dialux-help
Там же можно и скачать программу.
Сразу отмечу на текущий момент есть два ответвления
1 — Это собственно сам Dialux, более старый менее требовательный.
2 – Dialux Evo новинка, со своими прелестями, но более сырая и прожорливая.
Нам вполне хватит самого Dialux (актуальная версия 4.11)
Кстати Dialux после некоторых плясок с бубном запускается в *nix под Wine. (по крайней мере у меня на нетбуке с LMDE, работает правда из рук вон плохо)
И так приступим
Какая перед нами задача? Есть офисное помещение в котором находится два рабочих места, одно окно и дверь задача подобрать рабочее освещение в соответствии с нормативными требованиями. (по СП_52.13330.2011 возьмем примерно 300 люкс)
Я заранее подготовил планировку в dwg (лежит с самим проектом)
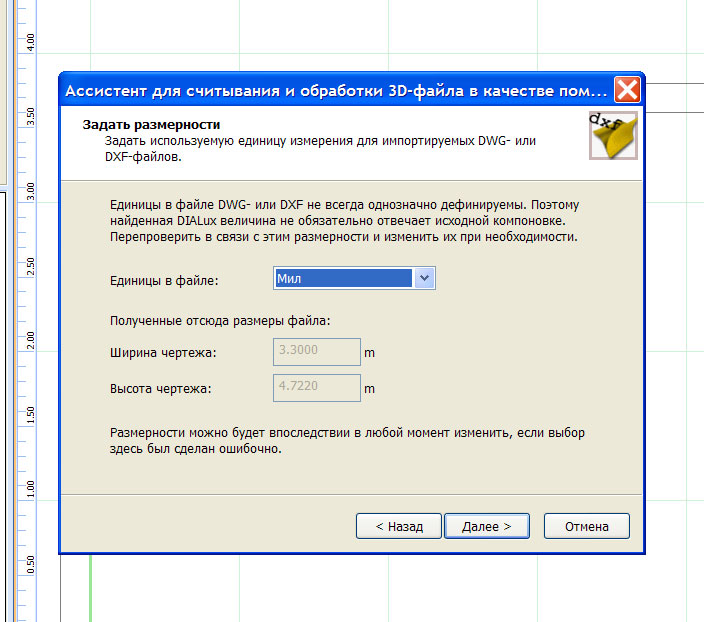
Я вычерчивал план в миллиметрах (то есть помещение 3000х4000мм) желательно, чтобы стены были поближе к началу координат
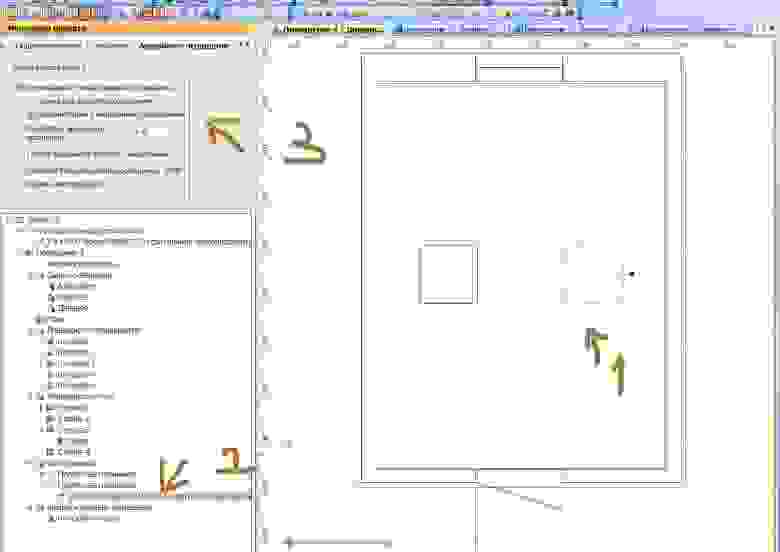
Теперь начнем разрабатывать сам проект освещения
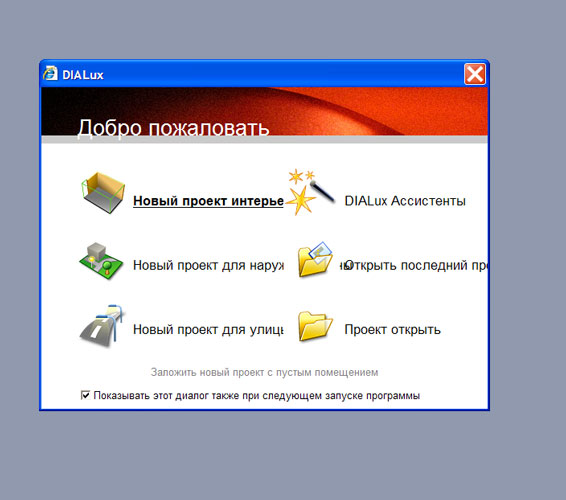
Откроем программу и с помощью мастера выберем новый проект интерьера
Потом импортируем нашу планировку
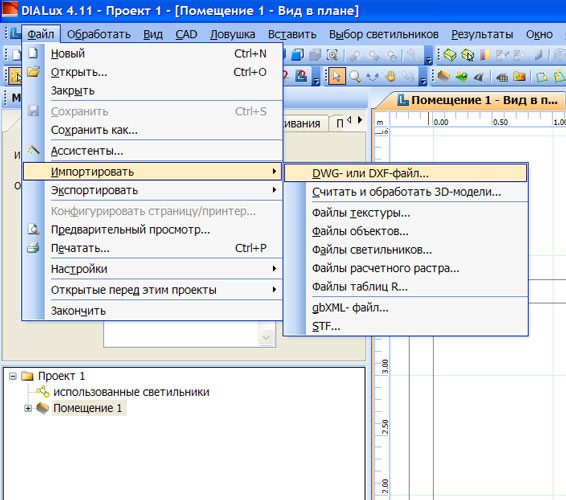
Пройдем необходимые шаги, выберем масштаб планировки Я чертил в миллиметрах (значит мил)
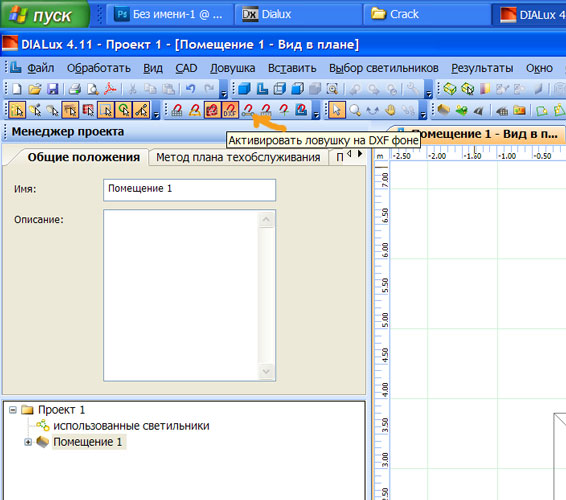
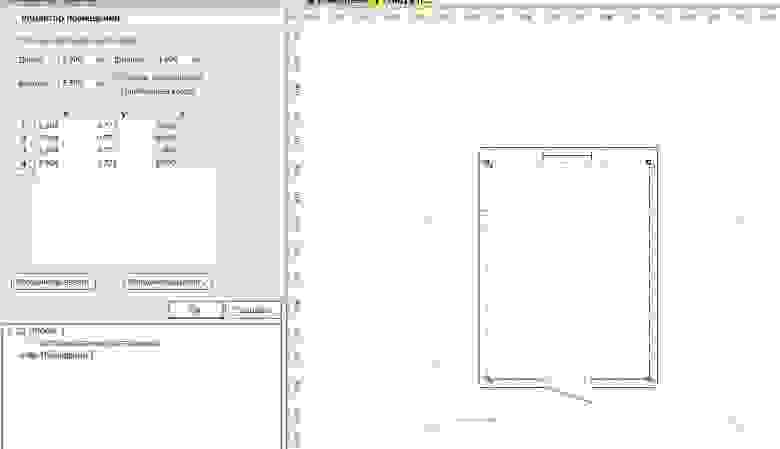
Помещение импортируется
Надо его подкорректировать
Но для начало настроим привязки можно отключить лишние и оставить привязку к dwg и светильникам
Теперь обработаем геометрию перетянем точки на нашу планировку и нажмем «Ок»
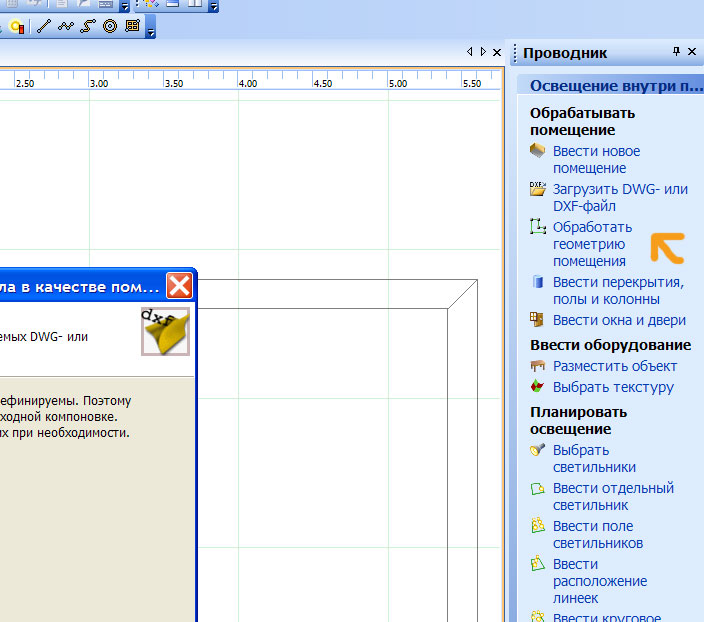
Вставим окна и двери (ставиться только на очерченные ранее границы помещения)
Просто выбираем кликнув на эскиз модели и перетаскиваем в пространство CAD потом до настраиваете размеры
Получим вот такую красоту


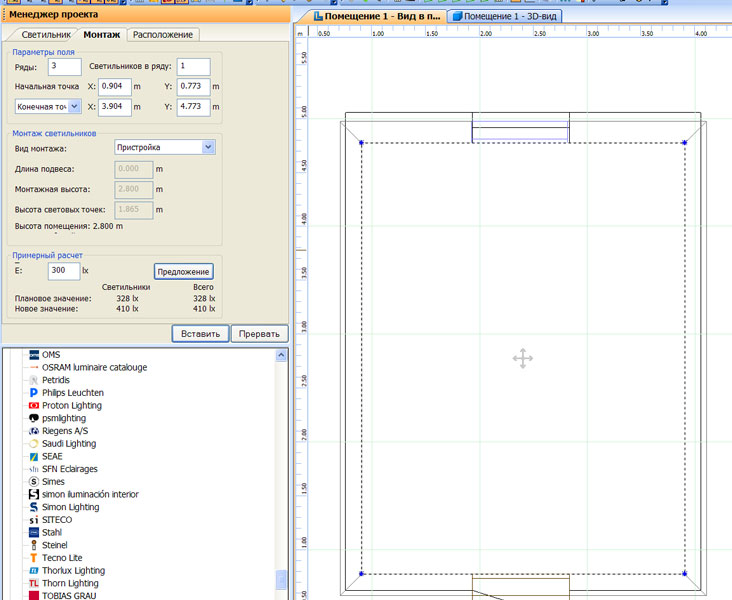
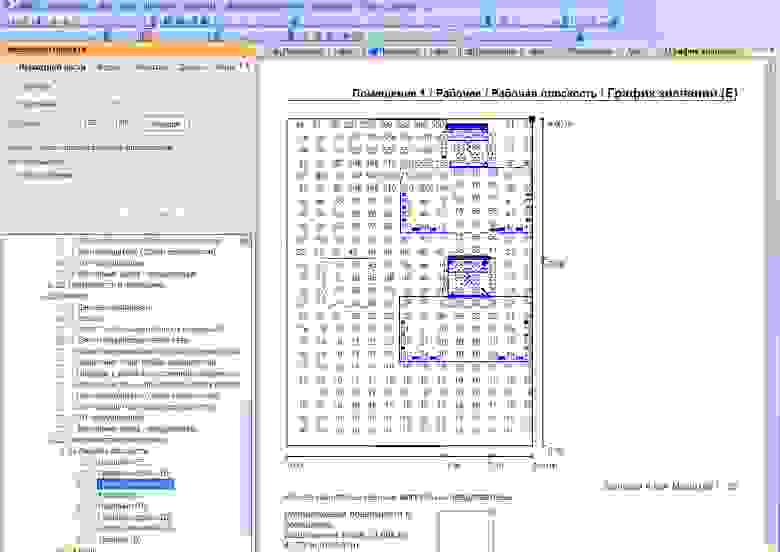
Потом внесем светильники для этого в правой части экрана во вкладке освещение внутри помещения выберем что-нибудь для установки светильника, я выбрал установить поле светильников. Программа подскажет, сколько светильников надо, чтобы соответствовать требованиям по освещенности.
Я выбрал вот такой светильник — ООО «Фокус SPARK 32-N светильник светодиодный Для внутреннего освещения
Светильники берутся либо с помощью вкладки выбор светильника
(там будут ссылки на каталоги), либо скачиваются ies файлы и импортируются в проект.
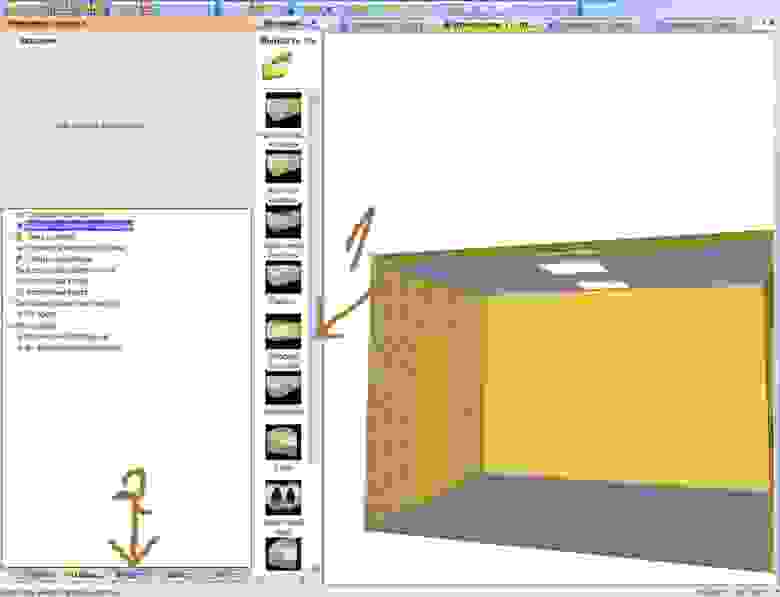
Чуть не забыл вставим потолок и покрасим стены. Все перетаскивается на окно в CAD и настраивается думаю вы уже поняли общий принцип.
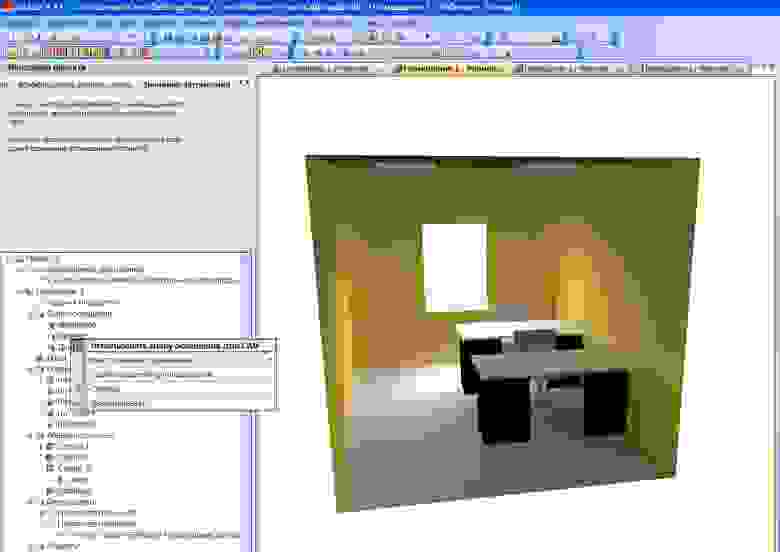
Dialux позволяет моделировать различные условия освещения Внесем сцены аварийного, рабочего и потом дневного освещения, дневное освещение зависит от местоположения и заданного времени суток (настраивается на вкладке проекта)

Разобьем группу наших светильников на единичные элементы и сделаем один из них как рабочим так и аварийным

В верхнем меню выберем результаты, запустим расчет для всех сцен
И потом ознакомимся с результатами расчета, там много красиво и подробно лучше 1 раз попробовать.
После проведения расчета 3D модель освещения можно увидеть не только в результатах расчета, но ин непосредственно в окне CAD выбирая необходимые сцены освещения
Dialux позволяет экспортировать необходимые результаты моделирования в pdf, jpg dwg, да и вообще еще много чего умеет, но это уже совсем другая история
Это только самые азы и статья написана в сжатые сроки, но надеюсь Вам было полезно и интересно.
Всех с наступающим!
Вот ссылка на исходники
Источник


