- Disable Data Logging & Privacy Settings In Windows 10
- Disabling Data Logging
- Disable Windows Updates
- Disable Cortana
- Windows 10 Enterprise and Professional
- Disable Data Collection
- Disable OneDrive
- Disable Windows Defender
- Disable Data Logging Via Registry Editor
- Your Choice
- Enabling debug logging for the Netlogon service
- More information
- For Windows Server 2019, Windows Server 2016, Windows Server 2012 R2
- Alternative methods to enable Netlogon logging
- How to: Disable Logging Events to the Windows Application Log
- To configure custom telemtery logging to the Windows Application log by using the Microsoft Dynamics NAV Server Administration tool
- To disable logging to the Windows Application log by modifying the CustomSettings.config file
Disable Data Logging & Privacy Settings In Windows 10
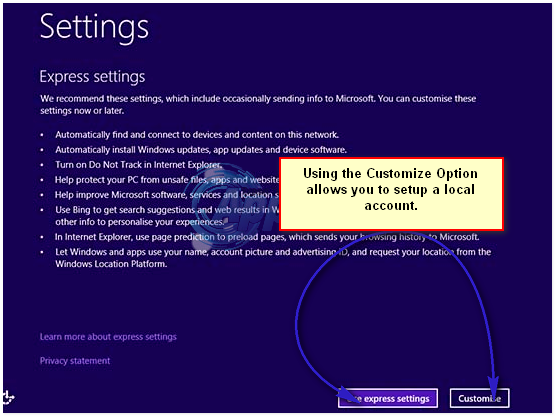
Since the introduction of Windows 8, Microsoft is pushing users to sign into their computers using a Microsoft Account, which means you would always need an active internet connection to sign in with your Microsoft Account (e-mail and password) putting a lot of information open to Microsoft, to start with the basics – Your login history, location, windows store app’s usage, etc.. whereas previously until Windows 7 and prior versions the user accounts were local accounts without any relation to the internet. The latest buzz is the Free Windows 10 upgrade, which has it’s user interface designed to prioritize signing in or signing up with a Microsoft Account. Many users, upgrading or setting up Windows 10 for the first time wouldn’t even know that they still have the option to setup/sign in with their local accounts because the option is hidden to the bottom (during setup). (see screen below), where you have two options (1) Express & (2) Customize; when setting up you should Customize if you don’t want your PC to be linked to a Microsoft Account. If you’ve done it by mistake, you can still switch to local account, instructions below.
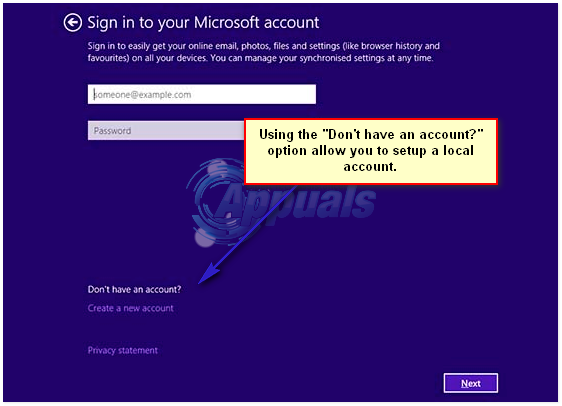
If you’ve signed in with a Microsoft Account by mistake, then you can change it to a local account after logging in and going to Settings -> Choose Accounts -> Your Account -> “Sign in with a local account instead“, key in your password and click Next, setup the account username and password and click Next, then choose “Sign out and Finish”
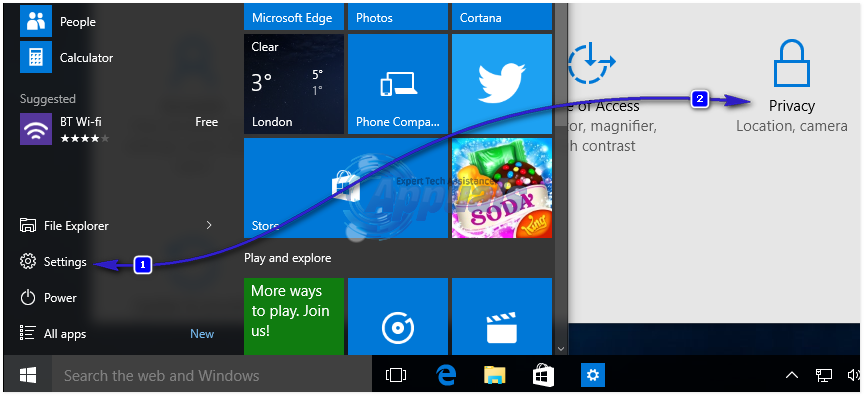
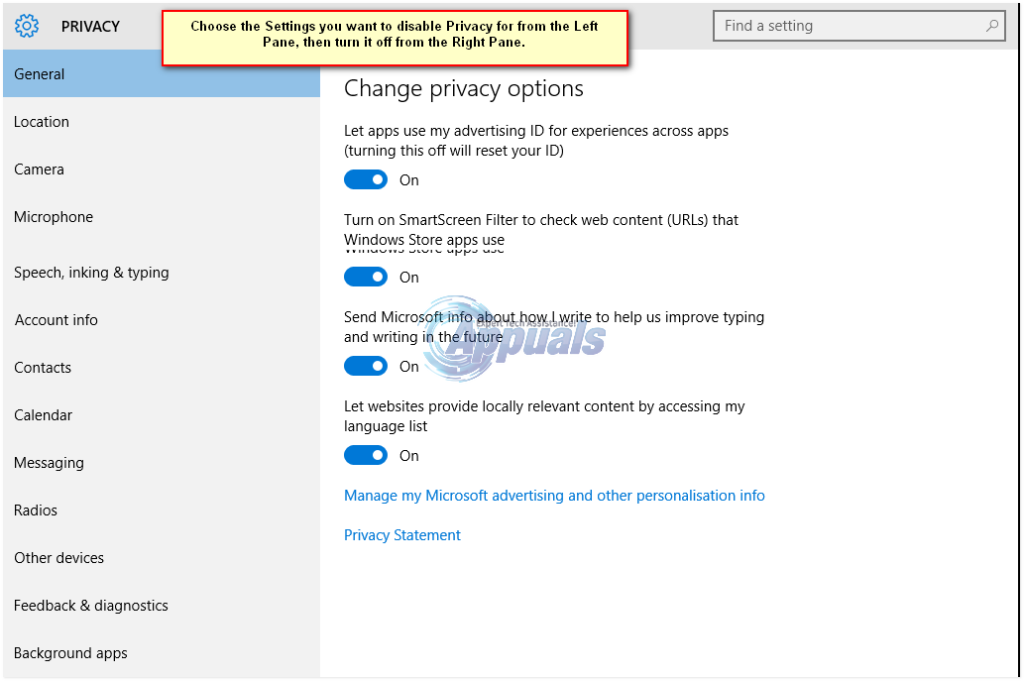
Once you’ve setup the local account, the next bit is to disable data logging or whatever you prefer not sharing. Assuming that you are now logged in; go to Settings -> Privacy
Disable the privacy by turning it off from the right pane, for each setting you don’t want, unless there is something you do want. Go through the list. Here, you will see all the settings that can have their Privacy disabled, in the left pane. Choose the setting, then disable it by turning the blue button off in the right pane.
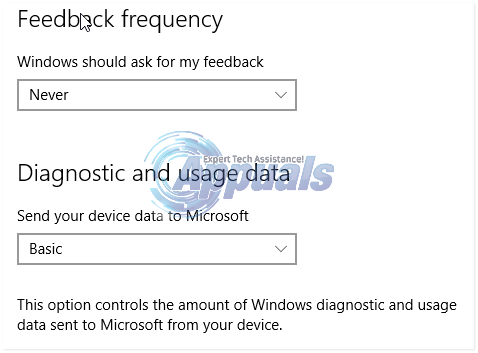
Disabling Data Logging
In the left pane, there is an option for “Feedback & Diagnostics“, Click on it and choose Never for “Windows should ask for my feedback“, choose Basic for “Send Your Device Data to Microsoft”
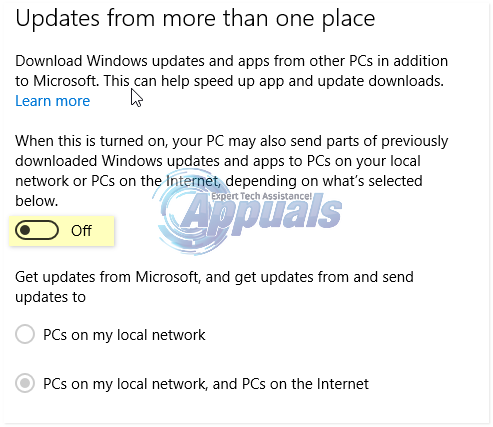
Disable Windows Updates
Having updates enabled in the first place, got Microsoft to push an update to your system that got you to upgrade to Windows 10. Disabling them, limits MS from pushing the updates. Some say, it is important for Security, i’d just use a solid antivirus / firewall / malware software to stay protected instead of letting MS apply patches.
To disable updates, go to Settings -> Windows Updates -> Advanced Options (located on the bottom) -> Choose how updates are delivered -> And turn the switch off.
Next, right click Here ; save the file. After it has been saved, right click on it again and choose Run As Administrator. This will delete the diagnostic’s service.
Disable Cortana
Cortana is a new search, that connects searches locally and from the Internet. I personally think this feature is no good, i am used to searching on Google and i’d prefer doing that rather then letting Cortana know what i want. However, it’s your preference, if you like it, use it. BUT this also does record your searches/history.
Windows 10 Enterprise and Professional
Hold the Windows Key and Press R. Type gpedit.msc and Click OK.
Disable Data Collection
Browse to Computer Configuration > Administrative Templates > Windows Components > Data Collection and Preview Builds -> Double Click Telemetry and choose Disabled/Apply.
Disable OneDrive
Next, browse to Computer Configuration > Administrative Templates > Windows Components > OneDrive -> Double click Prevent the usage of OneDrive for file storage, and choose Enabled/Apply.
Disable Windows Defender
Browse to Computer Configuration > Administrative Templates > Windows Components > Windows Defender, Double click “Turn off windows defender” and choose Enabled/Apply.
Disable Data Logging Via Registry Editor
Then click Start -> Type regedit, right click on it and choose Run As Administrator. Browse to
Locate and Choose the value, AllowTelemetry, double click it and change it’s value to 0.
Your Choice
You can replace MS Edge with Firefox, Windows Media Player with VLC, Groove Music with Winamp, and Photos with Windows Photo Viewer.
Enabling debug logging for the Netlogon service
This article describes the steps to enable logging of the Netlogon service in Windows to monitor or troubleshoot authentication, DC locator, account lockout, or other domain communication-related issues.
Original product version: В Windows 10 — all editions, Windows Server 2016, Windows Server 2019, Windows Server 2012 R2
Original KB number: В 109626
More information
This section, method, or task contains steps that tell you how to modify the registry. However, serious problems might occur if you modify the registry incorrectly. Therefore, make sure that you follow these steps carefully. For added protection, back up the registry before you modify it. Then, you can restore the registry if a problem occurs. For more information about how to back up and restore the registry, click the following article number to view the article in the Microsoft Knowledge Base:
322756 How to back up and restore the registry in Windows
The version of Netlogon.dll that has tracing included is installed by default on all currently supported versions of Windows. To enable debug logging, set the debug flag that you want by using Nltest.exe, the registry, or Group Policy. To do it, follow these steps:
For Windows Server 2019, Windows Server 2016, Windows Server 2012 R2
These steps also apply to Windows 10.
To enable Netlogon logging:
Open a Command Prompt window (administrative Command Prompt window for Windows Server 2012 R2 and later versions).
Type the following command, and then press Enter:
It’s typically unnecessary to stop and restart the Netlogon service for Windows Server 2012 R2 or later to enable Netlogon logging. Netlogon-related activity is logged to %windir%\debug\netlogon.log. Verify new writes to this log to determine whether a restart of the Netlogon service is necessary. If you have to restart the service, open a Command Prompt window (administrative Command Prompt window for Windows 10, and Windows Server 2012 R2 and later versions). Then run the following commands:
- In some circumstances, you may have to perform an authentication against the system in order to obtain a new entry in the log to verify that logging is enabled.
- Using the computer name may cause no new test authentication entry to be logged.
To disable Netlogon logging, follow these steps:
Open a Command Prompt window (administrative Command Prompt window for Windows Server 2012 R2 and higher).
Type the following command, and then press Enter:
It’s typically unnecessary to stop and restart the Netlogon service for Windows Server 2012 R2 or later versions to disable Netlogon logging. Netlogon-related activity is logged to %windir%\debug\netlogon.log. Verify that no new information is being written to this log to determine whether a restart of the Netlogon service is necessary. If you have to restart the service, open a Command Prompt window (administrative Command Prompt window for Windows 10, and Windows Server 2012 R2 and later versions). Then run the following commands:
Alternative methods to enable Netlogon logging
In all versions of Windows, you can use the registry method that’s provided in the Enable/Disable logging by using registry method section.
On computers that are running Windows Server 2012 R2 and later versions of the operating system, you can also use the following policy setting to enable verbose Netlogon logging (value is set in bytes):
\Computer Configuration\Administrative Templates\System\Net Logon\Specify log file debug output level
A value of decimal 545325055 is equivalent to 0x2080FFFF (which enables verbose Netlogon logging). This Group Policy setting is specified in bytes.
The Group Policy method can be used to enable Netlogon logging on a larger number of systems more efficiently. We don’t recommend that you enable Netlogon logging in policies that apply to all systems, such as the Default Domain Policy. Instead, consider narrowing the scope to systems that may be causing problems by using one of the following methods:
- Create a new policy by using this Group Policy setting, and then provide the Read and Apply Group Policy rights to a group that contains only the required computer accounts.
- Move computer objects into a different OU, and then apply the policy settings at that OU level.
Enable/Disable logging by using registry method
To enable logging, you may have to obtain a checked build of Netlogon.dll.
Start Registry Editor.
If it exists, delete the Reg_SZ value of the following registry entry, create a REG_DWORD value with the same name, and then add the 2080FFFF hexadecimal value:
HKEY_LOCAL_MACHINE\SYSTEM\CurrentControlSet\Services\Netlogon\Parameters\DBFlag
It’s typically unnecessary to stop and restart the Netlogon service for Windows Server 2012 R2 and later versions to enable Netlogon logging. Netlogon-related activity is logged to %windir%\debug\netlogon.log. Verify the new writes to this log to determine whether a restart of the Netlogon service is necessary. If you have to restart the service, open a Command Prompt window (administrative Command Prompt window for Windows Server 2012 R2/Windows 10 and above). Then run the following commands:
- In some circumstances, you may have to do an authentication against the system to obtain a new entry in the log to verify that logging is enabled.
- Using the computer name may cause no new test authentication entry to be logged.
To disable Netlogon logging, follow these steps:
In Registry Editor, change the data value to 0x0 in the following registry key:
Exit Registry Editor.
It’s typically unnecessary to stop and restart the Netlogon service for Windows Server 2012 R2, Windows 10, or later versions to disable Netlogon logging. Netlogon-related activity is logged to %windir%\debug\netlogon.log. Verify that no new information is being written to this log to determine whether a restart of the Netlogon service is necessary. If you have to restart the service, open a Command Prompt window (administrative Command Prompt window for Windows Server 2012 R2/Windows 10 and later versions of the operating system). Then run the following commands:
Set the maximum log file size for Netlogon logs:
The MaximumLogFileSize registry entry can be used to specify the maximum size of the Netlogon.log file. By default, this registry entry doesn’t exist, and the default maximum size of the Netlogon.log file is 20 MB. When the file reaches 20 MB, it’s renamed to Netlogon.bak, and a new Netlogon.log file is created. This registry entry has the following parameters:
- Path: HKEY_LOCAL_MACHINE\SYSTEM\CurrentControlSet\Services\Netlogon\Parameters
- Value Name: MaximumLogFileSize
- Value Type: REG_DWORD
- Value Data:
Remember that the total disk space that’s used by Netlogon logging is the size that’s specified in the maximum log file size times two (2). It’s required to accommodate space for the Netlogon.log and Netlogon.bak file. For example, a setting of 50 MB can require 100 MB of disk space, which provides 50 MB for Netlogon.log and 50 MB for Netlogon.bak.
As mentioned earlier, on Windows Server 2012 R2 and later versions of the operating system, you can use the following policy setting to configure the log file size (value is set in bytes):
\Computer Configuration\Administrative Templates\System\Net Logon\Maximum Log File Size
For more information, click the following article numbers to view the articles in the Microsoft Knowledge Base:
247811 How domain controllers are located in Windows
How to: Disable Logging Events to the Windows Application Log
Because the Microsoft Dynamics NAV Server instance events are always logged to the Application and Services Logs, you can disable logging Microsoft Dynamics NAV Server instance events in the Windows Application log and not lose any data. The Windows Application log contains events from several applications and components. Disabling logging to the Windows Application log enables you to limit the amount of data that is stored.
If you are using System Center Operations Manager to monitor Microsoft Dynamics NAV Server instances, do not disable logging to the Windows Application log. If you do, monitoring will not work.
To disable logging to the Window Applications Log, you can use the Microsoft Dynamics NAV Server Administration tool or modify the Microsoft Dynamics NAV Server instance configuration file (CustomSettings.config).
To configure custom telemtery logging to the Windows Application log by using the Microsoft Dynamics NAV Server Administration tool
To start the Microsoft Dynamics NAV Server Administration tool, choose Start, and in the Search programs and files box, type Microsoft Dynamics NAV Administration, and then choose the related link.
In the left pane, under Console root, select the Microsoft Dynamics NAV Server instance.
In the center pane, choose the Edit button.
Under General, clear the Enable Event Logging to Windows Application Log check box.
Choose the Save button, and then choose the OK button.
You must restart the Microsoft Dynamics NAV Server instance for the changes to take effect.
To restart, the Microsoft Dynamics NAV Server instance, in the left pane, select the Microsoft Dynamics NAV computer.
Unless you are administering a remote computer, this is Microsoft Dynamics NAV (local).
In the center pane, right-click an instance, and then choose Restart.
To disable logging to the Windows Application log by modifying the CustomSettings.config file
Open the CustomSettings.config file for the Microsoft Dynamics NAV Server instance in a text editor, such as Notepad.
By default, the file is located in the C:\Program Files\Microsoft Dynamics NAV\110\Service folder or C:\Program Files\Microsoft Dynamics NAV\110\Service\Instances\ folder (for multitenant installations).
Set the EnableApplicationChannelLog setting to false.
Save the file, and then restart the Microsoft Dynamics NAV Server instance.


