- Как включить и настроить автономные (offline) файлы в Windows 10?
- Включить автономные файлы в Windows 10
- Включить Offline Files для сетевой папки на Windows Server
- Настройка автономный файлов с помощью групповых политик
- Enable or Disable Offline Files in Windows 10 | Use it Correctly
- What is offline files in Windows 10?
- Why you should enable offline files in Windows 10?
- How to enable/disable offline files in Windows 10?
- Sync network drive to local drive
- Turn on/off offline files in Windows 10
- Method 1: Configure offline files in Windows 10 by Sync Center
- Method 2: Enable/Disable offline files in Windows 10 using GPO
- Method 3: Enable/Disable Offline Files in Windows 10 using Registry
- How to sync offline files in Windows 10?
- Method 1: Sync offline files manually
- Method 2: Sync files automatically
- Conflicts in syncing files — how to fix?
- Flexible way to sync files in Windows 10
- Conclusion
Как включить и настроить автономные (offline) файлы в Windows 10?
Функция автономных (офлайн) файлов в Windows 10 позволяет сделать определенные сетевые папки или файлы доступными в автономном режиме, даже если ваш компьютер не подключен к корпоративной сети. В этой статье мы рассмотрим, как включить и настроить автономные файлы (Offline Files) в Windows 10/Windows Server 2016 вручную и с помощью групповых политик.
Автономные файлы доступны в экосистеме Windows довольно давно. Все что требуется от пользователя – включить Offline Files на компьютере и пометить определенные файлы или папки на сетевом ресурсе “всегда доступными в автономном режиме”. После этого Windows сохраняет указанные ресурсы в локальный кэш на диске и периодически обновляет его в фоновом режиме (раз в 2 часа — частоту синхронизации автономных файлов можно задать с помощью параметра GPO Configure Background Sync).
Включить автономные файлы в Windows 10
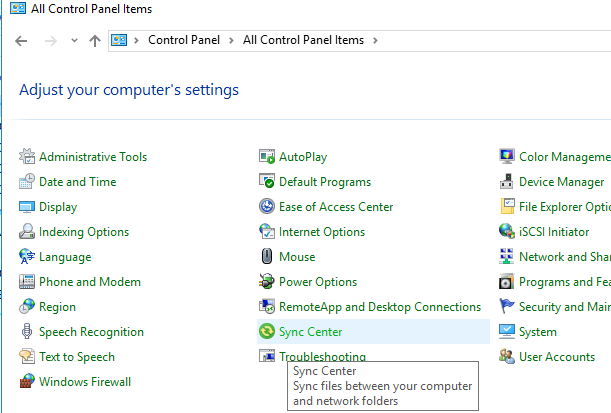
В Windows 10 можно включить автономное файлы через классическую Панель управления.
- Откройте Центр синхронизации (Sync Center);

- В левой панели выберите “Управление автономными файлами” (Manage Offline Files);
- Нажмите на кнопку “Включить автономные файлы” (Enable Offline Files);
- Перезагрузите компьютер.

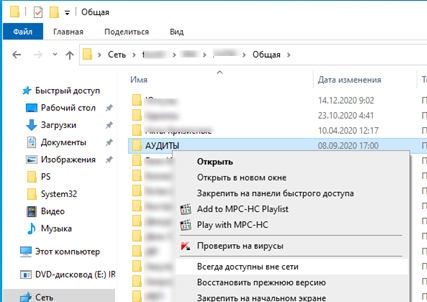
Теперь пользователю достаточно щелкнуть правой кнопкой мыши по файлу или папке в общей сетевой папке, который нужно сделать доступным автономном и выбрать пункт меню “Всегда доступно в автономном режиме” (Always available offline).
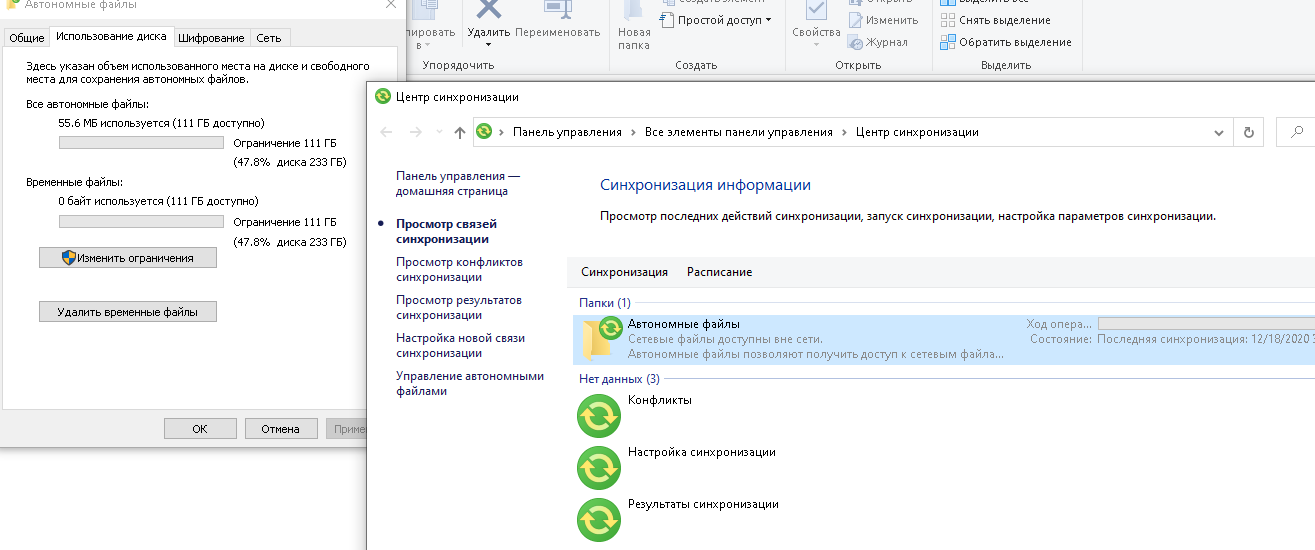
Windows начнет копировать указанные файлов в локальных кэш автономных файлов. По умолчанию размер кэша для автономных файлов в Windows составляет от 25% от емкости диска (в зависимости от версии Windows).
Теперь, если исходный файловый сервер недоступен, скорость сетевоегоподключения до него медленнее, чем заданное пороговое значение, эти файлы будут доступны для работы в автономном режиме через Центр синхронизации.
Все изменения, внесенные в автономные файлы, будут синхронизированы с сервером в следующий раз, когда компьютер подключится к сети.
Включить Offline Files для сетевой папки на Windows Server
Чтобы пользователь мог помечать некоторые файлы доступными в автономном режиме, поддержка Offline Files должна быть включена в настройках сетевой папки.
В Windows Server 2016 запустите Server Manager и для роли File and Storage Services в свойствах общей сетевой папки включите опцию “Allow caching of share”.
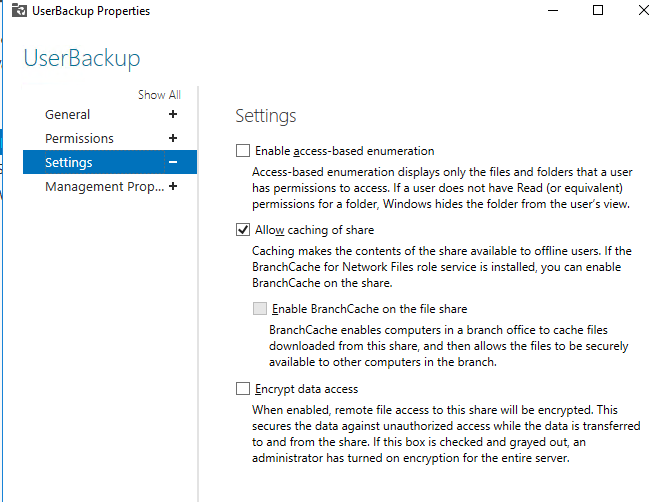
Можно включить ручной режим кэширования для сетевой папки с помощью PowerShell (в этом режиме пользователи могут вручную выбрать папки и файлы, которые нужно сделать доступными офлайн):
Set-SMBShare -Name Docs -CachingMode Manual
Если сетевая папка находится на компьютере с десктопной редакцией Windows, нужно в свойствах общей сетевой папки включить опцию Caching -> Only the files and programs that users specify are available offline.

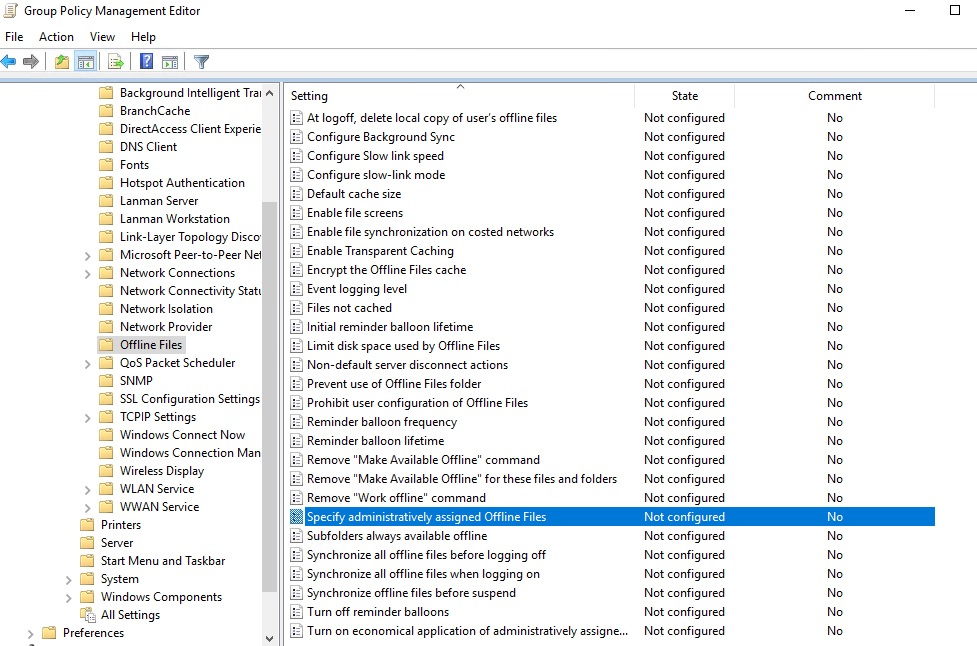
Настройка автономный файлов с помощью групповых политик
Если вы хотите включить службу автономных файлов на всех компьютерах в домене Active Directory, можно распространить на них следующие параметры реестра через GPO:
- HKEY_LOCAL_MACHINE\SYSTEM\CurrentControlSet\Services\CSC – тип DWORD Start = 1
- HKEY_LOCAL_MACHINE\SYSTEM\CurrentControlSet\Services\CscService
– тип DWORD Start = 2 - HKLM\Software\Policies\Microsoft\Windows\NetCache – тип DWORD Enabled=1
Либо можно использовать политику Allow or Disallow use of the Offline Files feature в разделе GPO Computer Configuration -> Policies -> Administrative Templates -> Network -> Offline Files. Здесь же можно настроить другие параметры Offline Folders:
- Configure Background Sync — включить фоновую синхронизацию и настроить интервалы синхронизации;
- Limit disk space used by Offline Files / Default Cache size – ограничить размер автономных файлов на диске;
- Specify administratively assigned Offline File – список сетевых ресурсов, которые автоматически должны быть синхронизированы на компьютеры пользователей и доступны в автономном режиме (можно указать UNC пути к любым сетевым папкам или личному каталогу пользователя \\Server1\Users$\%username%).
При анализе проблем работы с автономными файлами в Windows полезно исследовать события синхронизации в журнале Windows. Включите ведение лога синхронизации OfflineFiles:
wevtutil sl Microsoft-Windows-OfflineFiles/SyncLog /e:true /q
Затем, например, можно получить список успешно синхронизированных файлов за сутки с помощью такой PowerShell команды:
Для очистки кэша автономных файлов нужно изменить параметра реестра Format Database и перезагрузить компьютер:
reg add HKEY_LOCAL_MACHINE\SYSTEM\CurrentControlSet\Services\Csc\Parameters /v FormatDatabase /t REG_DWORD /d 1 /f
shutdown –f –r –t 0
Enable or Disable Offline Files in Windows 10 | Use it Correctly
Whether you want to enable or disable offline files in Windows 10, you can find a way to do it in this article. To be safer, you need to make an exact copy of files or folders.

By Ivy  / Last Updated March 16, 2021
Content of this article:
What is offline files in Windows 10?
Thanks toВ Sync Center, you can create offline files in Windows 10. It refers to a copy of network files and folders always in sync between local computer and network servers, and these data are kept available offline on your computer, even when your server is slow, not connected or unavailable. Moreover, you can see all data made offline at anytime, and it’s limited to this. By default, the network folders online only are empty, no files, if your computer is not connected to network drive.

Beside enabling offline files in Sync center and always available offline mode, your network files may also be offline in the following situations.
The connected server is unavailable.
The network connection is slower than a configurable threshold.
Work offline mode is enabled inВ File Explorer
Why you should enable offline files in Windows 10?
1. Access network files or folders at any time.
If you want to access network files or folders at any time, especially when your computer is not connected to the network and server, you need to make them always available files with Sync Center.В
2. Sync offline files between computer and network drive.
If you want to sync files with offline files folder or Sync Center, the first thing is to enable offline files and activate Offline Files folder. This folder is used to keep offline files in sync between your computer and network drive. Usually, it’s located atВ C:\windows\CSC folder if your system drive letter is C.
How to enable/disable offline files in Windows 10?
Usually, you shouldВ create a shared folder to save the network files and folders. If you want to make it always offline,В the first step is toВ map the network drive to local computer, and then turn on offline files in Windows 10. Also, disabling offline files is also included at the end. Now, without further ado, let’s start.
Sync network drive to local drive
Step 1.В Connect network drive and find the shared folder.В
Press Win + R to summon the Run window, then type two backslashes and IP address or hostname to connect your network drive. Once your connect to the server, you will see the shared folder.
Step 2. Right-click the shared folders, then choose Map network drive from the context menu.
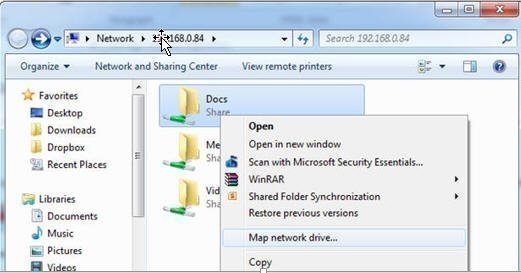
Step 3.В Make files or folders always available offline.В
Go to the mapped network drive, also called offline files folder or its subfolder, right-click the files or folder you want to acess at local computer and select Always available offline from the context menu.

Step 4.В Wait for the final result.В
Now, you will see a message, saying “ your files will be available offline”, just wait and then disconnect your network drive after this task ends. To confirm, please go to the mapped network drive and check your offline files.

Note:В Some users report «network files offline when online in Windows 10 «, which is strange, right. How to solve it? You can try to disable and enable offline files in Sync Center again. It does not 100% work, but it does help some users in a way.В
Turn on/off offline files in Windows 10
To turn on offline files in Windows 10, there are 3 common used ways. You can try one of them in the following. Of course, these methods are still applied in Window 7 and Windows 8.
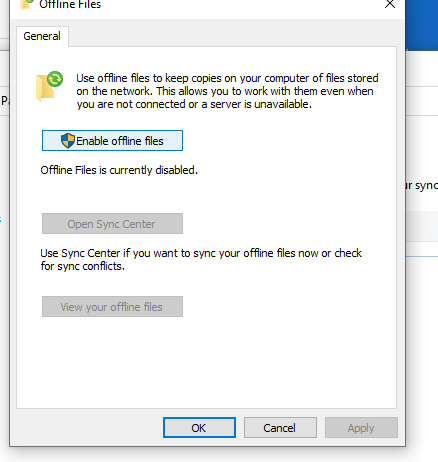
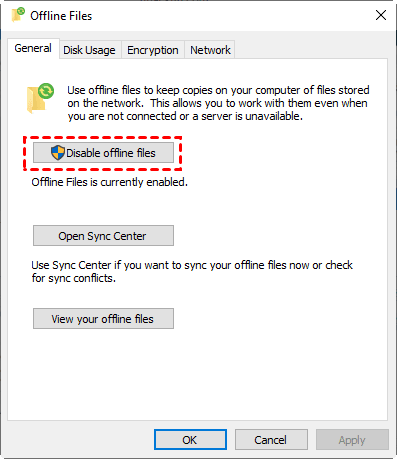
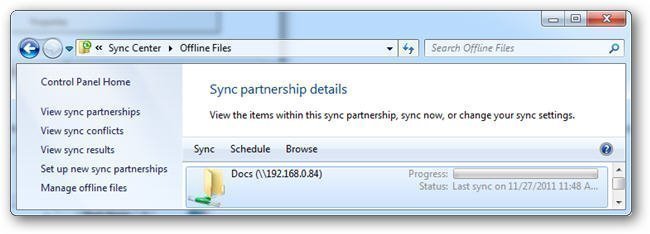
Method 1: Configure offline files in Windows 10 by Sync Center
Step 1. Open Sync center. Go to Control Panel, switch its view to «Large icon» or «Small icons«, then find Sync Center and click it to open.
Step 2. Click Manage offline files, then you will access the Offline Files window, it allows youВ to enable or disable offline files.
Step 3. To enable offline files, click Enable offline files under the General tab.В Please remember to restart your computer to activate Offline Files folder. If not, you will not offline files folder on the mapped network drive.
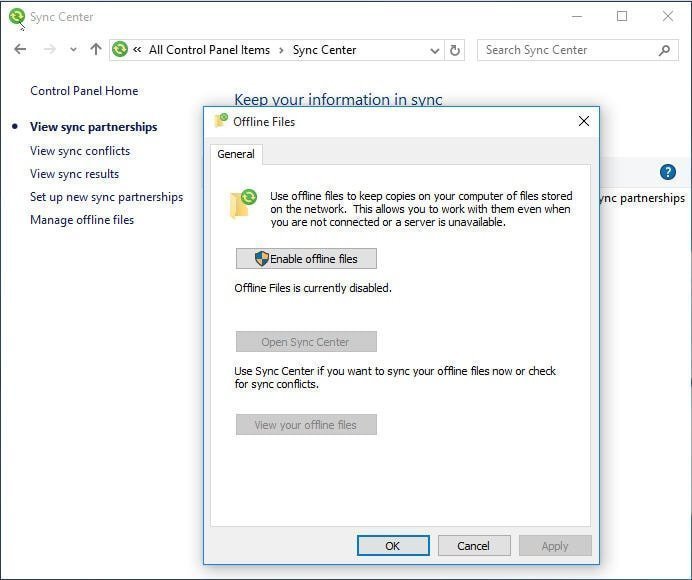
Step 4. To disable offline files, click Disable offline files in the Offline Files window. By default, after you enable offline files in the Offline Files window, this option will change В to Disable offline files.
Method 2: Enable/Disable offline files in Windows 10 using GPO
Step 1.Type group policy in the search box and then select group policy editor from the start menu list.
Step 2.В Go to Computer Configuration > Administrator templates > Network > Offline FilesВ key.
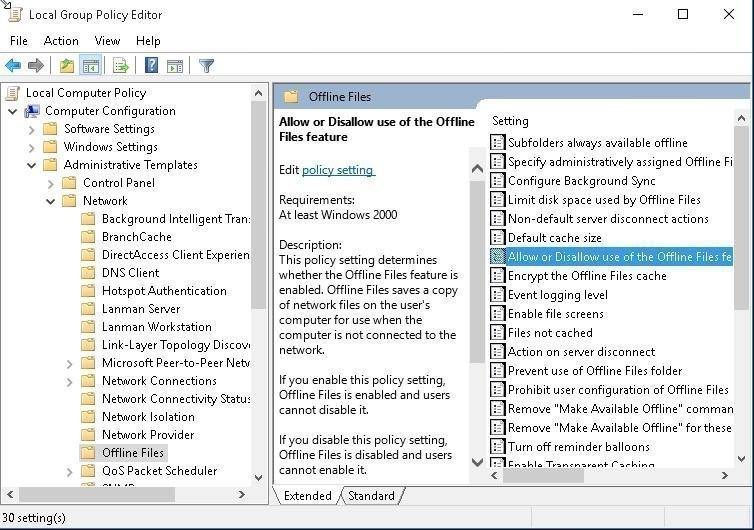
Step 3. Scroll down the Offline Files Setting and double-click Allow or Disallow the use of Offline Files feature. Then you can enable or disable offline files per your needs.
Step 4.В To enable offline files,В В selectВ Enabled in the next window.
Step 5. To disable offline files, select Disabled in the next window.
Method 3: Enable/Disable Offline Files in Windows 10 using Registry
Step 1. OpenВ registry editor by typingВ registry in the search box and selectingВ it.В
Step 2. Go to the CSC and CscService key and create a new Start key. To make it,В right-click on the blank, select new and DWORD (32-bit) Value (so do computer with 64-bit), set its name as StartВ
HKEY_LOCAL_MACHINE\SYSTEM\CurrentControlSet\Services\CSC
HKEY_LOCAL_MACHINE\SYSTEM\CurrentControlSet\Services\CscService
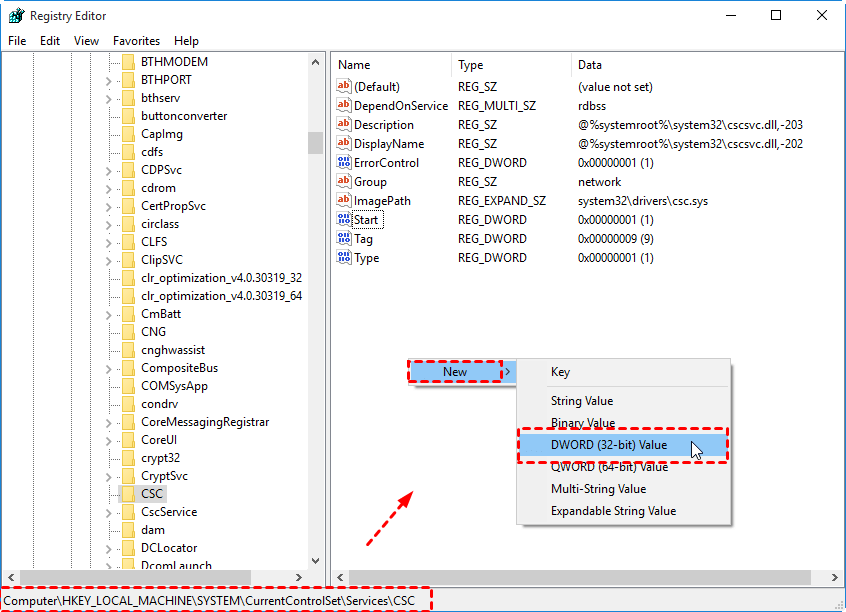
Step 3.В To enable offline files, set the start value of CSCВ and CscService to 1 and 2 in order.В
Step 4. Restart your computer and make changes available.
Step 5.В To disable offline files, setВ the start value of CSCВ and CscService to 4 and restart your computer to save changes.
How to sync offline files in Windows 10?
About offline files sync in Windows 10, you have two options, including syncing offline files manually and automatically. Detailed steps are below.
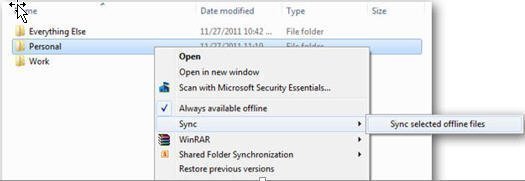
Method 1: Sync offline files manually
Step 1. Access the mapped network drive. Go to File Explore > This PC > network locations, then select the mapped network drive created in advance.
Step 2. Sync offline files. Right-click folders which contain offline files, then select Sync > Sync selected offline files.
Method 2: Sync files automatically
Step 1. Enter into Sync Center. You can type Sync Center in the search box, then select it from start menu list.
Step 2. Access the mapped network drive. You can click View sync partnerships link in the left pane, then double-click the mapped network drive.
Step 3. Select the folder you want to sync on a regular basis, then pitch on Schedule button on the menu bar. At last, follow the prompt to finish the rest of steps.
Conflicts in syncing files — how to fix?
If some certain files does not sync, you may see conflicts files in Offline Files. It occurs when you edit file offline and somebody else edit the same file on your network. After that, these files will not be synced and marked as conflicts. Don’t worry about it. It’s very easy to fix.
Step 1. Go to Sync Center, click View sync conflicts on the left panel and then you will see a list of conflict files.
Step 2. Right-click the files and click View option. Now, you can choose to keep the version that you created while you were away, keep the version on the server that someone else edited while you were away or keep both versions and rename the one that you created.
Step 3. Sync files with Sync Center again.
Flexible way to sync files in Windows 10
Offline files is very convenient, especially when your computer network is slow or not connected. But you needВ to know that this method only works in syncing offline files and making offline files available offline.В
Thus, if this is not your case, you can choose to sync files with a third-partyВ file sync software -В AOMEI Backupper Standard. After syncing, you will have two copies, one is on the original files, the other is the copy you sync. Then you no longer have to worry about losing data.
Why use this software? Here are some advantages of it:В
- Support four sync functions, including Basic Sync, Real-Time Sync, Mirror Sync and Two-Way Sync. The latter three options are designed to satisfy different users’В needs and available on the professional version at least.В
- Support useful sync features. You canВ schedule syncВ files in daily/weekly/monthly. Also, you can enable other backup settings, such as, email notification.
- SupportsВ Windows 7/8/8.1/10/XP/Vista.
- Support multiple storage device. You canВ sync files to network drive, internal hard drive, external storage device like USB flash drive, OneDrive etc. Also, you can sync files between two different locations, such as, external hard drive, computers, etc.В
- Have aВ В clean interface and user-friendly design, so beginners can complete this process easily and quickly.
Then, you can start to sync files automatically in Windows 10/8/7 with AOMEI Backupper Standard. In the first of place, download and install it on your computer. Then, please prepare a storage device to store the files or folders you want to sync.В
Step 1. Launch AOMEI Backupper Standard, click Sync and Basic Sync in order.В

As you can see from above picture, there are 3 different sync fuctions to help you sync files, but there are a little difference acrossВ them. Please stay for a while and check if they are better meets your needs.
вќ¤ Real-Time Sync:В This feature will monitor your files and sync the changes instantly when detected. It’s suitable for users whoВ changeВ files very frequently or work with a team.
вќ¤В Mirror Sync: This feature is able to keep files or folders in the destination are exactly the same as source. It can prevent others from adding files or folders by mistake or avoid any unwanted modification.В
вќ¤В Two-Way Sync: This feature ensures all the changes in the source directory will be synchronized to the destination, and vice versa.В
Step 2. Click +В Add folder > Share/NASВ and select your files or folders on network drive. After that, click the folder shapped button to select a local drive as destination. Also, if you want to backup to different locations, please connect it at first and be sure it can be recognized.В

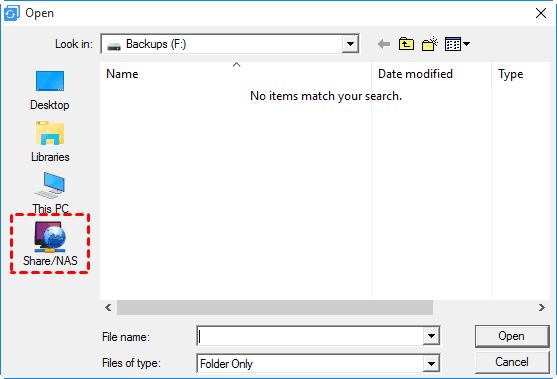
Note: If this is the first time to sync network files, you need to add network location first. Click Add network location, type IP address, username, password and save the infomation.
Step 3.В To automatic sync your files, click Schedule and select your preference setings. The default setting is daily and you change to a longer interval if you think it’s too short. Finally, click Start Sync.В

Conclusion
No matter what your purpose is, you can enable or disable offline files per your needs. Offline Files works when you want to sync network files to local computer and make it available offline.В
If you just want to make an exact of copy of original files or folders and save it to a safe location, you need toВ sync files withВ a third-party file sync software, AOMEI Backupper Standard, for example. It not only allows you to sync network files to multiple locations, but also help you track changes by schedule settings.В
In addition, it still offers you other data protection solution, such as, file backup, system backup, disk backup, schedule backup, disk clone, create bootable media etc. And its serverВ edition allows you sync files between windows servers and its technician is capabel of protectingВ unlimited computers within your company. Just select the edition suitable for you and start to protect your data.


