- How to enable or disable Windows AutoPlay
- Disable Microsoft Windows AutoPlay
- Disable AutoPlay in Windows Vista, 7, 8, and 10
- Disable AutoPlay in Windows XP
- Disable AutoPlay with TweakUI
- Disable AutoPlay in Windows 95, 98, and ME
- Disable AutoPlay on audio CDs only
- Disable AutoPlay by editing the Windows registry
- Disable AutoPlay in Windows NT and 2000
- Enable Microsoft Windows AutoPlay
- Enable AutoPlay in Windows Vista, 7, 8, and 10
- Enable AutoPlay in Windows XP
- Enable through Windows Explorer
- Enable AutoPlay on CD and DVD drives
- Enable AutoPlay in Windows 95, 98, and ME
- Disable AutoPlay for Audio CDs only
- Enable AutoPlay in Windows NT and 2000
- How to enable or disable AutoPlay in Windows 10
- Difference between AutoPlay & Autorun
- AutoPlay in Windows 10/8
- Disable AutoPlay in Windows 10
- How to Disable or Enable AutoPlay in Windows 10
- Disable or Enable AutoPlay using Settings
- Configure AutoPlay with the classic Control Panel
- Disable AutoPlay using a Registry tweak
- About Sergey Tkachenko
How to enable or disable Windows AutoPlay

The Windows AutoPlay feature allows a computer to automatically run a program or video on a CD or DVD that’s inserted into a computer disc drive. If AutoPlay is disabled, nothing automatically happens with a CD or DVD until you explore the disc.
By default, Autoplay is enabled in Windows, but may be disabled by a user or another program. To enable or disable the Windows AutoPlay feature, follow the appropriate steps below.
Disable Microsoft Windows AutoPlay
To disable AutoPlay in Microsoft Windows, follow these steps.
You can temporarily disable the AutoPlay feature by holding down the left Shift as the CD begins to run. Also, to browse the contents of the CD, open My Computer, right-click the CD-ROM drive, and choose Explore.
If you want to permanently disable the AutoPlay feature, follow the steps below for your version of Microsoft Windows.
Disable AutoPlay in Windows Vista, 7, 8, and 10
To perform the steps below, you must edit the system registry. Editing the registry incorrectly can cause system errors, and there is no undo function. Before editing your registry, create a backup of the current registry state. If something goes wrong, you can restore the registry to this state, to try to fix the problem. For more information, see: How to back up and restore the Windows registry.
- Open the Windows Registry Editor.
- In the Registry Editor, open the below registry key:
- In the Cdrom folder, change the Autorun string value from a ‘1’ to a ‘0’.
- Close the Registry Editor.
Disable AutoPlay in Windows XP
In Windows XP, you can disable AutoPlay by configuring Windows Explorer.
- Open My Computer or Explorer
- Right-click the CD-ROM drive and click Properties.
- Click the AutoPlaytab. In this section, you can specify all Windows AutoPlay features.
Disable AutoPlay with TweakUI
On multiple versions of Windows, you can disable AutoPlay with the TweakUI utility.
- Download and install TweakUI.
- Where can I get TweakUI for Microsoft Windows?
- From the TweakUI interface, click the + next to My Computer
- Click the + next to AutoPlay
- Select Drives and uncheck each drive you want to disable AutoPlay on.
Disable AutoPlay in Windows 95, 98, and ME
In Windows 95, 98, or ME, follow these steps to disable AutoPlay.
- Open the Device Manager.
- Click the + next to CD-ROM and double-click the currently installed CD-ROM drive.
- In the CD-ROM properties, click the Settings tab and verify that there is not a check in the Auto Insert Notification section.
Disable AutoPlay on audio CDs only
To disable AutoPlay for audio CDs only, follow these steps.
- Click Start, Programs, Windows Explorer
- In Windows Explorer, click View, then click Folder Options.
- Click the File types tab and locate » CD Audio Track» category in the list of available file types.
- Highlight » CD Audio Track» and click Edit or Advanced.
- In the Actions category, change the default from Play to Open or None.
Disable AutoPlay by editing the Windows registry
If the My Autorun or AutoPlay feature still does not work after following the above recommendations and you are running Microsoft Windows 95 or Windows 98, try the below solution.
Before editing your Microsoft Windows registry, we recommend you create a backup of the entire registry. Any improper registry changes can cause the operating system to malfunction. Only proceed if you’re confident in what you are doing, and are prepared to restore the registry if necessary.
In Regedit, navigate into the below folders.
Once in the Explorer folder, double-click the entry NoDriveTypeAutoRun if present and change the value to «95 00 00 00».
If NoDriveTypeAutoRun is not present, follow the steps below.
- Click Edit from the drop-down menu.
- Click New.
- Click Binary value.
- Enter «NoDriveTypeAutoRun» as the name.
- Enter «95 00 00 00» as the value.
Once the above is completed, exit Regedit and reboot the computer. Autoplay should now be disabled.
Disable AutoPlay in Windows NT and 2000
In Windows NT or 2000, follow these steps to disable AutoPlay.
Performing the steps below require you edit the system registry. Make sure you are aware of the issues that could occur if the incorrect registry entry is made.
- ClickStart, Run, type Regedit and press Enter .
- In the Registry Editor, open the below registry key:
- In the Cdrom folder, change the Autorun value from a ‘1’ to a ‘0’.
- Close the Registry Editor.
Enable Microsoft Windows AutoPlay
To enable AutoPlay in Microsoft Windows, follow these steps.
Before attempting the instructions below, ensure the CD that may not be AutoPlaying is capable of doing this. Not all CDs are capable of being auto played. CDs for Microsoft Windows that are AutoPlay data have an «autorun.inf» file in the root directory of the CD.
Enable AutoPlay in Windows Vista, 7, 8, and 10
In Windows Vista, 7, 8, and 10, follow these steps to enable AutoPlay.
Performing the steps below require you edit the system registry. Make sure you are aware of the issues that could occur if the incorrect registry entry is made.
- Open the Windows Registry Editor.
- In the Registry Editor, open the below registry key:
- When in the Cdrom folder, change the Autorun string value from a ‘0’ to a ‘1’.
- Close the Registry Editor.
Enable AutoPlay in Windows XP
Enable through Windows Explorer
- Open My Computer or Explorer
- Right-click the CD-ROM drive or another disc drive and click Properties.
- Click the AutoPlaytab. In this section, you can specify all Windows AutoPlay features.
Enable AutoPlay on CD and DVD drives
- Download and install TweakUI.
- Where can I get TweakUI for Microsoft Windows?
- From the TweakUI interface, click the + next to My Computer
- Click the + next to AutoPlay
- Select Drives and check each drive you want to AutoPlay.
Enable AutoPlay in Windows 95, 98, and ME
- Open the Device Manager.
- Click the + next to CD-ROM and double-click the currently installed CD-ROM drive.
- In the CD-ROM properties, click the Settings tab and verify that there is a check in the Auto Insert Notification section. If there is no check in this box, place a check into the box, then click Ok and restart the computer.
Disable AutoPlay for Audio CDs only
- Click Start, Programs, Windows Explorer
- In Windows Explorer, click View and then Folder Options.
- Click the File types tab and locate «CD Audio Track» category in the list of available file types.
- Highlight «CD Audio Track» and click Edit or Advanced.
- In the Actions category double-click the option listed Play; if this is not listed, see the next paragraph.
- If you want to use the default Windows CD player, ensure that in the «Application used to perform the action» section is «c:\windows\cdplayer.exe -play«.
- Once set, make sure this action is the Default.
If Play was not an option listed when following the above steps, in the «Edit File type» window click New. After that, type Play for the action type, then under «application used to perform this action» type c:\windows\cdplayer.exe -play.
The above steps are for setting audio CDs to be played with the default Microsoft Windows CD player. If you have a different CD player, you need to edit the play to point to the program you want to play your CDs.
Enable AutoPlay in Windows NT and 2000
Performing the steps below require you edit the system registry. Make sure you are aware of the issues that could occur if the incorrect registry entry is made.
How to enable or disable AutoPlay in Windows 10
In this post, we will see how to disable AutoPlay in Windows using the Control Panel, Group Policy, or the Registry Editor. But before that, let us see what is AutoPlay and AutoRun in Windows. Then we will see how to enable or disable AutoPlay or AutoRun in Windows 10/8.
Difference between AutoPlay & Autorun
Autorun is used to start some programs or enhanced media content automatically when you insert a CD, DVD, or another media type into your computer. This is different from AutoPlay, but the result is often the same: when inserted, the CD starts automatically, using a particular program.
AutoPlay lets you choose which program to use to start different kinds of media, such as DVD, CD, etc, containing music, video, photo, etc. For example, the first time you try to play a music CD, AutoPlay will ask you which media player you want to use if you have more than one installed on your computer. You can read more here about AutoPlay in Windows. Autorun is incorporated into the media types that use it, and you can’t modify it. When you try to play a CD that uses autorun, AutoPlay asks you to choose an action to perform -to play the autorun content or to skip it. AutoPlay lets you choose an action, and it is in a way, the successor to AutoRun.
In order to help prevent malware from spreading using the AutoRun mechanism, Microsoft made an important change, starting with Windows 7. AutoPlay no longer supports the AutoRun functionality for non-optical removable media. In other words, AutoPlay still works for CD/DVDs but not for work for USB drives.
AutoPlay in Windows 10/8
When you connect devices to your Windows computer, the AutoPlay feature starts running automatically and begins playing media such as music, images, and videos. For example, the first time you try to play a music CD, AutoPlay asks which media player you want to use if you have more than one installed on your computer. Although good, some of you may want to disable the feature.
Disable AutoPlay in Windows 10
Here’s how you can disable AutoPlay in Windows 10/8/7.
1] Control Panel
Open Control Panel\All Control Panel Items\AutoPlay and set the options as per your preferences.
2] Using Group Policy
Type gpedit.msc in the Run box, and then press ENTER to open the Group Policy Editor. Under Computer Configuration > Administrative Templates > Windows Components > Click Autoplay Policies.
In the RHS Details pane, double-click Turn off Autoplay to open the Properties box.
This policy setting allows you to turn off the Autoplay feature. Autoplay begins reading from a drive as soon as you insert media in the drive. As a result, the setup file of programs and the music on audio media start immediately. Prior to Windows XP SP2, Autoplay is disabled by default on removable drives, such as the floppy disk drive (but not the CD-ROM drive), and on network drives. Starting with Windows XP SP2, Autoplay is enabled for removable drives as well, including Zip drives and some USB mass storage devices. If you enable this policy setting, Autoplay is disabled on CD-ROM and removable media drives, or disabled on all drives. This policy setting disables Autoplay on additional types of drives. You cannot use this setting to enable Autoplay on drives on which it is disabled by default. If you disable or do not configure this policy setting, AutoPlay is enabled.
Click Enabled, and then select All drives in the Turn off Autoplay on box to disable Autorun on all drives.
Restart your computer.
3] Registry Editor
The same can also be achieved by editing the Registry. Run regedit and navigate to
In the RHS, you will see dword NoDriveTypeAutoRun. You will see the default value 60 or 3C. Right-click on it and give it a decimal value 255 (or Hexadecimal value 000000FF). Exit regedit. Reboot. This will disable AutoRun on all drives.
You can also download and use our Ultimate Windows Tweaker to disable AutoPlay. Alternatively, you can download Microsoft Fix it 50471 to disable Autorun and Microsoft Fix it 50475 to enable Autorun. Microsoft has released a hotfix for Windows Vista to restrict AutoRun entries in the AutoPlay dialog to only CD and DVD drives. Windows Vista users may want to see if they have it installed on their PC.
Date: September 20, 2019 Tags: Features, Tips
How to Disable or Enable AutoPlay in Windows 10
AutoPlay is a special feature of the shell which allows the user to quickly pick a desired action for various media types you have connected or attached to your computer. You can configure it to open your favorite image viewer app when you insert a disk with photos, or launch a media player app automatically for your drive containing media files. It saves your time, since the required app starts automatically every time you connect your device or insert your disk.
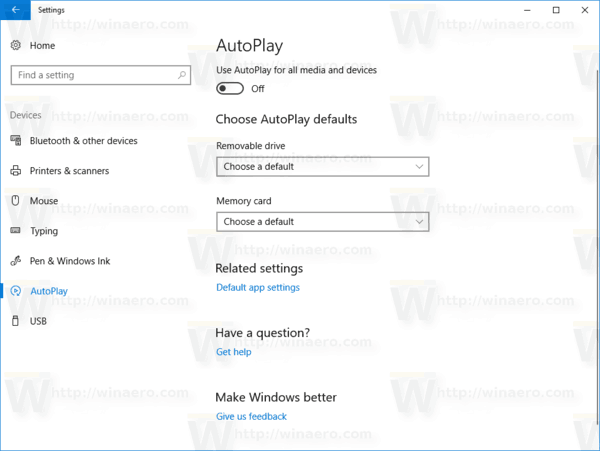
Disable or Enable AutoPlay using Settings
To disable AutoPlay in Windows 10, do the following.
- Open the Settings app.

- Go to Devices -> AutoPlay.
- On the right, turn off the option «Use AutoPlay for all media» and you are done.

To enable AutoPlay in Windows 10, do the following.
- Open the Settings app.
- Go to Devices -> AutoPlay.
- On the right, turn on the option «Use AutoPlay for all media».
- Under Choose AutoPlay defaults, configure the desired action for each media type.


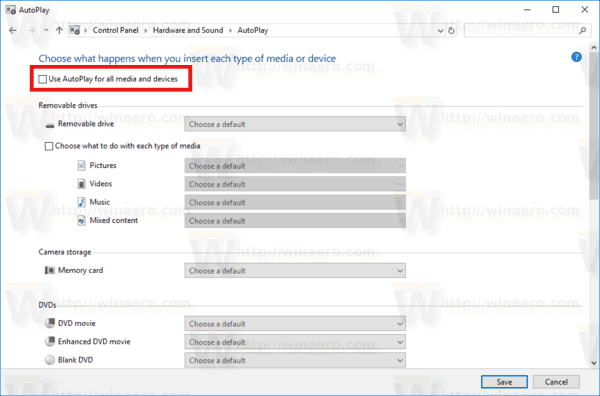
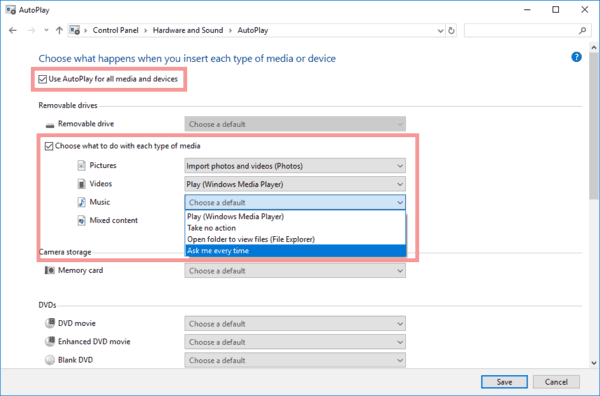
Configure AutoPlay with the classic Control Panel
- Open the classic Control Panel app.
- Go to Control Panel\Hardware and Sound\AutoPlay.
- To disable AutoPlay, uncheck the option Use AutoPlay for all media and devices.
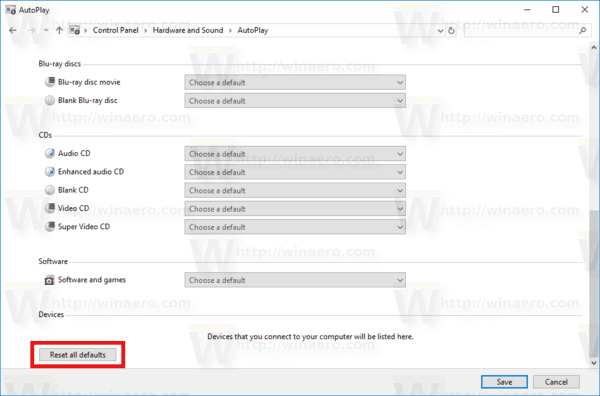
- To enable AutoPlay, turn on the option Use AutoPlay for all media and devices and select the desired action for each media type for each item listed below.
- You can use the Reset all defaults button to quickly reset all actions and set them to their default values.
Disable AutoPlay using a Registry tweak
- Open the Registry Editor app.
- Go to the following Registry key.
See how to go to a Registry key with one click.
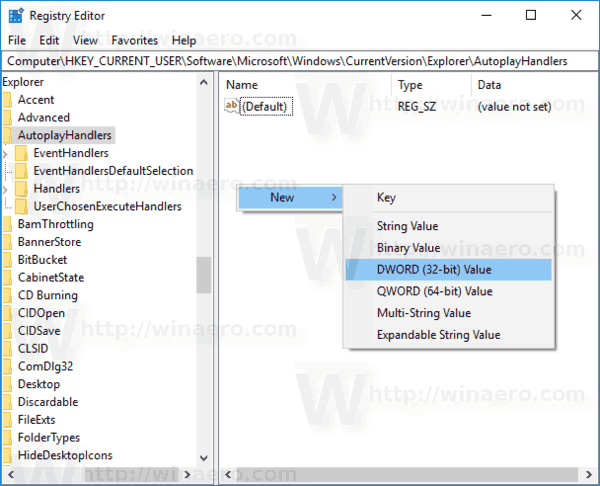
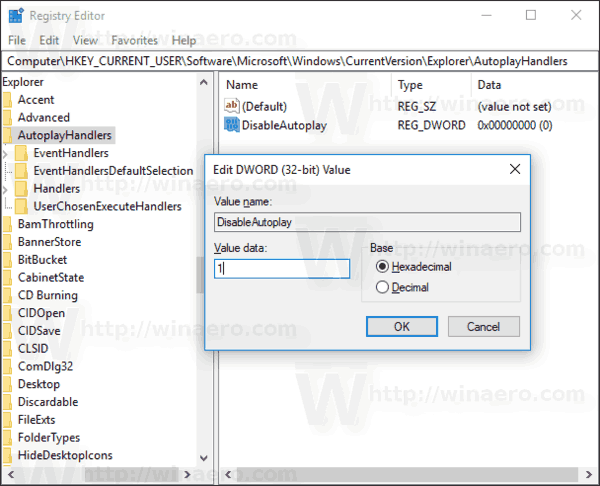
Note: Even if you are running 64-bit Windows you must still create a 32-bit DWORD value.
Winaero greatly relies on your support. You can help the site keep bringing you interesting and useful content and software by using these options:
Share this post
About Sergey Tkachenko
Sergey Tkachenko is a software developer from Russia who started Winaero back in 2011. On this blog, Sergey is writing about everything connected to Microsoft, Windows and popular software. Follow him on Telegram, Twitter, and YouTube.


