- Отключить гиперпоточность в реестре Windows 7
- Disable Hyperthreading in the Windows 7 registry
- 3 Answers 3
- How to Disable HyperThreading
- Steps 3-5
- Отключить гиперпоточность в реестре Windows 7
- 3 ответа 3
- Disabling Intel Hyper-Threading Technology on Amazon EC2 Windows Instances
- HT Technology
- Exploring HT Technology on Microsoft Windows
- Disabling HT Technology on Microsoft Windows
- Conclusion
Отключить гиперпоточность в реестре Windows 7
У некоторых биосов нет опции отключения Hyperthreading процессора, есть ли способ отключить его в реестре Windows 7? Или инструмент или программное обеспечение?
Я знаю о загрузочной вкладке msconfig (дополнительные параметры) и отключении там процессоров, не уверен, отключает ли она полные ядра или гиперпотоки, или как сказать.
32-битная или 64-битная Windows 7
Предположим, что это двухъядерный или более с гиперпоточностью.
В диспетчере устройств он показывает 4 процессора на моем процессоре Intel i5, и их тоже нельзя отключить, черт побери.
Технология Intel Hyper-Threading
[. ] Эта функция должна быть включена с использованием BIOS и требует использования поддержка системы.
Это связано с тем, что гиперпоточность является фактическим физическим оборудованием на кристалле ЦП и поэтому может быть включена / отключена. на аппаратном уровне только ,
Если вы знаете, какое приложение плохо работает с гиперпоточностью, вы можете использовать такой инструмент, как StartAffinity если у вас есть XP.
Если вы используете Windows 7, есть встроенный start Команда, которая может сделать это. Используйте следующую команду для запуска процесса с определенной привязкой к процессору (опять же, /AFFINITY аргумент был добавлен только в Windows 7):
куда следует заменить шестнадцатеричной маской для процессоров, которые вы хотите запустить (маска процессора — это просто двоичная маска, включающая / отключающая эту привязку, поэтому 00000101 включает CPU0 и CPU2, а 00000010 включает только CPU1).
Чтобы вычислить шестнадцатеричное значение, вы можете преобразовать двоичную маску, или же возьмите сумму 2, равную мощности ядер, на которых вы хотите запустить программу (начиная с 0), и преобразуйте это значение в шестнадцатеричное.
Например, если у меня есть четырехъядерная система, и я хочу, чтобы процесс выполнялся только на CPU0 и CPU2, я бы добавил 2 0 + 2 2 = 1 + 4 = 5. Преобразуйте 5 в гекс, то есть всего 5, и установите это как , Вы также можете просто конвертировать 00000101 в гекс. Если вы не знаете, как конвертировать эти базы, вы можете просто использовать эта таблица преобразования ,
Disable Hyperthreading in the Windows 7 registry
Some bios’s Do Not have the option to disable Hyperthreading of the CPU, it there a way to disable it in the Windows 7 Registry? Or a tool or software?
I know about msconfig boot tab (advanced options) and disabling processors there, not sure if it disables complete cores or hyperthreads, or how to tell.
32bit or 64bit Windows 7
Lets assume it is a dual core or more with hyperthreading.
In Device manager it shows 4 processors on my i5 Intel Processor, and you cannot disable them either, dang.


3 Answers 3
Intel Hyper-Threading Technology
[. ] This feature must be enabled using the BIOS and requires operating system support.
This is because hyperthreading is actual physical hardware on the CPU die, and thus can be enabled/disabled on a hardware level only.
If you know which application does not work well with hyperthreading, you can use a tool like StartAffinity if you have XP.
If you use Windows 7, there is a built in start command that can do this. Use the following command to launch a process with a particular processor affinity (again, the /AFFINITY argument was only added in Windows 7):
Where should be replaced with the hexadecimal mask for the processors you want to run (the processor mask is just a binary mask enabling/disabling that affinity, so 00000101 enables CPU0 and CPU2, and 00000010 enables only CPU1).
To calculate the hex value, you can either convert the binary mask, or take the sum of 2 to the power of the cores you want to run the program on (starting from 0), and convert that value to hexadecimal.
For example, if I have a four-core system, and only want the process to execute on CPU0 and CPU2, I would add 2 0 + 2 2 = 1 + 4 = 5. Convert 5 to hex, which is just 5, and set that as your . You could also just convert 00000101 to hex as well. If you don’t know how to convert these bases, you can just use this conversion table.
How to Disable HyperThreading
Modern apps and utilities are designed to work with multiple cores and multiple threads. Just in case you need to, here’s how to turn off HyperThreading on an Intel CPU.


HyperThreading (a.k.a., Hyper-Threading or hyperthreading) is part of Intel’s processor technology that essentially allows a CPU to work on multiple streams of data simultaneously, improving performance and efficiency. For myriad reasons, tweakers have historically wanted to turn HyperThreading off because of its perceived inefficiencies with single-threaded tasks. Here’s how to do it.
HyperThreading, simply put, is the Intel-branded technology that lets a multi-threaded processor work on multiple tasks/threads/processes simultaneously. Old school single-core processors could only process one data stream or task at a time. However, HyperThreading has trickled its way down from the highest-end Intel Core i7 Extreme Edition processors, down to the low-powered Intel Atom, and everything in between.
HyperThreading, and simultaneous multithreading in general, involves taking your current PC tasks (like downloading email, or applying a filter to a photo) and breaking them into streams that can be computed simultaneously. Programs have to be written and developed to work with a multi-stream or multi-core processor, but that’s commonplace now. This was not the case when the first Intel Pentium 4 processor with HyperThreading was released in 2002. In those days, running a single threaded app through the single core, multi-threaded Pentium 4 sometimes introduced inefficiencies that slowed down processing instead of improving performance. These days, both the operating systems (Windows 7/8, OS X, etc.) and the programs (Creative Suite 6, Handbrake, etc.) have been developed to take advantage of how many threads your processor can handle. This is the case with recent dual core Intel Atom processors (four streams, two CPU cores), all the way up to workstation-class Intel Xeon processors (sixteen streams, eight CPU cores).
Step One: Save any work, and reboot your PC.
Step Two: While your PC is rebooting, enter the BIOS setup screen. You can do this by hitting either the ESC, F1, F2, F8, F10, F12, or Delete key on your keyboard while the system is loading.
Look on the initial boot screen for an indication of this. It will either say BIOS Setup or simply Setup next to a listing of which key to hit. If Windows shows up too fast for you to see which key to hit, check your owner’s manual for which key to enter the BIOS setup screen.
Steps 3-5
Step Three: Locate the Hyper-Threading or Hyperthreading control. It’s usually under a sub-menu for one of the following key words: CPU, Processor, Performance, Advanced BIOS, CPU Feature, Tweaker, etc.
Step Four: The control itself should be called CPU Hyper-Threading, Hyper-Threading Function, Hyper-Threading Iechnology, or Intel (R) Hyper-Threading Technology. It should be set to Enabled by default.
Step Five: Move the cursor over the word Enabled, hit Enter, then move the cursor up or down to select Disabled. Hit escape a couple times to get to the exit screen, type Yes or Y to let the system exit while saving changes.
Отключить гиперпоточность в реестре Windows 7
У некоторых биосов нет опции отключения Hyperthreading процессора, есть ли способ отключить его в реестре Windows 7? Или инструмент или программное обеспечение?
Я знаю о загрузочной вкладке msconfig (дополнительные параметры) и отключении там процессоров, не уверен, отключает ли она полные ядра или гиперпотоки, или как сказать.
32-битная или 64-битная Windows 7
Предположим, что это двухъядерный или более с гиперпоточностью.
В диспетчере устройств он показывает 4 процессора на моем процессоре Intel i5 Intel, и вы также не можете отключить их, черт возьми.
3 ответа 3
Технология Intel Hyper-Threading
[. ] Эта функция должна быть включена с использованием BIOS и требует поддержки операционной системы.
Это происходит потому , что гиперпотоковой является актуальной физической аппаратной на кристалле процессора, и , таким образом , может быть включен / отключен только на аппаратном уровне.
Если вы знаете, какое приложение плохо работает с гиперпоточностью, вы можете использовать такой инструмент, как StartAffinity, если у вас есть XP.
Если вы используете Windows 7, есть встроенная команда start которая может сделать это. Используйте следующую команду для запуска процесса с определенной привязкой к процессору (опять же, аргумент /AFFINITY был добавлен только в Windows 7):
Где должна быть заменена шестнадцатеричной маской для процессоров, которые вы хотите запустить (маска процессора — это просто двоичная маска, включающая / отключающая эту привязку, поэтому 00000101 включает CPU0 и CPU2, а 00000010 включает только CPU1).
Чтобы вычислить шестнадцатеричное значение, вы можете либо преобразовать двоичную маску, либо взять сумму 2 в степень ядер, на которых вы хотите запустить программу (начиная с 0), и преобразовать это значение в шестнадцатеричное.
Например, если у меня есть четырехъядерная система, и я хочу, чтобы процесс выполнялся только на CPU0 и CPU2, я бы добавил 2 0 + 2 2 = 1 + 4 = 5. Преобразуйте 5 в шестнадцатеричный код, что составляет всего 5, и установите его в качестве . Вы также можете просто конвертировать 00000101 в гекс. Если вы не знаете, как конвертировать эти базы, вы можете просто использовать эту таблицу преобразования .
Disabling Intel Hyper-Threading Technology on Amazon EC2 Windows Instances
NOTE: In May of 2018, AWS announced Optimize CPUs for Amazon EC2 Instances. This feature allows customers to disable Hyper-Threading for workloads that perform well with single-threaded CPUs, like certain high-performance computing (HPC) applications. You can read more in the EC2 User Guide.
In a prior post, Disabling Intel Hyper-Threading on Amazon Linux, I investigated how the Linux kernel enumerates CPUs. I also discussed the options to disable Intel Hyper-Threading (HT Technology) in Amazon Linux running on Amazon EC2.
In this post, I do the same for Microsoft Windows Server 2016 running on EC2 instances. I begin with a quick review of HT Technology and the reasons you might want to disable it. I also recommend that you take a moment to review the prior post for a more thorough foundation.
HT Technology
HT Technology makes a single physical processor appear as multiple logical processors. Each core in an Intel Xeon processor has two threads of execution. Most of the time, these threads can progress independently; one thread executing while the other is waiting on a relatively slow operation (for example, reading from memory) to occur. However, the two threads do share resources and occasionally one thread is forced to wait while the other is executing.
There a few unique situations where disabling HT Technology can improve performance. One example is high performance computing (HPC) workloads that rely heavily on floating point operations. In these rare cases, it can be advantageous to disable HT Technology. However, these cases are rare, and for the overwhelming majority of workloads you should leave it enabled. I recommend that you test with and without HT Technology enabled, and only disable threads if you are sure it will improve performance.
Exploring HT Technology on Microsoft Windows
Here’s how Microsoft Windows enumerates CPUs. As before, I am running these examples on an m4.2xlarge. I also chose to run Windows Server 2016, but you can walk through these exercises on any version of Windows. Remember that the m4.2xlarge has eight vCPUs, and each vCPU is a thread of an Intel Xeon core. Therefore, the m4.2xlarge has four cores, each of which run two threads, resulting in eight vCPUs.
Windows does not have a built-in utility to examine CPU configuration, but you can download the Sysinternals coreinfo utility from Microsoft’s website. This utility provides useful information about the system CPU and memory topology. For this walkthrough, you enumerate the individual CPUs, which you can do by running coreinfo -c . For example:
As you can see from the screenshot, the coreinfo utility displays a table where each row is a physical core and each column is a logical CPU. In other words, the two asterisks on the first line indicate that CPU 0 and CPU 1 are the two threads in the first physical core. Therefore, my m4.2xlarge has for four physical processors and each processor has two threads resulting in eight total CPUs, just as expected.
It is interesting to note that Windows Server 2016 enumerates CPUs in a different order than Linux. Remember from the prior post that Linux enumerated the first thread in each core, followed by the second thread in each core. You can see from the output earlier that Windows Server 2016, enumerates both threads in the first core, then both threads in the second core, and so on. The diagram below shows the relationship of CPUs to cores and threads in both operating systems.

In the Linux post, I disabled CPUs 4–6, leaving one thread per core, and effectively disabling HT Technology. You can see from the diagram that you must disable the odd-numbered threads (that is, 1, 3, 5, and 7) to achieve the same result in Windows. Here’s how to do that.
Disabling HT Technology on Microsoft Windows
In Linux, you can globally disable CPUs dynamically. In Windows, there is no direct equivalent that I could find, but there are a few alternatives.
First, you can disable CPUs using the msconfig.exe tool. If you choose Boot, Advanced Options, you have the option to set the number of processors. In the example below, I limit my m4.2xlarge to four CPUs. Restart for this change to take effect.

Unfortunately, Windows does not disable hyperthreaded CPUs first and then real cores, as Linux does. As you can see in the following output, coreinfo reports that my c4.2xlarge has two real cores and four hyperthreads, after rebooting. Msconfig.exe is useful for disabling cores, but it does not allow you to disable HT Technology.
Note: If you have been following along, you can re-enable all your CPUs by unselecting the Number of processors check box and rebooting your system.
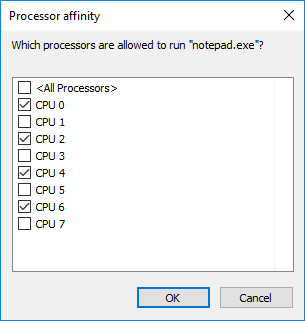
While you cannot disable HT Technology systemwide, Windows does allow you to associate a particular process with one or more CPUs. Microsoft calls this, “processor affinity”. To see an example, use the following steps.
- Launch an instance of Notepad.
- Open Windows Task Manager and choose Processes.
- Open the context (right click) menu on notepad.exe and choose Set Affinity….
This brings up the Processor Affinity dialog box.

As you can see, all the CPUs are allowed to run this instance of notepad.exe. You can uncheck a few CPUs to exclude them. Windows is smart enough to allow any scheduled operations to continue to completion on disabled CPUs. It then saves its state at the next scheduling event, and resumes those operations on another CPU. To ensure that only one thread in each core is able to run a process, you uncheck every other core. This effectively disables HT Technology for this process. For example:
Of course, this can be tedious when you have a large number of cores. Remember that the x1.32xlarge has 128 CPUs. Luckily, you can set the affinity of a running process from PowerShell using the Get-Process cmdlet. For example:
The ProcessorAffinity attribute takes a bitmask in hexadecimal format. 0x55 in hex is equivalent to 01010101 in binary. Think of the binary encoding as 1=enabled and 0=disabled. This is slightly confusing, but we work left to right so that CPU 0 is the rightmost bit and CPU 7 is the leftmost bit. Therefore, 01010101 means that the first thread in each CPU is enabled just as it was in the diagram earlier.
The calculator built into Windows includes a “programmer view” that helps you convert from hexadecimal to binary. In addition, the ProcessorAffinity attribute is a 64-bit number. Therefore, you can only configure the processor affinity on systems up to 64 CPUs. At the moment, only the x1.32xlarge has more than 64 vCPUs.
In the preceding examples, you changed the processor affinity of a running process. Sometimes, you want to start a process with the affinity already configured. You can do this using the start command. The start command includes an affinity flag that takes a hexadecimal number like the PowerShell example earlier.
It is interesting to note that a child process inherits the affinity from its parent. For example, the following commands create a batch file that launches Notepad, and starts the batch file with the affinity set. If you examine the instance of Notepad launched by the batch file, you see that the affinity has been applied to as well.
This means that you can set the affinity of your task scheduler and any tasks that the scheduler starts inherits the affinity. So, you can disable every other thread when you launch the scheduler and effectively disable HT Technology for all of the tasks as well. Be sure to test this point, however, as some schedulers override the normal inheritance behavior and explicitly set processor affinity when starting a child process.
Conclusion
While the Windows operating system does not allow you to disable logical CPUs, you can set processor affinity on individual processes. You also learned that Windows Server 2016 enumerates CPUs in a different order than Linux. Therefore, you can effectively disable HT Technology by restricting a process to every other CPU. Finally, you learned how to set affinity of both new and running processes using Task Manager, PowerShell, and the start command.
Note: this technical approach has nothing to do with control over software licensing, or licensing rights, which are sometimes linked to the number of “CPUs” or “cores.” For licensing purposes, those are legal terms, not technical terms. This post did not cover anything about software licensing or licensing rights.
If you have questions or suggestions, please comment below.


