- How to stop Windows 7 automatically installing drivers
- Summary
- Methods 1: Change device installation setting
- Methods 2: Configure group policy settings
- How to temporarily prevent a driver update from reinstalling in Windows 10
- Rolling back a device driver
- How to disable automatic driver updates on Windows 10
- How to stop updates for drivers with Windows Update using Group Policy
- How to stop updates for drivers with Windows Update using Registry
- Wrapping things up
- More Windows 10 resources
- Add the best VR headset to your Microsoft Flight Simulator experience
- The Dell XPS 15 is our choice for best 15-inch laptop
- Halo: MCC’s live service elements make it better, not worse
- These are the best PC sticks when you’re on the move
- How to Disable Driver Updates Through Windows Update
- 1. Disable Driver Updates Through Hardware Settings
- 2. Disable Driver Updates Through Group Policy
- 3. Disable Driver Updates Through Registry Editor
How to stop Windows 7 automatically installing drivers
Summary
Be default, Windows 7 automatically installs drivers for the devices that are connected to the computer. However, if you do not want Windows 7 to automatically install the drivers, you can use one of the methods listed in this article.
Methods 1: Change device installation setting
Click Start, type devices and printers in the search box, and then click Devices and Printers.
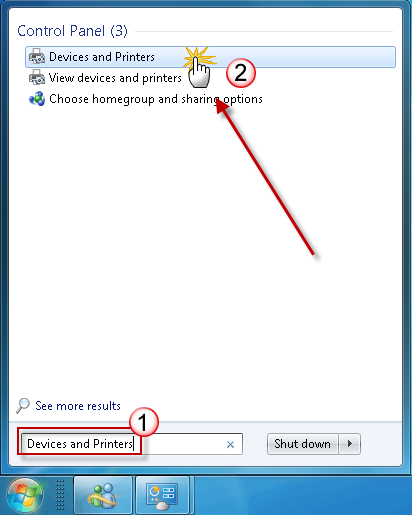
All the devices connected to the computer are listed, including monitor, keyboard, mouse, printer, and so on.
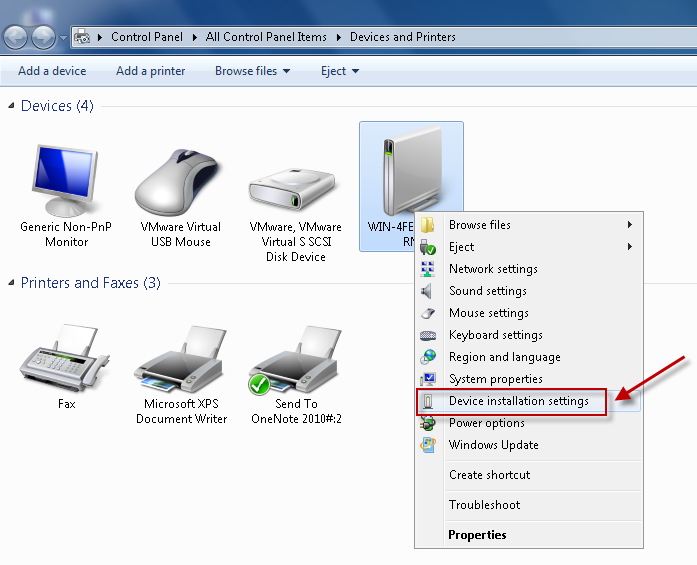
Under Devices, right-click the icon for the computer, and then click Device installation settings.
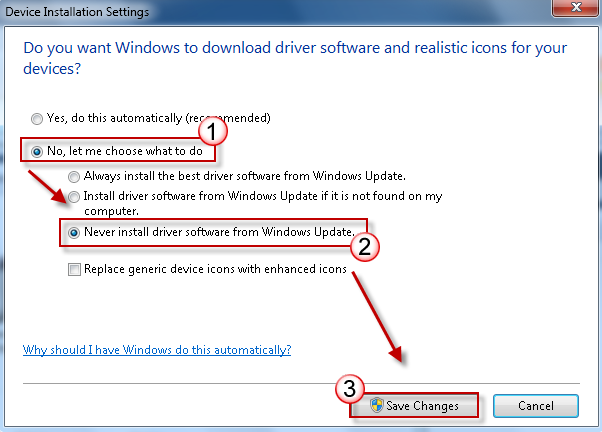
A new window pops up asking you whether you want Windows to download driver software.
Click to select No, let me choose what to do, select Never install driver software from Windows update, and then click Save Changes.
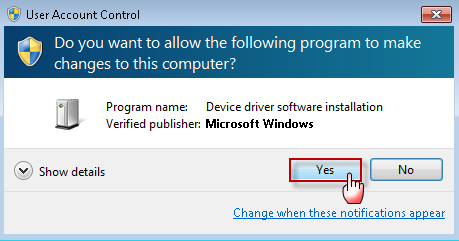
Click Yes when you are prompted for confirmation.
Methods 2: Configure group policy settings
Note This method only applies to Windows 7 Professional, Windows 7 Ultimate, and Windows 7 Enterprise.
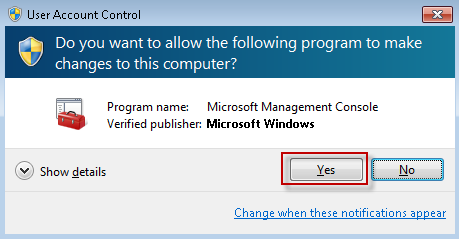
Click Start, type gpedit.msc in the search box, and then press ENTER. This step opens the Local Group Policy Editor.
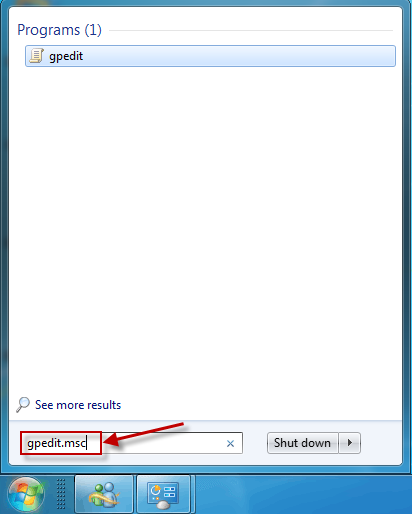
(Click Yes if you are prompted.)
Expand Computer Configuration, expand Administrative Templates, expand System, expand Device Installation, and then click Device Installation Restrictions.
In the right window, double-click Prevent installation of devices not described by other policy settings.
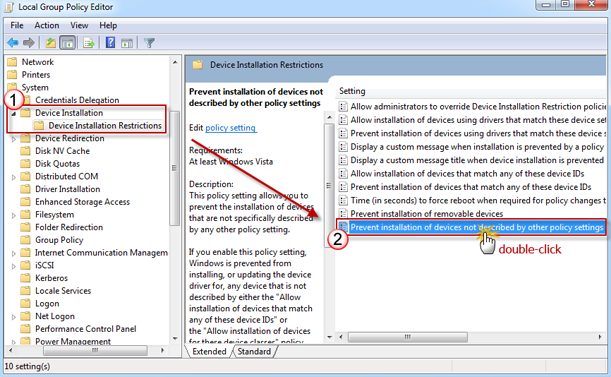
Click to select Enabled, and then click OK.
How to temporarily prevent a driver update from reinstalling in Windows 10
In Windows 10, your device is always kept up-to-date with the latest features and fixes. Drivers are installed automatically so that you don’t have to select which updates are needed. In rare cases, a specific driver might temporarily cause issues that affect your device. In this situation, you can prevent the problematic driver from reinstalling automatically the next time Windows Updates are installed.
Rolling back a device driver
If a driver that you are offered is causing system crashes or instability, and if Windows was operating correctly before that change, you can use this method to roll back the driver to the previous version.
The appropriate steps to roll back a driver installation depend on the version of Windows 10 that you have installed. We recommend that you update to the latest version of Windows 10 before you try to uninstall any drivers because this may resolve the issue. You can use Windows Update to check for the latest update by selecting the Start button, then selecting Settings > Update & security > Windows Update , and then Check for updates. Or you can install the latest version of Windows by going to Download Windows 10, and then selecting Update Now.
If you aren’t sure which version of Windows 10 you have, select the Start button, and then select Settings > System > About.
Start Device Manager. To do this, in the search box on the task bar type device manager, and then select Device Manager.
Locate and right-click the device that has the problem driver installed, and then select Properties.
Select the Driver tab, and then select Roll Back Driver.
Important If you don’t have the latest version of Windows 10, we recommend that you update now. To update to the latest version, go to Download Windows 10, and select Update Now.
Start Device Manager. To do this, in the search box on the task bar type device manager, and then select Device Manager.
Locate the category of device and right-click the device that has the problem driver installed, select Properties, and then choose the Driver tab.
In the Confirm Device Uninstall dialog box, select the Delete the driver software for this device check box.
Choose your automatic updates
To prevent the driver from being reinstalled by Windows Update, use the “Show or Hide Updates” troubleshooter to hide the driver. Window Update won’t install hidden drivers or updates.
Download the troubleshooter from the Microsoft Download Center:
How to disable automatic driver updates on Windows 10

On Windows 10, the automatic update mechanism is a convenient system that provides maintenance and security patches as well as updates for Microsoft products and device drivers.
Although drivers available through Windows Update usually work pretty well, they’re not always the most up to date, and sometimes getting driver updates automatically are known to cause issues on specific hardware configurations.
In previous versions, you’re able to exclude drivers using the Windows Update settings, but that option is no longer available in the Settings app. However, it’s still possible to prevent Windows 10 from downloading driver updates using the Local Group Policy Editor and Registry.
In this Windows 10 guide, we’ll walk you through the steps to prevent Windows Update from including driver updates during automatic maintenance.
How to stop updates for drivers with Windows Update using Group Policy
If you’re running Windows 10 Pro, the easiest way to stop getting driver updates from Windows Update is using the Local Group Policy Editor with these steps:
- Use the Windows key + R keyboard shortcut to open the Run command.
- Type gpedit.msc and click OK to open the Local Group Policy Editor.
Browse the following path:
Computer Configuration > Administrative Templates > Windows Components > Windows Update
On the right side, double-click the Do not include drivers with Windows Update policy.

Select the Enabled option.
![]()
After completing the steps, your device will continue to receive security and other patches, but drivers will be excluded.
If you need help downloading and installing device drivers manually, we have you covered with everything you need to know in this guide.
In the case you change your mind, you can roll back the previous settings using the same instructions, but on step No. 5, select the Not Configured option.
How to stop updates for drivers with Windows Update using Registry
On Windows 10 Home, you won’t have access to the Local Group Policy Editor, but you can still exclude driver updates by modifying the Registry with these steps:
Warning: This is a friendly reminder that editing the Registry is risky, and it can cause irreversible damage to your installation if you don’t do it correctly. It’s recommended to make a full backup of your PC before proceeding.
- Use the Windows key + R keyboard shortcut to open the Run command.
- Type regedit, and click OK to open the Registry.
Browse the following path:
Quick Tip: On Windows 10, you can now copy and paste the path in the Registry’s address bar to quickly jump to the key destination.
Right-click the Windows (folder) key, select New, and click on Key.
Right-click the newly created key, select New, and click on DWORD (32-bit) Value.
Double-click the newly created DWORD and set the value from 0 to 1.
Once you’ve completed the steps, cumulative updates will continue to download, but you won’t receive updates for drivers.
At any time you can revert the changes using the same instructions, but on step No. 4, inside the WindowsUpdate (folder) key, make sure to right-click the ExcludeWUDriversInQualityUpdate DWORD and select the Delete option.
Wrapping things up
While we’re outlining the steps to disable driver updates, we’re not saying that you should block this type of updates as they’re required for hardware to work correctly. However, there are special cases when you may need to use custom drivers or drivers provided by your manufacturer, instead of those available through Windows Update, and in these situations, this guide can come in handy.
If you’re having problems with a single driver update, it’s recommended to temporarily block that update using the Show or hide updates tool.
More Windows 10 resources
For more helpful articles, coverage, and answers to common questions about Windows 10, visit the following resources:
![]()
Add the best VR headset to your Microsoft Flight Simulator experience
Microsoft Flight Simulator is an impressive game on a standard 2D monitor, but have you experienced it within VR? Grab one of these headsets and take off.
![]()
The Dell XPS 15 is our choice for best 15-inch laptop
For a lot of people, a 15-inch laptop is a perfect size that offers enough screen for multitasking, and in a lot of cases, some extra performance from powerful hardware. We’ve rounded up the best of the best at this size.
![]()
Halo: MCC’s live service elements make it better, not worse
Halo: The Master Chief Collection is more popular than ever, but some fans don’t agree with the live service approach 343 Industries has taken with it. Here’s why those elements are, at the end of the day, great for the game and for Halo overall.
![]()
These are the best PC sticks when you’re on the move
Instant computer — just add a screen. That’s the general idea behind the ultra-portable PC, but it can be hard to know which one you want. Relax, we have you covered!
How to Disable Driver Updates Through Windows Update

Whenever you attach a new device to your Windows machine, Windows tries to install the device driver automatically, and whenever possible it even tries to update your device driver through the regular Windows update.
This is convenient most of the time as you don’t have to manually search the drivers for each and every device you attach to your Windows machine. However, it can also be frustrating at times when you specifically installed an older version of a device driver, and Windows automatically updated it disregarding your requirements.
So, if you ever need to, here is how you can disable driver updates through Windows update.
1. Disable Driver Updates Through Hardware Settings
Disabling driver updates using the regular Windows hardware settings is one of the easiest ways. To start, press “Win + X” and select the option “System.” If you are on Windows 7, search for it in the Start menu.

This action will open the System window. Here, click on the link “Advanced System Settings.”

Once the System Properties window has been opened, navigate to the “Hardware” tab and click on the “Device Installation Settings” button.

In the Device Installation Settings window, select the “No, let me choose what to do” radio button and again select the “Never install driver software from Windows update” radio button. Click on the “Save changes” button to save the changes.

Restart your system and you are good to go.
2. Disable Driver Updates Through Group Policy
If you are managing multiple systems, then using Group Policy Editor is a good thing to do. To start, press “Win + R,” type gpedit.msc and press the Enter button to open the Group Policy Editor.

Navigate to the following folder: “Computer Configuration -> Administrative Templates -> System -> Internet Communication Management -> Internet Communication settings.”

Now, find the “Turn off Windows update device driver searching” option and double click on it.

The above action will open the additional settings window. Simply select the “Enabled” option and click on the “Ok” button to save the changes.

Restart your system and you are good to go. If you ever want to revert back, select either the “Disabled” or “Not configured” option.
3. Disable Driver Updates Through Registry Editor
The other way to disable driver updates is by using the Windows Registry Editor. First, press “Win + R,” type regedit and press the Enter button to open the Windows registry.

Once the Windows registry has been opened, navigate to the following key.

Here on the right pane you can see the “SearchOrderConfig” key. The default value data is set to “1,” which simply means that the automatic updates are enabled. To change the value, double click on it.
The above action will open the “Edit DWORD Value” window. Here, enter the new value data as “0” and click on the “Ok” button to save the changes.

The above action will completely disable the driver updates through Windows update.
As you can see, disabling the driver updates through Windows update is just a matter of a few clicks. But, only follow this tutorial if you know what you are doing, as disabling automatic driver updates may sometimes interfere with how the device works.
Do comment below sharing your thoughts and experiences about disabling driver updates through Windows update.
Vamsi is a tech and WordPress geek who enjoys writing how-to guides and messing with his computer and software in general. When not writing for MTE, he writes for he shares tips, tricks, and lifehacks on his own blog Stugon.


